2017 MERCEDES-BENZ GLE43AMG SUV brake light
[x] Cancel search: brake lightPage 63 of 366

merely aids designed to assist driving. You are
responsible for maintaining the distance to the
vehicle in front, for vehicle speed, for braking in
good time, and for staying in lane. Always adapt
your driving style to suit the prevailing road and
weather conditions and maintain a safe distance
from the vehicle in front. Drive carefully.
The driving safety systems described only work
as effectively as possible when there is ade-
quate contact between the tires and the road
surface. Pay particular attention to the informa-
tion regarding tires, recommended minimum
tire tread depths etc. in the "Wheels and tires"
section (
Ypage 321).
In wintry driving conditions, always use winter
tires (M+S tires) and if necessary, snow chains.
Only in this way will the driving safety systems
described in this section work as effectively as
possible.
ABS (Anti-lock Braking System)
General information
ABS regulates brake pressure in such a way that
the wheels do not lock when you brake. This
allows you to continue steering the vehicle when
braking.
The ! ABS warning lamp in the instrument
cluster lights up when the ignition is switched
on. It goes out when the engine is running.
ABS works from a speed of about 5 mph
(8 km/h), regardless of road-surface conditions.
ABS works on slippery surfaces, even when you
only brake gently.
Important safety notes
iObserve the "Important safety notes" sec-
tion (Ypage 60).
GWARNING
If ABS is faulty, the wheels could lock when
braking. The steerability and braking charac-
teristics may be severely impaired. Addition-
ally, further driving safety systems are deac-
tivated. There is an increased danger of skid-
ding and accidents.
Drive on carefully. Have ABS checked imme-
diately at a qualified specialist workshop. When ABS is malfunctioning, other systems,
including driving safety systems, will also
become inoperative. Observe the information
on the ABS warning lamp (
Ypage 253) and dis-
play messages which may be shown in the
instrument cluster (
Ypage 222).
Braking
XIf ABS intervenes: continue to depress the
brake pedal vigorously until the braking sit-
uation is over.
XTo make a full brake application: depress
the brake pedal with full force.
If ABS intervenes when braking, you will feel a
pulsing in the brake pedal.
The pulsating brake pedal can be an indication
of hazardous road conditions, and functions as a reminder to take extra care while driving.
BAS (Brake Assist System)
General information
BAS operates in emergency braking situations.
If you depress the brake pedal quickly, BAS
automatically boosts the braking force, thus
shortening the stopping distance.
Important safety notes
iObserve the "Important safety notes" sec-
tion (Ypage 60).
GWARNING
If BAS is malfunctioning, the braking distance
in an emergency braking situation is
increased. There is a risk of an accident.
In an emergency braking situation, depress
the brake pedal with full force. ABS prevents
the wheels from locking.
Braking
XKeep the brake pedal firmly depressed until
the emergency braking situation is over.
ABS prevents the wheels from locking.
The brakes will function as usual once you
release the brake pedal. BAS is deactivated.
Driving safety systems61
Safety
Z
Page 65 of 366
Function
Starting at a speed of around 4 mph (7 km/h),
the distance warning function warns you ifyou
rapid ly appr oach a veh icle infront. An intermit-
tent warning tone willthen sound, and the·
dist ance warning lamp willlight up inthe instru-
ment cluster.
XBrake immediately inorder to increase the
dist ance from the veh icle infront.
or
XTake evasive action, pro videdit is safe to do
so.
Due to the nature of the system, particularly
co mpli cated but non-critical driving conditions
may also cause the system to display a warning.
With the help of the radar sensor system, the
dist ance warning function can detect obstacles
that are inthe path of your veh iclefor an exten-
ded period of time.
Up to a speed of around 44 mph (70 km/h), the
dist ance warning function can also react to sta-
tionary obstacles, such as stoppe d or parked
veh icles.
Autonomous braking function
Ifthe driver does not react to the distance warn-
ing signal ina critical situation, Active Brake
Assist can assist the driverwit h the autonomous
braking function.
Vehicles without Distance Pilot DISTRONIC:
the autonomous braking function isavailab le in
the fol lowing speed ranges:
R4 - 65 mph (7-10 5km/ h)for moving objects
R4 - 31 mph (7 - 50 km/h) for stationary
objects
Vehicles with Distance Pilot DISTRONIC: the
autonomous braking function is available in the
following speed ranges:
R4 - 124 mph (7 - 200 km/h) for moving
objects
R4 - 31 mph (7 - 50 km/h) for stationary
objects
Due to the nature of the system, particularly
complicated but non-critical driving conditions
may also cause the Autonomous Braking Func-
tion to intervene.
If the autonomous braking function requires a
particularly high braking force, preventative
passenger protection measures (PRE-SAFE
®)
are activated simultaneously (Ypage 53).
Adaptive Brake Assist
General information
iObserve the "Important safety notes" sec-
tion (Ypage 60).
With the help of adaptive Brake Assist, the dis-
tance warning signal can detect obstacles that
are in the path of your vehicle for an extended
period of time.
If adaptive Brake Assist detects a risk of colli-
sion with the vehicle in front, it calculates the
braking force necessary to avoid a collision. If
you apply the brakes forcefully, adaptive Brake
Assist will automatically increase the braking
force to a level suitable for the traffic conditions.
Adaptive Brake Assist provides braking assis-
tance in hazardous situations at speeds above
4 mph (7 km/h). It uses radar sensor technology
to assess the traffic situation.
Up to a speed of approximately 155 mph
(250 km/h), Adaptive Brake Assist is capable of reacting to moving objects that have already
been detected as such at least once over the
period of observation.
Up to a speed of approximately 44 mph
(70 km/h), Adaptive Brake Assist reacts to sta-
tionary obstacles.
If adaptive Brake Assist demands particularly
high braking force, preventative passenger pro-
tection measures (PRE-SAFE
®) are activated
simultaneously (Ypage 53).
XKeep the brake pedal depressed until the
emergency braking situation is over.
ABS prevents the wheels from locking.
The brakes will work normally again if:
Ryou release the brake pedal.
Rthere is no longer any danger of a collision.
Rno obstacle is detected in front of your vehi-
cle.
Adaptive Brake Assist is then deactivated.
Important safety notes
iObserve the "Important safety notes" sec-
tion for driving safety systems (Ypage 60).
GWARNING
Adaptive Brake Assist cannot always clearly
identify objects and complex traffic situa-
tions.
Driving safety systems63
Safety
Z
Page 70 of 366

if Active Brake Assist with cross-traffic func-
tion alerts you.
In order to maintain the appropriate distance to
the vehicle in front and thus prevent a collision,
you must apply the brakes yourself.
GWARNING
Active Brake Assist with cross-traffic function does not react:
Rto small people, e.g. children
Rto animals
Rto oncoming vehicles
Rwhen cornering
As a result, Active Brake Assist with cross-
traffic function may not warn you or engage in
all critical situations. There is a risk of an acci-
dent.
Always pay careful attention to the traffic sit- uation and be ready to brake.
In the event of snowfall or heavy rain, the rec-
ognition can be impaired.
Recognition by the radar sensor system is also
impaired if:
Rthere is dirt on the sensors or anything else
covering the sensors
Rthere is interference by other radar sources
Rthere are strong radar reflections, for exam-
ple in parking garages
Ra narrow vehicle is traveling in front, e.g. a
motorbike
Ra vehicle is traveling in front on a different line relative to the center of your vehicle
Rvehicles quickly move into the radar sensor
system detection range
Recognition by the camera system is also
impaired in the event of:
Rdirt on the camera or if the camera is covered
Rglare on the camera system, e.g. from the sun being low in the sky
Rdarkness
Ror if:
-pedestrians move quickly, e.g. into the path
of the vehicle
-the camera system no longer recognizes a
pedestrian as a person due to special cloth-ing or other objects
-a pedestrian is concealed by other objects
-the typical outline of a person is not distin-
guishable from the background
Following damage to the front end of the vehic le,
have t
he configuration and operation of the
radar sensors checked at a qualified specialist
workshop. This also applies to collisions at slow
speeds where there is no visible damage to the
front of the vehicle.
Following damage to the windshield, have the
configuration and operation of the camera sys-
tem checked at a qualified specialist workshop.
Function
XTo activate or deactivate: activate or deac-
tivate Active Brake Assist with cross-traffic
function using the on-board computer
(
Ypage 214).
If the Active Brake Assist with cross-traffic
function is deactivated, the æsymbol
appears in the multifunction display.
If you have activated DSR (
Ypage 168), the
Active Brake Assist with cross-traffic function is
deactivated.
Starting at a speed of around 4 mph (7 km/h),
this function warns you if you rapidly approach a
vehicle in front. An intermittent warning tone
will then sound and the ·distance warning
lamp will light up in the instrument cluster.
XBrake immediately to defuse the situation.
or
XTake evasive action provided it is safe to do
so.
Active Brake Assist with cross-traffic function
can also brake the vehicle automatically under
the following conditions:
Rthe driver and front-passenger have their seat
belts fastened
and
Rthe vehicle speed is between approximately
4 mph (7 km/h) and 124 mph (200 km/h)
68Driving safety systems
Safety
Page 108 of 366

The blueKindicator lamp in the instru-
ment cluster lights up when the high-beam
headlamps are switched on.
XTo switch off the high-beam head-
lamps: move the combination switch back to
its normal position.
The blue Kindicator lamp in the instru-
ment cluster goes out.
Vehicles with Adaptive Highbeam Assist: if
Adaptive Highbeam Assist is activated, it auto-
matically controls activation and deactivation of
the high-beam headlamps (
Ypage 107).
Hazard warning lamps
XTo switch on the hazard warning
lamps: press button :.
All turn signals flash. If you now switch on a
turn signal using the combination switch, only
the turn signal lamp on the corresponding
side of the vehicle will flash.
XTo switch off the hazard warning lamps:
press button :.
The hazard warning lamps automatically switch
on if:
Ran air bag is deployed or
Rthe vehicle decelerates rapidly from a speed
of above 45 mph (70 km/h) and comes to a
standstill
The hazard warning lamps switch off automati-
cally if the vehicle reaches a speed of above
6 mph (10 km/h) again after a full brake appli-
cation.
iThe hazard warning lamps still operate if the
ignition is switched off.
Intelligent Light System
General notes
The Intelligent Light System is a system that
adjusts the headlamps automatically to suit the
prevailing driving and weather conditions. It
offers advanced functions for improved illumi-
nation of the road surface, e.g. depending on the
vehicle speed or weather conditions. The sys-
tem includes the active light function, cornering
light function, highway mode and extended
range fog lamps. The system is only active when
it is dark.
You can activate or deactivate the "Intelligent
Light System" using the on-board computer
(
Ypage 216).
Active light function
The active light function is a system that moves
the headlamps according to the steering move-
ments of the front wheels. In this way, relevant
areas remain illuminated while driving. This
allows you to identify pedestrians, cyclists and
animals.
Active: when the lights are switched on.
Vehicles with Lane Keeping Assist: the active
light function evaluates the course of the lane in
which you are driving and pre-emptively con-
trols the active light function.
Vehicles with the drive program S+(Sport Plus):
when the drive program is activated, the active
light function headlamps swing in and out. This
shows that the light setting is in sport mode. The
dynamism of the active light function increases.
Cornering light function
The cornering light function improves the illu-
mination of the road over a wide angle in the
direction you are turning, enabling better visi-
bility in tight bends, for example. It can only be
activated when the low-beam headlamps are
switched on.
Active:
Rif you are driving at speeds below 25 mph
(40 km/h) and switch on the turn signal or
turn the steering wheel
Rif you are driving at speeds between 25 mph
(40 km/h) and 45 mph (70 km/h) and turn
the steering wheel
106Exterior lighting
Lights and windshield wipers
Page 112 of 366
XSwitch on the ignition.
XTurn the combination switch to the corre-
sponding position.
In the ÄorÅ position, the appropriate
wiping frequency is set automatically according
to the intensity of the rain. In the Åposition,
the rain sensor is more sensitive than in
the Ä position, causing the windshield wiper
to wipe more frequently.
Vehicles with MAGIC VISION CONTROL: the
washer fluid is fed through the wiper blades and
when wiping with washer fluid îthe washer
fluid is emitted directly from the blades.
If the wiper blades are worn, the windshield will
no longer be wiped properly. This could prevent
you from observing the traffic conditions.
Replacing the wiper blades
Important safety notes
GWARNING
If the windshield wipers begin to move while
you are changing the wiper blades, you could be trapped by the wiper arm. There is a risk of
injury.
Always switch off the windshield wipers and
ignition before changing the wiper blades.
!Always position the windshield wiper arms
vertically before folding them away from the
windshield. By doing so, you will avoid dam-
age to the hood.
!To avoid damaging the wiper blades, make
sure that you touch only the wiper arm of the
wiper.
!Never open the hood if a windshield wiper
arm has been folded away from the wind-
shield.
Never fold a windshield wiper arm without a
wiper blade back onto the windshield.
Hold the windshield wiper arm firmly when
you change the wiper blade. If you release the
windshield wiper arm without a wiper blade
and it falls onto the windshield, the windshield
may be damaged by the force of the impact.
Mercedes-Benz recommends that you have
the wiper blades changed at a qualified spe-
cialist workshop.
Replacing the wiper blades (standard
wiper blades)
Moving the wiper arms to a vertical posi-
tion
On vehicles without KEYLESS-GO:
XTurn the SmartKey to position 0in the ignition
lock (Ypage 125).
XSet the windshield wiper to position °on
the combination switch.
XTurn the SmartKey to position 1in the ignition
lock (Ypage 125).
XAs soon as the wiper arms are vertical to the
hood, turn the SmartKey to position 0in the
ignition lock (
Ypage 125).
XRemove the SmartKey.
XFold the wiper arms away from the windshield
until you feel them snap into place.
On vehicles with KEYLESS-GO:
XSwitch off the engine.
XRemove your foot from the brake pedal.
XSet the windshield wiper to the °position.
XPress the Start/Stop button repeatedly until
the windshield wiper starts.
XWhen the wiper arms are vertical to the hood,
press the Start/Stop button repeatedly until
the windshield wiper stops.
XFold the wiper arms away from the windshield
until you feel them snap into place.
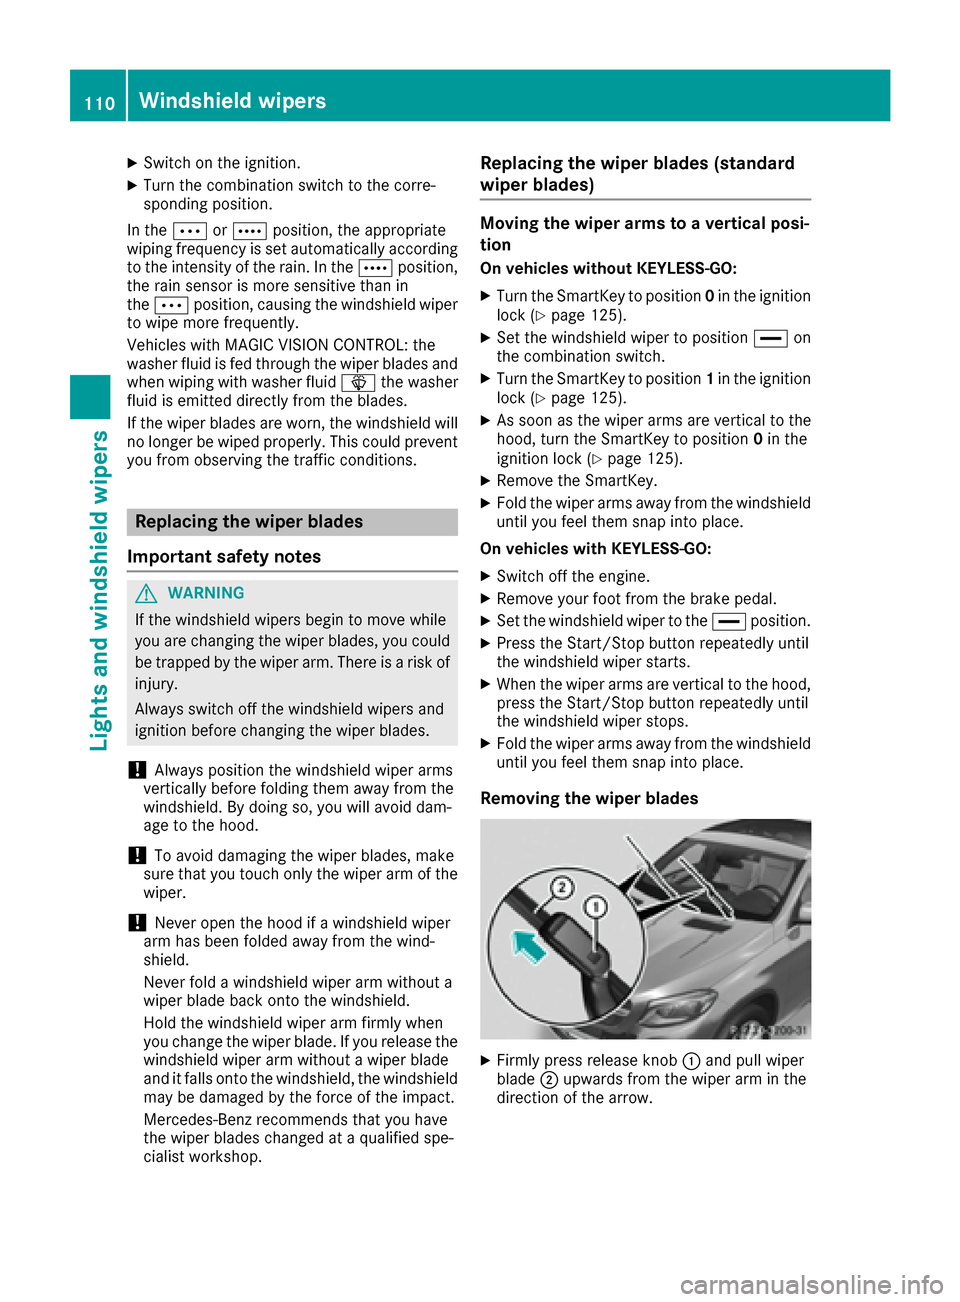
Removing the wiper blades
XFirmly press release knob :and pull wiper
blade ;upwards from the wiper arm in the
direction of the arrow.
110Windshield wipers
Lights and windshield wipers
Page 113 of 366
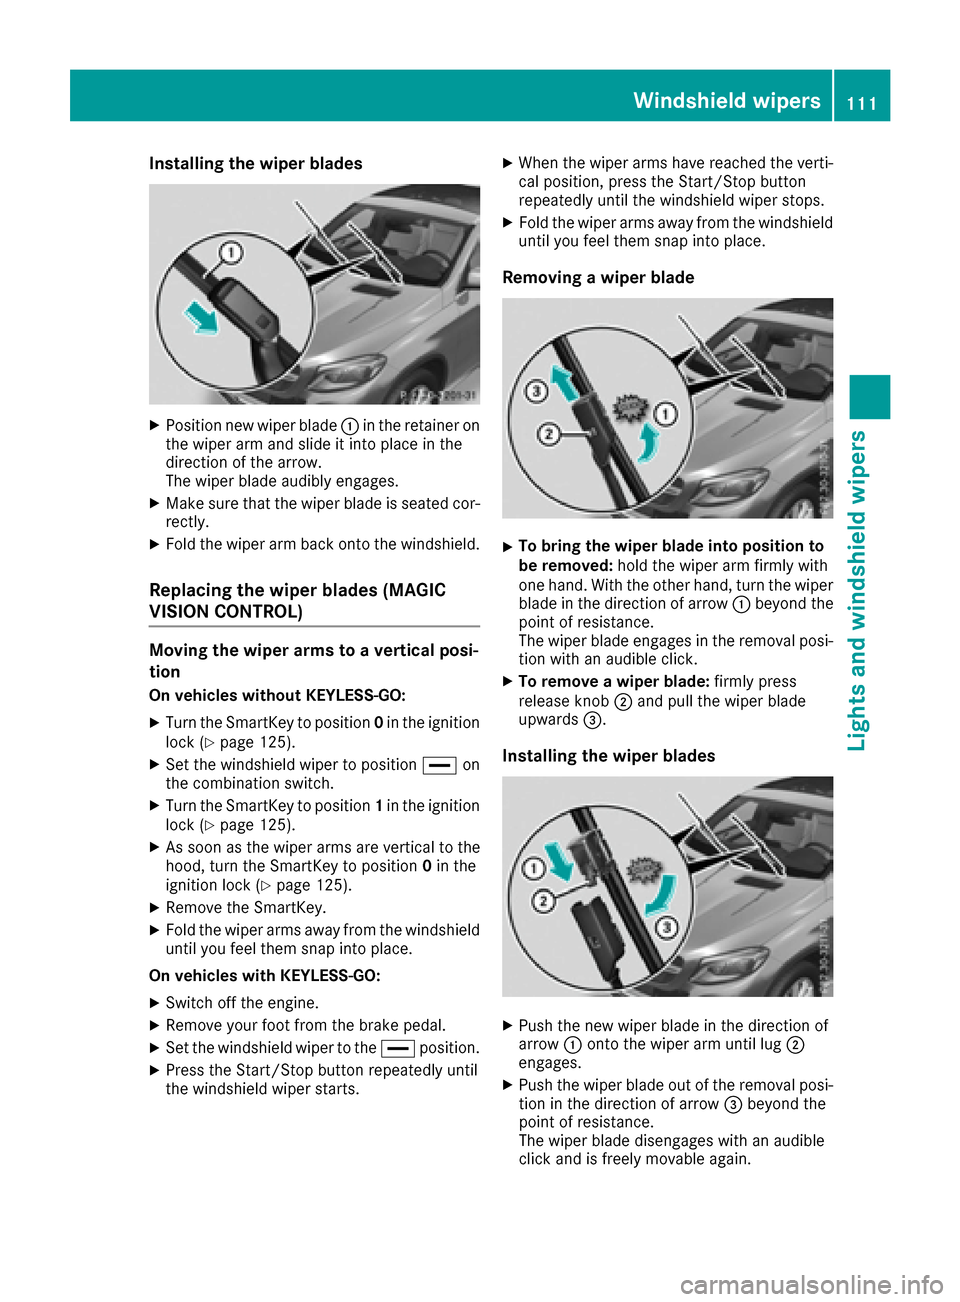
Installing the wiper blades
XPosition newwiper blade:inthe retainer on
the wiper arm and slide itintoplacein the
dire ction of the arrow.
The wiper blade audibly engages.
XMake sure that thewiper blade isseated cor-
rectly.
XFold the wiperarm back onto the windshield.
Replacing the wiper blades (MAGIC
VISION CONTROL)
Moving the wiper arms to a vertical posi-
tion
On vehicles without KEYLESS-GO:
XTurn the SmartKey to position 0in the ignition
lock (Ypage 125).
XSet the windshield wiperto position °on
the co mbination switch.
XTurn the SmartKey to position 1in the ignition
lock (Ypage 125).
XAs soon as the wiperarms are vertical to the
hood, turn the SmartKey to position 0in the
ignition lock (
Ypage 125).
XRemove the SmartKey.
XFold the wiperarms away from the windshield
unt ilyou feel them snap into place.
On vehicles with KEYLESS-GO:
XSwit ch off the engine.
XRemove your foot from the brake pedal.
XSet thewindshield wiperto the °position.
XPress the Start /S top button repeatedly until
the windshield wiperstarts.
XWhen the wiper arms have reached the verti-
cal position, press the Start/Stop button
repeatedly until the windshield wiper stops.
XFo ldthe wiper arms away from the windshield
until you feel them snap into place.
Removing a wiper blade
XTo bring the wiper blade into positi on to
be removed: hold the wiper arm firmly with
one hand. With the other hand, turn thewiper
blade inthe direction of arrow :beyond the
point of resistance.
The wiper blade engages in the removal posi-
tion with an audible click.
XTo remove a wiper blade: firmly press
release knob ;and pull the wiper blade
upwards =.
Installing the wiper blades
XPush the new wiper blade in the direction of
arrow:onto the wiper arm until lug ;
engages.
XPush the wiper blade out of the removal posi- tion inthe direction of arrow =beyond the
point of resistance.
The wiper blade disengages with an audible
click and is freely movable again.
Windshield wipers111
Lights and windshield wipers
Z
Page 128 of 366
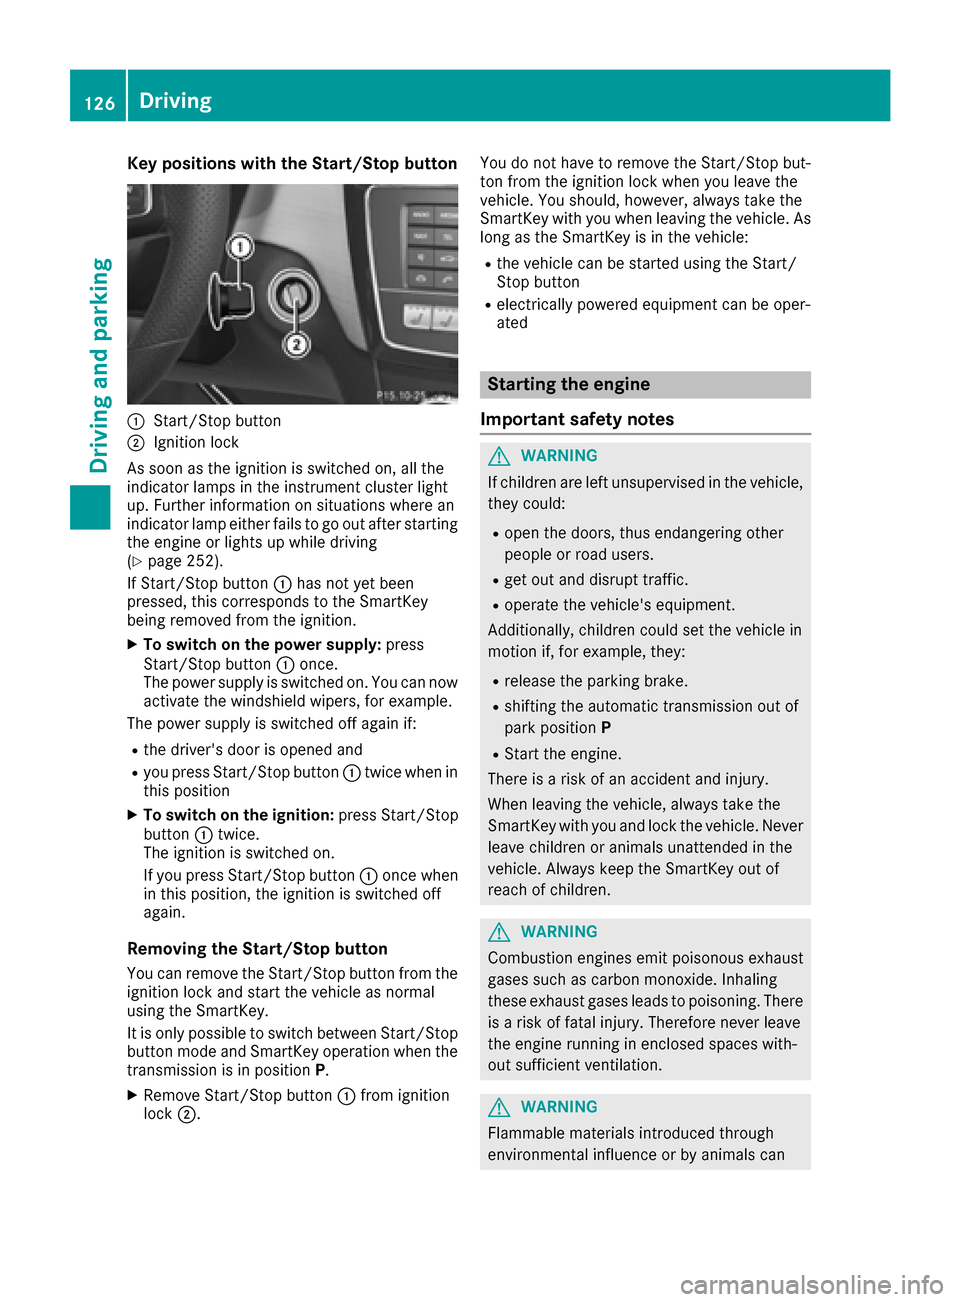
Key positions withthe Start/S topbutton
:Start/Sto pbutto n
;Ignition loc k
As soo nas th eignition is switched on ,all th e
indicator lamps in th einstrumen tcluste rligh t
up. Further information on situation swher ean
indicator lamp either fails to go out after starting
th eengin eor lights up while driving
(
Ypage 252).
If Start/Sto pbutto n: has no tyet been
pressed, this correspond sto th eSmartKey
bein gremove dfrom th eignition .
XTo switch on th epower supply :press
Start/Sto pbutto n: once.
The power suppl yis switched on .You can no w
activat eth ewindshield wipers, for example .
The power suppl yis switched off again if:
Rth edriver' sdoor is opened and
Ryou press Start/Sto pbutto n: twice when in
this position
XTo switch on th eignition: press Start/Sto p
butto n: twice.
The ignition is switched on .
If you press Start/Sto pbutto n: once when
in this position ,th eignition is switched off
again .
Removing the Start/S topbutton
You can remove th eStart/Sto pbutto nfrom th e
ignition loc kand start th evehicl eas normal
usin gth eSmartKey.
It is only possible to switch between Start/Sto p
butto nmod eand SmartKey operation when th e
transmission is in position P.
XRemove Start/Stopbutto n: from ignition
loc k;. You do no
thave to remove th eStart/Sto pbut -
to nfrom th eignition loc kwhen you leav eth e
vehicle. You should, however ,always tak eth e
SmartKey wit hyou when leaving th evehicle. As
lon gas th eSmartKey is in th evehicle:
Rth evehicl ecan be started usin gth eStart /
Stop butto n
Relectrically powered equipmen tcan be oper -
ate d
Starting the engine
Important safety notes
GWARNIN G
If children are lef tunsupervised in th evehicle,
they could:
Ropen th edoors, thus endangering other
people or road users.
Rget out and disrupt traffic.
Roperate th evehicle's equipment.
Additionally, children could set th evehicl ein
motion if, for example ,they:
Rrelease th eparking brake.
Rshiftin gth eautomatic transmission out of
park positio nP
RStart th eengine.
Ther eis aris kof an acciden tand injury.
When leaving th evehicle, always tak eth e
SmartKey wit hyou and loc kth evehicle. Never
leav echildren or animals unattended in th e
vehicle. Always keep th eSmartKey out of
reac hof children .
GWARNING
Combustion engines emit poisonous exhaust
gase ssuc has carbon monoxide. Inhalin g
these exhaust gase sleads to poisoning .Ther e
is aris kof fatal injury. Therefore never leav e
th eengin erunnin gin enclosed spaces with-
out sufficien tventilation .
GWARNING
Flammable materials introduce dthroug h
environmental influence or by animals can
126Driving
Driving and parking
Page 129 of 366
ignite if in contact with the exhaust system or
parts of the engine that heat up. There is a risk
of fire.
Carry out regular checks to make sure that
there are no flammable foreign materials in
the engine compartment or in the exhaust
system.
General notes
Vehicles with a gasoline engine:the catalytic
converter is preheated for up to 30 seconds
after a cold start. The sound of the engine may
change during this time.
Automatic transmission
XShift the transmission to position P
(Ypage 132).
The transmission position display in the mul-
tifunction display shows P(
Ypage 134).
iYou can start the engine in transmission
position Pand N.
Starting procedure with the SmartKey
XTo start a diesel engine : turn the SmartKey
to position 2in the ignition lock (Ypage 125).
The % preglow indicator lamp in the instru-
ment cluster lights up.
XTurn the SmartKey to position 3in the ignition
lock and release it as soon as the engine is
running (
Ypage 125).
iVehicles with a diesel engine: you can
start the engine without preglow if the engine
is warm.
Using KEYLESS-GO to start the engine
The Start/Stop button can be used to start the
vehicle without inserting the SmartKey into the
ignition lock. The Start/Stop button must be
inserted in the ignition lock and the SmartKey
must be in the vehicle. This mode for starting the
engine operates independently of the ECO
start/stop automatic engine start function.
XDepress the brake pedal and keep it
depressed.
XPress the Start/Stop button once
(Ypage 125).
Vehicles with a gasoline engine: the engine
starts.
Vehicles with a diesel engine: preglow is
activated and the engine starts.
Starting procedure via smartphone
Observe the important safety notes on starting
the engine (Ypage 126).
You can also start your engine via your smart-
phone from outside the vehicle. In this case, the
previously selected climate control setting is
activated. In this way you can cool or heat the
interior of the vehicle before starting the jour-
ney.
Only start the engine via your smartphone if it is
safe to start and run the engine where your vehi-
cle is parked.
Observe the legal stipulations in the area where your vehicle is parked. Engine start via smart-
phone may be limited to certain countries or
regions.
You can execute a maximum of two consecutive
starting attempts via your smartphone. If you
insert the SmartKey into the ignition lock, you
can carry out two more starting attempts.
Once you have started the engine, you can
switch the engine off via your smartphone at any
time.
You can only start the engine via your smart-
phone if:
Rthe SmartKey is in the ignition lock
Rpark position Pis selected
Rthe accelerator pedal is not depressed
Rthe anti-theft alarm system is not activated
Rthe panic alarm is not activated
Rthe hazard warning lamps are switched off
Rthe hood is closed.
Rthe doors are closed and locked
Rthe windows and sliding sunroof are closed
Also make sure that:
Rthe fuel tank is sufficiently filled
Rthe starter battery is sufficiently charged
Driving127
Driving and parking
Z