2017 MERCEDES-BENZ GLE engine
[x] Cancel search: enginePage 179 of 390
R
offroad level 1 for driving on easily negotiable
off-road terrain R
offroad level 2 for driving on normal off-road
terrain R
offroad level 3 for freeing the vehicle in par-
ticularly rough terrain at low speeds only
The individual vehicle levels differ from the nor-
mal level as follows: R
–0.6 in (–15 mm) in the Sport drive programR
+/–0 in (+/–0 mm) in the Comfort drive pro-
gram R
+ 1.2 in (+ 30 mm) in the Offroad drive pro-
gram R
+ 2.4 in (+ 60 mm) in the Offroad Plus drive
program R
+ 1.2 in (+ 30 mm) in offroad level 1 R
+ 2.4 in (+ 60 mm) in offroad level 2 R
+ 3.5 in (+ 90 mm) in offroad level 3
Setting the vehicle level
! Make sure that there is enough ground
clearance when the vehicle is being lowered.
It could otherwise hit the ground, damaging
the underbody.
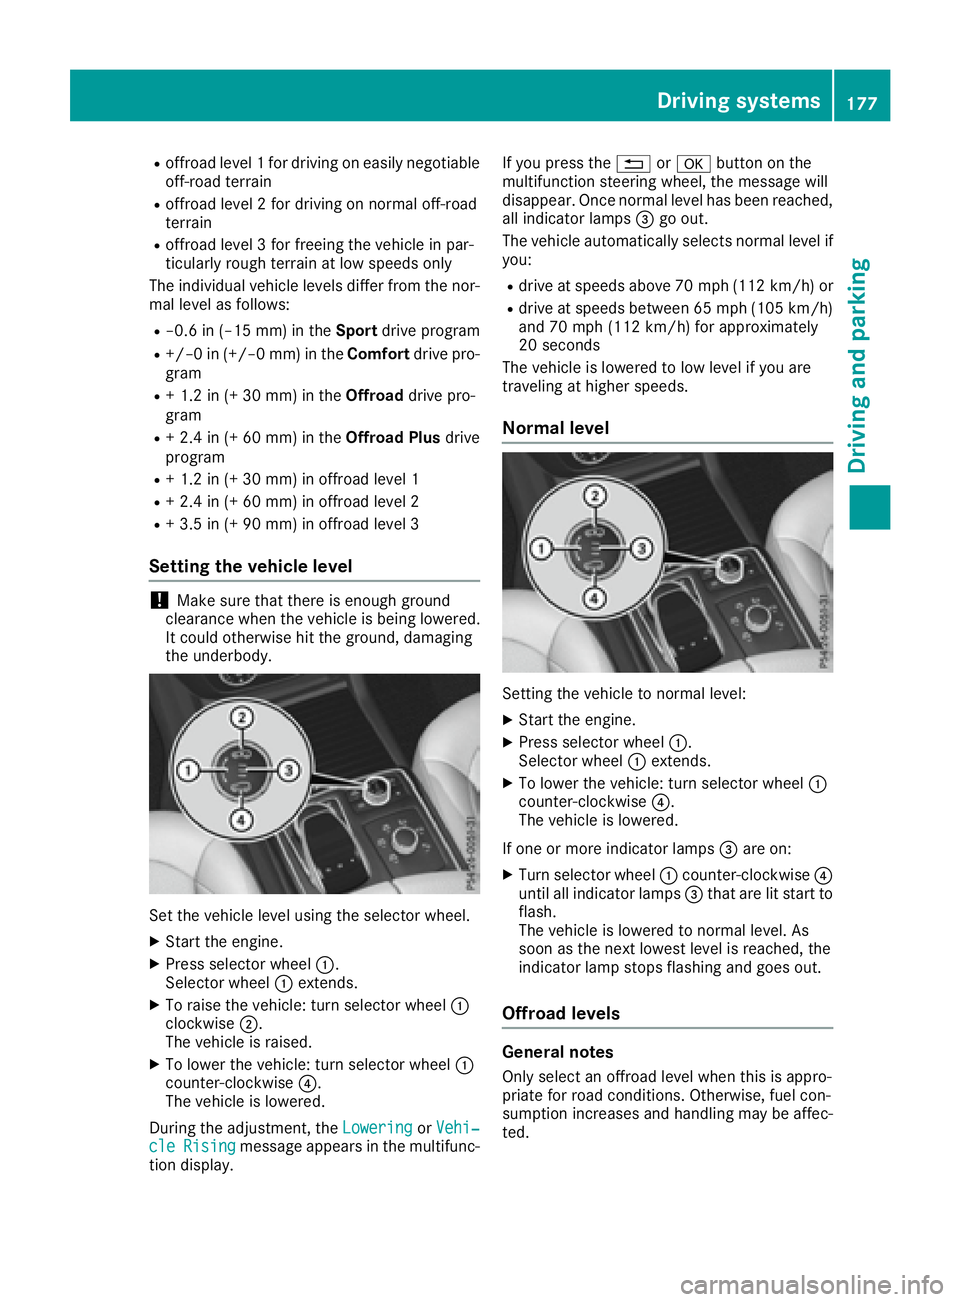
Set the vehicle level using the selector wheel. X
Start the engine. X
Press selector wheel �C .
Selector wheel �C extends.X
To raise the vehicle: turn selector wheel �C
clockwise �D .
The vehicle is raised. X
To lower the vehicle: turn selector wheel �C
counter-clockwise �
Page 181 of 390
HOLD function
General notes The HOLD function can assist the driver in the
following situations: R
when pulling away, especially on steep slopes R
when maneuvering on steep slopes R
when waiting in traffic
The vehicle is kept stationary without the driver
having to depress the brake pedal.
The braking effect is canceled and the HOLD
function deactivated when you depress the
accelerator pedal to pull away.
i Do not use the HOLD function when driving
off-road, on steep uphill or downhill gradients
or on slippery or loose surfaces. The HOLD
function cannot hold the vehicle on such sur-
faces.
Important safety notes
G WARNING
When leaving the vehicle, it can still roll away
despite being braked by the HOLD function if: R
there is a malfunction in the system or in
the voltage supply. R
the HOLD function has been deactivated by
pressing the accelerator pedal or the brake
pedal, e.g. by a vehicle occupant. R
the electrical system in the engine com-
partment, the battery or the fuses have
been tampered with. R
the battery is disconnected
There is a risk of an accident.
If you wish to exit the vehicle, always turn off
the HOLD function and secure the vehicle
against rolling away.
! When DISTRONIC PLUS or the HOLD func-
tion is activated, the vehicle brakes automat-
ically in certain situations.
To avoid damage to the vehicle, deactivate
DISTRONIC PLUS and the HOLD function in
the following or similar situations: R
when towing the vehicle R
in the car wash
Deactivating the HOLD function ( Y
page 179). Activation conditions You can activate the HOLD function if: R
the vehicle is stationary R
the engine is running or if it has been auto-
matically switched off by the ECO start/stop
function R
the driver's door is closed or your seat belt is
fastened R
the electric parking brake is released R
the transmission is in position D , R or NR
Distance Pilot DISTRONIC is deactivated
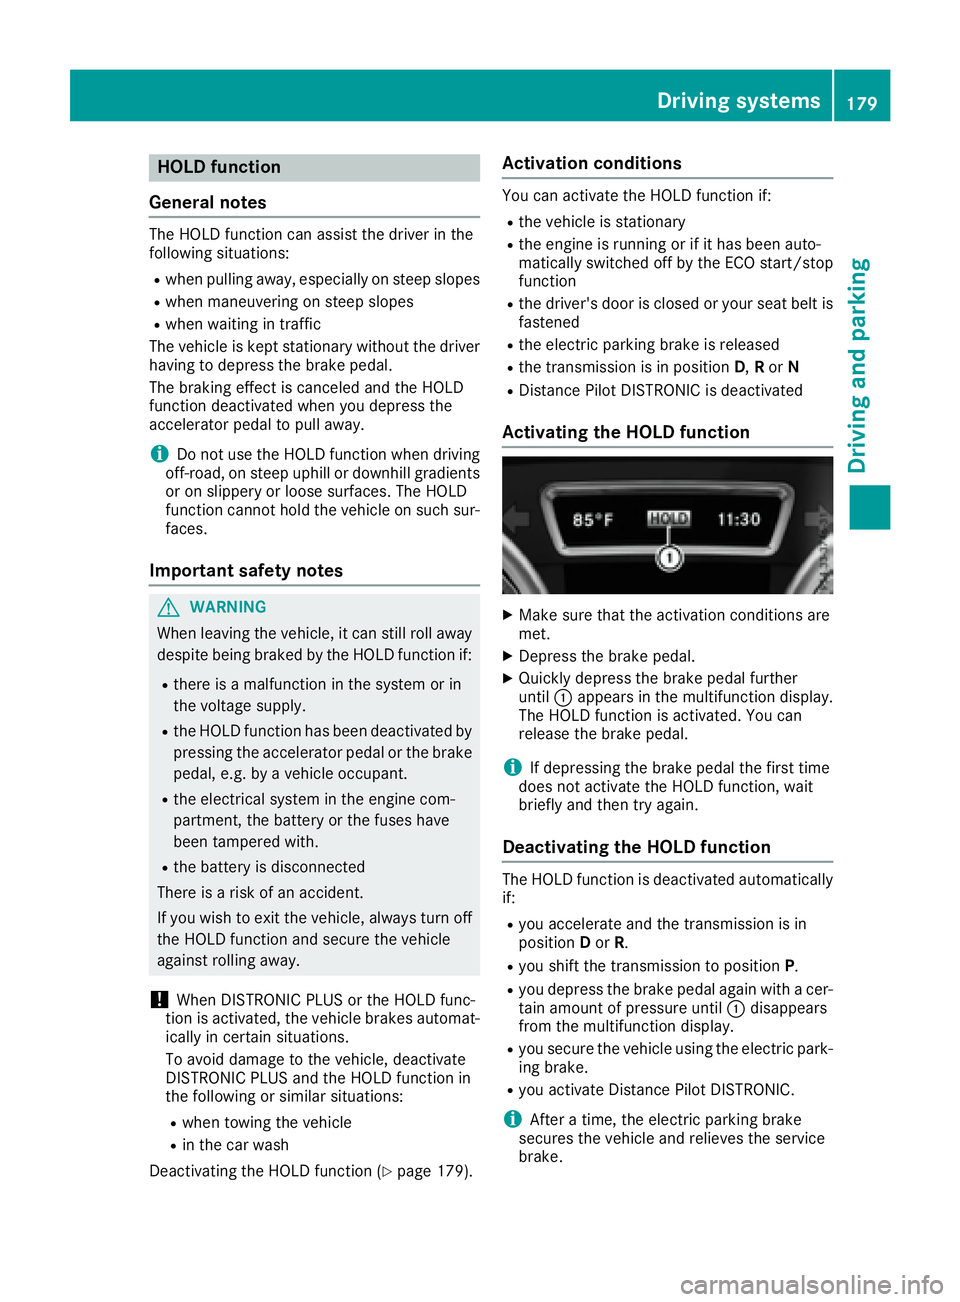
Activating the HOLD function X
Make sure that the activation conditions are
met. X
Depress the brake pedal. X
Quickly depress the brake pedal further
until �C appears in the multifunction display.
The HOLD function is activated. You can
release the brake pedal.
i If depressing the brake pedal the first time
does not activate the HOLD function, wait
briefly and then try again.
Deactivating the HOLD function The HOLD function is deactivated automatically
if: R
you accelerate and the transmission is in
position D or R . R
you shift the transmission to position P .R
you depress the brake pedal again with a cer-
tain amount of pressure until �C disappears
from the multifunction display. R
you secure the vehicle using the electric park-
ing brake. R
you activate Distance Pilot DISTRONIC.
i After a time, the electric parking brake
secures the vehicle and relieves the service
brake.Driving systems 179
Driving and parking Z
Page 182 of 390
When the HOLD function is activated, the trans-
mission is shifted automatically to position P if:R
the driver's door is open and the driver's seat
belt is unfastened. R
the engine is switched off, unless it is auto-
matically switched off by the ECO start/stop
function.
The electric parking brake secures the vehicle
automatically if the HOLD function is activated
when the vehicle is stationary and: R
a system malfunction occurs. R
the power supply is not sufficient.
On steep uphill or downhill inclines or if there is
a malfunction, the transmission may also be
automatically shifted into position P .
AIRMATIC package
General notes AIRMATIC is an air suspension system with var-
iable damping for improved driving comfort.
Level control ensures the best possible suspen-
sion and constant ground clearance, even with a
laden vehicle. When you drive fast, the vehicle is
lowered automatically to improve driving safety
and to reduce fuel consumption. There is also
the option to manually adjust the vehicle level.
All vehicles (except Mercedes-AMG vehi-
cles): AIRMATIC consists of:R
level settings R
level control and R
ADS (Adaptive Damping System)
Mercedes-AMG vehicles: AIRMATIC consists
of: R
level settings R
level control and R
ADS PLUS (Adaptive Damping System)
All vehicles (except Mercedes-AMG vehi-
cles): your vehicle may also be equipped with
the ACTIVE CURVE SYSTEM ( Y
page 182).
Mercedes-AMG vehicles: your vehicle is equip-
ped with the ACTIVE CURVE SYSTEM.
( Y
page 182).
Observe the notes on driving with a trailer
( Y
page 216).
The vehicle level can be set using the DYNAMIC
SELECT controller ( Y
page 139) or the level but- ton ( Y
page 182). The setting always corre-
sponds to the last selected function.
Important safety notes
G WARNING
When the vehicle is being lowered, people
could become trapped if their limbs are
between the vehicle body and the wheels or
underneath the vehicle. There is a risk of
injury.
Make sure no one is underneath the vehicle or
in the immediate vicinity of the wheel arches
when the vehicle is being lowered.
If you unlock the vehicle or open a door, the
vehicle begins to compensate for load discrep-
ancies while still parked. However, for signifi-
cant level changes, such as after the vehicle has
been stationary for a long period, the engine
must be on. For safety reasons, the vehicle is
only lowered when the doors are closed. Low-
ering is interrupted if a door is opened, and it
continues once the door has been closed.
ADS and ADS PLUS (Adaptive Damping
System)
General notes The Adaptive Damping System automatically
controls the calibration of the dampers. The
damping characteristics adapt to the current
operating and driving situation.
The damping is tuned individually to each wheel
and depends on: R
your driving style, e.g. sporty R
the road surface conditions R
the drive program selected R
the vehicle level setting180
Driving systems
Driving and parking
Page 185 of 390
If you unlock the vehicle or open a door, the
vehicle begins to compensate for load discrep-
ancies while still parked. However, for signifi-
cant level changes, such as after the vehicle has
been stationary for a long period, the engine
must be on. For safety reasons, the vehicle is
only lowered when the doors are closed. Low-
ering is interrupted if a door is opened, and it
continues once the door has been closed.
Vehicles with no trailer coupled: below a
speed of 40 mph (64 km/h), you can choose
between the normal and raised vehicle level.
Select the normal vehicle level for normal road
surfaces and the raised vehicle level for driving
with snow chains or on particularly poor road
surfaces. Your selection remains stored even if
you remove the SmartKey from the ignition lock.
If you try to select raised level at a speed above
40 mph (64 km/h), the Drive More Slowly
message appears in the multifunction display.
Vehicles with a trailer coupled: below a speed
of 19 mph (30 km/h), you can choose between
the normal and raised vehicle level.
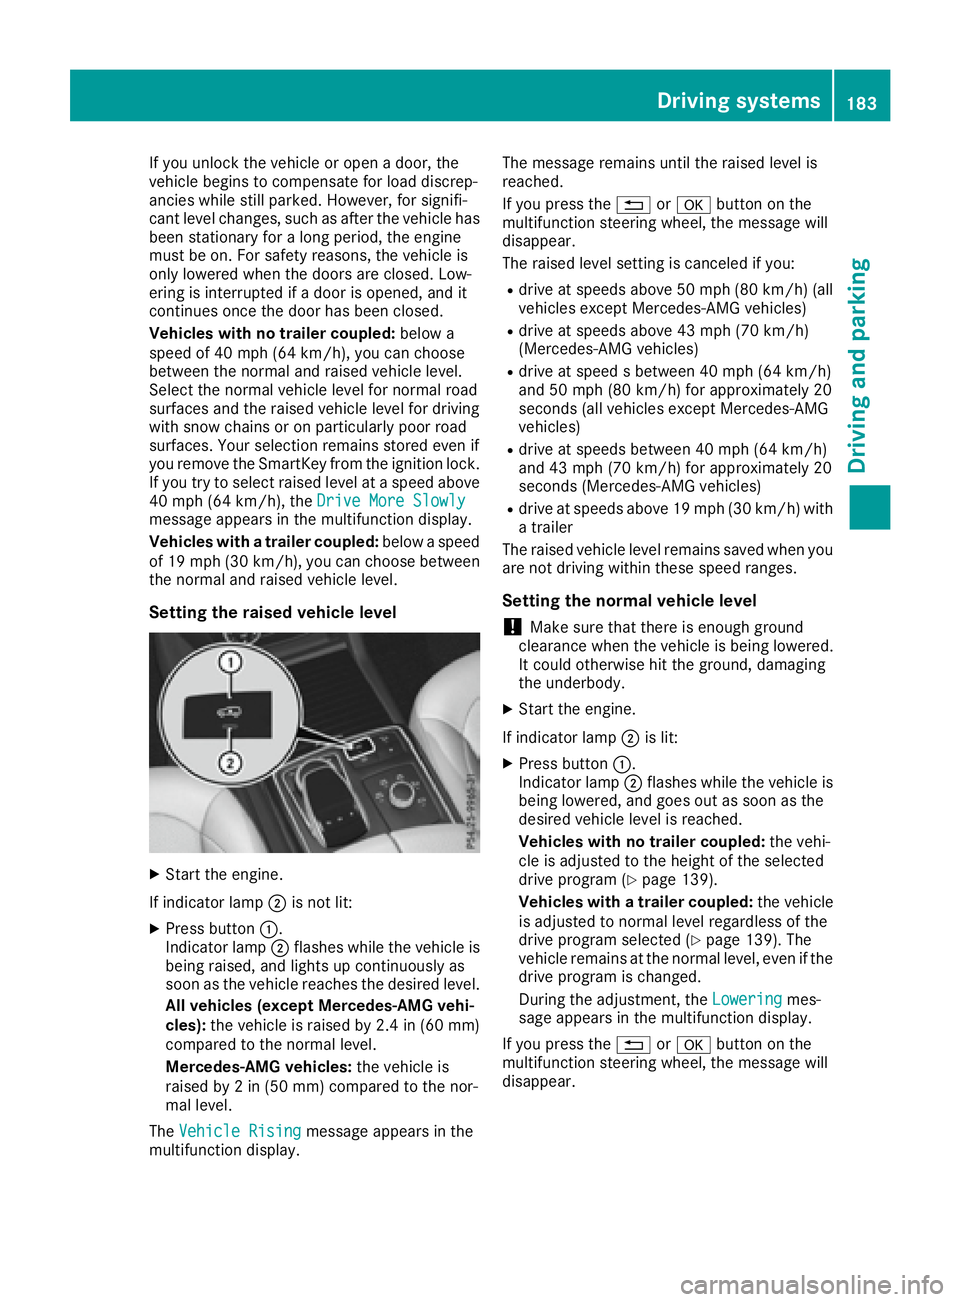
Setting the raised vehicle level
X
Start the engine.
If indicator lamp �D is not lit:X
Press button �C .
Indicator lamp �D flashes while the vehicle is
being raised, and lights up continuously as
soon as the vehicle reaches the desired level.
All vehicles (except Mercedes-AMG vehi-
cles): the vehicle is raised by 2.4 in (60 mm)
compared to the normal level.
Mercedes-AMG vehicles: the vehicle is
raised by 2 in (50 mm) compared to the nor-
mal level.
The Vehicle Rising
message appears in the
multifunction display. The message remains until the raised level is
reached.
If you press the �8 or �v button on the
multifunction steering wheel, the message will
disappear.
The raised level setting is canceled if you: R
drive at speeds above 50 mph (80 km/h) (all
vehicles except Mercedes-AMG vehicles) R
drive at speeds above 43 mph (70 km/h)
(Mercedes-AMG vehicles) R
drive at speed s between 40 mph (64 km/h)
and 50 mph (80 km/h) for approximately 20
seconds (all vehicles except Mercedes-AMG
vehicles) R
drive at speeds between 40 mph (64 km/h)
and 43 mph (70 km/h) for approximately 20
seconds (Mercedes-AMG vehicles) R
drive at speeds above 19 mph (30 km/h) with
a trailer
The raised vehicle level remains saved when you
are not driving within these speed ranges.
Setting the normal vehicle level
! Make sure that there is enough ground
clearance when the vehicle is being lowered.
It could otherwise hit the ground, damaging
the underbody. X
Start the engine.
If indicator lamp �D is lit: X
Press button �C .
Indicator lamp �D flashes while the vehicle is
being lowered, and goes out as soon as the
desired vehicle level is reached.
Vehicles with no trailer coupled: the vehi-
cle is adjusted to the height of the selected
drive program ( Y
page 139).
Vehicles with a trailer coupled: the vehicle
is adjusted to normal level regardless of the
drive program selected ( Y
page 139). The
vehicle remains at the normal level, even if the
drive program is changed.
During the adjustment, the Lowering mes-
sage appears in the multifunction display.
If you press the �8 or �v button on the
multifunction steering wheel, the message will
disappear.Driving systems 183
Driving and parking Z
Page 186 of 390
AMG adaptive sp ort suspension sys-
tem
Gene ra l notes
i The AM G adaptive sport suspension system
is available for Mercedes-AM G vehicles and
for th e Mercedes-AM G GLE 43 4MATIC.
The electronically controlled damping system
works continuously. This improves drivin g
safet y and rid e comfort .
The damping is tuned individually to eac h whee l
and depend s on :R
your drivin g style, e.g. sport yR
th e road surfac e condition , e.g. bump sR
your individual selection of Sport , Sport + or
Comfort
The suspension setting can be adjusted usin g
th e corresponding butto n in th e center console
or th e DYNAMIC SELECT controller
( Y
page 139).
Eac h time you start th e engin e wit h th e ignition
SmartKey or th e Start/Sto p button, Comfort
mod e is activated. Fo r further information about
starting th e engine, see ( Y
page 133).
Sp ort mod e
The firmer setting of th e suspension tuning in
Sport mod e ensures eve n bette r contact wit h
th e road . Selec t this mod e when employin g a
sport y drivin g style, e.g. on windin g country
roads. X
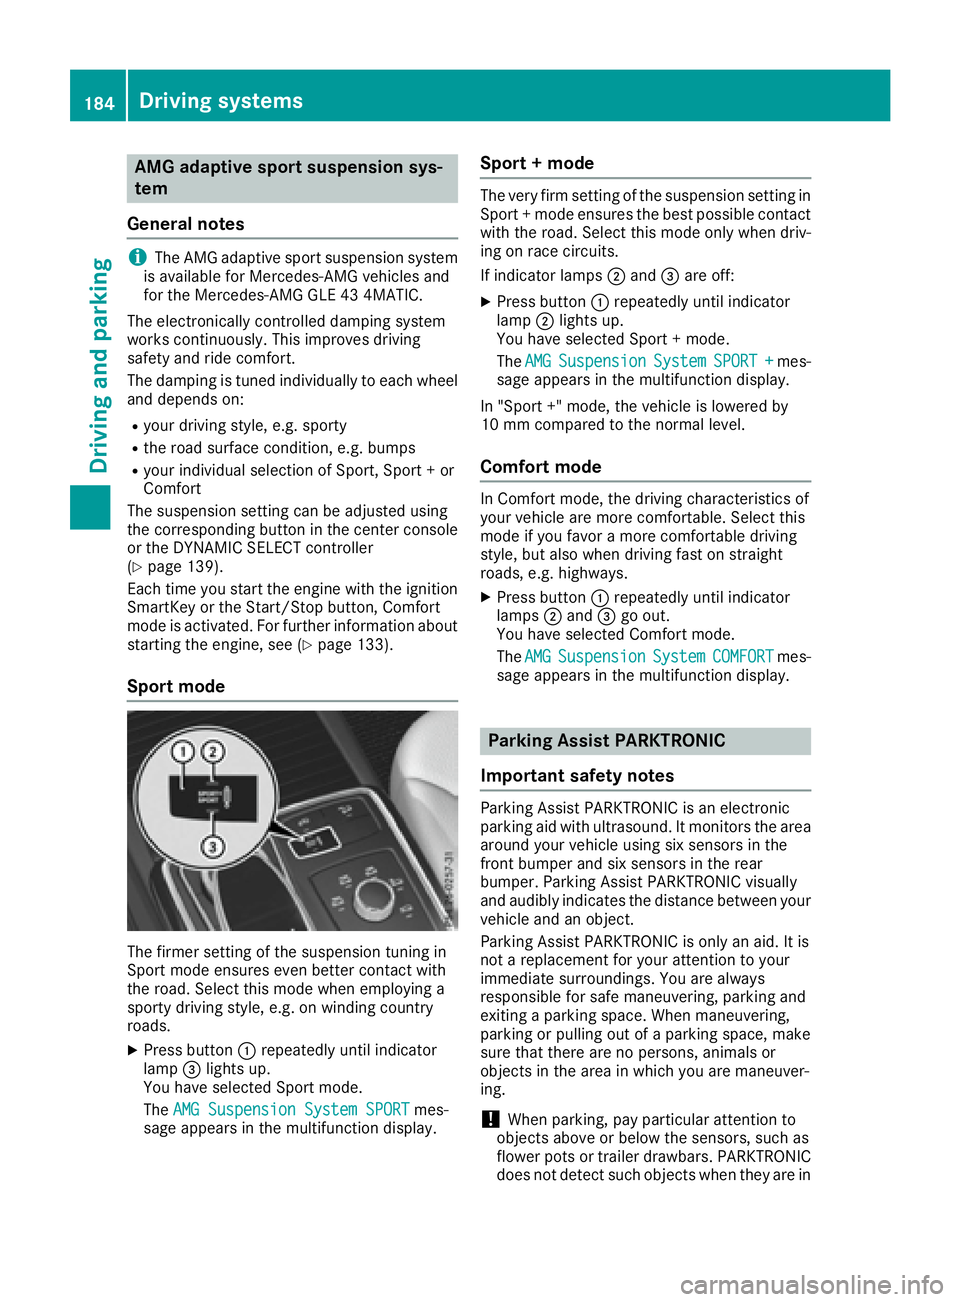
Press butto n �C repeatedly until indicator
lamp �
Page 191 of 390
R
that are parallel to the direction of travel and
at least 39.5 in (1.0 m) longer than your vehi-
cle R
that are at right angles to the direction of
travel and at least 39.5 in (1.0 m) wider than
your vehicle
i Note that Parking Pilot PARKTRONIC cannot
measure the depth of parking spaces if they
are at right angles to the direction of travel.
You need to judge whether your vehicle will fit
into the parking space.
When driving at speeds below 19 mph
(30 km/h), you will see parking symbol �D as a
status indicator in the instrument cluster. When
a parking space has been detected, an arrow
towards the right or the left also appears. Park-
ing Pilot displays only parking spaces on the
front-passenger side as standard. Parking
spaces on the driver's side are displayed as
soon as the turn signal on the driver's side is
activated. When parking on the driver's side,
this must remain activated until you confirm the
use of Parking Pilot by pressing the �v button
on the multifunction steering wheel. The system
automatically determines whether the parking
space is parallel or at right angles to the direc-
tion of travel.
A parking space is displayed while you are driv-
ing past it, and until you are approximately 50 ft
(15 m) away from it.
Parking
G WARNING
If you leave the vehicle when it is only being
braked by Active Parking Assist it could roll
away if: R
there is a malfunction in the system or in
the voltage supply. R
the electrical system in the engine com-
partment, the battery or the fuses have
been tampered with. R
the battery is disconnected. R
the accelerator pedal has been depressed,
e.g. by a vehicle occupant.
There is a risk of an accident.
Before leaving the vehicle, always secure it
against rolling away. i If Parking Assist PARKTRONIC detects
obstacles, Parking Pilot brakes automatically
whilst the vehicle is being parked. You are
responsible for braking in good time. X
Stop the vehicle when the parking space sym-
bol shows the desired parking space in the
instrument cluster. X
Shift the transmission to position R .
The Start Parking Pilot? Yes: OK No:
�8 message appears in the multifunction
display. X
To cancel the procedure: press the �8
button on the multifunction steering wheel or
pull away.
or X
To park using Parking Pilot: press the �v
button on the multifunction steering wheel.
The Parking Pilot Active Accelerate
and Brake Observe Surroundings mes-
sage appears in the multifunction display. X
Let go of the multifunction steering wheel. X
Back up the vehicle, being ready to brake at all
times. When backing up, drive at a speed
below approximately 6 mph (10 km/h). Oth-
erwise, Parking Pilot will be canceled.
Parking Pilot brakes the vehicle to a standstill
when the vehicle approaches the rear border
of the parking space.
Maneuvering may be required in tight parking
spaces.
The Parking Pilot Active Select D
Observe Surroundings message appears in
the multifunction display. X
Shift the transmission to position D while the
vehicle is stationary.
Parking Pilot immediately steers in the other
direction.
The Parking Pilot Active Accelerate
and Brake Observe Surroundings mes-
sage appears in the multifunction display.
i You will achieve the best results by waiting
for the steering procedure to complete before
pulling away. X
Drive forwards and be ready to brake at all
times.
Parking Pilot brakes the vehicle to a standstill.
The Parking Pilot Active Select R
Observe Surroundings message appears in
the multifunction display.
As soon as the parking procedure is complete,
the Parking Pilot Finished messageDriving systems 189
Driving and parking Z
Page 192 of 390
appears and a warning tone sounds. The vehicle
is now parked. The vehicle is kept stationary
without the driver having to depress the brake
pedal. The braking effect is canceled when you
depress the accelerator pedal.
Parking Pilot no longer supports you with steer-
ing interventions and brake applications. When
Parking Pilot is finished, you must steer and
brake again yourself. Parking Assist
PARKTRONIC is still available.
Parking tips: R
The way your vehicle is positioned in the park-
ing space after parking is dependent on vari-
ous factors. These include the position and
shape of the vehicles parked in front and
behind it and the conditions of the location. It
may be the case that Parking Pilot guides you
too far into a parking space, or not far enough
into it. In some cases, it may also lead you
across or onto the curb. If necessary, you
should cancel the parking procedure with
Parking Pilot. R
You can also select preselect transmission
position D . The vehicle redirects and does not
drive as far into the parking space. Should the
transmission change take place too early, the
parking procedure will be canceled. A sensi-
ble parking position can no longer be ach-
ieved from this position.
Exiting a parking space In order for Parking Pilot to assist you: R
the border of the parking space must be high
enough at the front and the rear. A curb is too
small, for example. R
the border of the parking space must not be
too wide, as the position of the vehicle must
not exceed an angle of 45° to the starting
position as it is maneuvering into the parking
space. R
a maneuvering distance of at least 3.3 ft
(1.0 m) must be available.
Parking Pilot can assist you with exiting a park-
ing space only if you have parked the vehicle
parallel to the direction of travel.
i If Parking Assist PARKTRONIC detects
obstacles, Parking Pilot brakes automatically
whilst the vehicle is exiting the parking space.
You are responsible for braking in good time. X
Start the engine. X
Release the electric parking brake. X
Switch on the turn signal in the direction you
will drive out of the parking space. X
Shift the transmission to position D or R .
The Start Parking Pilot? Yes: OK No:
�8 message appears in the multifunction
display. X
To cancel the procedure: press the �8
button on the multifunction steering wheel or
pull away.
or X
To exit a parking space using Parking
Pilot: press the �v button on the multi-
function steering wheel.
The Parking Pilot Active Accelerate
and Brake Observe Surroundings mes-
sage appears in the multifunction display. X
Let go of the multifunction steering wheel. X
Pull away, being ready to brake at all times. Do
not exceed a maximum speed of approx-
imately 6 mph (10 km/h) when exiting a park-
ing space. Otherwise, Parking Pilot will be
canceled. X
Shift the transmission to position D or R as
required or according to the message while
the vehicle is stationary.
Parking Pilot immediately steers in the other
direction. The Parking Pilot Active
Accelerate and Brake Observe Sur‐
roundings message appears in the multi-
function display.
i You will achieve the best results by waiting
for the steering procedure to complete before
pulling away.
If you back up after activation, the steering
wheel is moved to the straight-ahead posi-
tion. X
Drive forwards and back up as prompted by
the Parking Assist PARKTRONIC warning dis-
plays, several times if necessary.
Once you have exited the parking space com-
pletely, the steering wheel is moved to the
straight-ahead position. You hear a tone and the
Parking Pilot Finished message appears in
the multifunction display. You will then have to
steer and merge into traffic on your own. Park-
ing Assist PARKTRONIC is still available. You can
take over the steering before the vehicle has
exited the parking space completely. This is
useful, for example when you recognize that it is
already possible to pull out of the parking space.190
Driving systems
Driving and parking
Page 194 of 390
The flap closes again when: R
you have finished the maneuvering process R
you switch off the engine R
you open the cargo compartment
Observe the notes on cleaning ( Y
page 323).
For technical reasons, the flap may remain
open briefly after the rear view camera has
been deactivated.
Activating/deactivating the rear view
camera X
To activate: make sure that the SmartKey is
in position 2 in the ignition lock.X
Make sure that the Activation by R gear
function is selected in the multimedia system;
see the Digital Operator's Manual. X
Engage reverse gear.
The rear view camera flap opens. The multi-
media system shows the area behind the vehi-
cle with guide lines.
The image from the rear view camera is avail-
able throughout the maneuvering process.
To deactivate: the rear view camera deacti-
vates if you shift the transmission to P or after
driving forwards a short distance.
Displays in the multimedia system The rear view camera may show a distorted view
of obstacles, show them incorrectly or not at all.
The rear view camera does not show objects in
the following positions: R
very close to the rear bumper R
under the rear bumper R
in the area immediately above the tailgate
handle
! Objects not at ground level may appear to
be further away than they actually are, e.g.: R
the bumper of a parked vehicle R
the drawbar of a trailer R
the ball coupling of a trailer tow hitch R
the rear section of an HGV R
a slanted post
Use the guidelines only for orientation.
Approach objects no further than the bottom-
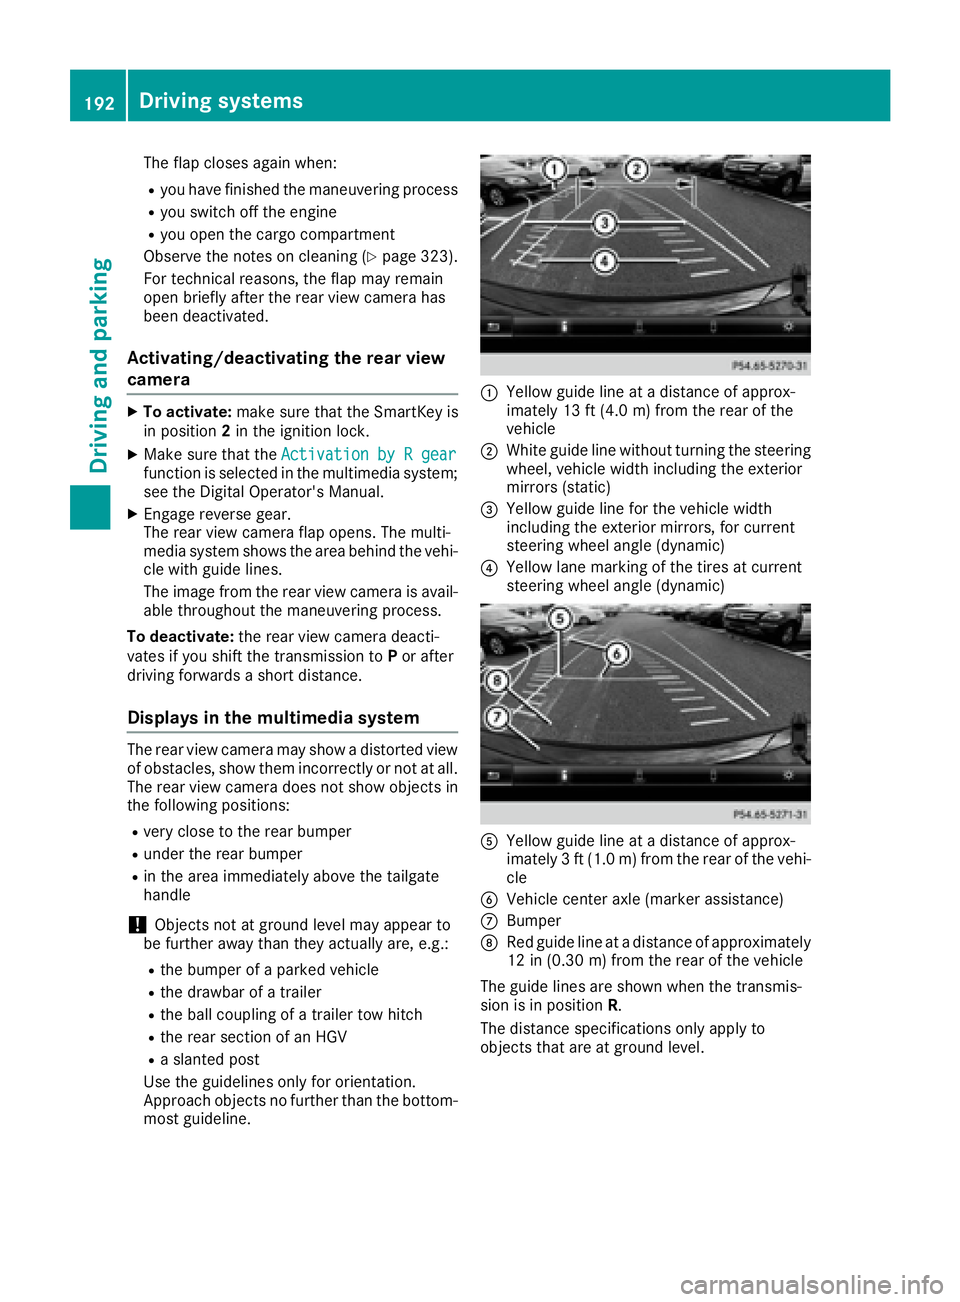
most guideline. �C
Yellow guide line at a distance of approx-
imately 13 ft (4.0 m) from the rear of the
vehicle �D
White guide line without turning the steering
wheel, vehicle width including the exterior
mirrors (static) �