2017 MERCEDES-BENZ GLE COUPE mount
[x] Cancel search: mountPage 11 of 366
Central locking/unlocking
(SmartKey) .......................................71
Control panel .................................. .38
Display message ............................ 248
Emergency locking ........................... 78
Emergency unlocking ....................... 78
Important safety notes .................... 77
Opening (from inside) ...................... 77
Overview .......................................... 77
Power closing .................................. 78
Drinking and driving ......................... 149
Drive program
Automatic transmission ................. 135
SETUP (on-board computer) .......... 218
Drive programs
Display (DIRECT SELECT lever) ...... 134
Driver's door
see Doors
Driving
Important safety notes .................. 124
Driving abroad
Mercedes-Benz Service ................. 299
Driving Assistance PLUS package ... 194
Driving in mountainous terrain
Approach/departure angle ............ 156
Driving lamps
see Daytime running lamps
Driving off-road
see Off-road driving
Driving safety system
Active Brake Assist .......................... 62
Driving safety systems
ABS (Anti-lock Braking System) ....... 61
Active Brake Assist with cross-
traffic function ................................. 67
ADAPTIVE BRAKE ............................. 67
Adaptive Brake Assist ...................... 63
BAS (Brake Assist System) .............. 61
Distance warning function ............... 62
EBD (electronic brake force distri-
bution) ............................................. 66
ESP
®(Electronic Stability Pro-
gram) ............................................... 64
Important safety information ........... 60
Overview .......................................... 60
STEER CONTROL ............................. 69
Driving system
ADS PLUS ...................................... 170 AIRMATIC package ........................ 169
Distance Pilot DISTRONIC ............. 159
Distance
Pilot DISTRONIC w
ith
Steering Pilot ................................. 165
Parking assist PARKTRONIC .......... 174
Parking Pilot .................................. 177
Driving systems
360°camera .................................. 185
Active Blind Spot Assist ................. 194
Active Curve System ...................... 171
Active Lane Keeping Assist ............ 197
AMG adaptive sport suspension
system ........................................... 173
ATTENTION ASSIST ........................ 189
Blind Spot Assist ............................ 191
Cruise control ................................ 157
Display message ............................ 238
Driving Assistance Plus package ... 194
HOLD function ............................... 167
Lane Keeping Assist ...................... 193
Rear view camera .......................... 181
Traffic Sign Assist .......................... 190
Driving tips
Automatic transmission ................. 135
Brakes ........................................... 150
Break-in period .............................. 124
Distance Pilot DISTRONIC ............. 165
Downhill gradient ........................... 150
Drinking and driving ....................... 149
Driving in winter ............................. 153
Driving on flooded roads ................ 152
Driving on sand .............................. 155
Driving on wet roads ...................... 152
Driving over obstacles ................... 156
Exhaust check ............................... 149
Fuel ................................................ 148
General .......................................... 148
Hydroplaning ................................. 152
Icy road surfaces ........................... 153
Limited braking efficiency on sal-
ted roads ....................................... 151
Off-road driving .............................. 154
Off-road fording ............................. 152
Snow chains .................................. 323
The first 1000 miles (1500 km) ..... 124
Tire ruts ......................................... 155
Towing a trailer .............................. 200
Traveling uphill ............................... 156
Index9
Page 16 of 366
ATTENTION ASSIST ........................ 189
Blind Spot Assist ............................ 191
Distance Pilot DISTRONIC ............. 159
Distance Pilot DISTRONIC with
Steering Pilot ................................. 165
General notes ................................ 157
Lane Keeping Assist ...................... 193
Parking Assist PARKTRONIC .......... 174
Parking Pilot .................................. 177
PRE-SAFE
®PLUS (anticipatory
occupant protection PLUS) .............. 54
Rear view camera .......................... 181
Traffic Sign Assist .......................... 190
Message memory (on-board com-
puter) .................................................. 221
Mirror
Vanity mirror (sun visor) ................ 279
Mirror turn signal
Cleaning ......................................... 302
Mirrors
see Exterior mirrors
see Rear-view mirror
see Vanity mirror (in the sun visor)
Mobile phone
Connecting (Bluetooth
®inter-
face) .............................................. 266
Connecting another mobile
phone ............................................ 268
Frequencies ................................... 350
Installation .....................................3 50
Menu (on-board computer) ............ 212
Transmission output (maximum) .... 350
Modifying the programming
(SmartKey) ...........................................7 3
MOExtended tires .............................. 307
Mounting wheels
Lowering the vehicle ...................... 345
Mounting a new wheel ................... 344
Preparing the vehicle .....................3 41
Raising the vehicle ......................... 342
Removing a wheel .......................... 343
Securing the vehicle against roll-
ing away ........................................ 342
MP3
Operation ....................................... 212
see also Digital Operator's Man-
ual ..................................................2 63see separate operating instructions
Multifunction display
Function/notes .............................2 08
Permanent di
splay ......................... 215
Multifunction steering wheel
Operating the on-board computer .. 207
Overview .......................................... 34
Multimedia system
see Separate operating instructions
Music files
see also Digital Operator's Man-
ual ..................................................2 63
N
Navigation
Menu (on-board computer) ............ 210
see also Digital Operator's Man-
ual ..................................................2 63
see separate operating instructions
Notes on breaking-in a new vehi-
cle ....................................................... 124
O
Occupant Classification System
(OCS)
Conditions ....................................... 47
Faults ............................................... 50
Operation ......................................... 47
System self-test ............................... 49
Occupant safety
Air bags ...........................................4 4
Automatic measures after an acci-
dent ................................................. 54
Children in the vehicle ..................... 55
Important safety notes .................... 39
Introduction to the restraint sys-
tem .................................................. 39
Occupant Classification System
(OCS) ............................................... 46
PASSENGER AIR BAG indicator
lamps ............................................... 40
Pets in the vehicle ........................... 60
PRE-SAFE
®(anticipatory occu-
pant protection) ............................... 53
PRE-SAFE
®PLUS (anticipatory
occupant protection PLUS) .............. 54
14Index
Page 23 of 366

PSI (pounds per square inch) (def-
inition) ...........................................340
Replacing ....................................... 341
Service life ..................................... 322
Sidewall (definition) ....................... 340
Snow chains .................................. 323
Speed rating (definition) ................ 339
Storing ...........................................3 41
Structure and characteristics
(definition) ..................................... 338
Summer tires in winter .................. 323
Temperature .................................. 335
TIN (Tire Identification Number)
(definition) ..................................... 340
Tire bead (definition) ......................3 40
Tire pressure (definition) ................ 340
Tire pressures (recommended) ...... 339
Tire size (data) ............................... 345
Tire size designation, load-bearing
capacity, speed rating .................... 335
Tire tread ....................................... 322
Tire tread (definition) ..................... 340
Total load limit (definition) ............. 340
Traction ......................................... 334
Traction (definition) ....................... 340
Tread wear ..................................... 334
TWR (permissible trailer drawbar
noseweight) (definition) ................. 340
Uniform Tire Quality Grading
Standards ...................................... 334
Uniform Tire Quality Grading
Standards (definition) .................... 339
Wear indicator (definition) ............. 340
Wheel and tire combination ........... 345
Wheel rim (definition) .................... 339
see Flat tire
Top Tether ............................................ 57
Tow-starting
Emergency engine starting ............ 318
Important safety notes .................. 316
Towing a trailer
Axle load, permissible .................... 361
Cleaning the trailer tow hitch ......... 304
Coupling up a trailer ...................... 202
Decoupling a traile r ....................... 204
Dri
ving tips .................................... 200
ESP
®(Electronic Stability Pro-
gram) ............................................... 66 Important safety notes .................. 199
Installing the ball coupling ............. 201
Lights display message .................. 233
Mounting dimensions .................... 361
Parking Assist PARKTRONIC .......... 174
Power supply ................................. 205
Pulling away with a trailer .............. 128
Removing the ball coupling ............ 205
Trailer loads ................................... 361
Towing away
Important safety guidelines ........... 316
Installing the towing eye ................ 317
Notes for 4MATIC vehicles ............ 318
Removing the towing eye ............... 317
Transporting the vehicle ................ 318
With both axles on the ground ....... 317
Towing eye ......................................... 306
Traffic reports
see also Digital Operator's Man-
ual .................................................. 263
Traffic Sign Assist
Display message ............................ 239
Function/notes ............................. 190
Important safety notes .................. 190
Instrument cluster display ............. 190
Trailer coupling
see Towing a trailer
Trailer loads and drawbar nose-
weights ............................................... 204
Trailer towing
Active Blind Spot Assist ................. 197
Active Lane Keeping Assist ............ 199
Blind Spot Assist ............................ 193
Permissible trailer loads and
drawbar noseweights ..................... 204
Transfer case ..................................... 139
Transmission
see Automatic transmission
Transmission position display ......... 134
Transporting the vehicle .................. 318
Traveling uphill
Brow of hill ..................................... 156
Driving downhill ............................. 157
Maximum gradient-climbing capa-
bility ............................................... 156
Trim pieces (cleaning instruc-
tions) .................................................. 305
Index21
Page 25 of 366
Overview .......................................... 33
Parking brake ................................ 258
PASSENGER AIR BAG ......................40
Reserv efuel .................................. .259
Restraint system ............................ 258
Seat belt ........................................ 250
Tire pressure monitor .................... 262
Warranty .............................................. 25
Washer fluid
Display message ............................ 248
Weather display (COMAND)
see also Digital Operator's Man-
ual ..................................................2 63
Wheel and tire combinations
Tires ............................................... 345
Wheel bolt tightening torque ........... 345
Wheel chock ...................................... 342
Wheels
Changing a wheel .......................... 341
Checking ........................................ 321
Cleaning ......................................... 301
Emergency spare wheel ................. 346
Important safety notes .................. 321
Information on driving .................... 321
Interchanging/changing ................ 341
Mounting a new wheel ................... 344
Mounting a wheel .......................... 341
Overview ........................................ 321
Removing a wheel .......................... 343
Snow chains .................................. 323
Storing ...........................................3 41
Tightening torque ........................... 345
Wheel size/tire size ....................... 345
Window curtain air bag
Display message ............................ 230
Operation ......................................... 46
Windows
see Side windows
Windshield
Defrosting ...................................... 120
Windshield washer fluid
see Windshield washer system
Windshield washer system
Adding washer fluid ....................... 297
Important safety notes .................. 357
Windshield wi pers
Probl
em (malfunction) ................... 112
Replacing the wiper blades ............ 110 Switching on/off ........................... 109
Winter driving
Slippery road surfaces ................... 153
Winter operation
Overview ........................................ 323
Radiator cover ............................... 295
Winter tires
M+S tires ....................................... 323
Wiper blades
Cleaning ......................................... 302
Replacing ....................................... 110
Replacing (windshield) ................... 110
Wooden trim (cleaning instruc-
tions) .................................................. 305
Z
ZONE function
Switching on/off ........................... 120
Index23
Page 54 of 366

repaired. This will help to make sure the air bags
continue to perform their protective function for
the vehicle occupants in the event of a crash.
GWARNING
Emergency Tensioning Devices that have
deployed pyrotechnically are no longer opera-
tional and are unable to perform their inten-
ded protective function. This poses an
increased risk of injury or even fatal injury.
Have pyrotechnically triggered Emergency
Tensioning Devices replaced immediately at a
qualified specialist workshop.
An electric motor is used by PRE-SAFE
®to trig-
ger the tightening of the seat belt in hazardous
situations. This procedure is reversible.
If Emergency Tensioning Devices are triggered
or air bags are deployed, you will hear a bang,
and a small amount of powder may also be
released. The 6restraint system warning
lamp lights up.
Only in rare cases will the bang affect your hear-
ing. The powder that is released generally does
not constitute a health hazard, but it may cause short-term breathing difficulties in people with
asthma or other respiratory problems. Provided
it is safe to do so, you should leave the vehicle
immediately or open the window in order to pre-
vent breathing difficulties.
Air bags and pyrotechnic Emergency Tensioning
Devices (ETDs) contain perchlorate material,
which may require special handling and regard
for the environment. National guidelines must
be observed during disposal. In California, see
www.dtsc.ca.gov/HazardousWaste/
Perchlorate/index.cfm.
Method of operation
During the first stage of a collision, the restraint
system control unit evaluates important physi-
cal data relating to vehicle deceleration or accel-
eration, such as:
Rduration
Rdirection
Rintensity
Based on the evaluation of this data, the
restraint system control unit triggers the Emer-
gency Tensioning Devices during a frontal or
rear collision. An Emergency Tensioning Device can only be
triggered, if:
Rthe ignition is switched on
Rthe components of the restraint system are
operational. You can find further information
under: "Restraint system warning lamp"
(
Ypage 40)
Rthe belt tongue is engaged in the buckle on
the respective front-passenger seat
The Emergency Tensioning Devices in the rear
compartment are triggered independently of the
lock status of the seat belts.
If the restraint system control unit detects a
more severe accident, further components of
the restraint system are activated independ-
ently of each other in certain frontal collision
situations:
RFront air bags and driver's knee bag
RWindow curtain air bag, if the system deter-
mines that deployment can offer additional
protection to that provided by the seat belt
The front-passenger front air bag is activated or
deactivated depending on the person on the
front-passenger seat. The front-passenger front
air bag can only deploy in an accident if the
PASSENGER AIR BAG OFF indicator lamp is off.
Observe the information on the PASSENGER AIR
BAG indicator lamps (
Ypage 40).
Your vehicle has two-stage front air bags. During
the first deployment stage, the front air bag is
filled with propellant gas to reduce the risk of
injuries. The front air bag is fully deployed with
the maximum amount of propellant gas if a sec- ond deployment threshold is reached within a
few milliseconds.
The activation threshold of the Emergency Ten-
sioning Devices and the air bag are determined
by evalua ting the ra
te of vehicle deceleration or
acceleration which occurs at various points in
the vehicle. This process is pre-emptive in
nature. Deployment should take place in good
time at the start of the collision.
The rate of vehicle deceleration or acceleration
and the direction of the force are essentially
determined by:
Rthe distribution of forces during the collision
Rthe collision angle
Rthe deformation characteristics of the vehicle
Rthe characteristics of the object with which
the vehicle has collided
Factors which can only be seen and measured
after a collision has occurred do not play a deci-
52Occupant safety
Safety
Page 90 of 366
tion remains active for five minutes or until you
open a front door.
When a roof carrier is mounted the panorama
roof with power tilt/sliding panel cannot be
opened. The panorama roof with power tilt/slid-
ing panel can still be raised to allow ventilation
of the vehicle interior.
If the panorama roof with power tilt/sliding
panel makes contact with a roof carrier
approved by Mercedes-Benz, the sunroof will
lower slightly but remain raised at the rear.
Rain-closing feature
The raised panorama roof with power tilt/slidingpanel automatically lowers when driving if it
starts to rain. The sliding sunroof is lowered
depending on:
Rthe road speed and
Rthe intensity of the rain
You can manually cancel the automatic closing
procedure. Press or pull the 3switch in any
direction.
To raise the panorama roof with power tilt/slid- ing panel again, press the 3switch in direc-
tion :. The rain-closing feature remains acti-
vated.
Operating the roller sunblind for the
panorama roof with power tilt/sliding
panel
Important safety notes
GWARNING
Parts of the body could become trapped
between the roller sunblind and frame or slid-
ing sunroof during automatic opening or clos-
ing. There is a risk of injury.
When opening or closing, make sure that no
body parts are in the sweep of the roller sun-
blind.
If somebody becomes trapped:
Rrelease the switch immediately, or
Rduring automatic operation, push the
switch briefly in any direction
The opening or closing procedure will be stop- ped. The roller sunblind shields the vehicle interior
from sunlight. The roller sunblind can only be
closed when the panorama roof with power tilt/
sliding panel is closed.
Roller sunblind reversing feature
The roller sunblind is equipped with an auto-
matic reversing feature. If a solid object blocks
or restricts the roller sunblind during the closing
process, the roller sunblind opens again auto-
matically. The automatic reversing feature is
only an aid and is not a substitute for your atten-
tiveness to the roller sunblind while it is closing.
GWARNING
The reversing feature does not react:
Rto soft, light and thin objects, e.g. small fin-
gers
Rwhen closing the roller sunblind again man-
ually immediately after automatic reversal
This means that the reversing feature cannot
prevent someone being trapped in these sit-
uations. There is a risk of injury.
When closing the roller sunblind, make sure
that no body parts are in the sweep area.
If somebody becomes trapped:
Rrelease the switch immediately, or
Rpress the switch in any direction during the
automatic closing process
The closing process is stopped.
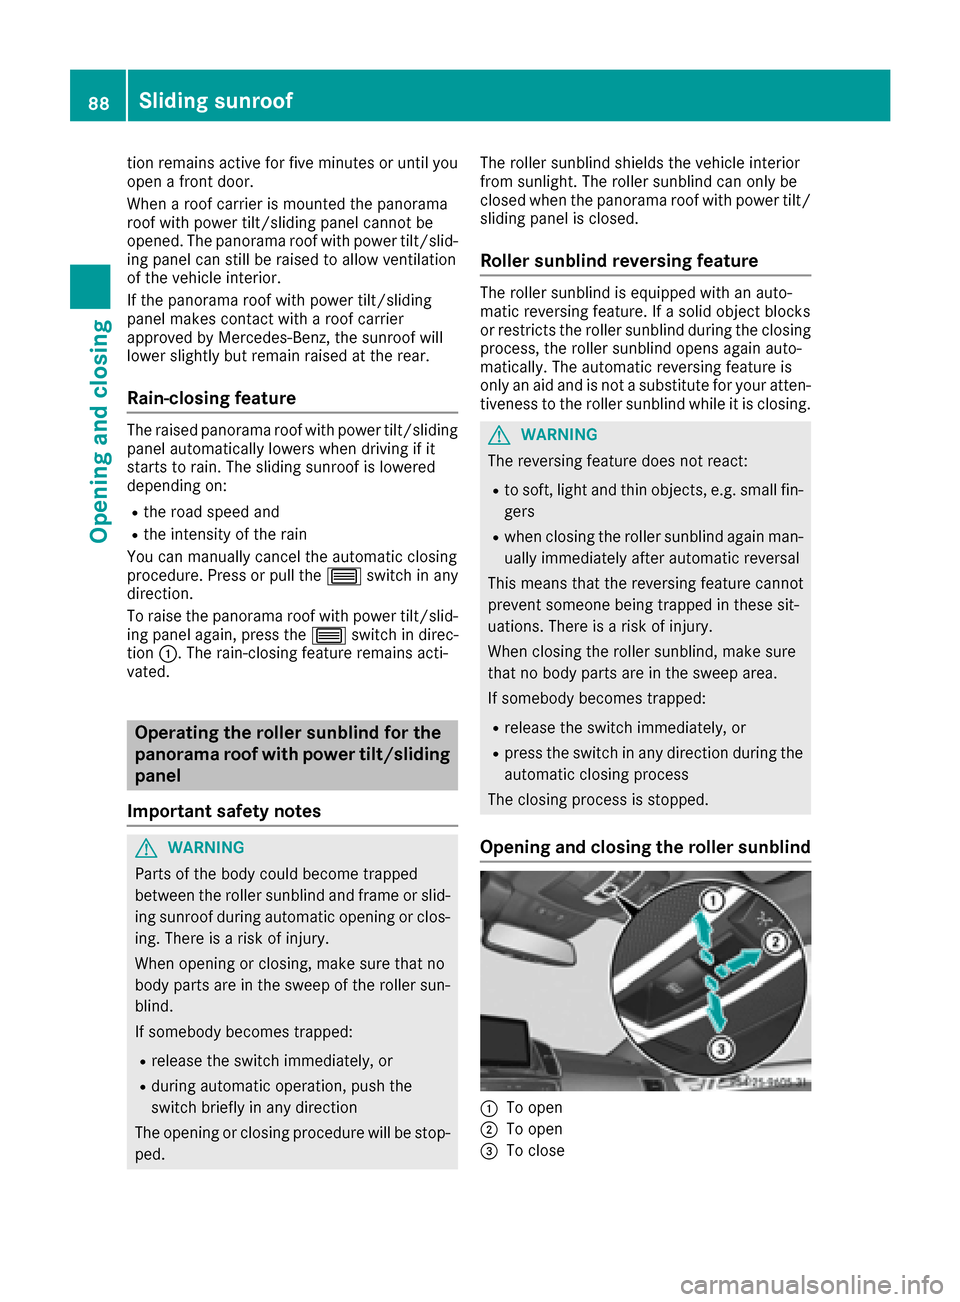
Opening and closing the roller sunblind
:To open
;To open
=To close
88Sliding sunroof
Opening and closing
Page 115 of 366
Overview of climate control systems
General notes
Observe the settings recommended on the fol-
lowing pages. The windows could otherwise fog
up.
To prevent the windows from fogging up:
Rswitch off climate control only briefly
Rswitch on air-recirculation mode only briefly
Rswitch on the cooling with air dehumidifica-
tion function
Rswitch on the defrost windshield function
briefly, if required
Climate control regulates the temperature and
the humidity in the vehicle interior and filters
undesirable substances out of the air.
The residual heat function can only be activated
or deactivated with the ignition switched off
(
Ypage 121).
iVentilate the vehicle for a brief period during
warm weather, e.g. using the convenience
opening feature (
Ypage 84).
This will speed up the cooling process and the
desired interior temperature will be reached
more quickly. If you start the engine using your smartphone,
the last selected climate control setting is reac-
tivated (
Ypage 127).
iThe integrated filter filters out most parti-
cles of dust and soot and completely filters
out pollen. It also reduces gaseous pollutants
and odors. A clogged filter reduces the
amount of air supplied to the vehicle interior.
For this reason, you should always observe
the interval for replacing the filter, which is
specified in the Maintenance Booklet. As it
depends on environmental conditions, e.g.
heavy air pollution, the interval may be
shorter than stated in the Maintenance Book-
let.
iVehicles with AIR-BALANCE package: in
addition to ionization, the vehicle has an air
filter with anti-allergenic properties that con-
tribute to improved air filtration.
iIt is possible that under certain circumstan-
ces the residual heat function may be activa-
ted automatically an hour after the SmartKey
has been removed in order to dry the auto-
matic climate control. The vehicle is then ven-
tilated for 30 minutes.
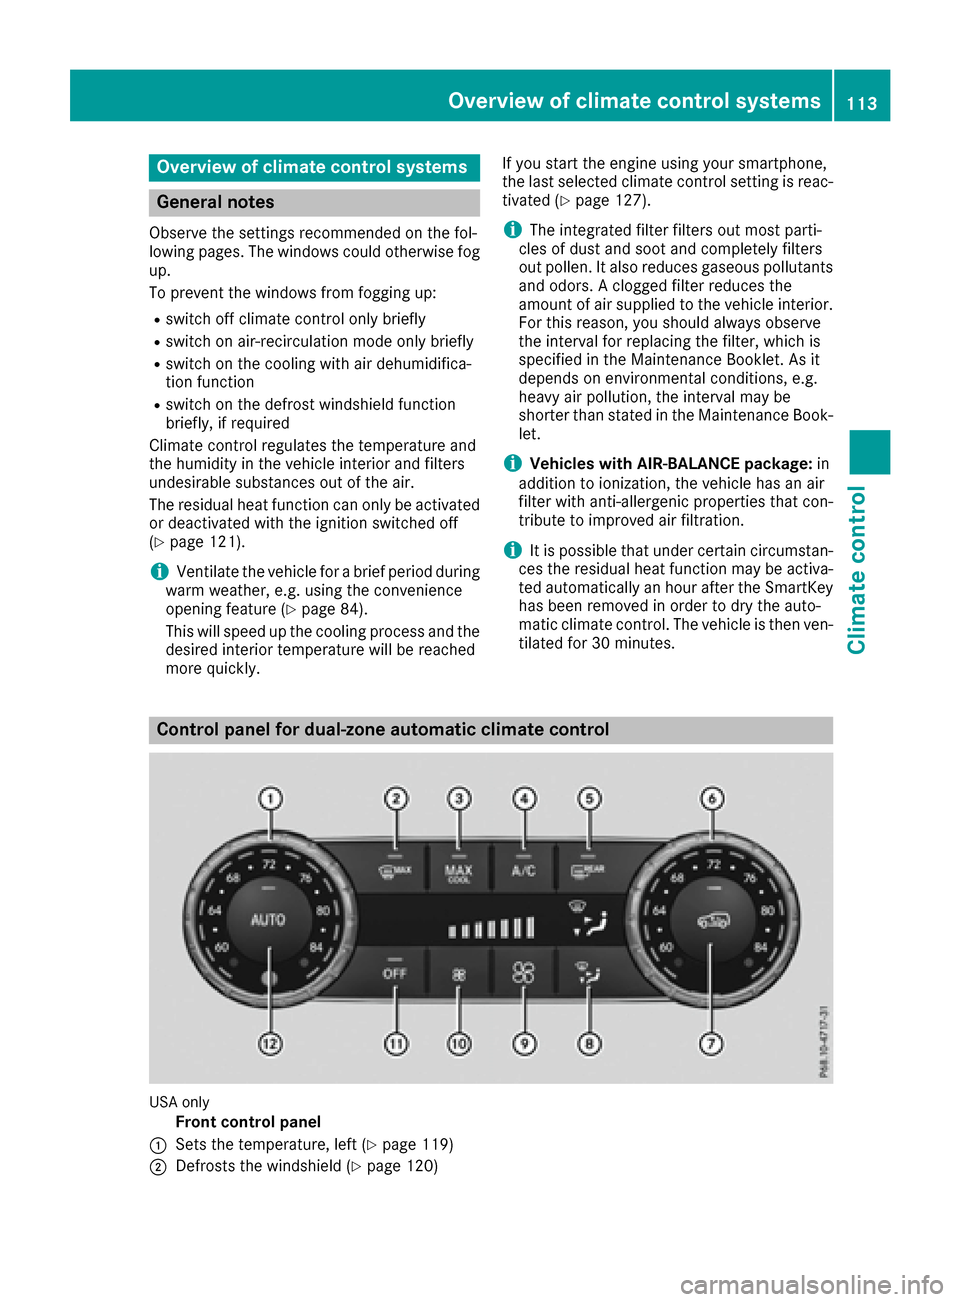
Control panel for dual-zone automatic climate control
USA only
Front control panel
:Sets the temperature, left (Ypage 119)
;Defrosts the windshield (Ypage 120)
Overview of climate control systems113
Climate control
Page 139 of 366
Temporary setting
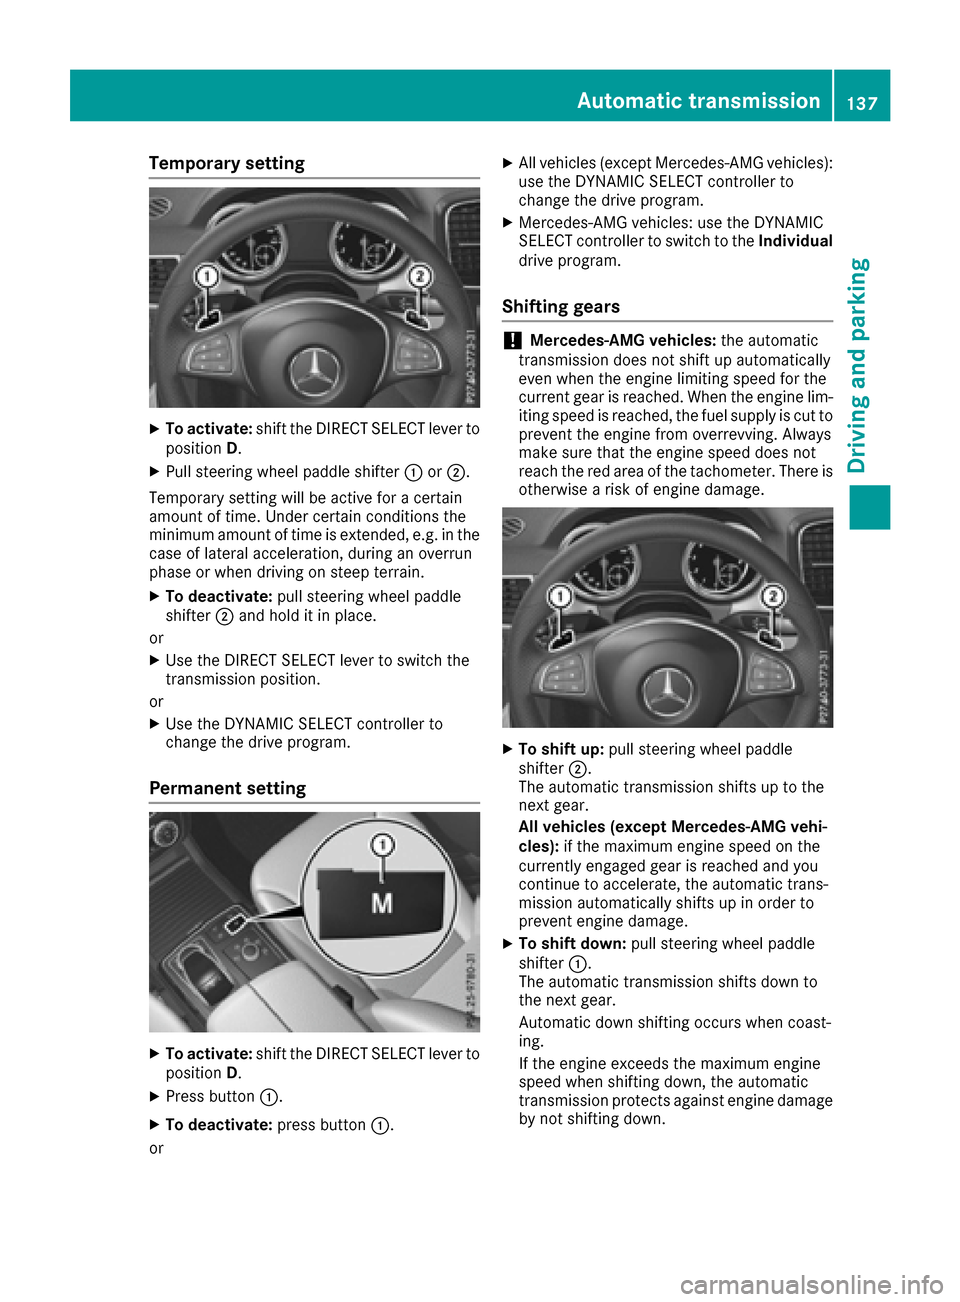
XTo activate:shift the DIRECT SELECT lever to
position D.
XPull steering wheel paddle shifter :or;.
Temporary setting will be active for a certain
amount of time. Under certain conditions the
minimum amount of time is extended, e.g. in the case of lateral acceleration, during an overrun
phase or when driving on steep terrain.
XTo deactivate: pull steering wheel paddle
shifter ;and hold it in place.
or
XUse the DIRECT SELECT lever to switch the
transmission position.
or
XUse the DYNAMIC SELECT controller to
change the drive program.
Permanent setting
XTo activate: shift the DIRECT SELECT lever to
position D.
XPress button :.
XTo deactivate: press button:.
or
XAll vehicles (except Mercedes-AMG vehicles):
use the DYNAMIC SELECT controller to
change the drive program.
XMercedes-AMG vehicles: use the DYNAMIC
SELECT controller to switch to the Individual
drive program.
Shifting gears
!Mercedes-AMG vehicles: the automatic
transmission does not shift up automatically
even when the engine limiting speed for the
current gear is reached. When the engine lim-
iting speed is reached, the fuel supply is cut to
prevent the engine from overrevving. Always
make sure that the engine speed does not
reach the red area of the tachometer. There is
otherwise a risk of engine damage.
XTo shift up: pull steering wheel paddle
shifter ;.
The automatic transmission shifts up to the
next gear.
All vehicles (except Mercedes-AMG vehi-
cles): if the maximum engine speed on the
currently engaged gear is reached and you
continue to accelerate, the automatic trans-
mission automatically shifts up in order to
prevent engine damage.
XTo shift down: pull steering wheel paddle
shifter :.
The automatic transmission shifts down to
the next gear.
Automatic down shifting occurs when coast-
ing.
If the engine exceeds the maximum engine
speed when shifting down, the automatic
transmission protects against engine damage
by not shifting down.
Automatic transmission137
Driving an d parking
Z