2017 MERCEDES-BENZ GLE COUPE Breakdown
[x] Cancel search: BreakdownPage 5 of 366

Breakdown assistance.....................306
Where will I find...? .............................. 306
Flat tire ................................................ 306
Battery (vehicle) .................................. 311
Jump-starting ....................................... 313
Towing and tow-starting ...................... 316
Fuses ................................................... 318
Wheels and tires ............................... 321
Important safety notes ........................ 321
Operation ............................................ 321
Winter operation .................................. 323
Tire pressure ....................................... 324
Loading the vehicle .............................. 331
All about wheels and tires ................... 334
Changing a wheel ................................ 341
Wheel and tire combinations ............... 345
Emergency spare wheel ....................... 346
Technical data ................................... 350
Information regarding technical data ... 350
Vehicle electronics .............................. 350
Identification plates ............................. 351
Service products and filling capaci-
ties ...................................................... 352
Vehicle data ......................................... 358
Vehicle data for off-road driving .......... 359
Trailer tow hitch ................................... 361
Contents3
Page 8 of 366

Ball couplingInstalling ........................................ 201
Removing ....................................... 205
BAS (Brake Assist System) ................. 61
Battery (SmartKey)
Checking .......................................... 74
Important safety notes .................... 74
Replacing ......................................... 74
Battery (vehicle)
Charging ........................................ 313
Display message ............................ 235
Important safety notes .................. 311
Jump starting ................................. 313
Overview ........................................ 311
Blind Spot Assist
Activating/deactivating ................. 214
Display message ............................ 240
Notes/function .............................. 191
Trailer towing ................................. 193
see Active Blind Spot Assist
Blootooth
®
Connecting a different mobile
phone ............................................ 268
BlueTEC
Adding DEF .................................... 142
BlueTEC (DEF) .................................... 355
Bluetooth
®
Searching for a mobile phone ........ 267
see also Digital Operator's Man-
ual .................................................. 263
Telephony ...................................... 266
Brake fluid
Display message ............................ 227
Notes ............................................. 356
Brake force distribution
see EBD (electronic brake force
distribution)
Brake lamps
Display message ............................ 233
Brakes
ABS .................................................. 61
Adaptive Brake Assist ...................... 63
BAS .................................................. 61
Brake fluid (notes) ......................... 356
Display message ............................ 222
Hill start assist ............................... 128
Important safety notes .................. 150 Maintenance .................................. 151
Parking brake ................................ 146
Riding tips ...................................... 150
Warning lamp ................................. 252
Breakdown
Where will I find...? ........................ 306
see Flat tire
see Towing away
Brightness control (instrument
cluster lighting) ................................... 33
C
California
Important notice for retail cus-
tomers and lessees .......................... 25
Calling up a malfunction
see Display messages
Care
360° camera ................................. 303
Car wash ........................................ 299
Carpets .......................................... 305
Display ........................................... 304
Exhaust pipe .................................. 303
Exterior lights ................................ 302
Gear or selector lever .................... 304
Interior ........................................... 304
Matte finish ................................... 301
Notes ............................................. 299
Paint .............................................. 301
Plastic trim .................................... 304
Power washer ................................ 300
Rear view camera .......................... 303
Roof lining ...................................... 305
Seat belt ........................................ 305
Seat cover ..................................... 305
Sensors ......................................... 303
Side running board ........................ 302
Steering wheel ............................... 304
Trim pieces .................................... 305
Washing by hand ........................... 300
Wheels ........................................... 301
Windows ........................................ 302
Wiper blades .................................. 302
Wooden trim .................................. 305
Cargo compartment enlargement
Important safety notes .................. 273
6Index
Page 19 of 366

Rear-view mirrorAnti-glare (manual) .......................... 99
Dipping (automatic) ....................... 101
Refrigerant (air-conditioning sys-
tem)
Important safety notes .................. 357
Refueling
Fuel gauge ....................................... 33
Important safety notes .................. 139
Refueling process .......................... 140
see Fuel
Remote control
Garage door opener ....................... 289
Programming (garage door
opener) .......................................... 290
Replacing bulbs
General notes ................................ 109
Reporting safety defects .................... 29
Rescue card ......................................... 29
Reserve (fuel tank)
see Fuel
Reserve fuel
Display message ............................ 236
Warning lamp ................................. 259
Residual heat (climate control) ........ 121
Restraint system
Display message ............................ 229
Introduction ..................................... 39
Warning lamp ................................. 258
Warning lamp (function) ................... 40
Reversing feature
Panorama sliding sunroof ................ 87
Roller sunblind ................................. 88
Side windows ................................... 83
Tailgate ............................................ 79
Reversing lamps (display mes-
sage) ................................................... 233
Roadside Assistance (breakdown) .... 26
Roller sunblind
Panorama roof with power tilt/
sliding panel ..................................... 88
Roof carrier ........................................ 277
Roof lining and carpets (cleaning
guidelines) ......................................... 305
Roof load (maximum) ........................ 358
Route (navigation)
see Route guidance (navigation) Route guidance
see also Digital Operator's Man-
ual .................................................. 263
Route guidance (navigation) ............ 210
S
Safety
Children in the vehicle ..................... 55
see Occupant safety
see Operating safety
SD card
Inserting ........................................ 268
Inserting/removing ........................ 268
Removing ....................................... 268
SD memory card
see also Digital Operator's Man-
ual .................................................. 263
Selecting ........................................ 212
Search & Send
see also Digital Operator's Man-
ual .................................................. 263
Seat belts
Adjusting the driver's and front-
passenger seat belt ......................... 43
Adjusting the height ......................... 42
Cleaning ......................................... 305
Correct usage .................................. 42
Fastening ......................................... 42
Important safety guidelines ............. 41
Introduction ..................................... 40
Releasing ......................................... 43
Switching belt adjustment on/off
(on-board computer) ...................... 217
Warning lamp ................................. 250
Warning lamp (function) ................... 43
Seats
Adjusting (electrically) ..................... 93
Adjusting the 4-way lumbar sup-
port .................................................. 95
Adjusting the head restraint ............ 93
Calling up a stored setting (mem-
ory function) .................................. 103
Cleaning the cover ......................... 305
Correct driver's seat position ........... 91
Folding the rear bench seat for-
wards/back ................................... 273
Important safety notes .................... 91
Index17
Page 28 of 366
death or serious bodily injury if the vehicle is
driven, that defect or malfunction has been
subject to repair two or more times, and you
have directly notified Mercedes-Benz USA,
LLC in writing of the need for its repair.
(2) the same substantial defect or malfunction of a less serious nature than category (1)
has been subject to repair four or more
times and you have directly notified
Mercedes-Benz in writing of the need for its
repair.
(3) the vehicle is out of service by reason of repair of the same or different substantial
defects or malfunctions for a cumulative
total of more than 30 calendar days.
Please send your written notice to:
Mercedes-Benz USA, LLC
Customer Assistance Center
One Mercedes Drive
Montvale, NJ 07645-0350
Maintenance
The Service and Warranty Booklet describes all
the necessary maintenance work which should
be done at regular intervals.
Always have the Service and Warranty Booklet
with you when you bring the vehicle to an
authorized Mercedes-Benz Center. The service
advisor will record every service for you in the
Service and Warranty Booklet.
Roadside Assistance
The Mercedes-Benz Roadside Assistance Pro-
gram offers technical help in the event of a
breakdown. Calls to the toll-free Roadside Assis-
tance Hotline are answered by our agents 24
hours a day, 365 days a year.
1-800-FOR-MERCedes(1-800-367-6372)
(USA)
1-800-387-0100(Canada)
For additional information, refer to the
Mercedes-Benz Roadside Assistance Program
brochure (USA) or the "Roadside Assistance"
section in the Service and Warranty Booklet
(Canada). You will find both in the vehicle docu-
ment wallet.
Change of address or change of own-
ership
In the event of a change of address, please send us the "Notification of Address Change" in the
Service and Warranty Booklet or simply call the
Mercedes-Benz Customer Assistance Center
(USA) at the hotline number
1-800-FOR-MERCedes (1-800-367-6372) or
Customer Service Center (Canada) at
1-800-387-0100. This will assist us in contact-
ing you in a timely manner should the need arise.
If you sell your Mercedes, please leave all liter-
ature in the vehicle so that it is available to the
next owner.
If you have purchased a used car, please send us
the "Notification of Used Car Purchase" in the
Service and Warranty Booklet or simply call the
Mercedes-Benz Customer Assistance Center
(USA) at the hotline number
1-800-FOR-MERCedes (1-800-367-6372) or
Customer Service (Canada) at 1-800-387-0100.
Vehicle operation outside the USA
and Canada
When you are abroad with your vehicle, observe
the following points:
RService facilities or replacement parts may
not be readily available.
RLead-free fuel for vehicles with a catalytic
converter may not be available. Leaded fuel
can cause damage to the catalytic converter.
RThe fuel may have a considerably lower
octane number. Unsuitable fuel can cause
engine damage.
Some Mercedes-Benz models are available for
delivery in Europe through our European Deliv-
ery Program. For details, consult an authorized
Mercedes-Benz Center or write to one of the
following addresses.
In the USA
Mercedes-Benz USA, LLC
European Delivery Department
One Mercedes Drive
Montvale, NJ 07645-0350
In Canada
Mercedes-Benz Canada, Inc.
European Delivery Department
98 Vanderhoof Avenue
Toronto, Ontario M4G 4C9
26Introduction
Page 249 of 366
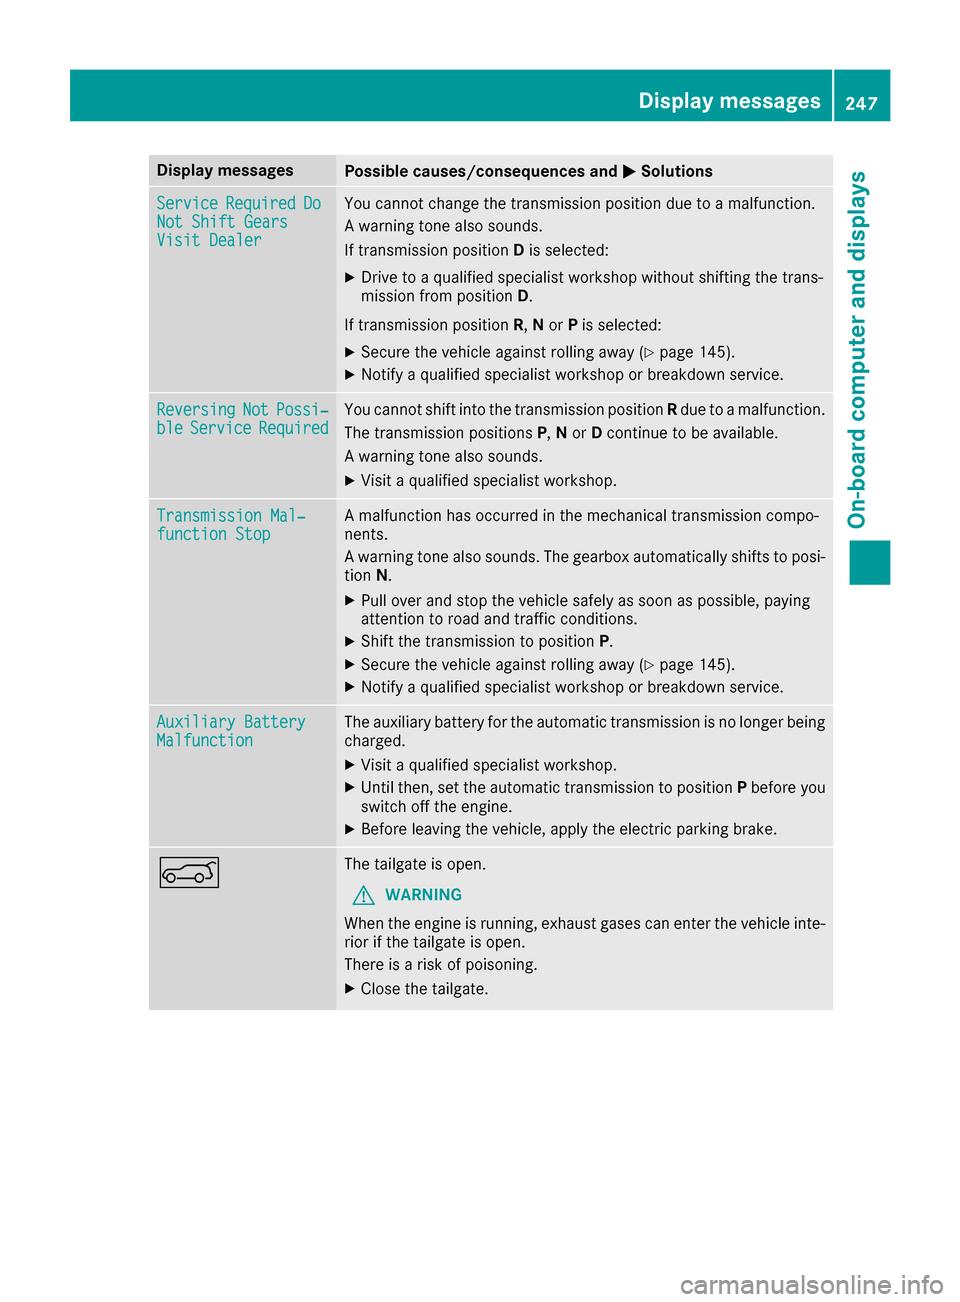
Display messagesPossible causes/consequences andMSolutions
ServiceRequiredDoNot Shift GearsVisit Dealer
You canno tchang eth etransmission position due to amalfunction .
A warning tone also sounds.
If transmission position Dis selected:
XDrive to aqualified specialist workshop without shifting th etrans -
mission from position D.
If transmission position R,N or Pis selected:
XSecur eth evehicl eagainst rollin gaway (Ypage 145).
XNotify aqualified specialist workshop or breakdown service.
ReversingNotPossi‐bleServic eRequiredYou canno tshift int oth etransmission position Rdue to amalfunction .
The transmission position sP,N or Dcontinu eto be available.
A warning tone also sounds.
XVisit aqualified specialist workshop .
Transmission Mal‐function StopAmalfunction has occurred in th emechanical transmission compo -
nents.
A warning tone also sounds. The gearbox automatically shift sto posi-
tion N.
XPull ove rand stop th evehicl esafely as soo nas possible, payin g
attention to roa dand traffic conditions.
XShift th etransmission to position P.
XSecureth evehicl eagainst rollin gaway (Ypage 145).
XNotify aqualified specialist workshop or breakdown service.
Auxiliary Batter yMalfunctionThe auxiliary battery for th eautomatic transmission is no longer bein g
charged.
XVisit aqualified specialist workshop .
XUntilthen ,set th eautomatic transmission to position Pbefore you
switch off th eengine.
XBefor eleaving th evehicle, apply th eelectric parking brake.
AThe tailgat eis open .
GWARNIN G
Whe nth eengin eis running, exhaust gase scan ente rth evehicl einte-
rio rif th etailgat eis open .
There is aris kof poisoning .
XCloseth etailgate.
Display messages24 7
On-board computer and displays
Z
Page 286 of 366
There is a risk of an accident and injury.
Leave the vehicle immediately in this or simi-lar situations as soon as it is safe to do so.
Move to a safe location along with other vehi-
cle occupants. In such situations, secure the
vehicle in accordance with national regula-
tions, e. g. with a warning triangle.
General notes
Observe the notes on system activation
(Ypage 283).
An emergency call is dialed automatically if an
air bag or Emergency Tensioning Device is trig-
gered. You cannot end an automatically trig-
gered emergency call yourself.
An emergency call can also be initiated man-
ually.
As soon as the emergency call has been initi-
ated, the indicator lamp in the SOS button
flashes. The Connecting Call
message
appears in the multifunction display.
The audio output is muted.
Once the connection has been made, the Call
Connectedmessage appears in the multifunc-
tion display.
All important information relating to the emer-
gency is transferred, for example:
Rcurrent location of the vehicle (as determined by the GPS system)
Rvehicle identification number
Rinformation on the severity of the accident
Shortly after the emergency call has been initi-
ated, a voice connection is automatically estab-
lished between the Customer Assistance Center
and the vehicle occupants.
RIf the vehicle occupants respond, the
Mercedes-Benz Customer Assistance Center
attempts to get more information on the
emergency.
RIf there is no response from the vehicle occu-
pants, an ambulance is immediately sent to
the vehicle.
If no voice connection can be established to the
Mercedes-Benz Customer Assistance Center,
the system has been unable to initiate an emer-
gency call.
This can occur, for example, if the relevant
mobile phone network is not available. The indi-
cator lamp in the SOS button flashes continu-
ously. The
Call Failed
message appears in the mul-
tifunction display and must be confirmed.
In this case, summon assistance by other
means.
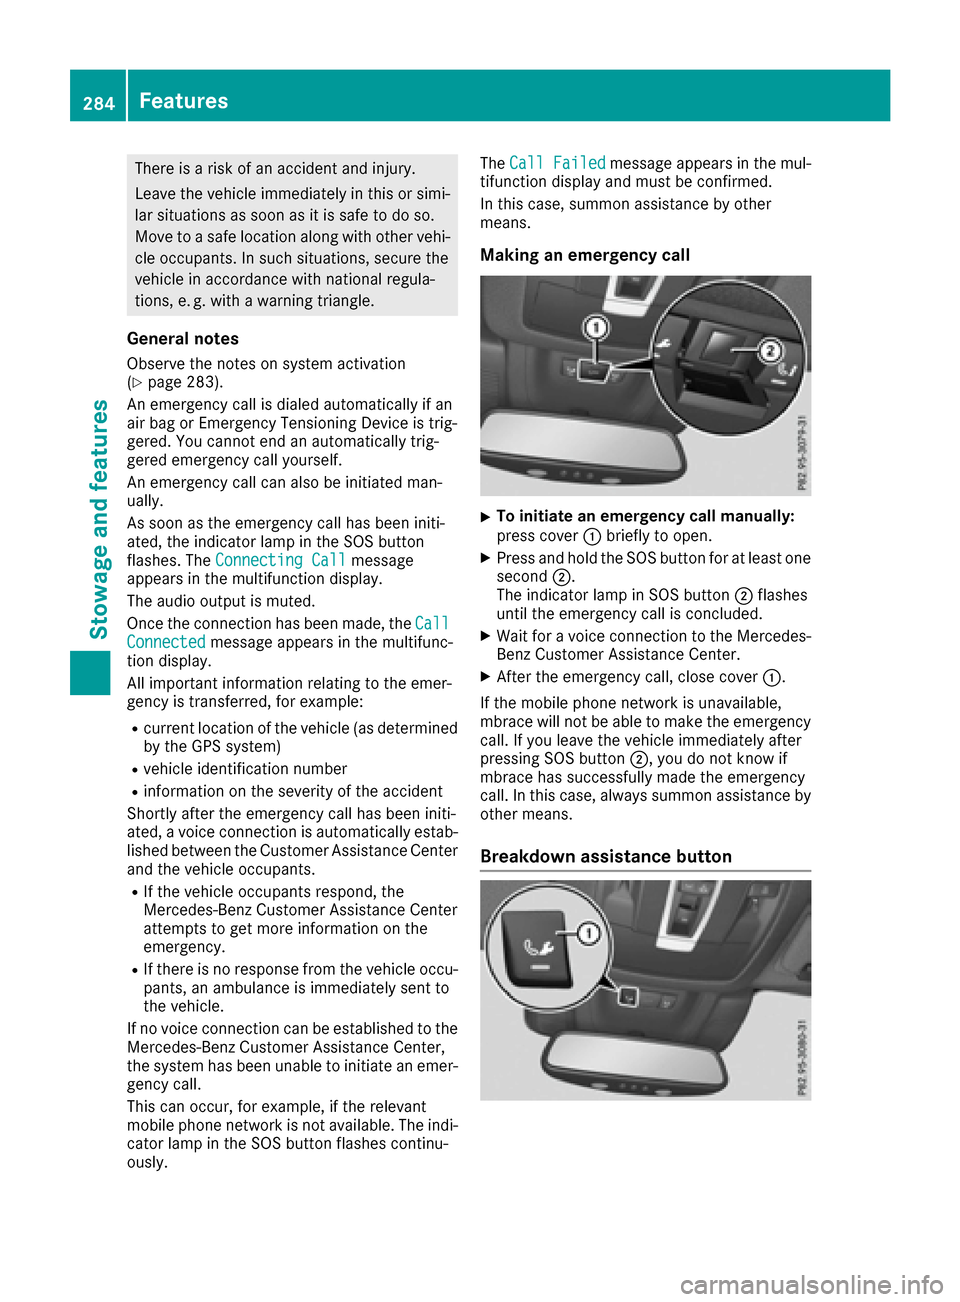
Making an emergency call
XTo initiate an emergency call manually:
press cover :briefly to open.
XPress and hold the SOS button for at least one
second ;.
The indicator lamp in SOS button ;flashes
until the emergency call is concluded.
XWait for a voice connection to the Mercedes-
Benz Customer Assistance Center.
XAfter the emergency call, close cover :.
If the mobile phone network is unavailable,
mbrace will not be able to make the emergency
call. If you leave the vehicle immediately after
pressing SOS button ;, you do not know if
mbrace has successfully made the emergency
call. In this case, always summon assistance by
other means.
Breakdown assistance button
284Features
Stowage and features
Page 308 of 366
Where will I find...?
Vehicle tool kit
General notes
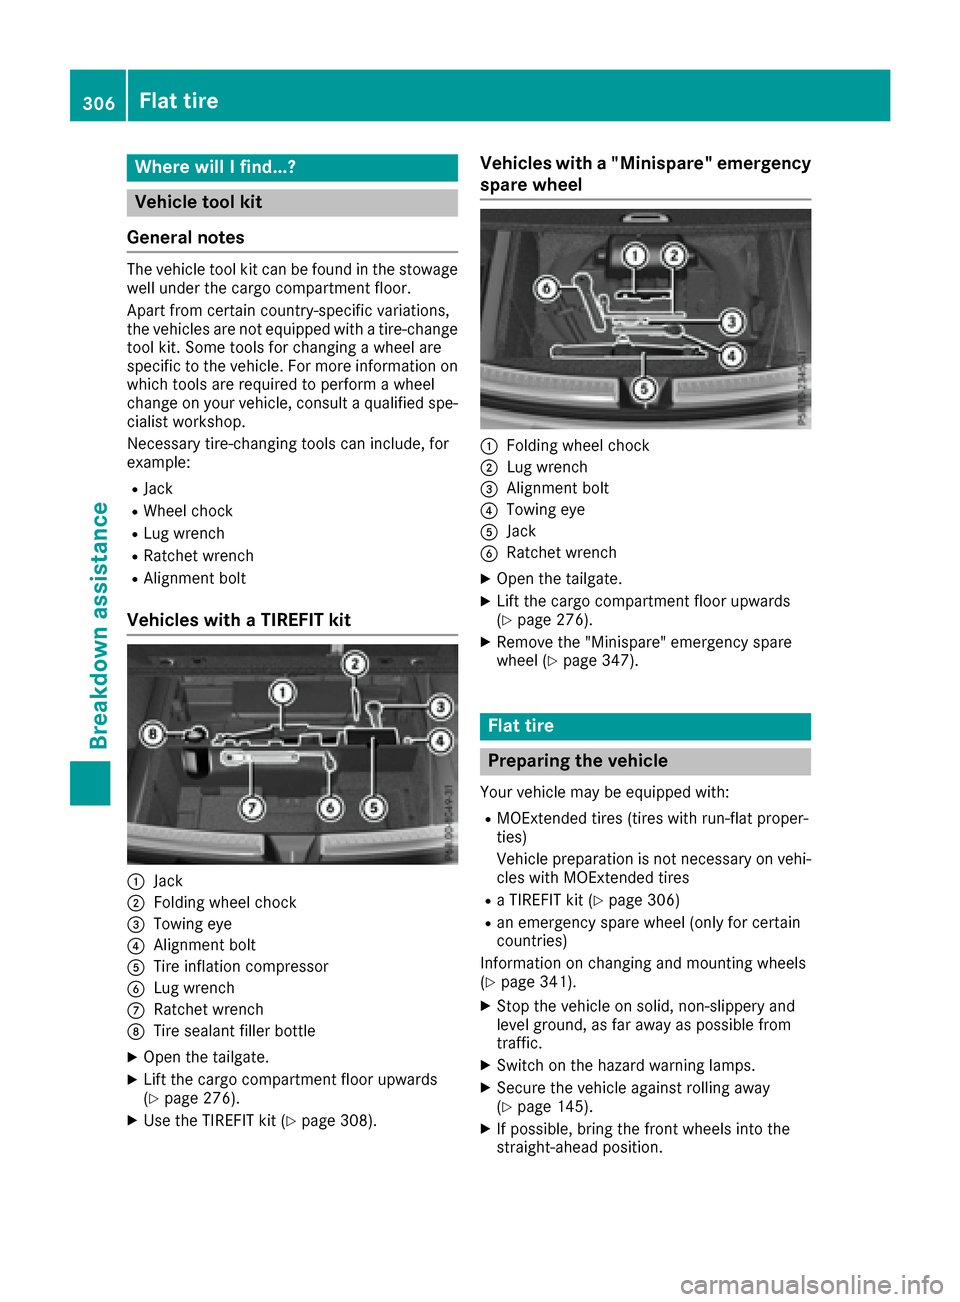
The vehicle tool kit can be found in the stowage
well under the cargo compartment floor.
Apart from certain country-specific variations,
the vehicles are not equipped with a tire-change
tool kit. Some tools for changing a wheel are
specific to the vehicle. For more information on
which tools are required to perform a wheel
change on your vehicle, consult a qualified spe-
cialist workshop.
Necessary tire-changing tools can include, for
example:
RJack
RWheel chock
RLug wrench
RRatchet wrench
RAlignment bolt
Vehicles with a TIREFIT kit
:Jack
;Folding wheel chock
=Towing eye
?Alignment bolt
ATire inflation compressor
BLug wrench
CRatchet wrench
DTire sealant filler bottle
XOpen the tailgate.
XLift the cargo compartment floor upwards
(Ypage 276).
XUse the TIREFIT kit (Ypage 308).
Vehicles with a "Minispare" emergency
spare wheel
:Folding wheel chock
;Lug wrench
=Alignment bolt
?Towing eye
AJack
BRatchet wrench
XOpen the tailgate.
XLift the cargo compartment floor upwards
(Ypage 276).
XRemove the "Minispare" emergency spare
wheel (Ypage 347).
Flat tire
Preparing the vehicle
Your vehicle may be equipped with:
RMOExtended tires (tires with run-flat proper-
ties)
Vehicle preparation is not necessary on vehi-
cles with MOExtended tires
Ra TIREFIT kit (Ypage 306)
Ran emergency spare wheel (only for certain
countries)
Information on changing and mounting wheels
(
Ypage 341).
XStop the vehicle on solid, non-slippery and
level ground, as far away as possible from
traffic.
XSwitch on the hazard warning lamps.
XSecure the vehicle against rolling away
(Ypage 145).
XIf possible, bring the front wheels into the
straight-ahead position.
306Flat tire
Breakdown assistance
Page 309 of 366
XVehicles with the AIRMATIC package:
make sure that the normal vehicle level is
selected (
Ypage 171).
XSwitch off the engine.
XVehicles without KEYLESS-GO:remove the
SmartKey from the ignition lock.
XVehicles with KEYLESS-GO: open the driv-
er's door.
The on-board electronics now have status 0.
This is the same as the SmartKey having been
removed.
XVehicles with KEYLESS-GO: remove the
Start/Stop button from the ignition lock
(
Ypage 125).
XMake sure that the engine cannot be started
via your smartphone (Ypage 127).
XMake sure that the passengers are not endan-
gered as they do so. Make sure that no one is
near the danger area while a wheel is being
changed. Anyone who is not directly assisting
in the wheel change should, for example,
stand behind the barrier.
XGet out of the vehicle. Pay attention to traffic
conditions when doing so.
XClose the driver's door.
XUnload heavy luggage.
iOnly operate the tire inflation compressor
using a 12 V socket, even if the ignition is
turned off (
Ypage 280).
An emergency cut-out ensures that the on-
board voltage does not drop too low. If the on-
board voltage is too low, the power to the
sockets is automatically cut. This ensures
that there is sufficient power to start the
engine.
MOExtended tires (tires with run-flat
properties)
General notes
With MOExtended tires (tires with run flat char-
acteristics), you can continue to drive your vehi-
cle even if there is a total loss of pressure in one
or more tires. The affected tire must not show
any clearly visible damage.
You can recognize MOExtended tires by the
MOExtended marking which appears on the
sidewall of the tire. You will find this marking
next to the tire size designation, the load-bear-
ing capacity and the speed index (
Ypage 335). MOExtended tires may only be used in conjunc-
tion with an active tire pressure loss warning
system or with an active tire pressure monitor.
If a pressure loss warning message appears
in the multifunction display:
Robserve the instructions in the display mes-
sages (Ypage 244).
Rcheck the tire for damage.
Rif driving on, observe the following notes.
The driving distance possible in run-flat mode is
approximately 50 miles (80 km) when the vehi-
cle is partially laden and approximately 18 miles
(30 km) when the vehicle is fully laden.
In addition to the vehicle load, the driving dis-
tance possible depends upon:
Rvehicle speed
Rroad condition
Routside temperature
The driving distance possible in run-flat mode
may be reduced by extreme driving conditions
or maneuvers, or it can be increased through a
moderate style of driving.
The driving dista
nce possible in run-flat mode is
counted from the moment the tire pressure loss
warning appears in the multifunction display.
You must not exceed a maximum speed of
50 mph (80 km/h).
When replacing one or all tires, please observe
the following specifications for your vehicle's
tires:
Rsize
Rtype and
Rthe "MOExtended" mark
Vehicles equipped with MOExtended tires are
not equipped with a TIREFIT kit at the factory. It
is therefore recommended that you additionally
equip your vehicle with a TIREFIT kit if you mount tires that do not feature run-flat properties, e.g.
winter tires. A TIREFIT kit may be obtained from
a qualified specialist workshop.
Important safety notes
GWARNING
When driving in emergency mode, the driving
characteristics deteriorate, e.g. when corner-
ing, accelerating quickly and when braking.
There is a risk of an accident.
Flat tire307
Breakdown assistance
Z