2017 MERCEDES-BENZ GLE COUPE Front door
[x] Cancel search: Front doorPage 9 of 366
Cargo compartment floorImportant safety notes .................. 276
Opening/closing ............................ 276
Stowage well (under) .................... .276
Cargo tie down rings ......................... 274
CD
see also Digital Operator's Man-
ual ..................................................2 63
CD player (on-board computer) ........212
Center console
Lower section .................................. 36
Upper section .................................. 35
Central locking
Automatic locking (on-board com-
puter) ............................................. 216
Locking/unlocking (SmartKey) ........7 1
Child
Restraint system .............................. 56
Child seat
Forward-facing restraint system ...... 59
LATCH-type (ISOFIX) child seat
anchors ............................................ 57
On the front-passenger seat ............ 58
Rearward-facing restraint system .... 58
Top Tether ...................................... .57
Child-proof locks
Important safety notes .................... 59
Rear doors ...................................... .60
Children
Special seat belt retractor .............. .55
Cigarette lighter ................................ 280
Cleaning
Mirror turn signal .......................... .302
Trailer tow hitch .............................3 04
C
limate control
Automatic climate control (3-
zone) .............................................. 115
Controlling automatically ...............1 18
Cooling with air dehumidification .. 118
Defrosting the windows ................. 120
Defrosting the windshield .............. 120
Dual-zone automatic climate con-
trol ................................................. 113
General notes ................................ 113
Indicator lamp ................................ 118
Ionization ....................................... 122
Maximum cooling .......................... 120 Notes on using the automatic cli-
mate control .................................. 117
Overview of systems ......................1
13
Problem with the rear window
defroster ........................................ 121
Problems with cooling with air
dehumidification ............................ 118
Rear control panel ......................... 115
Refrigerant ..................................... 357
Refrigerant filling capacity ............. 358
Setting the air distribution ............. 119
Setting the air vents ......................1 22
Setting the airflow ......................... 119
Setting the climate mode (AIR
FLOW) ............................................ 118
Setting the temperature ................ 119
Switching air-recirculation mode
on/off ............................................ 121
Switching on/off ........................... 117
Switching residual heat on/off ...... 121
Switching the rear window
defroster on/off ............................ 121
Switching the ZONE function
on/off ............................................ 120
Coat hooks ......................................... 276
Cockpit
Overview .......................................... 32
see Instrument cluster
Collapsible spare wheel
Inflating ......................................... 349
see Emergency spare wheel
COMAND
Switching on/off ........................... 264
COMAND display
Cleaning ......................................... 304
Combination switch .......................... 105
Connectin g a USB de
vice
see also Digital Operator's Man-
ual ..................................................2 63
Consumption statistics (on-board
computer) .......................................... 209
Controller ...........................................2 64
Convenience closing feature .............. 84
Convenience opening feature ............ 84
Coolant (engine)
Checking the level ......................... 297
Display message ............................ 234
Index7
Page 19 of 366

Rear-view mirrorAnti-glare (manual) .......................... 99
Dipping (automatic) ....................... 101
Refrigerant (air-conditioning sys-
tem)
Important safety notes .................. 357
Refueling
Fuel gauge ....................................... 33
Important safety notes .................. 139
Refueling process .......................... 140
see Fuel
Remote control
Garage door opener ....................... 289
Programming (garage door
opener) .......................................... 290
Replacing bulbs
General notes ................................ 109
Reporting safety defects .................... 29
Rescue card ......................................... 29
Reserve (fuel tank)
see Fuel
Reserve fuel
Display message ............................ 236
Warning lamp ................................. 259
Residual heat (climate control) ........ 121
Restraint system
Display message ............................ 229
Introduction ..................................... 39
Warning lamp ................................. 258
Warning lamp (function) ................... 40
Reversing feature
Panorama sliding sunroof ................ 87
Roller sunblind ................................. 88
Side windows ................................... 83
Tailgate ............................................ 79
Reversing lamps (display mes-
sage) ................................................... 233
Roadside Assistance (breakdown) .... 26
Roller sunblind
Panorama roof with power tilt/
sliding panel ..................................... 88
Roof carrier ........................................ 277
Roof lining and carpets (cleaning
guidelines) ......................................... 305
Roof load (maximum) ........................ 358
Route (navigation)
see Route guidance (navigation) Route guidance
see also Digital Operator's Man-
ual .................................................. 263
Route guidance (navigation) ............ 210
S
Safety
Children in the vehicle ..................... 55
see Occupant safety
see Operating safety
SD card
Inserting ........................................ 268
Inserting/removing ........................ 268
Removing ....................................... 268
SD memory card
see also Digital Operator's Man-
ual .................................................. 263
Selecting ........................................ 212
Search & Send
see also Digital Operator's Man-
ual .................................................. 263
Seat belts
Adjusting the driver's and front-
passenger seat belt ......................... 43
Adjusting the height ......................... 42
Cleaning ......................................... 305
Correct usage .................................. 42
Fastening ......................................... 42
Important safety guidelines ............. 41
Introduction ..................................... 40
Releasing ......................................... 43
Switching belt adjustment on/off
(on-board computer) ...................... 217
Warning lamp ................................. 250
Warning lamp (function) ................... 43
Seats
Adjusting (electrically) ..................... 93
Adjusting the 4-way lumbar sup-
port .................................................. 95
Adjusting the head restraint ............ 93
Calling up a stored setting (mem-
ory function) .................................. 103
Cleaning the cover ......................... 305
Correct driver's seat position ........... 91
Folding the rear bench seat for-
wards/back ................................... 273
Important safety notes .................... 91
Index17
Page 26 of 366
Protecting the environment
General notes
HEnvironmental note
Daimler's declared policy is one of compre-
hensive environmental protection.
The objectives are for the natural resources
that form the basis of our existence on this
planet to be used sparingly and in a manner
that takes the requirements of both nature
and humanity into account.
You too can help to protect the environment
by operating your vehicle in an environmen-
tally responsible manner.
Fuel consumption and the rate of engine,
transmission, brake and tire wear are affected by these factors:
Roperating conditions of your vehicle
Ryour personal driving style
You can influence both factors. You should
bear the following in mind:
Operating conditions:
Ravoid short trips as these increase fuel con-
sumption.
Ralways make sure that the tire pressures
are correct.
Rdo not carry any unnecessary weight.
Rremove roof racks once you no longer need
them.
Ra regularly serviced vehicle will contribute
to environmental protection. You should
therefore adhere to the service intervals.
Ralways have service work carried out at a
qualified specialist workshop.
Personal driving style:
Rdo not depress the accelerator pedal when
starting the engine.
Rdo not warm up the engine when the vehicle
is stationary.
Rdrive carefully and maintain a safe distance
from the vehicle in front.
Ravoid frequent, sudden acceleration and
braking.
Rchange gear in good time and use each gear
only up to Ôof its maximum engine speed.
Rswitch off the engine in stationary traffic.
Rkeep an eye on the vehicle's fuel consump-
tion.
Environmental concerns and recom-
mendations
Wherever the operating instructions require you
to dispose of materials, first try to regenerate or
re-use them. Observe the relevant environmen-
tal rules and regulations when disposing of
materials. In this way you will help to protect the
environment.
Genuine Mercedes-Benz parts
HEnvironmental note
Daimler AG also supplies reconditioned major
assemblies and parts which are of the same
quality as new parts. They are covered by the
same Limited Warranty entitlements as new
parts.
!Air bags and Emergency Tensioning Devi-
ces, as well as control units and sensors for
these restraint systems, may be installed in
the following areas of your vehicle:
Rdoors
Rdoor pillars
Rdoor sills
Rseats
Rcockpit
Rinstrument cluster
Rcenter console
Do not install accessories such as audio sys-
tems in these areas. Do not carry out repairs or welding. You could impair the operating
efficiency of the restraint systems.
Have aftermarket accessories installed at a
qualified specialist workshop.
You could jeopardize the operating safety of
your vehicle if you use parts, tires and wheels as
well as accessories relevant to safety which
have not been approved by Mercedes-Benz. This
could lead to malfunctions in safety-relevant
24Introduction
Page 39 of 366
Overhead control panel
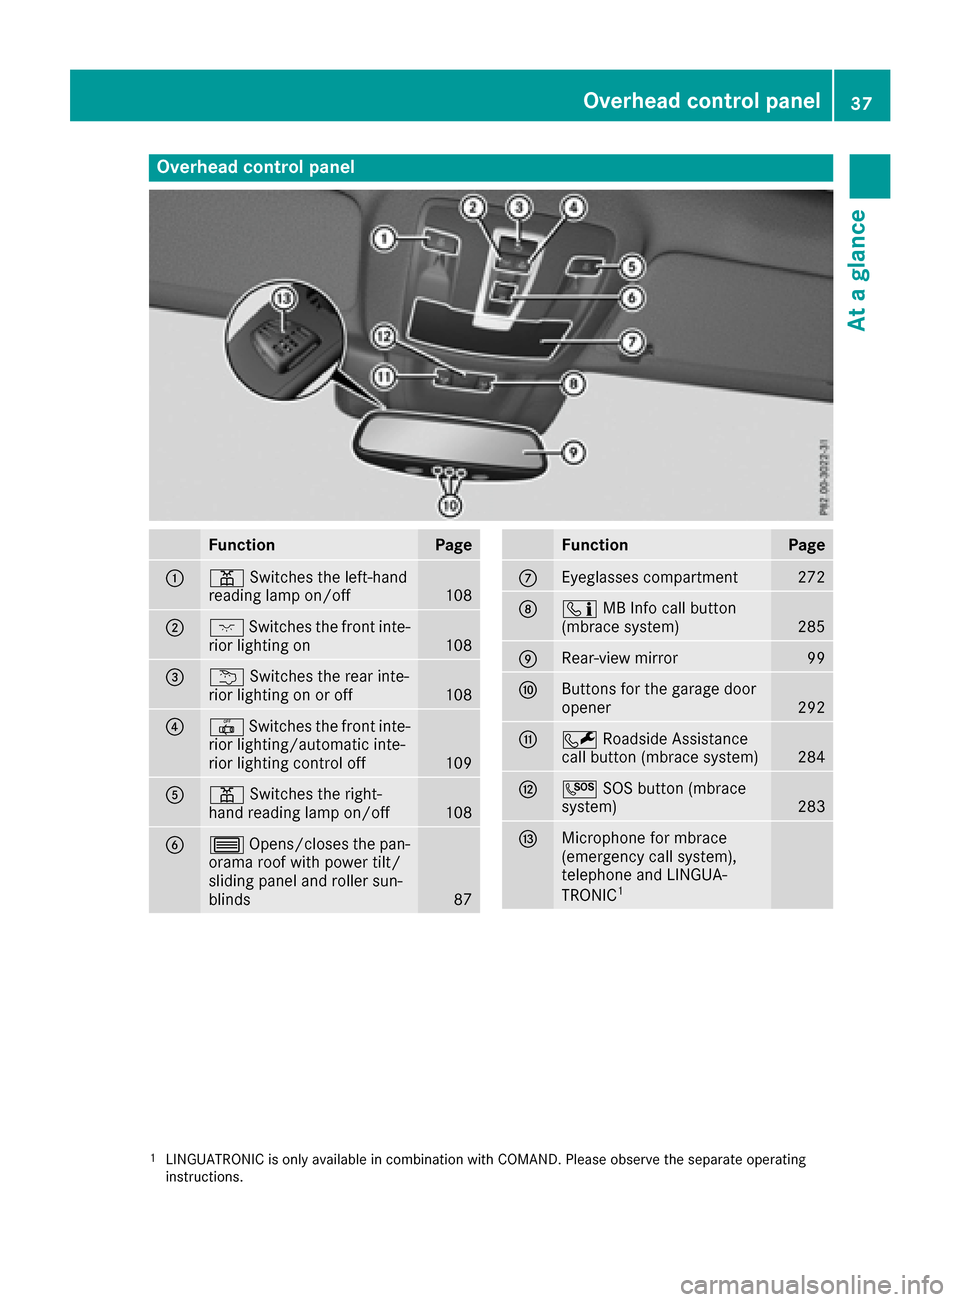
FunctionPage
:pSwitches the left-hand
reading lamp on/off108
;c Switches the front inte-
rior lighting on108
=u Switches the rear inte-
rior lighting on or off108
?| Switches the front inte-
rior lighting/automatic inte-
rior lighting control off
109
Ap Switches the right-
hand reading lamp on/off108
B3 Opens/closes the pan-
orama roof with power tilt/
sliding panel and roller sun-
blinds
87
FunctionPage
CEyeglasses compartment272
Dï MB Info call button
(mbrace system)285
ERear-view mirror99
FButtons for the garage door
opener292
GF Roadside Assistance
call button (mbrace system)284
HG SOS button (mbrace
system)283
IMicrophone for mbrace
(emergency call system),
telephone and LINGUA-
TRONIC
1
1LINGUATRONIC is only available in combination with COMAND. Please observe the separate operating
instructions.
Overhead control panel37
At a glance
Page 45 of 366
Basic illustration
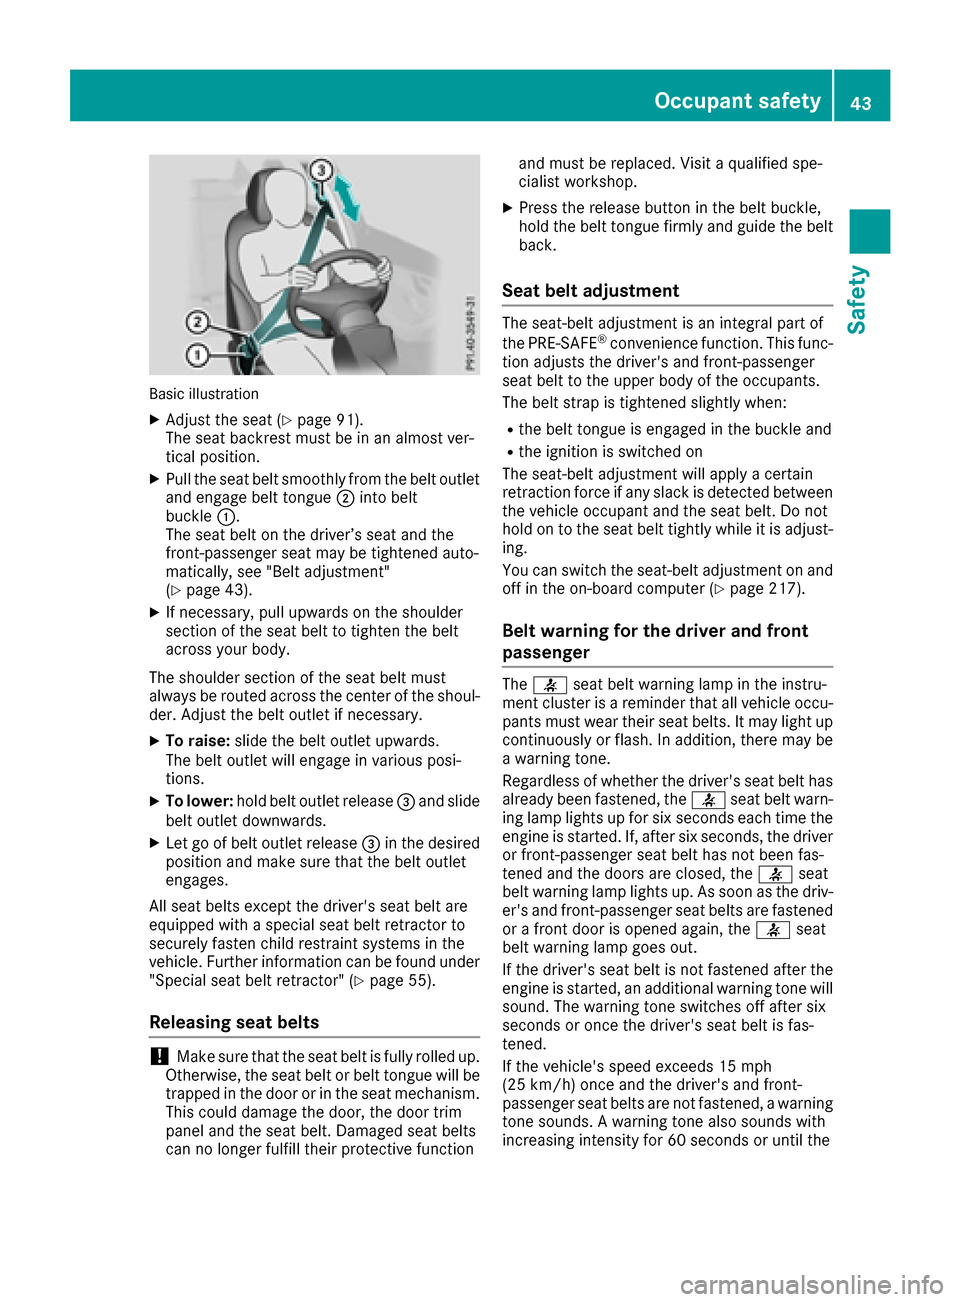
XAdjust the seat (Ypage 91).
The seat backrest must be in an almost ver-
tical position.
XPull the seat belt smoothly from the belt outlet
and engage belt tongue ;into belt
buckle :.
The seat belt on the driver’s seat and the
front-passenger seat may be tightened auto-
matically, see "Belt adjustment"
(
Ypage 43).
XIf necessary, pull upwards on the shoulder
section of the seat belt to tighten the belt
across your body.
The shoulder section of the seat belt must
always be routed across the center of the shoul-
der. Adjust the belt outlet if necessary.
XTo raise: slide the belt outlet upwards.
The belt outlet will engage in various posi-
tions.
XTo lower: hold belt outlet release =and slide
belt outlet downwards.
XLet go of belt outlet release =in the desired
position and make sure that the belt outlet
engages.
All seat belts except the driver's seat belt are
equipped with a special seat belt retractor to
securely fasten child restraint systems in the
vehicle. Further information can be found under
"Special seat belt retractor" (
Ypage 55).
Releasing seat belts
!Make sure that the seat belt is fully rolled up.
Otherwise, the seat belt or belt tongue will be
trapped in the door or in the seat mechanism.
This could damage the door, the door trim
panel and the seat belt. Damaged seat belts
can no longer fulfill their protective function and must be replaced. Visit a qualified spe-
cialist workshop.
XPress the release button in the belt buckle,
hold the belt tongue firmly and guide the belt
back.
Seat belt adjustment
The seat-belt adjustment is an integral part of
the PRE-SAFE®convenience function. This func-
tion adjusts the driver's and front-passenger
seat belt to the upper body of the occupants.
The belt strap is tightened slightly when:
Rthe belt tongue is engaged in the buckle and
Rthe ignition is switched on
The seat-belt adjustment will apply a certain
retraction force if any slack is detected between
the vehicle occupant and the seat belt. Do not
hold on to the seat belt tightly while it is adjust-
ing.
You can switch the seat-belt adjustment on and
off in the on-board computer (
Ypage 217).
Belt warning for the driver and front
passenger
The 7 seat belt warning lamp in the instru-
ment cluster is a reminder that all vehicle occu-
pants must wear their seat belts. It may light up
continuously or flash. In addition, there may be
a warning tone.
Regardless of whether the driver's seat belt has
already been fastened, the 7seat belt warn-
ing lamp lights up for six seconds each time the engine is started. If, after six seconds, the driver
or front-passenger seat belt has not been fas-
tened and the doors are closed, the 7seat
belt warning lamp lights up. As soon as the driv-
er's and front-passenger seat belts are fastened
or a front door is opened again, the 7seat
belt warning lamp goes out.
If the driver's seat belt is not fastened after the
engine is started, an additional warning tone will
sound. The warning tone switches off after six
seconds or once the driver's seat belt is fas-
tened.
If the vehicle's speed exceeds 15 mph
(25 km/h) once and the driver's and front-
passenger seat belts are not fastened, a warning
tone sounds. A warning tone also sounds with
increasing intensity for 60 seconds or until the
Occupant safety43
Safety
Z
Page 46 of 366
driver or front passenger have fastened their
seat belts.
If the driver or front passenger unfasten their
seat belts during the journey, the seat belt warn-
ing is activated again.
Air bags
Introduction
The installation point of an air bag can be rec-
ognized by the AIR BAG symbol.
An air bag complements the correctly fastened
seat belt. It is no substitute for the seat belt. The
air bag provides additional protection in appli-
cable accident situations.
Not all air bags are deployed in an accident. The
different air bag systems function independ-
ently from one another (
Ypage 51).
However, no system available today can com-
pletely eliminate injuries and fatalities.
It is also not possible to rule out a risk of injury
caused by an air bag due to the high speed at
which the air bag must be deployed.
Important safety notes
GWARNING
If you do not sit in the correct seat position,
the air bag cannot protect as intended and
could even cause additional injury when
deployed. This poses an increased risk of
injury or even fatal injury.
To avoid hazardous situations, always make
sure that all of the vehicle's occupants:
Rhave fastened their seat belts correctly,
including pregnant women
Rare sitting correctly and maintain the great-
est possible distance to the air bags
Rfollow the following instructions
Always make sure that there are no objects
between the air bag and the vehicle's occu-
pants.
RAdjust the seats properly before beginning
your journey. Always make sure that the seat
is in an almost upright position. The center of the head restraint must support the head at
about eye level.
RMove the driver's and front-passenger seats
as far back as possible. The driver's seat posi-
tion must allow the vehicle to be driven safely.
ROnly hold the steering wheel on the outside.
This allows the air bag to be fully deployed.
RAlways lean against the backrest while driv-
ing. Do not lean forwards or lean against the
door or side window. You may otherwise be in
the deployment area of the air bags.
RAlways keep your feet in the footwell in front
of the seat. Do not put your feet on the dash-
board, for example. Your feet may otherwise
be in the deployment area of the air bag.
RFor this reason, always secure persons less
than 5 ft (1.50 m) tall in suitable restraint sys-
tems. Up to this height, the seat belt cannot
be worn correctly.
If a child is traveling in your vehicle, also
observe the following notes:
RAlways secure children under twelve years of
age and less than 5 ft (1.50 m)tall in suitable
child restraint systems.
RChild restraint systems should be installed on
the rear seats.
ROnly secure a child in a rearward-facing child
restraint system on the front-passenger seat
when the front-passenger front air bag is
deactivated. If the PASSENGER AIR BAG OFF
indicator lamp is permanently lit, the front-
passenger front air bag is deactivated
(
Ypage 40).
RAlways observe the instructions and safety
notes on the "Occupant Classification System
(OCS)" (
Ypage 46) and on "Children in the
vehicle" (Ypage 55 )in addition to the child
restraint system manufacturer's installation
and operating instructions.
Objects in the vehicle interior may prevent
an air bag from functioning correctly. Before
starting your journey and to avoid risks resulting from the speed of the air bag as it deploys, make
sure that:
Rthere are no people, animals or objects
between the vehicle occupants and an air
bag.
Rthere are no objects between the seat, door
and B-pillar.
Rno hard objects, e.g. coat hangers, hang on
the grab handles or coat hooks.
44Occupant safety
Safety
Page 47 of 366
Rno accessories, such as cup holders, are
attached to the vehicle within the deployment
area of an air bag, e.g. to doors, side windows,
rear side trim or side walls.
Rno heavy, sharp-edged or fragile objects are in
the pockets of your clothing. Store such
objects in a suitable place.
GWARNING
If you modify the air bag cover or affix objects
such as stickers to it, the air bag can no longer
function correctly. There is an increased risk
of injury.
Never modify an air bag cover or affix objects
to it.
GWARNING
Sensors to control the air bags are located in
the doors. Modifications or work not per-
formed correctly to the doors or door panel-
ing, as well as damaged doors, can lead to the
function of the sensors being impaired. The air
bags might therefore not function properly
anymore. Consequently, the air bags cannot
protect vehicle occupants as they are
designed to do. There is an increased risk of
injury.
Never modify the doors or parts of the doors.
Always have work on the doors or door pan-
eling carried out at a qualified specialist work-
shop.
Front air bags
!Do not place heavy objects on the front-
passenger seat. This could cause the system
to identify the seat as being occupied. In the
event of an accident, the restraint systems on
the front-passenger side may be triggered
and have to be replaced.
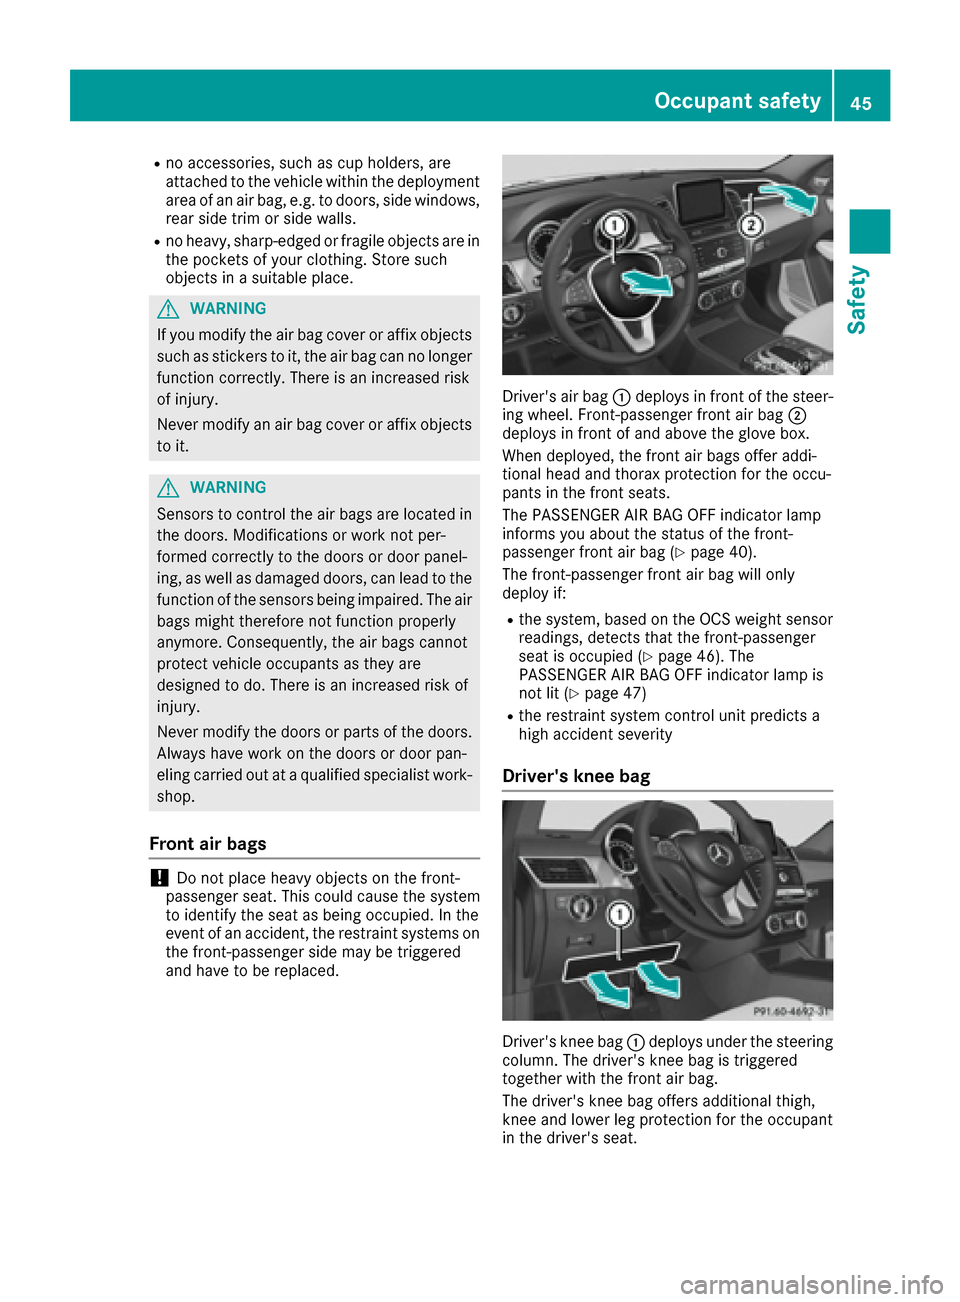
Driver's air bag :deploys in front of the steer-
ing wheel. Front-passenger front air bag ;
deploys in front of and above the glove box.
When deployed, the front air bags offer addi-
tional head and thorax protection for the occu-
pants in the front seats.
The PASSENGER AIR BAG OFF indicator lamp
informs you about the status of the front-
passenger front air bag (
Ypage 40).
The front-passenger front air bag will only
deploy if:
Rthe system, based on the OCS weight sensor
readings, detects that the front-passenger
seat is occupied (
Ypage 46). The
PASSENGER AIR BAG OFF indicator lamp is
not lit (
Ypage 47)
Rthe restraint system control unit predicts a
high accident severity
Driver's knee bag
Driver's knee bag :deploys under the steering
column. The driver's knee bag is triggered
together with the front air bag.
The driver's knee bag offers additional thigh,
knee and lower leg protection for the occupant
in the driver's seat.
Occupant safety45
Safety
Z
Page 56 of 366
Rvehicles with the memory function: the front-
passenger seat is adjusted if it is in an unfav-
orable position.
Rvehicles with a multicontour seat: the air pres-
sure in the side bolsters of the seat backrest
is increased.
If the hazardous situation passes without result-
ing in an accident, PRE-SAFE
®slackens the belt
pre-tensioning. On vehicles with multicontour
seats, the air pressure in the side bolsters is
reduced again. All settings made by PRE-SAFE
®
can then be reversed.
If the seat belt pre-tensioning is not reduced:
XMove the seat backrest or seat back slightly
when the vehicle is stationary.
The seat belt pre-tensioning is reduced and
the locking mechanism is released.
The seat-belt adjustment is an integral part of
the PRE-SAFE
®convenience function. Informa-
tion about the convenience function can be
found under "Belt adjustment" (
Ypage 43).
PRE-SAFE®PLUS (anticipatory occu-
pant protection system PLUS)
Introduction
PRE-SAFE®PLUS is only available in vehicles
with the Driving Assistance package.
Using the radar sensor system, PRE-SAFE
®
PLUS is able to detect that a head-on or rear-end
collision is imminent. In certain hazardous sit-
uations, PRE-SAFE
®PLUS takes pre-emptive
measures to protect the vehicle occupants.
Important safety notes
The intervention of PRE-SAFE®PLUS cannot
prevent an imminent collision.
The driver is not warned about the intervention
of PRE-SAFE
®PLUS.
PRE-SAFE®PLUS does not intervene if the vehi-
cle is backing up.
When driving, or when parking or exiting a park-
ing space with assistance from Parking Pilot,
PRE-SAFE
®PLUS will not apply the brakes.
Function
PRE-SAFE®PLUS intervenes in certain situa-
tions if the radar sensor system detects an
imminent head-on or rear-end collision.
PRE-SAFE
®PLUS takes the following measures
depending on the hazardous situation detected:
Rif the radar sensor system detects that a
head-on collision is imminent, the seat belts
are pre-tensioned.
Rif the radar sensor system detects that a rear-
end collision is imminent:
-the brake pressure is increased if the driver
applies the brakes when the vehicle is sta- tionary.
-the seat belts are pre-tensioned.
The PRE-SAFE®PLUS braking application is can-
celed:
Rif the accelerator pedal is depressed when a
gear is engaged
Rif the risk of a collision passes or is no longer
detected
Rif Distance Pilot DISTRONIC indicates an
intention to pull away
If the hazardous situation passes without result-
ing in an accident, the original settings are
restored.
Automatic measures after an acci-
dent
Immediately after an accident, the following
measures are implemented, depending on the
type and severity of the impact:
Rthe hazard warning lamps are activated
Rthe emergency lighting is activated
Rthe vehicle doors are unlocked
Rthe front side windows are lowered
Rvehicles with a memory function: the electri-
cally adjustable steering wheel is raised
Rthe engine is switched off and the fuel supply
is cut off
Rvehicles with mbrace: automatic emergency
call
54Occupant safety
Safety