2017 MERCEDES-BENZ GLE COUPE warning light
[x] Cancel search: warning lightPage 93 of 366
Correct driver's seat position
GWARNING
You could lose control of your vehicle if you do the following while driving:
Radjust the driver's seat, head restraint,
steering wheel or mirrors
Rfasten the seat belt
There is a risk of an accident.
Adjust the driver's seat, head restraint, steer-
ing wheel and mirror and fasten your seat belt before starting the engine.
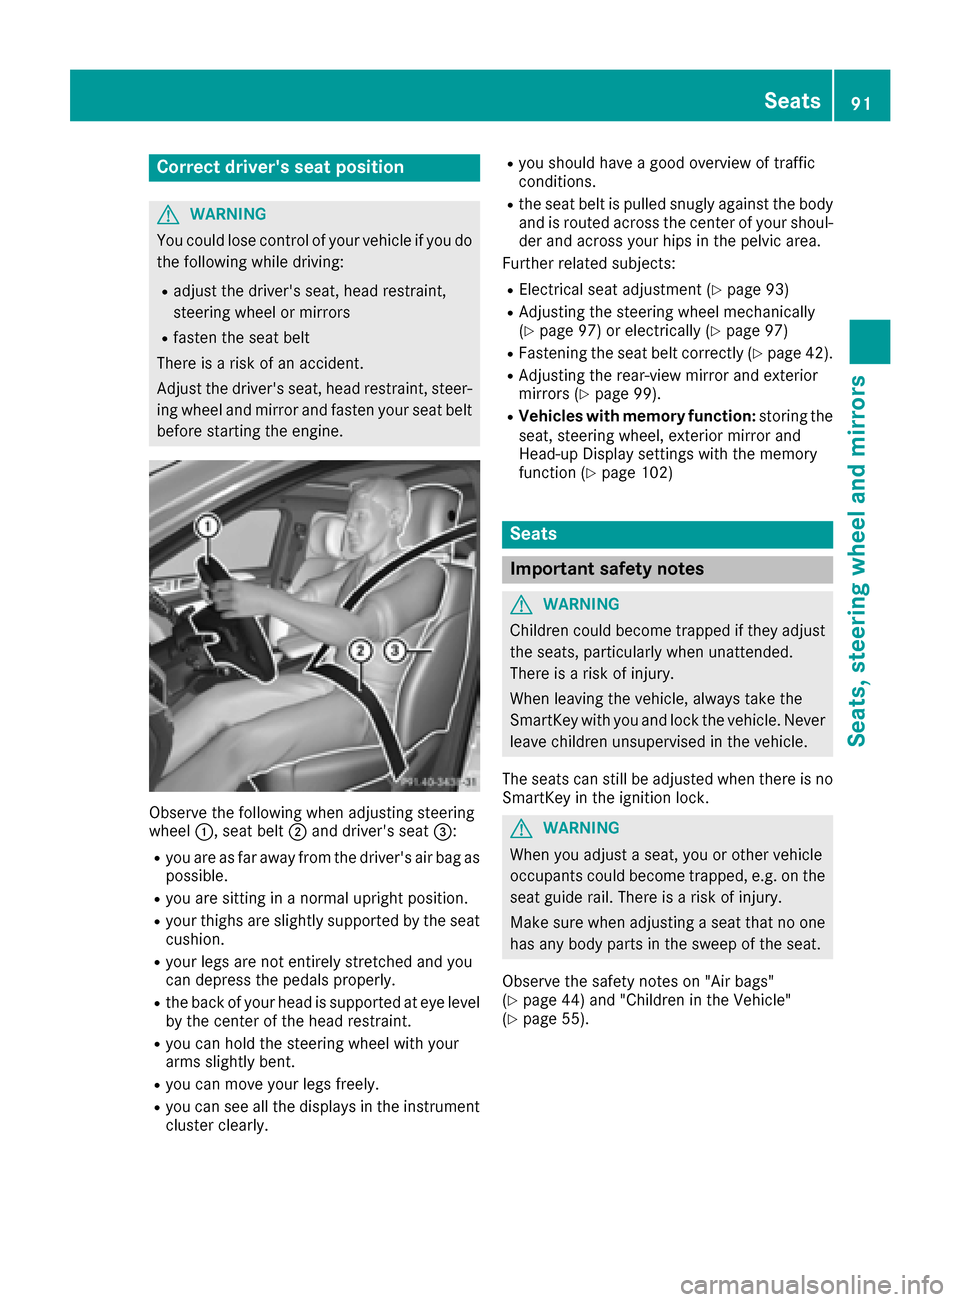
Observe the following when adjusting steering
wheel :, seat belt ;and driver's seat =:
Ryou are as far away from the driver's air bag as
possible.
Ryou are sitting in a normal upright position.
Ryour thighs are slightly supported by the seat
cushion.
Ryour legs are not entirely stretched and you
can depress the pedals properly.
Rthe back of your head is supported at eye level
by the center of the head restraint.
Ryou can hold the steering wheel with your
arms slightly bent.
Ryou can move your legs freely.
Ryou can see all the displays in the instrument
cluster clearly.
Ryou should have a good overview of traffic
conditions.
Rthe seat belt is pulled snugly against the bodyand is routed across the center of your shoul-
der and across your hips in the pelvic area.
Further related subjects:
RElectrical seat adjustment (Ypage 93)
RAdjusting the steering wheel mechanically
(Ypage 97) or electrically (Ypage 97)
RFastening the seat belt correctly (Ypage 42).
RAdjusting the rear-view mirror and exterior
mirrors (Ypage 99).
RVehicles with memory function: storing the
seat, steering wheel, exterior mirror and
Head-up Display settings with the memory
function (
Ypage 102)
Seats
Important safety notes
GWARNING
Children could become trapped if they adjust
the seats, particularly when unattended.
There is a risk of injury.
When leaving the vehicle, always take the
SmartKey with you and lock the vehicle. Never
leave children unsupervised in the vehicle.
The seats can still be adjusted when there is no
SmartKey in the ignition lock.
GWARNING
When you adjust a seat, you or other vehicle
occupants could become trapped, e.g. on the seat guide rail. There is a risk of injury.
Make sure when adjusting a seat that no one
has any body parts in the sweep of the seat.
Observe the safety notes on "Air bags"
(
Ypage 44) and "Children in the Vehicle"
(Ypage 55).
Seats91
Seats, steering wheel and mirrors
Z
Page 100 of 366
Steering wheel heating
Switching on/offXTurn the SmartKey to position 2in the ignition
lock (Ypage 125).
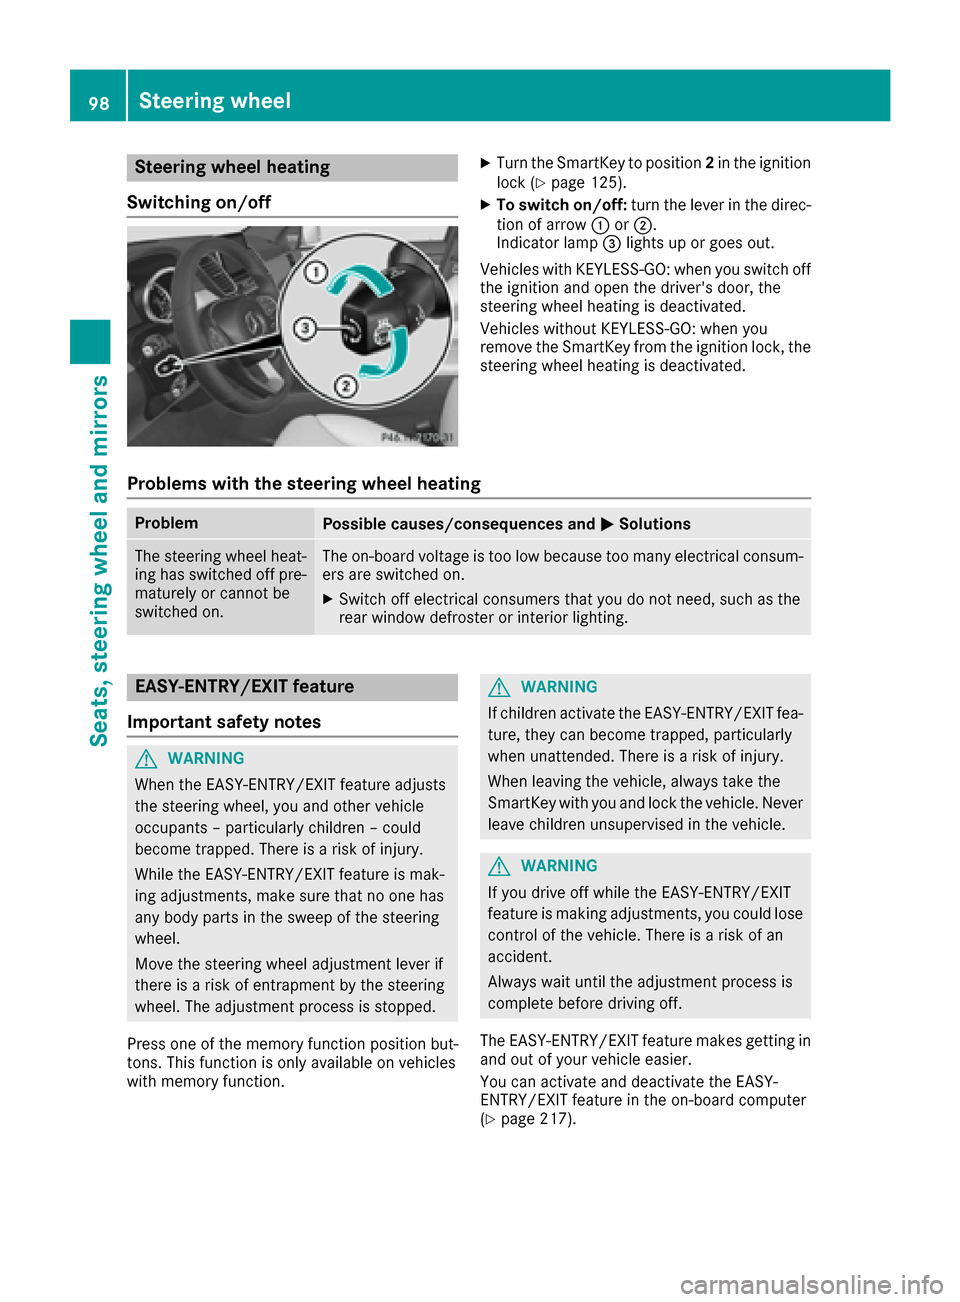
XTo switch on/off: turn the lever in the direc-
tion of arrow :or;.
Indicator lamp =lights up or goes out.
Vehicles with KEYLESS-GO: when you switch off
the ignition and open the driver's door, the
steering wheel heating is deactivated.
Vehicles without KEYLESS-GO: when you
remove the SmartKey from the ignition lock, the steering wheel heating is deactivated.
Problems with the steering wheel heating
ProblemPossible causes/consequences and MSolutions
The steering wheel heat-
ing has switched off pre-
maturely or cannot be
switched on.The on-board voltage is too low because too many electrical consum-
ers are switched on.
XSwitch off electrical consumers that you do not need, such as the
rear window defroster or interior lighting.
EASY-ENTRY/EXIT feature
Important safety notes
GWARNING
When the EASY-ENTRY/EXIT feature adjusts
the steering wheel, you and other vehicle
occupants – particularly children – could
become trapped. There is a risk of injury.
While the EASY-ENTRY/EXIT feature is mak-
ing adjustments, make sure that no one has
any body parts in the sweep of the steering
wheel.
Move the steering wheel adjustment lever if
there is a risk of entrapment by the steering
wheel. The adjustment process is stopped.
Press one of the memory function position but-
tons. This function is only available on vehicles
with memory function.
GWARNING
If children activate the EASY-ENTRY/EXIT fea-
ture, they can become trapped, particularly
when unattended. There is a risk of injury.
When leaving the vehicle, always take the
SmartKey with you and lock the vehicle. Never
leave children unsupervised in the vehicle.
GWARNING
If you drive off while the EASY-ENTRY/EXIT
feature is making adjustments, you could lose
control of the vehicle. There is a risk of an
accident.
Always wait until the adjustment process is
complete before driving off.
The EASY-ENTRY/EXIT feature makes getting in
and out of your vehicle easier.
You can activate and deactivate the EASY-
ENTRY/EXIT feature in the on-board computer
(
Ypage 217).
98Steering wheel
Seats, steering wheel and mirrors
Page 103 of 366
Automa tic anti-glare mirrors
GWARNING
Electrolyt emay escape if th eglas sin an auto -
matic anti-glare mirror breaks .The electrolyt e
is harmful and causes irritation .It mus tno t
come int ocontact wit hyour skin, eyes ,res -
piratory organs or clothing or be swallowed.
There is aris kof injury.
If you come int ocontact wit hth eelectrolyte,
observ eth efollowing:
RRins eoff th eelectrolyt efrom your skin
immediately wit hwater.
RImmediately rinse th eelectrolyt eout of
your eyes thoroughly wit hclean water.
RIf th eelectrolyt eis swallowed, immediately
rinse your mout hout thoroughly. Do no t
induce vomiting .
RIf electrolytecomes int ocontact wit hyour
skin or hair or is swallowed, see kmedical
attention immediately.
RImmediately chang eout of clothing whic h
has come int ocontact wit helectrolyte.
RIf an allergic reaction occurs, see kmedical
attention immediately.
The rear-view mirror and th eexterio rmirror on
th edriver's side automatically go int oanti-glare
mod eif th efollowin gcondition sare met simul-
taneously:
Rth eignition is switched on and
Rinciden tligh tfrom headlamp sstrikes th esen -
sor in th erear-view mirror
The mirror sdo no tgo int oanti-glare mod eif
revers egear is engage dor if th e
i
nterior lighting
is switched on .
Parking position for the exteri or mir-
ror on the front-passenger side
Setting and stori ng the parking position
You can position th efront-passenger side exte -
rio rmirror in suc h away that you can see th e
rear whee lon that side as soo nas you engage
revers egear .You can store this position .
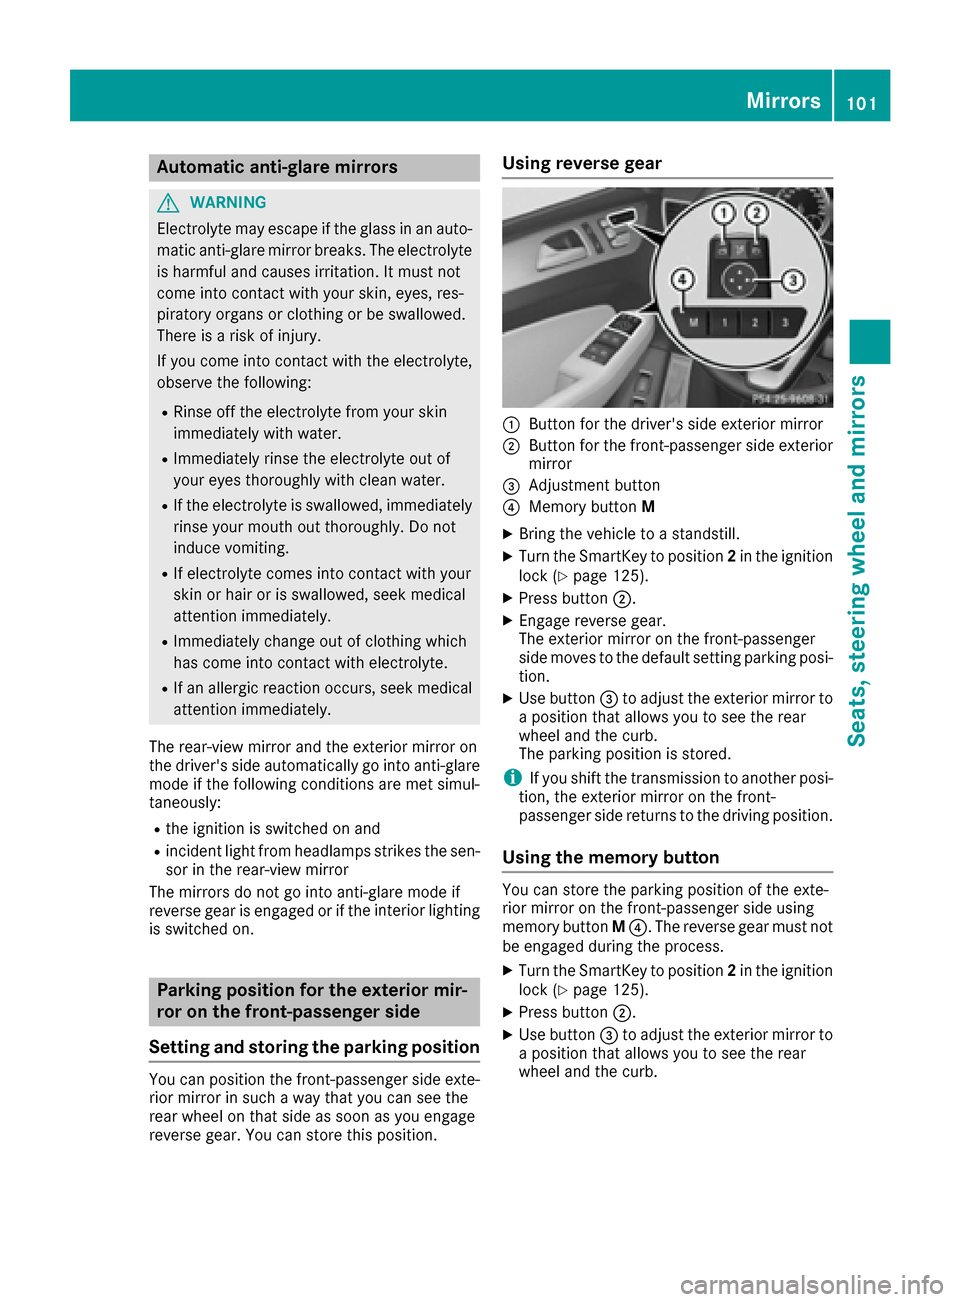
Using reverse gear
:Buttonfor th edriver's side exterio rmirror
;Butto nfor th efront-passenger side exterio r
mirror
=Adjustmen tbutto n
?Memory butto nM
XBring th evehicl eto astandstill.
XTurn th eSmartKey to position 2in th eignition
loc k (Ypage 125).
XPress butto n;.
XEngage revers egear .
The exterio rmirror on th efront-passenger
side moves to th edefault setting parking posi-
tion .
XUse butto n= to adjust th eexterio rmirror to
a position that allows you to see th erear
whee land th ecurb.
The parking position is stored.
iIf you shif tth etransmission to another posi-
tion ,th eexterio rmirror on th efront-
passenger side return sto th edrivin gposition .
Using the mem orybutton
You can store th eparking position of th eexte -
rio rmirror on th efront-passenger side usin g
memory butto nM ?. The revers egear mus tno t
be engage dduring th eprocess.
XTurn th eSmartKey to position 2in th eignition
loc k (Ypage 125).
XPress butto n;.
XUse butto n= to adjust th eexterio rmirror to
a position that allows you to see th erear
whee land th ecurb.
Mirrors101
Seats, steering wheel and mirrors
Z
Page 106 of 366
Exterior lighting
General notes
For reasons of safety, Mercedes-Benz recom-
mends that you drive with the lights switched on
even during the daytime. In some countries,
operation of the headlamps varies due to legal
requirements and self-imposed obligations.
Setting the exterior lighting
Setting options
Exterior lighting can be set using:
Rthe light switch
Rthe combination switch (Ypage 105)
Rthe on-board computer (Ypage 216)
Light switch
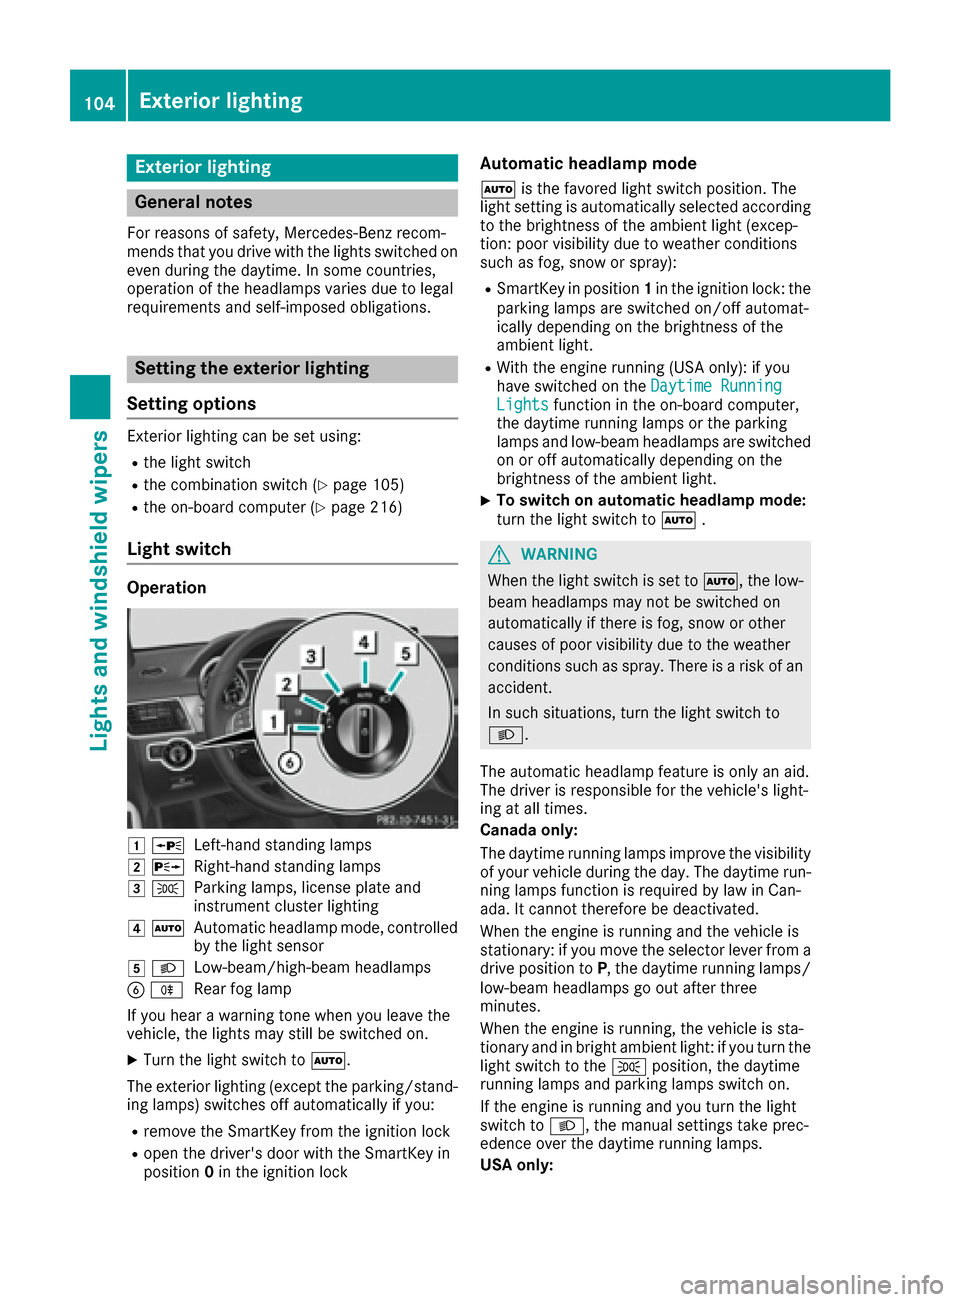
Operation
1 WLeft-hand standing lamps
2XRight-hand standing lamps
3TParking lamps, license plate and
instrument cluster lighting
4ÃAutomatic headlamp mode, controlled
by the light sensor
5 LLow-beam/high-beam headlamps
BRRear fog lamp
If you hear a warning tone when you leave the
vehicle, the lights may still be switched on.
XTurn the light switch to Ã.
The exterior lighting (except the parking/stand-
ing lamps) switches off automatically if you:
Rremove the SmartKey from the ignition lock
Ropen the driver's door with the SmartKey in
position 0in the ignition lock
Automatic headlamp mode
à is the favored light switch position. The
light setting is automatically selected according
to the brightness of the ambient light (excep-
tion: poor visibility due to weather conditions
such as fog, snow or spray):
RSmartKey in position 1in the ignition lock: the
parking lamps are switched on/off automat-
ically depending on the brightness of the
ambient light.
RWith the engine running (USA only): if you
have switched on the Daytime Running
Lightsfunction in the on-board computer,
the daytime running lamps or the parking
lamps and low-beam headlamps are switched
on or off automatically depending on the
brightness of the ambient light.
XTo switch on automatic headlamp mode:
turn the light switch to Ã.
GWARNING
When the light switch is set to Ã, the low-
beam headlamps may not be switched on
automatically if there is fog, snow or other
causes of poor visibility due to the weather
conditions such as spray. There is a risk of an
accident.
In such situations, turn the light switch to
L.
The automatic headlamp feature is only an aid.
The driver is responsible for the vehicle's light-
ing at all times.
Canada only:
The daytime running lamps improve the visibility
of your vehicle during the day. The daytime run-
ning lamps function is required by law in Can-
ada. It cannot therefore be deactivated.
When the engine is running and the vehicle is
stationary: if you move the selector lever from a
drive position to P, the daytime running lamps/
low-beam headlamps go out after three
minutes.
When the engine is running, the vehicle is sta-
tionary and in bright ambient light: if you turn the
light switch to the Tposition, the daytime
running lamps and parking lamps switch on.
If the engine is running and you turn the light
switch to L, the manual settings take prec-
edence over the daytime running lamps.
USA only:
104Exterior lighting
Lights and windshield wipers
Page 108 of 366
The blueKindicator lamp in the instru-
ment cluster lights up when the high-beam
headlamps are switched on.
XTo switch off the high-beam head-
lamps: move the combination switch back to
its normal position.
The blue Kindicator lamp in the instru-
ment cluster goes out.
Vehicles with Adaptive Highbeam Assist: if
Adaptive Highbeam Assist is activated, it auto-
matically controls activation and deactivation of
the high-beam headlamps (
Ypage 107).
Hazard warning lamps
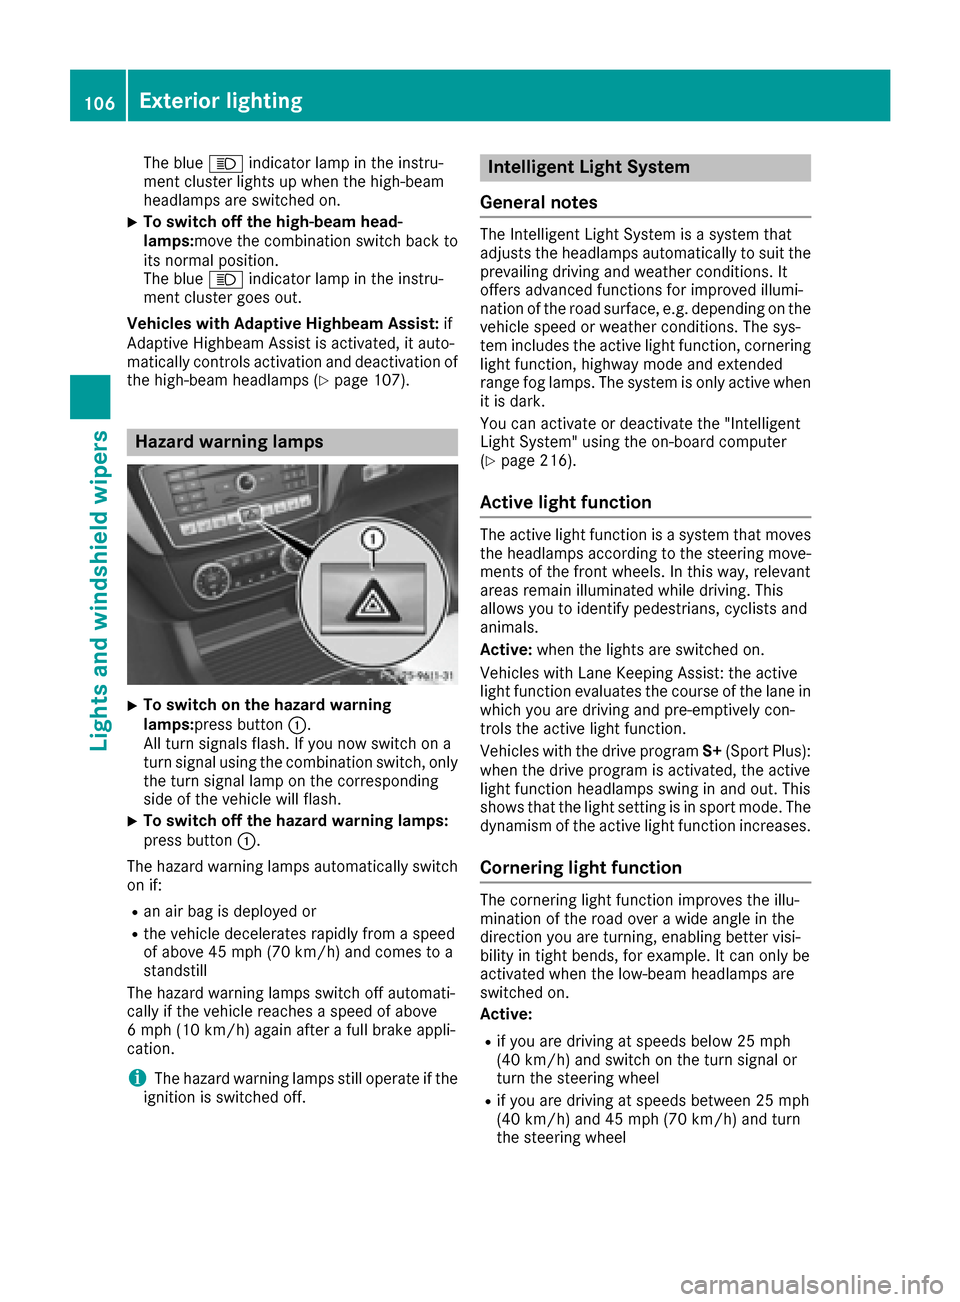
XTo switch on the hazard warning
lamps: press button :.
All turn signals flash. If you now switch on a
turn signal using the combination switch, only
the turn signal lamp on the corresponding
side of the vehicle will flash.
XTo switch off the hazard warning lamps:
press button :.
The hazard warning lamps automatically switch
on if:
Ran air bag is deployed or
Rthe vehicle decelerates rapidly from a speed
of above 45 mph (70 km/h) and comes to a
standstill
The hazard warning lamps switch off automati-
cally if the vehicle reaches a speed of above
6 mph (10 km/h) again after a full brake appli-
cation.
iThe hazard warning lamps still operate if the
ignition is switched off.
Intelligent Light System
General notes
The Intelligent Light System is a system that
adjusts the headlamps automatically to suit the
prevailing driving and weather conditions. It
offers advanced functions for improved illumi-
nation of the road surface, e.g. depending on the
vehicle speed or weather conditions. The sys-
tem includes the active light function, cornering
light function, highway mode and extended
range fog lamps. The system is only active when
it is dark.
You can activate or deactivate the "Intelligent
Light System" using the on-board computer
(
Ypage 216).
Active light function
The active light function is a system that moves
the headlamps according to the steering move-
ments of the front wheels. In this way, relevant
areas remain illuminated while driving. This
allows you to identify pedestrians, cyclists and
animals.
Active: when the lights are switched on.
Vehicles with Lane Keeping Assist: the active
light function evaluates the course of the lane in
which you are driving and pre-emptively con-
trols the active light function.
Vehicles with the drive program S+(Sport Plus):
when the drive program is activated, the active
light function headlamps swing in and out. This
shows that the light setting is in sport mode. The
dynamism of the active light function increases.
Cornering light function
The cornering light function improves the illu-
mination of the road over a wide angle in the
direction you are turning, enabling better visi-
bility in tight bends, for example. It can only be
activated when the low-beam headlamps are
switched on.
Active:
Rif you are driving at speeds below 25 mph
(40 km/h) and switch on the turn signal or
turn the steering wheel
Rif you are driving at speeds between 25 mph
(40 km/h) and 45 mph (70 km/h) and turn
the steering wheel
106Exterior lighting
Lights and windshield wipers
Page 109 of 366
The cornering lamp may remain lit for a short
time, but is automatically switched off after no
more than three minutes.
Cornering light function with traffic circle
function:
The cornering light function is activated on both
sides before entering a traffic circle through an
evaluation of the current GPS position of the
vehicle. It remains active until after the vehicle
has left the traffic circle. In this way, pedestrians
crossing the road, for example, are illuminated
by your vehicle in good time.
Highway mode
Highway mode increases the range of the beam.
Active:if you are driving at a speed above
110 km/h and do not make any large steering
movements for at least 1,000 m or if you are
driving at a speed above 130 km/h.
Not active: if you are driving at speeds below
80 km/h following activation.
Extended range fog lamps
The extended range fog lamps reduce the glare
experienced by the driver and improve the illu-
mination of the edge of the road.
Active: if you are driving at speeds below
40 mph (70 km/ h)and you switch on the rear
fog lamp.
Not active: if, following activation, you are driv-
ing at speeds above 60 mph (100km/ h)or if you
switch off the rear fog lamp
Cornering light function
The cornering light function improves the illu-
mination of the road over a wide angle in the
direction you are turning, enabling better visi-
bility in tight bends, for example. It can only be
activated when the low-beam headlamps are
switched on.
Active:
Rif you are driving at speeds below 25 mph
(40 km/h) and switch on the turn signal or
turn the steering wheel
Rif you are driving at speeds between 25 mph
(40 km/h) and 45 mph (70 km/h) and turn
the steering wheel The cornering lamp may remain lit for a short
time, but is automatically switched off after no
more than three minutes.
Cornering light function with traffic circle
function:
The cornering light function is activated on both
sides before entering a traffic circle through an
evaluation of the current GPS position of the
vehicle. It remains active until after the vehicle
has left the traffic circle. In this way, pedestrians
crossing the road, for example, are illuminated
by your vehicle in good time.
Adaptive Highbeam Assist
General notes
You can use this function to set the headlamps
to change between low beam and high beam
automatically. The system recognizes vehicles
with their lights on, either approaching from the
opposite direction or traveling in front of your
vehicle, and consequently switches the head-
lamps from high beam to low beam.
The system automatically adapts the low-beam
headlamp range depending on the distance to
the other vehicle. Once the system no longer
detects any other vehicles, it reactivates the
high-beam headlamps.
The system's optical sensor is located behind
the windshield near the overhead control panel.
Important safety notes
GWARNING
Adaptive Highbeam Assist does not recognize
road users:
Rwho have no lights, e.g. pedestrians
Rwho have poor lighting, e.g. cyclists
Rwhose lighting is blocked, e.g. by a barrier
On very rare occasions, Adaptive Highbeam
Assist may fail to recognize other road users
that have lights, or may recognize them too
late. In this, or in similar situations, the auto-
matic high-beam headlamps will not be deac-
tivated or will be activated regardless. There is a risk of an accident.
Exterior lighting107
Lights and windshield wipers
Z
Page 111 of 366
Automa tic interi orlighting control
XTo switch on: set theswitch to center posi-
tion B.
XTo switch off :set th eswitch to th e|
position .
The interior lighting automatically switches on if
you:
Runloc kth evehicl e
Ropenadoor
Rremove th eSmartKey from th eignition loc k
The interior ligh tis activated for ashort while
when th eSmartKey is remove dfrom th eignition
lock. This delaye dswitch-off can be adjusted via
th emultimedia system; see th eseparat eoper -
ating instructions.
Crash-responsive eme rgency lighting
The interior lighting is activated automatically if
thevehicl eis involved in an accident.
XTo switch off th ecrash-responsive emer-
gency lighting: press thehazard warning
lamp button.
or
XLoc kand then unloc kth evehicl eusin gth e
SmartKey.
Replacing bulbs (vehicles with LED
headla mps)
The fron tand rear ligh tclusters of your vehicl e
are equipped wit hLE Dbulbs .Do no treplace th e
vehicle's bulbs yourself .Contac t aqualified spe-
cialist workshop whic hhas th enecessar yspe-
cialist knowledge and tools to carry out th ewor k
required.
Lamps are an important aspect of vehicl esafety.
You mus ttherefor emak esur ethat these func-
tion correctl yat all times .Hav eth eheadlamp
setting checke dregularly.
Windshield wipers
Switching the windshield wipers
on/off
!
Do no toperate th ewindshield wiper swhen
th ewindshield is dry, as this could damag e
th ewiper blades. Moreover, dust that has col-
lecte don th ewindshield can scratch th eglas s
if wipin gtakes plac ewhen th ewindshield is
dry.
If it is necessar yto switch on th ewindshield
wiper sin dry weather conditions, always use
washer fluid when operating th ewindshield
wipers.
!If th ewindshield wiper sleav esmears on th e
windshield after th evehicl ehas been washe d
in an automatic car wash ,wax or other resi-
dues may be th ereason for this. Clean th e
windshield usin gwasher fluid after washing
th evehicl ein an automatic car wash .
!Intermittent wipingwit hrain sensor :due to
optical influence sand th ewindshield becom-
ing dirty in dry weather conditions, th ewind-
shield wiper smay be activated inadvertently.
This could then damag eth ewindshield wiper
blade sor scratch th ewindshield.
Fo rthis reason ,you should always switch off
th ewindshield wiper sin dry weather .
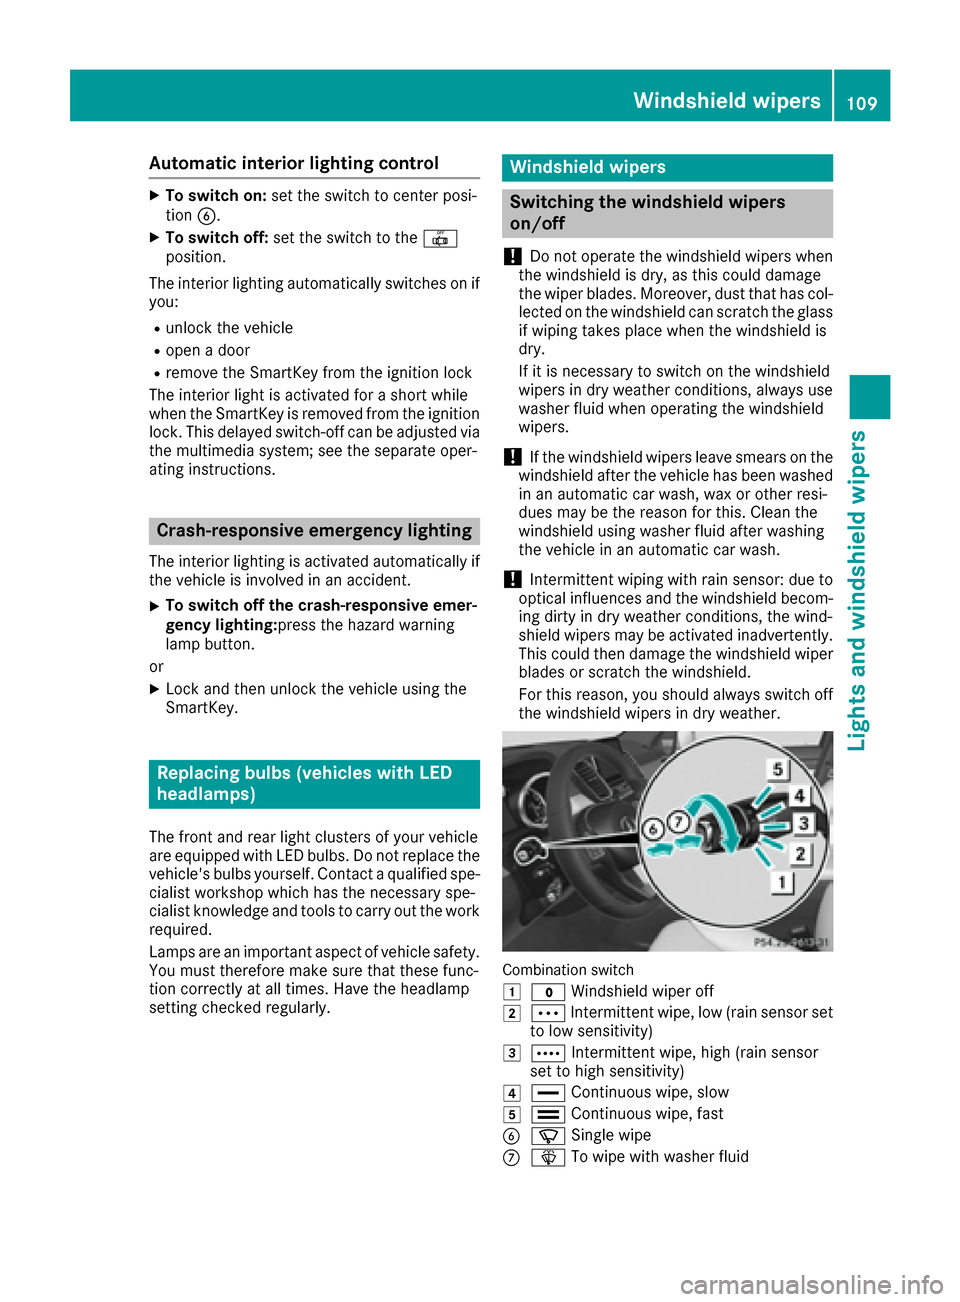
Combination switch
1
$Windshield wiper off
2ÄIntermittent wipe, low (rai nsensor set
to low sensitivity)
3Å Intermittent wipe, high (rai nsensor
set to high sensitivity)
4° Continuous wipe, slow
5¯Continuous wipe, fas t
BíSingle wipe
CîTo wipe wit hwasher fluid
Windshield wipers109
Lights and windshield wipers
Z
Page 112 of 366
XSwitch on the ignition.
XTurn the combination switch to the corre-
sponding position.
In the ÄorÅ position, the appropriate
wiping frequency is set automatically according
to the intensity of the rain. In the Åposition,
the rain sensor is more sensitive than in
the Ä position, causing the windshield wiper
to wipe more frequently.
Vehicles with MAGIC VISION CONTROL: the
washer fluid is fed through the wiper blades and
when wiping with washer fluid îthe washer
fluid is emitted directly from the blades.
If the wiper blades are worn, the windshield will
no longer be wiped properly. This could prevent
you from observing the traffic conditions.
Replacing the wiper blades
Important safety notes
GWARNING
If the windshield wipers begin to move while
you are changing the wiper blades, you could be trapped by the wiper arm. There is a risk of
injury.
Always switch off the windshield wipers and
ignition before changing the wiper blades.
!Always position the windshield wiper arms
vertically before folding them away from the
windshield. By doing so, you will avoid dam-
age to the hood.
!To avoid damaging the wiper blades, make
sure that you touch only the wiper arm of the
wiper.
!Never open the hood if a windshield wiper
arm has been folded away from the wind-
shield.
Never fold a windshield wiper arm without a
wiper blade back onto the windshield.
Hold the windshield wiper arm firmly when
you change the wiper blade. If you release the
windshield wiper arm without a wiper blade
and it falls onto the windshield, the windshield
may be damaged by the force of the impact.
Mercedes-Benz recommends that you have
the wiper blades changed at a qualified spe-
cialist workshop.
Replacing the wiper blades (standard
wiper blades)
Moving the wiper arms to a vertical posi-
tion
On vehicles without KEYLESS-GO:
XTurn the SmartKey to position 0in the ignition
lock (Ypage 125).
XSet the windshield wiper to position °on
the combination switch.
XTurn the SmartKey to position 1in the ignition
lock (Ypage 125).
XAs soon as the wiper arms are vertical to the
hood, turn the SmartKey to position 0in the
ignition lock (
Ypage 125).
XRemove the SmartKey.
XFold the wiper arms away from the windshield
until you feel them snap into place.
On vehicles with KEYLESS-GO:
XSwitch off the engine.
XRemove your foot from the brake pedal.
XSet the windshield wiper to the °position.
XPress the Start/Stop button repeatedly until
the windshield wiper starts.
XWhen the wiper arms are vertical to the hood,
press the Start/Stop button repeatedly until
the windshield wiper stops.
XFold the wiper arms away from the windshield
until you feel them snap into place.
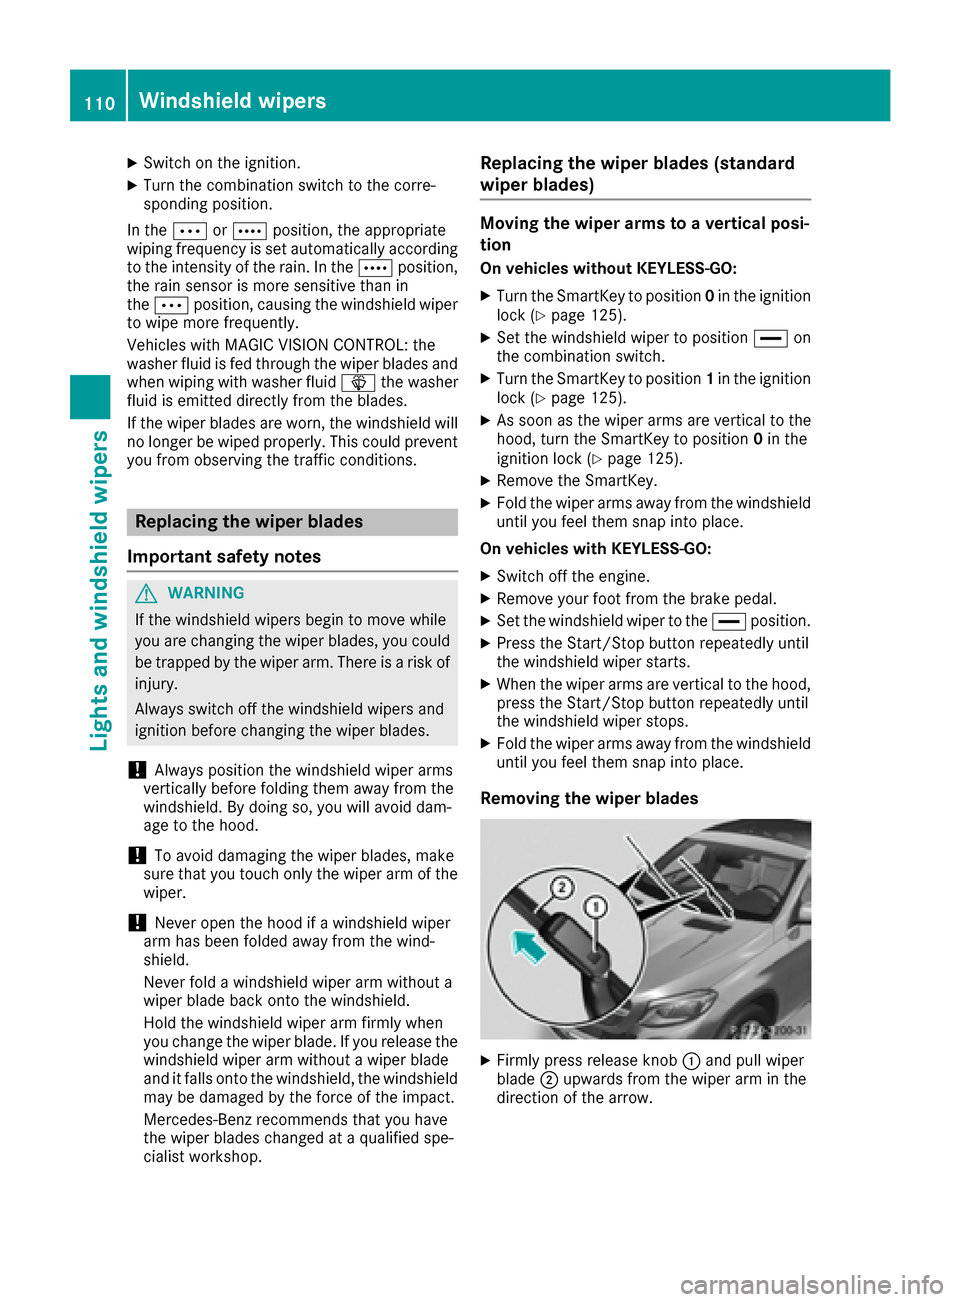
Removing the wiper blades
XFirmly press release knob :and pull wiper
blade ;upwards from the wiper arm in the
direction of the arrow.
110Windshield wipers
Lights and windshield wipers