2017 MERCEDES-BENZ GLE COUPE Airmatic
[x] Cancel search: AirmaticPage 171 of 366
set speed suitable for the prevailing conditions
and when necessary, apply the brakes manually.
Activating DSR
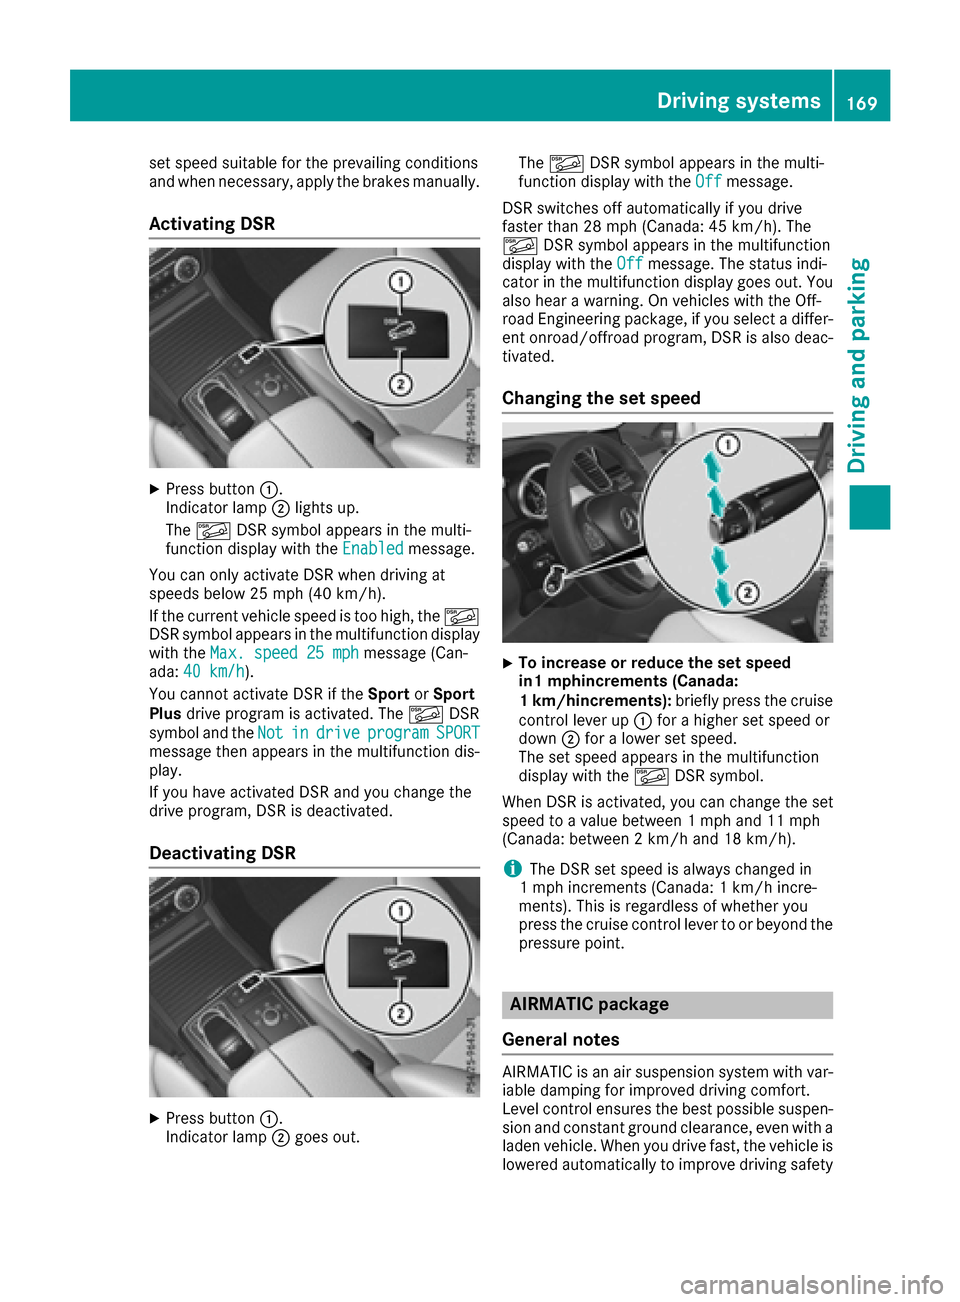
XPress button:.
Indicator lamp ;lights up.
The à DSR symbol appears in the multi-
function display with the Enabled
message.
You can only activate DSR when driving at
speeds below 25 mph (40 km/h).
If the current vehicle speed is too high, the Ã
DSR symbol appears in the multifunction display
with the Max. speed 25 mph
message (Can-
ada: 40 km/h).
You cannot activate DSR if the SportorSport
Plus drive program is activated. The ÃDSR
symbol and the Not
indriveprogramSPORTmessage then appears in the multifunction dis-
play.
If you have activated DSR and you change the
drive program, DSR is deactivated.
Deactivating DSR
XPress button:.
Indicator lamp ;goes out. The
à DSR symbol appears in the multi-
function display with the Off
message.
DSR switches off automatically if you drive
faster than 28 mph (Canada: 45 km/h). The
à DSR symbol appears in the multifunction
display with the Off
message. The status indi-
cator in the multifunction display goes out. You
also hear a warning. On vehicles with the Off-
road Engineering package, if you select a differ-
ent onroad/offroad program, DSR is also deac-
tivated.
Changing the set speed
XTo increase or reduce the set speed
in1 mphincrements (Canada:
1 km/hincrements): briefly press the cruise
control lever up :for a higher set speed or
down ;for a lower set speed.
The set speed appears in the multifunction
display with the ÃDSR symbol.
When DSR is activated, you can change the set
speed to a value between 1 mph and 11 mph
(Canada: between 2 km/h and 18 km/h).
iThe DSR set speed is always changed in
1 mph increments (Canada: 1 km/h incre-
ments). This is regardless of whether you
press the cruise control lever to or beyond the pressure point.
AIRMATIC package
General notes
AIRMATIC is an air suspension system with var-
iable damping for improved driving comfort.
Level control ensures the best possible suspen-
sion and constant ground clearance, even with a
laden vehicle. When you drive fast, the vehicle is
lowered automatically to improve driving safety
Driving systems169
Driving and parking
Z
Page 172 of 366
and to reduce fuel consumption. There is also
the option to manually adjust the vehicle level.
AIRMATIC consists of:
Rlevel settings
Rlevel control and
RADS PLUS (Adaptive Damping System)
All vehicles (except Mercedes-AMG vehi-
cles): your vehicle may also be equipped with
the ACTIVE CURVE SYSTEM (
Ypage 171).
Mercedes-AMG vehicles: your vehicle is equip-
ped with the ACTIVE CURVE SYSTEM.
(
Ypage 171).
Observe the notes on driving with a trailer
(
Ypage 200).
The vehicle level can be set using the DYNAMIC
SELECT controller (
Ypage 132) or the level but-
ton (Ypage 171). The setting always corre-
sponds to the last selected function.
Important safety notes
GWARNING
When the vehicle is being lowered, people
could become trapped if their limbs are
between the vehicle body and the wheels or
underneath the vehicle. There is a risk of
injury.
Make sure no one is underneath the vehicle or
in the immediate vicinity of the wheel arches
when the vehicle is being lowered.
If you unlock the vehicle or open a door, the
vehicle begins to compensate for load discrep-
ancies while still parked. However, for signifi-
cant level changes, such as after the vehicle has
been stationary for a long period, the engine
must be on. For safety reasons, the vehicle is
only lowered when the doors are closed. Low-
ering is interrupted if a door is opened, and it
continues once the door has been closed.
ADS PLUS (Adaptive Damping System)
General notes
ADS PLUS automatically controls the calibration
of the dampers. The damping characteristics
adapt to the current operating and driving sit-
uation. The damping is tuned individually to each wheel
and depends on:
Ryour driving style, e.g. sporty
Rthe road surface conditions
Rthe drive program selected
Rthe vehicle level setting
Selecting Comfort mode
In the Comfort drive program, the driving char-
acteristics of your vehicle are more comforta-
ble. Therefore, select this mode if you favor a
more comfortable driving style. Also select the
Comfort drive program when driving fast on
straight roads, e.g. on straight stretches of high-
way.
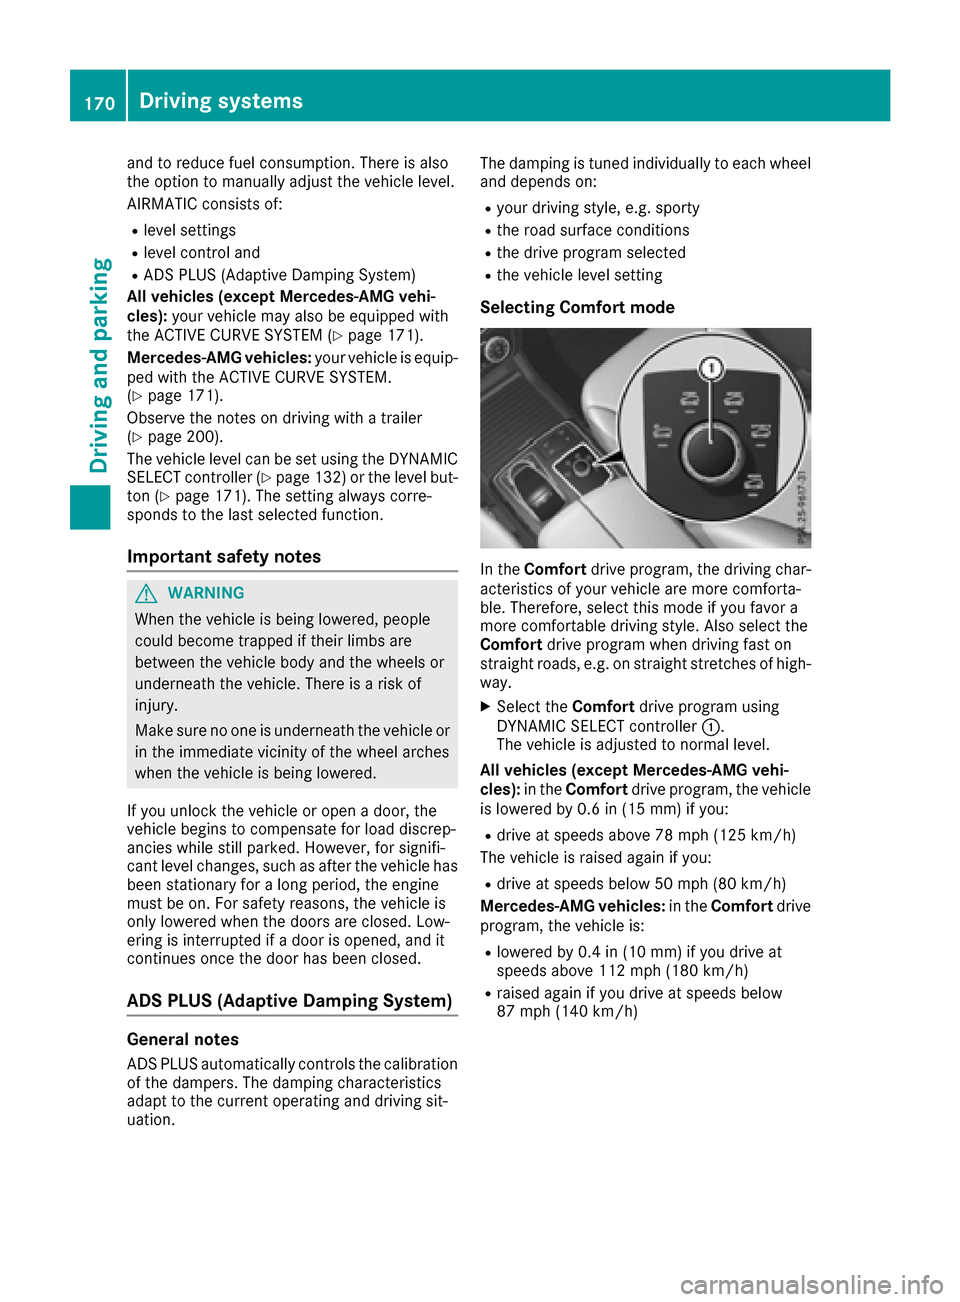
XSelect the Comfortdrive program using
DYNAMIC SELECT controller :.
The vehicle is adjusted to normal level.
All vehicles (except Mercedes-AMG vehi-
cles): in theComfort drive program, the vehicle
is lowered by 0.6 in (15 mm) if you:
Rdrive at speeds above 78 mph (125 km/h)
The vehicle is raised again if you:
Rdrive at speeds below 50 mph (80 km/h)
Mercedes-AMG vehicles: in theComfort drive
program, the vehicle is:
Rlowered by 0.4 in (10 mm) if you drive at
speeds above 112 mph (180 km/h)
Rraised again if you drive at speeds below
87 mph (140km/ h)
170Driving systems
Driving and parking
Page 204 of 366
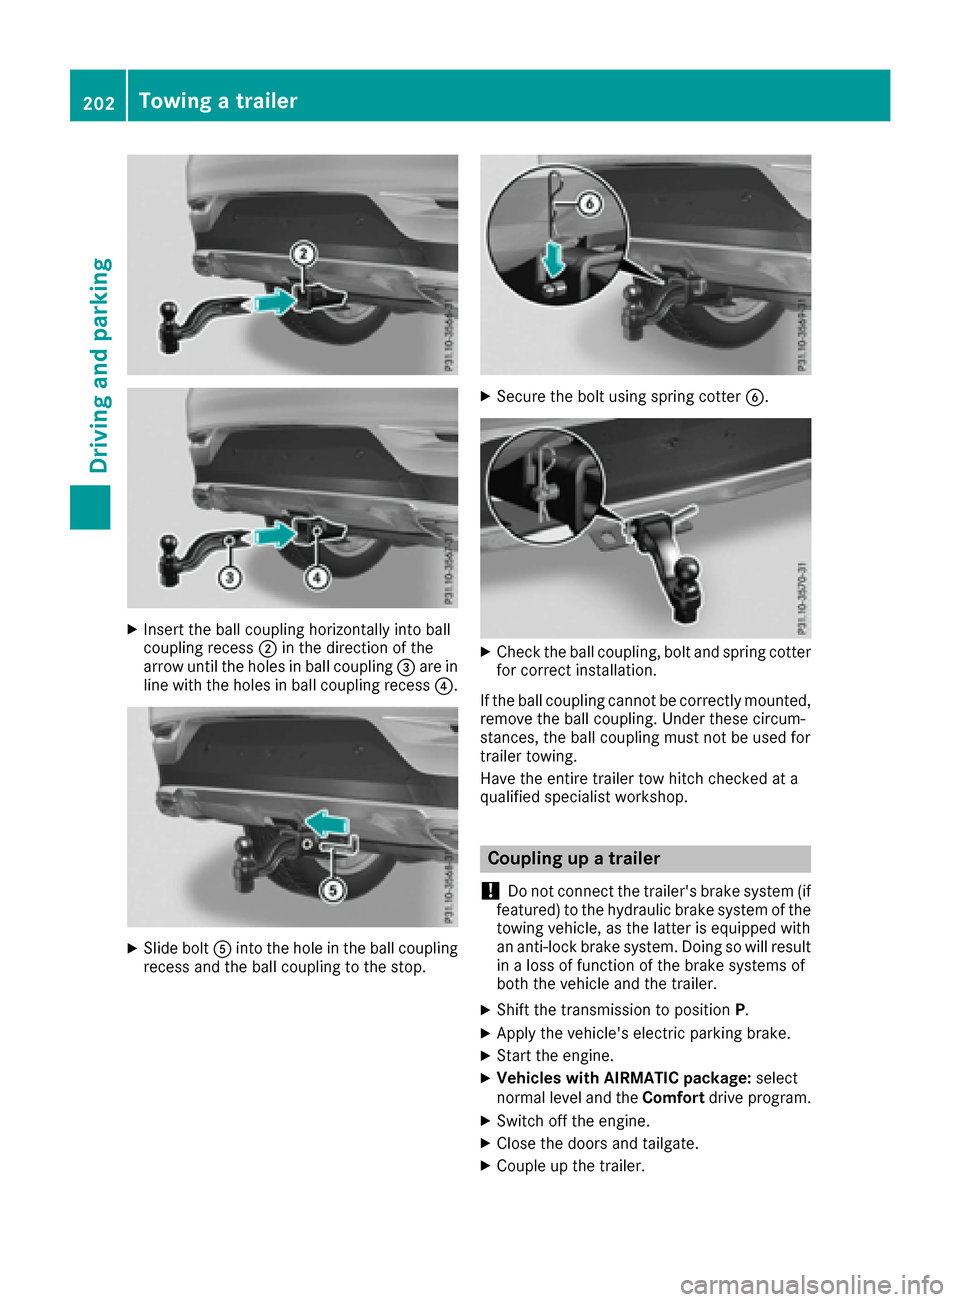
XInsert the ball coupling horizontally into ball
coupling recess;in the direction of the
arrow until the holes in ball coupling =are in
line with the holes in ball coupling recess ?.
XSlide boltAinto the hole in the ball coupling
recess and the ball coupling to the stop.
XSecure the bolt using spring cotter B.
XCheck the ball coupling, bolt and spring cotter
for correct installation.
If the ball coupling cannot be correctly mounted,
remove the ball coupling. Under these circum-
stances, the ball coupling must not be used for
trailer towing.
Have the entire trailer tow hitch checked at a
qualified specialist workshop.
Coupling up a trailer
!
Do not connect the trailer's brake system (if
featured) to the hydraulic brake system of the
towing vehicle, as the latter is equipped with
an anti-lock brake system. Doing so will result
in a loss of function of the brake systems of
both the vehicle and the trailer.
XShift the transmission to position P.
XApply the vehicle's electric parking brake.
XStart the engine.
XVehicles with AIRMATIC package: select
normal level and the Comfortdrive program.
XSwitch off the engine.
XClose the doors and tailgate.
XCouple up the trailer.
202Towing a trailer
Driving and parking
Page 205 of 366
XEstablish the electrical connection between
the vehicle and the trailer.
XCheck that the trailer lighting system is work-
ing.
XPush the combination switch upwards/down-wards and check whether the corresponding
turn signal on the trailer flashes.
A trailer that is connected is recognized only
when the electrical connection is established
correctly and when the lighting system is work-
ing properly. The function of other systems also
depends on this, for example:
RESP®
RParking Assist PARKTRONIC
RParking Pilot
RActive Blind Spot Assist
RActive Lane Keeping Assist
iVehicles with the AIRMATIC package: if you
couple up a trailer, the vehicle always remains
at normal level. When coupling up a trailer,
please observe the following:
RIf the normal level has not been set man-
ually, the vehicle is automatically lowered
to normal level. This is the case if a speed of
5 mph (8 km/h) is reached.
RThe Sport drive program is not available.
These restrictions apply to all accessories
powered through a connection to the trailer
power socket of your vehicle, e.g. a bicycle
carrier.
Observe the maximum permissible trailer
dimensions (wi
dth and length).
Most U.S. states and all Canadian provinces
require by law:
RSafety chains between the towing vehicle and
the trailer. The chains should be cross-wound
under the trailer drawbar. They must be fas-
tened to the vehicle's trailer coupling, not to
the bumper or the axle.
Leave enough play in the chains to make tight
cornering possible.
RA separate brake system for certain types of
trailer.
RSafety switch for braked trailers. Check the
specific legal requirements applicable to your
state.
If the trailer becomes detached from the tow-
ing vehicle, the safety switch applies the
trailer brakes.
Towing a trailer
There are numerous legal requirements con-
cerning the towing of a trailer, e.g. speed restric- tions. Make sure that your car/trailer combina-
tion complies with the local regulations:
Rin your place of residence
Rin the location to which you are driving
The police and local authorities can provide reli- able information.
Observe the following when towing a trailer:
RTo gain driving experience and to become
accustomed to the new handling characteris-
tics, you should practice the following in a
traffic-free location:
-cornering
-stopping
-backing up
RBefore driving, check:
-trailer tow hitch
-safety switch for braked trailers
-safety chains
-electrical connections
-lights
-wheels
RAdjust the exterior mirrors to provide an
unobstructed view of the rear section of the
trailer.
RIf the trailer has electronically controlled
brakes, pull away carefully. Brake manually
using the brake controller and check whether
the brakes function correctly.
RSecure any objects on the trailer to prevent
the cargo from slipping when the vehicle is in
motion.
RWhen you couple up a trailer, check at regular
intervals that the load is firmly secured. If the
tra
iler is equipped with trailer lights and
brakes, check the trailer to ensure that these
are working.
RBear in mind that the handling will be less
stable when towing a trailer than when driving
without one. Avoid sudden steering move-
ments.
RThe vehicle/trailer combination is heavier,
accelerates more slowly, has a decreased
gradient climbing capability and a longer
braking distance.
It is more susceptible to side winds and
requires more careful steering.
Towing a trailer203
Driving an d parking
Z
Page 240 of 366
Drivingsystems
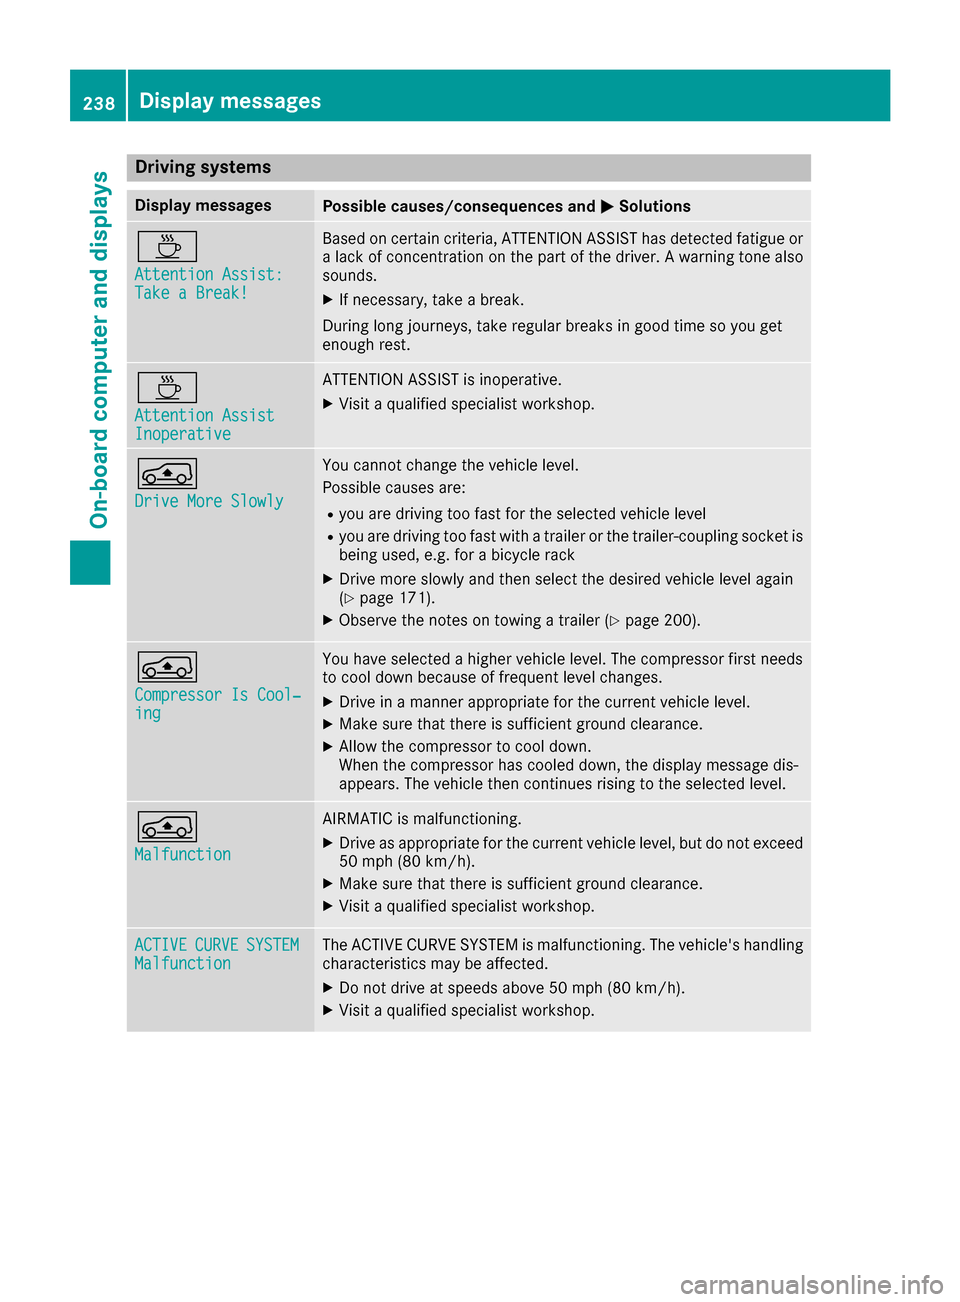
Display messagesPossible causes/consequences an dMSolutions
À
Attention Assist :Take a Break!
Based on certain criteria, ATTENTION ASSIST has detecte dfatigue or
a lac kof concentration on th epar tof th edriver . Awarnin gtone also
sounds.
XIf necessary, take abreak .
Durin glon gjourneys, take regular break sin goo dtime so you get
enough rest.
À
Attention AssistInoperative
ATTENTION ASSIST is inoperative .
XVisitaqualified specialis tworkshop .
Á
Drive Mor eSlowly
You canno tchang eth evehicle level.
Possible causes are :
Ryou are drivingto ofas tfo rth eselecte dvehicle level
Ryou are drivin gto ofas twit h a trailer or th etrailer-couplin gsocke tis
bein gused ,e.g. fo r abicycl erac k
XDrive more slowly and then selec tth edesire dvehicle level again
(Ypage 171).
XObserv eth enote son towin g atrailer (Ypage 200).
Á
Compresso rIs Cool‐ing
You hav eselecte d ahigher vehicle level. The compressor first needs
to cool down because of frequent level changes.
XDrive in amanne rappropriat efo rth ecurren tvehicle level.
XMak esur ethat there is sufficien tgroun dclearance.
XAllow th ecompressor to cool down .
Whe nth ecompressor has cooled down ,th edisplay messag edis -
appears .The vehicle then continues risin gto th eselecte dlevel.
Á
Malfunction
AIRMATIC is malfunctioning.
XDrive as appropriat efo rth ecurren tvehicle level, but do no texceed
50 mph (80 km/h).
XMak esur ethat there is sufficien tgroun dclearance.
XVisit aqualified specialis tworkshop .
ACTIVECURVESYSTEMMalfunctionThe ACTIV ECURV ESYSTEM is malfunctioning. The vehicle' shandlin g
characteristics may be affected.
XDo no tdrive at speeds abov e50 mph (80 km/h).
XVisit aqualified specialis tworkshop .
238Display messages
On-board computer and displays
Page 309 of 366
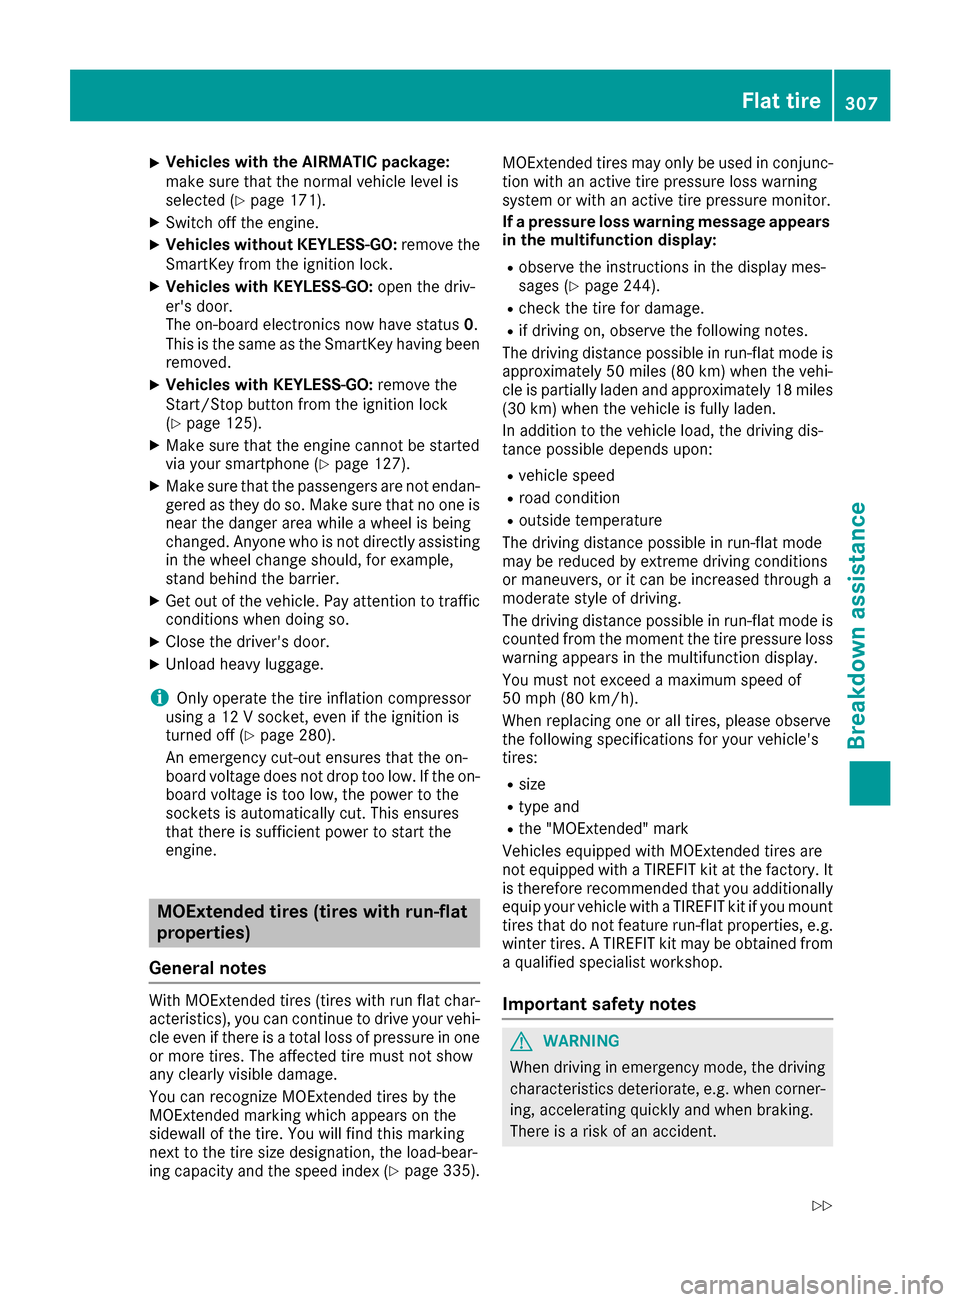
XVehicles with the AIRMATIC package:
make sure that the normal vehicle level is
selected (
Ypage 171).
XSwitch off the engine.
XVehicles without KEYLESS-GO:remove the
SmartKey from the ignition lock.
XVehicles with KEYLESS-GO: open the driv-
er's door.
The on-board electronics now have status 0.
This is the same as the SmartKey having been
removed.
XVehicles with KEYLESS-GO: remove the
Start/Stop button from the ignition lock
(
Ypage 125).
XMake sure that the engine cannot be started
via your smartphone (Ypage 127).
XMake sure that the passengers are not endan-
gered as they do so. Make sure that no one is
near the danger area while a wheel is being
changed. Anyone who is not directly assisting
in the wheel change should, for example,
stand behind the barrier.
XGet out of the vehicle. Pay attention to traffic
conditions when doing so.
XClose the driver's door.
XUnload heavy luggage.
iOnly operate the tire inflation compressor
using a 12 V socket, even if the ignition is
turned off (
Ypage 280).
An emergency cut-out ensures that the on-
board voltage does not drop too low. If the on-
board voltage is too low, the power to the
sockets is automatically cut. This ensures
that there is sufficient power to start the
engine.
MOExtended tires (tires with run-flat
properties)
General notes
With MOExtended tires (tires with run flat char-
acteristics), you can continue to drive your vehi-
cle even if there is a total loss of pressure in one
or more tires. The affected tire must not show
any clearly visible damage.
You can recognize MOExtended tires by the
MOExtended marking which appears on the
sidewall of the tire. You will find this marking
next to the tire size designation, the load-bear-
ing capacity and the speed index (
Ypage 335). MOExtended tires may only be used in conjunc-
tion with an active tire pressure loss warning
system or with an active tire pressure monitor.
If a pressure loss warning message appears
in the multifunction display:
Robserve the instructions in the display mes-
sages (Ypage 244).
Rcheck the tire for damage.
Rif driving on, observe the following notes.
The driving distance possible in run-flat mode is
approximately 50 miles (80 km) when the vehi-
cle is partially laden and approximately 18 miles
(30 km) when the vehicle is fully laden.
In addition to the vehicle load, the driving dis-
tance possible depends upon:
Rvehicle speed
Rroad condition
Routside temperature
The driving distance possible in run-flat mode
may be reduced by extreme driving conditions
or maneuvers, or it can be increased through a
moderate style of driving.
The driving dista
nce possible in run-flat mode is
counted from the moment the tire pressure loss
warning appears in the multifunction display.
You must not exceed a maximum speed of
50 mph (80 km/h).
When replacing one or all tires, please observe
the following specifications for your vehicle's
tires:
Rsize
Rtype and
Rthe "MOExtended" mark
Vehicles equipped with MOExtended tires are
not equipped with a TIREFIT kit at the factory. It
is therefore recommended that you additionally
equip your vehicle with a TIREFIT kit if you mount tires that do not feature run-flat properties, e.g.
winter tires. A TIREFIT kit may be obtained from
a qualified specialist workshop.
Important safety notes
GWARNING
When driving in emergency mode, the driving
characteristics deteriorate, e.g. when corner-
ing, accelerating quickly and when braking.
There is a risk of an accident.
Flat tire307
Breakdown assistance
Z
Page 343 of 366
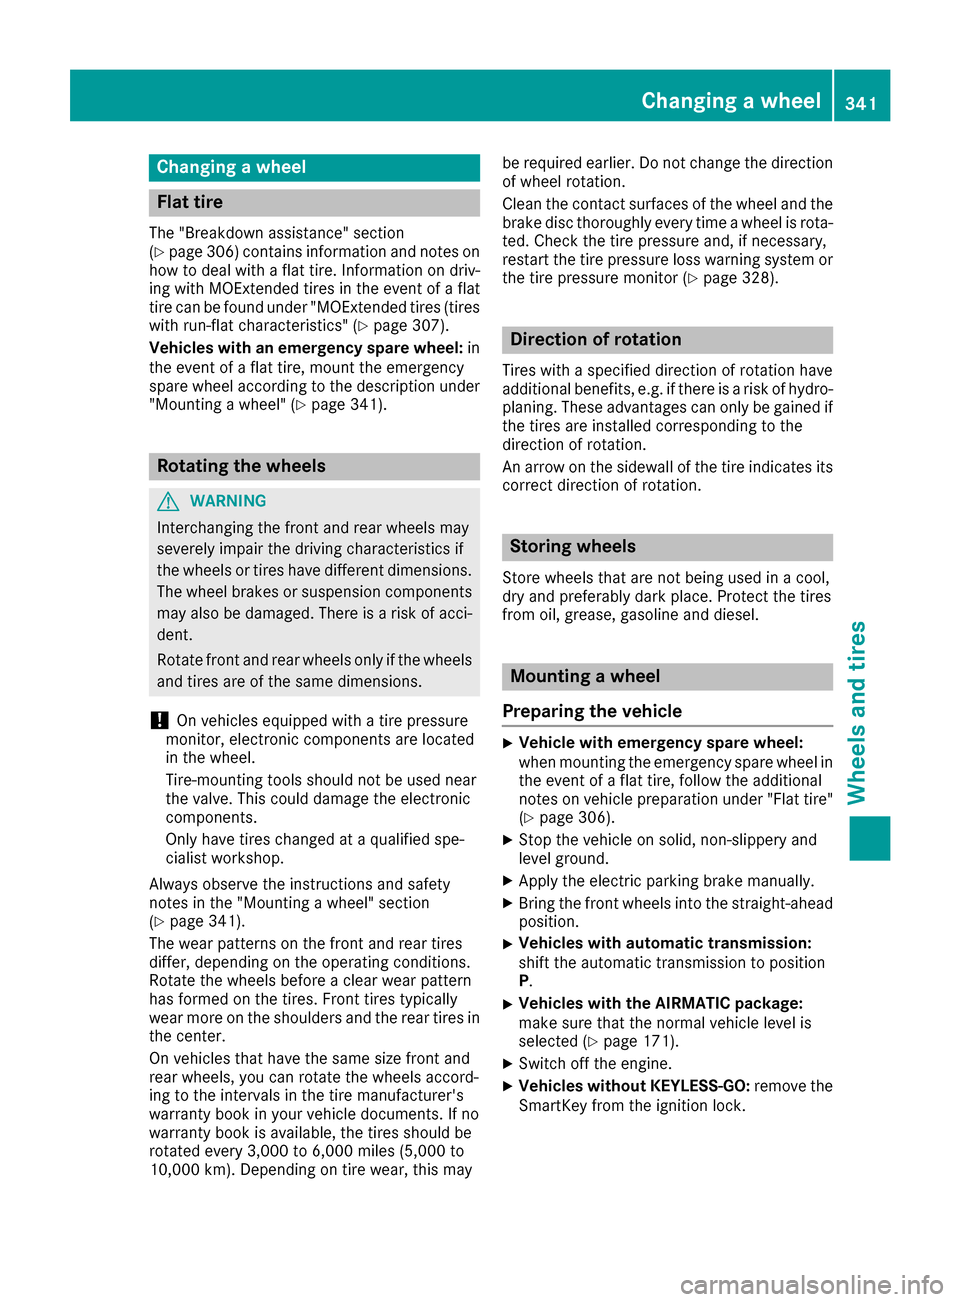
Changing a wheel
Flat tire
The "Breakdown assistance" section
(Ypage 306) contains information and notes on
how to deal with a flat tire. Information on driv-
ing with MOExtended tires in the event of a flat
tire can be found under "MOExtended tires (tires
with run-flat characteristics" (
Ypage 307).
Vehicles with an emergency spare wheel: in
the event of a flat tire, mount the emergency
spare wheel according to the description under "Mounting a wheel" (
Ypage 341).
Rotating the wheels
GWARNING
Interchanging the front and rear wheels may
severely impair the driving characteristics if
the wheels or tires have different dimensions. The wheel brakes or suspension components
may also be damaged. There is a risk of acci-
dent.
Rotate front and rear wheels only if the wheels and tires are of the same dimensions.
!On vehicles equipped with a tire pressure
monitor, electronic components are located
in the wheel.
Tire-mounting tools should not be used near
the valve. This could damage the electronic
components.
Only have tires changed at a qualified spe-
cialist workshop.
Always observe the instructions and safety
notes in the "Mounting a wheel" section
(
Ypage 341).
The wear patterns on the front and rear tires
differ, depending on the operating conditions.
Rotate the wheels before a clear wear pattern
has formed on the tires. Front tires typically
wear more on the shoulders and the rear tires in
the center.
On vehicles that have the same size front and
rear wheels, you can rotate the wheels accord-
ing to the intervals in the tire manufacturer's
warranty book in your vehicle documents. If no
warranty book is available, the tires should be
rotated every 3,000 to 6,000 miles (5,000to
10,
000 km). Depending on tire wear, this may be required earlier. Do not change the direction
of wheel rotation.
Clean the contact surfaces of the wheel and the
brake disc thoroughly every time a wheel is rota-
ted. Check the tire pressure and, if necessary,
restart the tire pressure loss warning system or
the tire pressure monitor (
Ypage 328).
Direction of rotation
Tires with a specified direction of rotation have
additional benefits, e.g. if there is a risk of hydro-
planing. These advantages can only be gained if
the tires are installed corresponding to the
direction of rotation.
An arrow on the sidewall of the tire indicates its
correct direction of rotation.
Storing wheels
Store wheels that are not being used in a cool,
dry and preferably dark place. Protect the tires
from oil, grease, gasoline and diesel.
Mounting a wheel
Preparing the vehicle
XVehicle with emergency spare wheel:
when mounting the emergency spare wheel in
the event of a flat tire, follow the additional
notes on vehicle preparation under "Flat tire"
(
Ypage 306).
XStop the vehicle on solid, non-slippery and
level ground.
XApply the electric parking brake manually.
XBring the front wheels into the straight-ahead position.
XVehicles with automatic transmission:
shift the automatic transmission to position
P .
XVehicles with the AIRMATIC package:
make sure that the normal vehicle level is
selected (
Ypage 171).
XSwitch off the engine.
XVehicles without KEYLESS-GO: remove the
SmartKey from the ignition lock.
Changing a wheel341
Wheels an d tires
Z
Page 360 of 366
R-134arefrigerant. Otherwise, th eclimat e
control system may be damaged.
Service work, suc has refillin gwit hrefrigeran tor
replacing component parts, may only be carrie d
out by aqualified specialist workshop. All appli-
cable regulations, as well as SA Estandard J639,
mus tbe adhered to .
Always hav ewor kon th eclimat econtrol system
carrie dout at aqualified specialist workshop.
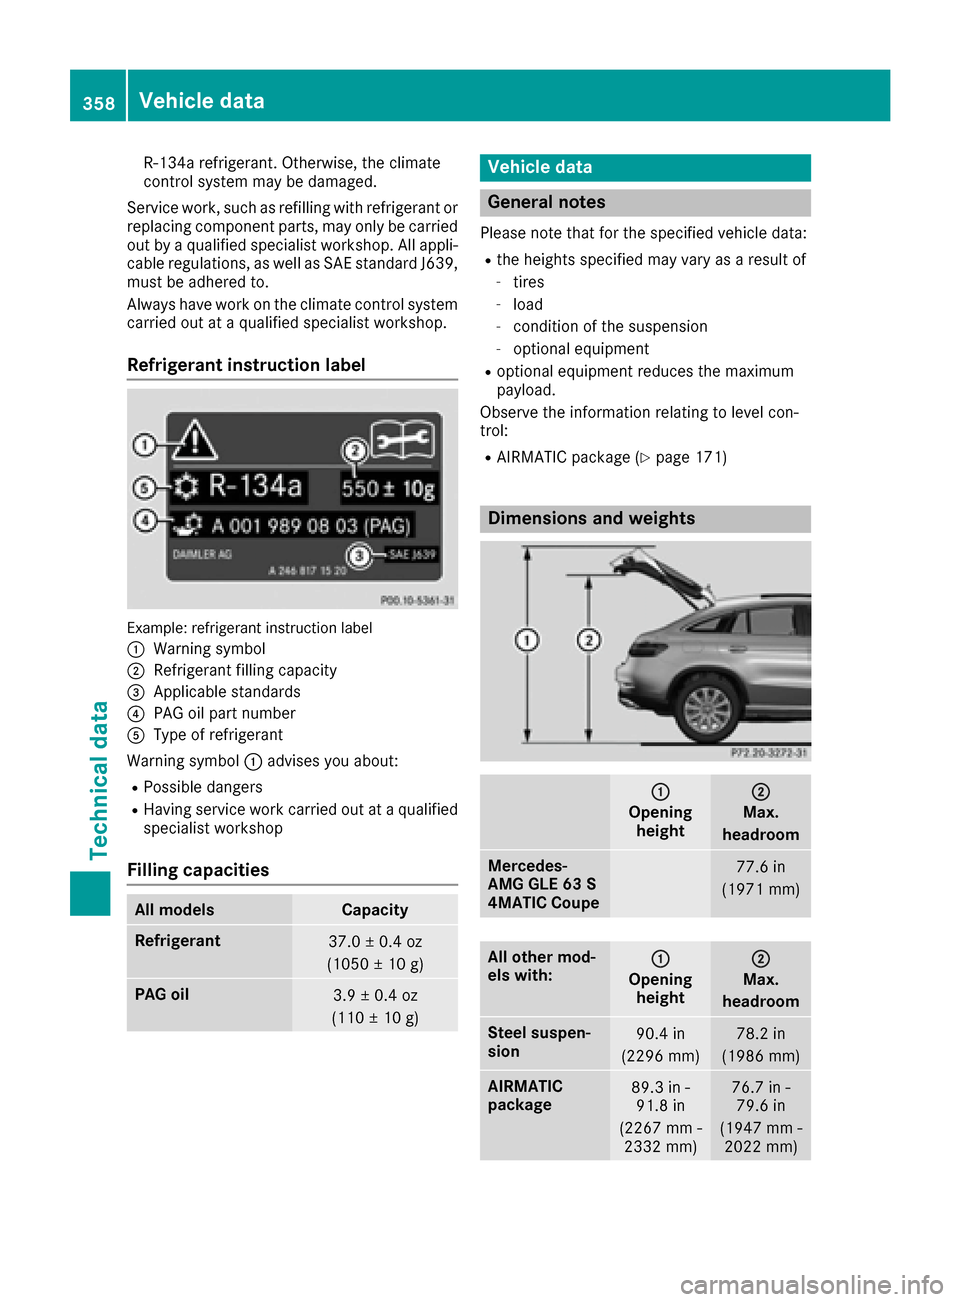
Refrigerant instruction label
Example: refrigeran tinstruction label
:
Warning symbol
;Refrigerant filling capacit y
=Applicable standards
?PAGoil part number
AType of refrigeran t
Warning symbol :advises you about :
RPossibledanger s
RHaving servic ewor kcarrie dout at aqualified
specialist workshop
Filling capacities
All modelsCapacit y
Refrigerant37.0±0. 4oz
(1050 ±10 g)
PAG oil3.9 ± 0.4 oz
(110 ± 10 g)
Vehicle data
General notes
Please note that for the specified vehicle data:
Rthe heights specified may vary as a result of
-tires
-load
-condition of the suspension
-optional equipment
Roptional equipment reduces the maximum
payload.
Observe the information relating to level con-
trol:
RAIRMATIC package (Ypage 171)
Dimensions and weights
:
Opening height
;
Max.
headroom
Mercedes-
AMG GLE 63 S
4MATIC Coupe77.6 in
(1971 mm)
All other mod-
els with::
Opening height
;
Max.
headroom
Steel suspen-
sion90.4 in
(2296 mm)78.2 in
(1986 mm)
AIRMATIC
package89.3 in - 91.8 in
(2267 mm - 2332 mm)76.7 in -79.6 in
(1947 mm - 2022 mm)
358Vehicle data
Technical data