Page 25 of 202

Confirming a selection
XUse one finger to press the touch-sensitive
surface until you reach the pressure point.
A menu, an option or an application is started.
Calling up quick access for audio and
telephone
XUse two fingers to touch the lower part of the
touch-sensitive surface.
XSwipe your fingers up.
Quick access is displayed.
Further information on quick access for audio
and telephone (
Ypage 26).
Hiding the quick access for audio and
telephone
XUse two fingers to touch the touch-sensitive
surface.
XSwipe your fingers down.
Quick access is hidden.
Operating the control for vehicle and
sound settings
XTouch the touch-sensitive surface with two
fingers, spaced slightly apart.
XTurn both fingers clockwise.
The control setting is increased.
or
XTurn both fingers counter-clockwise.
The control setting is decreased.
Moving the map
XUse one finger to press the touch-sensitive
surface until you reach the pressure point.
The crosshair is shown.
Touchpad23
Overview and operation
Page 38 of 202

XTo selectTime: slide6, turn and press the
controller.
A menu appears.
XTo select Daylight Saving Time: turn and
press the controller.
A list with options appears.
XTo select Automatic,Onor Off: turn and
press the controller.
SettingFunction
AutomaticThe summer and
standard time are
automatically
changed over.
OnThe clock is advanced
one hour ahead of
standard time.
OffThe standard time for
the chosen time zone
is selected.
Manual time setting
iUsing the manual time settings, you can set
the time forwards or backwards by up to sev-
eral hours.
XPress the Øbutton.
or
XPress Vehiclein the main function bar.
The vehicle menu is displayed.
XTo select Time: slide6, turn and press the
controller.
A menu appears.
XTo select Set Time Manually: turn and
press the controller.
A menu with an analog clock appears.
XTo set the hour: turn the controller.
XTo highlight the minutes: slide9 the
controller.
XTo set the minutes: turn and press the con-
troller.
The time is accepted.
The Automatic Time Settings
function is
deactivated ª.
If Automatic
is set for the summer time
changeover, you will see a prompt asking
whether the automatic changeover should be
maintained between summer and winter
time.
iIf Automatic Time Settingsis reactiva-
ted, the previous settings for time zone and
summer time changeover are restored.
Setting the time and date format
Use this function to set the time and date format for all displays in the vehicle.
XPress the Øbutton.
or
XPress Vehiclein the main function bar.
The vehicle menu is displayed.
XTo select Time: slide6, turn and press the
controller.
A menu appears.
XTo select Format: turn and press the control-
ler.
XTo select the desired date format: turn and
press the controller.
The #dot indicates the current setting.
XTo select the desired time format: turn and
press the controller.
The #dot indicates the current setting.
AbbreviationMeaning
DD.MM.YYYYDay.Month.Year
date format,
year (all four dig-
its)
DD/MM/YYYYDay/Month/
Year
date format,
year (all four dig-
its)
36Time settings
System settings
Page 187 of 202

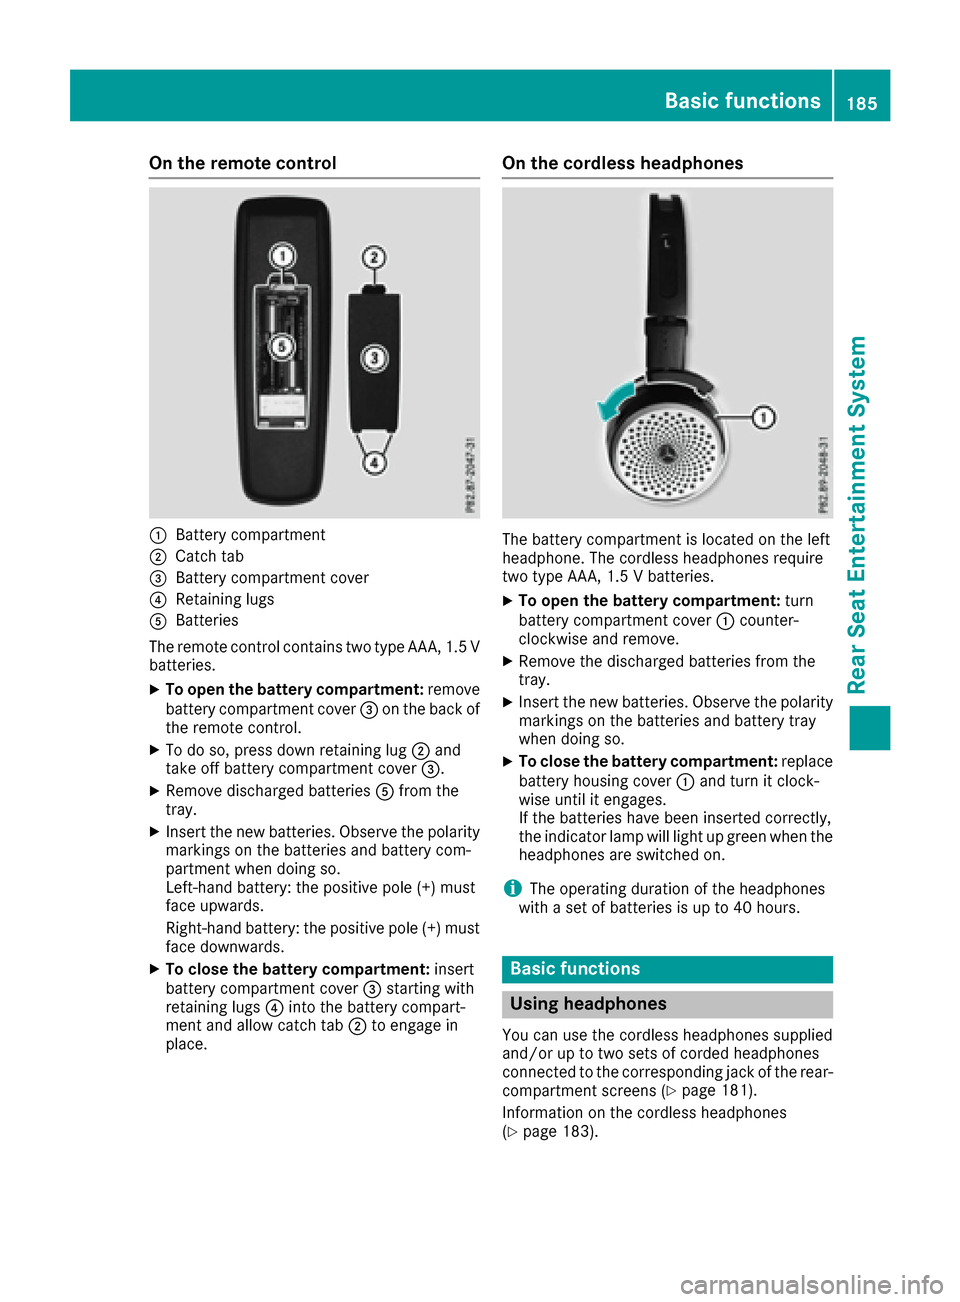
On the remote control
:Battery compartment
;Catch tab
=Battery compartment cover
?Retaining lugs
ABatteries
The remote control contains two type AAA, 1.5 V
batteries.
XTo open the battery compartment: remove
battery compartment cover =on the back of
the remote control.
XTo do so, press down retaining lug ;and
take off battery compartment cover =.
XRemove discharged batteriesAfrom the
tray.
XInsert the new batteries. Observe the polarity markings on the batteries and battery com-
partment when doing so.
Left-hand battery: the positive pole (+) must
face upwards.
Right-hand battery: the positive pole (+) must
face downwards.
XTo close the battery compartment: insert
battery compartment cover =starting with
retaining lugs ?into the battery compart-
ment and allow catch tab ;to engage in
place.
On the cordless headphones
The battery compartment is located on the left
headphone. The cordless headphones require
two type AAA, 1.5 V batteries.
XTo open the battery compartment: turn
battery compartment cover :counter-
clockwise and remove.
XRemove the discharged batteries from the
tray.
XInsert the new batteries. Observe the polarity markings on the batteries and battery tray
when doing so.
XTo close the battery compartment: replace
battery housing cover :and turn it clock-
wise until it engages.
If the batteries have been inserted correctly,
the indicator lamp will light up green when the
headphones are switched on.
iThe operating duration of the headphones
with a set of batteries is up to 40 hours.
Basic functions
Using headphones
You can use the cordless headphones supplied
and/or up to two sets of corded headphones
connected to the corresponding jack of the rear-
compartment screens (
Ypage 181).
Information on the cordless headphones
(
Ypage 183).
Basic functions185
Rear Seat Entertainment System
Z