2017 MERCEDES-BENZ GLC SUV Seat fold
[x] Cancel search: Seat foldPage 21 of 374

Important safety guidelines .............45
Introduction .....................................4 4
Releasin g ......................................... 47
Warning lamp ................................. 256
Warning lamp (function) ................... 47
Seats
Adjusting (AMG Performance
Seat) .............................................. 102
Adjusting (electrically) ................... 100
Adjusting the 4-way lumbar sup-
port ................................................ 102
Adjusting the head restraint .......... 100
Calling up a stored setting (mem-
ory function) .................................. 110
Cleaning the cover ......................... 317
Folding the backrest (rear com-
partment) forwards/back .............. 281
Important safety notes .................... 98
Seat heating .................................. 102
Seat heating problem .................... 104
Seat ventilation .............................. 103
Seat ventilation problem ................ 104
Storing settings (memory func-
tion) ............................................... 109
Securing a load
see Securing cargo
Securing cargo .................................. 284
Selector lever
Cleaning ......................................... 317
see Automatic transmission
Sensors (cleaning instructions) ....... 315
Service menu (on-board com-
puter) .................................................. 219
Service message
see ASSYST PLUS
Service products
Brake fluid ..................................... 368
Coolant (engine) ............................ 368
DEF special additives ..................... 367
Engine oil ....................................... 367
Fuel ................................................ 364
Important safety notes .................. 364
Refrigerant (air-conditioning sys-
tem) ............................................... 369
Washer fluid ................................... 369
Setting the date/time format
see also Digital Operator's Man-
ual .................................................. 268 Setting the language
see also Digital Operator's Man-
ual .................................................. 268
Setting the time
see also Digital Operator's Man-
ual .................................................. 268
Settings
Factory (on-board computer) ......... 223
On-board computer ....................... 220
SE TUP (
on-board computer,
Mercedes-AMG vehicles) .................. 225
Side impact air bag ............................. 50
Side marker lamp (display mes-
sage) ................................................... 239
Side running board
Cleaning ......................................... 315
Side windows
Cleaning ......................................... 314
Convenience closing feature ............ 91
Convenience opening feature .......... 91
Important safety information ........... 90
Opening/closing .............................. 90
Problem (malfunction) ..................... 93
Resetting ......................................... 92
Reversing feature ............................. 90
SIRIUS services
see also Digital Operator's Man-
ual .................................................. 268
Ski and snowboard bag .................... 280
Sliding sunroof
Important safety notes .................... 93
Problem (malfunction) ..................... 96
see Panorama roof with power
tilt/sliding panel
SmartKey
Changing the battery ....................... 80
Changing the programming ............. 79
Checking the battery ....................... 80
Convenience closing feature ............ 92
Convenience opening feature .......... 91
Display message ............................ 255
Door central locking/unlocking ....... 77
Important safety notes .................... 77
KEYLESS-GO start function .............. 79
Loss ................................................. 81
Mechanical key ................................ 79
Overview .......................................... 77
Positions (ignition lock) ................. 132
Index19
Page 44 of 374

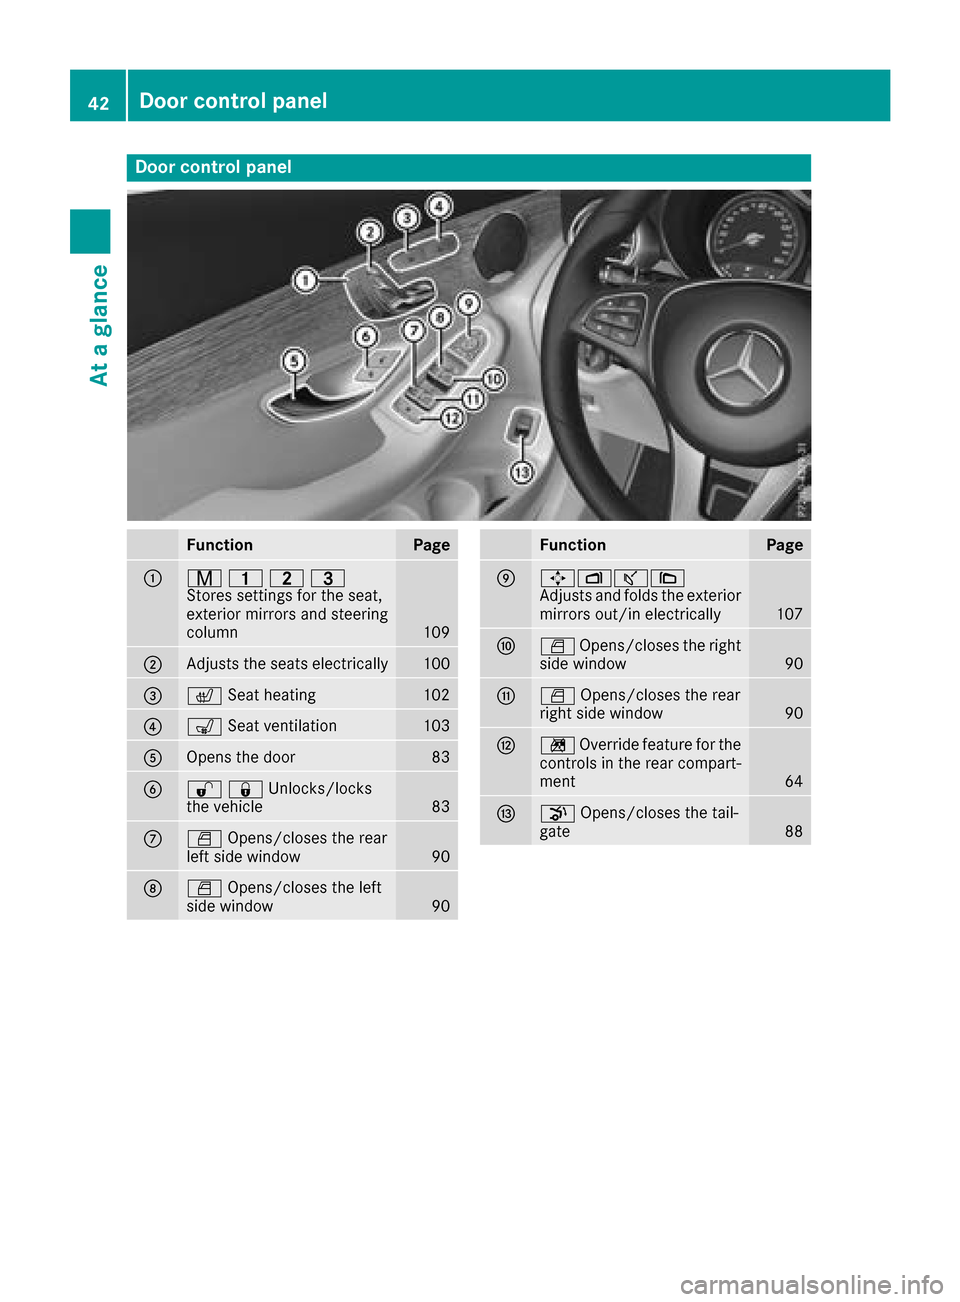
Door controlpanel
FunctionPage
:r 45=
Stores settings for the seat,
exterior mirrors and steering
column
109
;Adjusts the seats electrically100
=c Seat heating102
?sSeat ventilation103
AOpens the door83
B%&Unlocks/locks
the vehicle83
CWOpens/closes the rear
left side window90
DW Opens/closes the left
side window90
FunctionPage
E7Zª\
Adjusts and folds the exterior
mirrors out/in electrically
107
FW Opens/closes the right
side window90
GW Opens/closes the rear
right side window90
Hn Override feature for the
controls in the rear compart-
ment
64
Ip Opens/closes the tail-
gate88
42Door control panel
At a glance
Page 49 of 374

Fastening and adjusting the seat belts
Observeth esafet ynote son th eseat belt
(Ypage 45) and th enote son correct use of seat
belt s (Ypage 46) .
If th ecente rrear seat belt is bein gused, also
observ eth einformation about th eseat belt for
th ecente rrear seat (
Ypage 47).
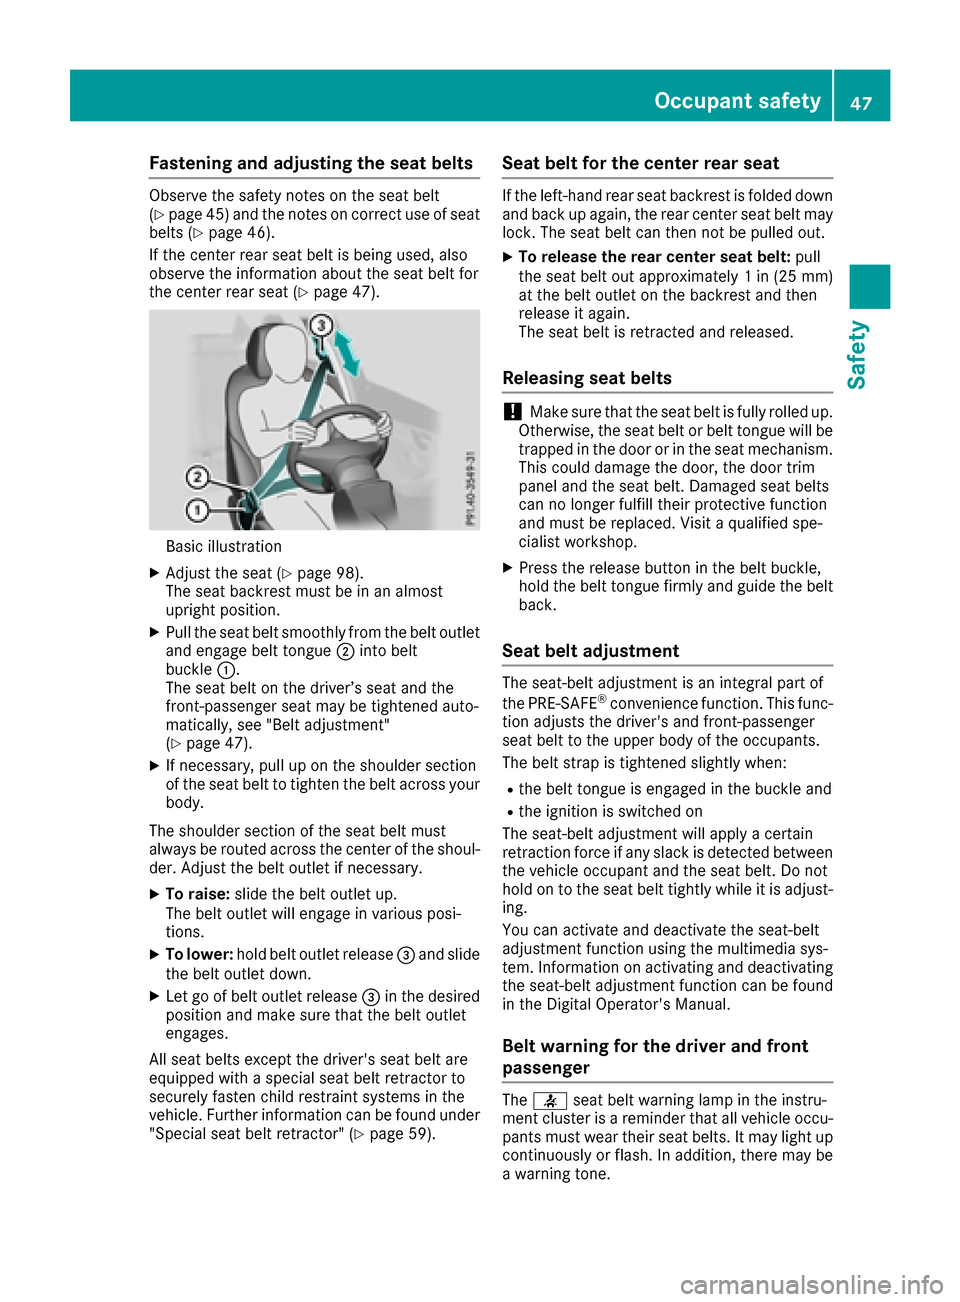
Basic illustration
XAdjustth eseat (Ypage 98).
The seat backrest must be in an almost
upright position .
XPull theseat belt smoothly from th ebelt outlet
and engage belt tongue ;intobelt
buckle :.
The seat belt on th edriver’s seat and th e
front-passenger seat may be tightened auto -
matically, see "Belt adjustment"
(
Ypage 47).
XIf necessary, pull up on th eshoulder section
of th eseat belt to tighten th ebelt across your
body.
The shoulder section of th eseat belt must
always be routed across th ecente rof th eshoul-
der .Adjus tth ebelt outlet if necessary.
XTo raise: slide thebelt outlet up.
The belt outlet will engage in various posi-
tions.
XTo lower :hold belt outlet release =and slide
th ebelt outlet down .
XLet go of belt outlet release =in th edesired
position and mak esure that th ebelt outlet
engages.
All seat belt sexcep tth edriver' sseat belt are
equipped wit h aspecial seat belt retracto rto
securel yfaste nchild restrain tsystems in th e
vehicle. Further information can be foun dunder
"Special seat belt retractor" (
Ypage 59).
Seat belt for the center rear seat
If theleft-han drear seat backrest is folded down
and bac kup again ,th erear cente rseat belt may
lock. The seat belt can then no tbe pulled out .
XTo releaseth erea rcenter sea tbelt :pull
th eseat belt out approximately 1in (25 mm )
at th ebelt outlet on th ebackrest and then
release it again .
The seat belt is retracte dand released.
Releasing seat belts
!Mak esure that th eseat belt is fully rolled up.
Otherwise, th eseat belt or belt tongue will be
trapped in th edoor or in th eseat mechanism .
This could damag eth edoor ,th edoor trim
panel and th eseat belt .Damaged seat belt s
can no longer fulfill their protective function
and must be replaced. Visit aqualified spe-
cialist workshop.
XPress th erelease butto nin th ebelt buckle,
hold th ebelt tongue firmly and guide th ebelt
back.
Seat belt adjustment
The seat-belt adjustmen tis an integral part of
th ePRE-SAF E®convenience function .This func-
tion adjust sth edriver' sand front-passenger
seat belt to th eupper body of th eoccupants.
The belt strap is tightened slightly when :
Rthebelt tongue is engage din th ebuckle and
Rth eignition is switched on
The seat-belt adjustmen twill apply acertai n
retraction force if any slac kis detected between
th evehicl eoccupant and th eseat belt .Do no t
hold on to th eseat belt tightly while it is adjust -
ing .
You can activat eand deactivat eth eseat-belt
adjustmen tfunction usin gth emultimedia sys-
tem. Information on activating and deactivating
th eseat-belt adjustmen tfunction can be foun d
in th eDigital Operator's Manual.
Belt warning for the driver and front
passenger
The 7 seat belt warning lamp in th einstru-
men tcluste ris areminder that all vehicl eoccu-
pants must wear their seat belts. It may ligh tup
continuously or flash. In addition ,there may be
a warning tone .
Occupant safety47
Safety
Z
Page 63 of 374

the instructions on “Occupant Classification
System (OCS)” (Ypage 51). This includes infor-
mation on deactivating the front-passenger's air
bag.
All child restraint systems must meet the fol-
lowing standards:
RU.S. Federal Motor Vehicle Safety Standards
213 and 225
RCanadian Motor Vehicle Safety Standards
213 and 210.2
A statement by the child restraint manufacturer
of compliance with these standards can be
found on the instruction label on the child
restraint system. You will also find the state-
ment in the instruction manual provided with the
child restraint system.
Observe the warning labels in the vehicle inte-
rior and on the child restraint system.
LATCH-type (ISOFIX) child seat secur-
ing system
GWARNING
LATCH-type (ISOFIX) child restraint systems
do not offer sufficient protective effect for
children whose weight is greater than 48 lbs
(22 kg) who are secured using the safety belt integrated in the child restraint system. In the
event of an accident, a child might not be
restrained correctly. This poses an increased
risk of injury or even fatal injury.
If the child weighs more than 48 lbs (22 kg),
only use LATCH-type (ISOFIX) child restraint
systems with which the child is also secured
with the vehicle seat belt. Also secure the
child restraint system with the Top Tether
belt, if available.
Always comply with the manufacturer's instal-
lation and operating instructions for the child
restraint system used.
Before every trip, make sure that the LATCH-
type (ISOFIX) child restraint system is engaged
correctly in both LATCH-type (ISOFIX) securing
rings
!When installing the child restraint system,
make sure that the seat belt for the middle
seat does not get trapped. The seat belt could
otherwise be damaged.
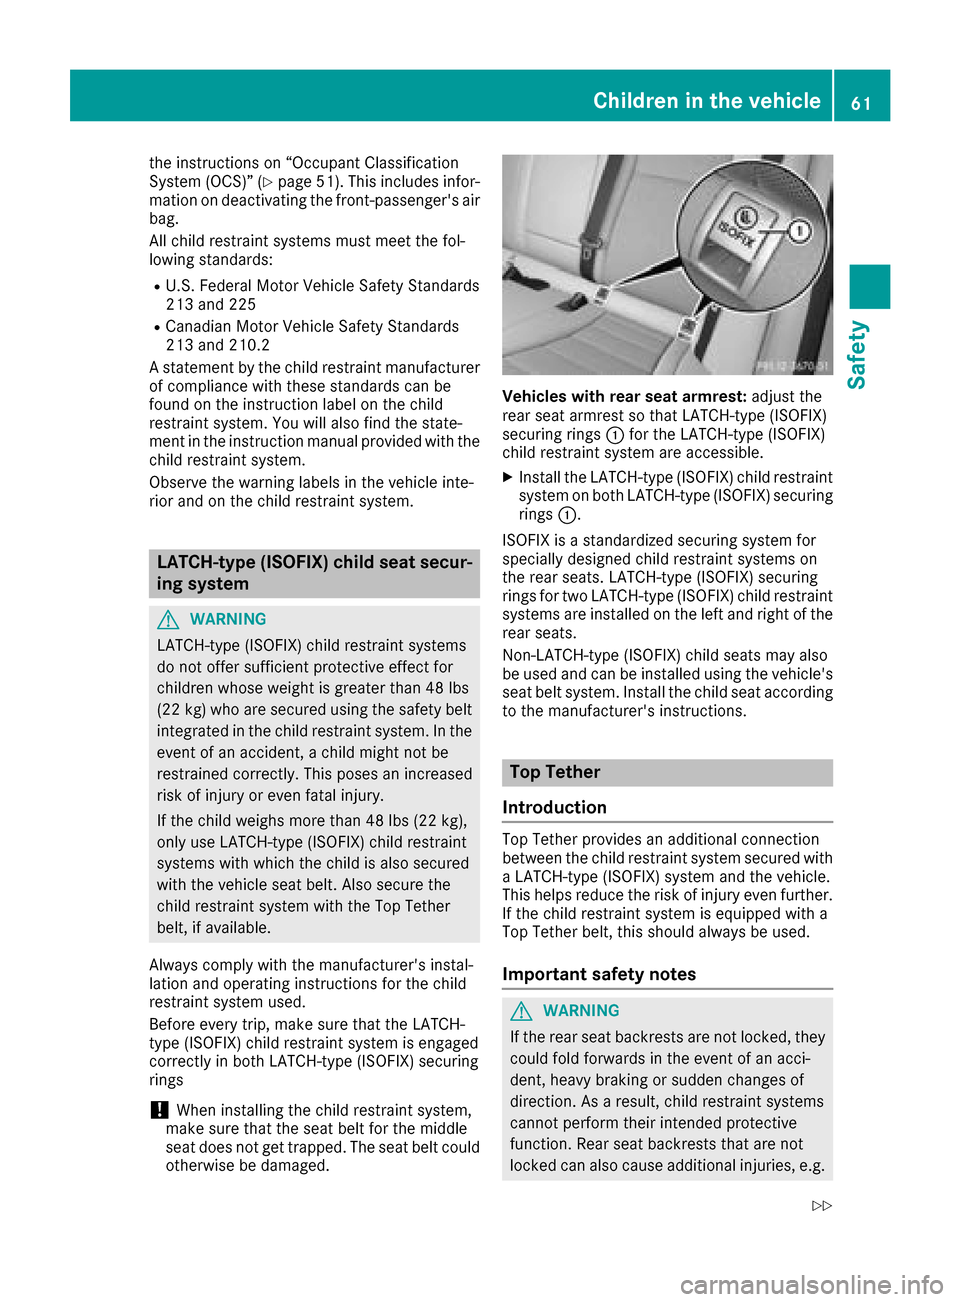
Vehicles with rear seat armrest: adjust the
rear seat armrest so that LATCH-type (ISOFIX)
securing rings :for the LATCH-type (ISOFIX)
child restraint system are accessible.
XInstall the LATCH-type (ISOFIX) child restraint
system on both LATCH-type (ISOFIX) securing
rings :.
ISOFIX is a standardized securing system for
specially designed child restraint systems on
the rear seats. LATCH-type (ISOFIX) securing
rings for two LATCH-type (ISOFIX) child restraint
systems are installed on the left and right of the
rear seats.
Non-LATCH-type (ISOFIX) child seats may also
be used and can be installed using the vehicle's
seat belt system. Install the child seat according
to the manufacturer's instructions.
Top Tether
Introduction
Top Tether provides an additional connection
between the child restraint system secured with
a LATCH-type (ISOFIX) system and the vehicle.
This helps reduce the risk of injury even further. If the child restraint system is equipped with a
Top Tether belt, this should always be used.
Important safety notes
GWARNING
If the rear seat backrests are not locked, they
could fold forwards in the event of an acci-
dent, heavy braking or sudden changes of
direction. As a result, child restraint systems
cannot perform their intended protective
function. Rear seat backrests that are not
locked can also cause additional injuries, e.g.
Children in the vehicle61
Safety
Z
Page 92 of 374

!The tailgate swings upwards and to the rear
when opened. Therefore, make sure that
there is sufficient clearance above and behind
the tailgate.
Unlocking
XRemove cargo compartment cover
(Ypage 285).
XFold the rear seat backrest forward
(Ypage 281).
XInsert mechanical key ;into opening :in
the paneling and push it in.
XOpen the tailgate.
When you lock the vehicle, the cargo compart-
ment is also locked again.
Side windows
Important safety notes
GWARNING
While opening the side windows, body parts
could become trapped between the side win-
dow and the door frame as the side window
moves. There is a risk of injury.
Make sure that nobody touches the side win-
dow during the opening procedure. If some-
body becomes trapped, release the switch or
pull the switch to close the side window again.
GWARNING
While closing the side windows, body parts in
the closing area could become trapped. There is a risk of injury.
When closing make sure that no parts of the
body are in the closing area. If somebody
becomes trapped, release the switch or press
the switch to open the side window again.
GWARNING
If children operate the side windows they
could become trapped, particularly if they are left unsupervised. There is a risk of injury.
Activate the override feature for the rear side
windows. When leaving the vehicle, always
take the SmartKey with you and lock the vehi-
cle. Never leave children unsupervised in the
vehicle.
Side window reversing feature
The side windows are equipped with an auto-
matic reversing feature. If a solid object blocks
or restricts a side window from traveling
upwards during the automatic closing process,
the side window opens again automatically. Dur-
ing the manual closing process, the side windowonly opens again automatically after the corre-
sponding switch is released. The automatic
reversing feature is only an aid and is no substi-
tute for your attention when closing a side win-
dow.
GWARNING
The reversing feature does not react:
Rto soft, light and thin objects, e.g. small fin-
gers
Rwhile resetting
This means that the reversing feature cannot
prevent someone being trapped in these sit-
uations. There is a risk of injury.
Make sure that no body parts are in close
proximity during the closing procedure. If
someone becomes trapped, press the switch
to open the side window again.
Opening and closing the side win-
dows
The switches for all side windows are located on the driver's door. There is also a switch on each
door for the corresponding side window.
90Side windows
Opening and closing
Page 101 of 374

of injury in the head and neck area, e.g. in theevent of an accident or when braking.
Always drive with the head restraints instal-
led. Before driving off, make sure for every
vehicle occupant that the center of the head
restraint supports the back of the head at
about eye level.
Do not rotate the head restraints of the front and rear seats. Otherwise, you cannot adjust the
height and angle of the head restraints cor-
rectly.
Using the fore-and-aft adjustment, adjust the
head restraint so that it is as close as possible to
your head.
GWARNING
If the driver's seat is not engaged, it could
move unexpectedly while the vehicle is in
motion. This could cause you to lose control of the vehicle. There is a risk of an accident.
Always make sure that the driver's seat is
engaged before starting the vehicle.
GWARNING
You could lose control of your vehicle if you do the following while driving:
Radjust the driver's seat, head restraint,
steering wheel or mirrors
Rfasten the seat belt
There is a risk of an accident.
Adjust the driver's seat, head restraint, steer-
ing wheel and mirror and fasten your seat belt before starting the engine.
GWARNING
If you adjust the seat height carelessly, you or
other vehicle occupants could be trapped and
thereby injured. Children in particular could
accidentally press the electrical seat adjust-
ment buttons and become trapped. There is a
risk of injury.
While moving the seats, make sure that your
hands or other body parts do not get under the
lever assembly of the seat adjustment sys-
tem.
GWARNING
The seat belt does not offer the intended level of protection if you have not moved the back-
rest to an almost vertical position. When brak-
ing or in the event of an accident, you could
slide underneath the seat belt and sustain
abdomen or neck injuries, for example. This
poses an increased risk of injury or even fatal injury.
Adjust the seat properly before beginning
your journey. Always ensure that the backrest
is in an almost vertical position and that the
shoulder section of your seat belt is routed
across the center of your shoulder.
!To avoid damage to the seats and the seat
heating, observe the following information:
Rkeep liquids from spilling on the seats. If
liquid is spilled on the seats, dry them as
soon as possible.
Rif the seat covers are damp or wet, do not
switch on the seat heating. The seat heat-
ing should also not be used to dry the seats.
Rclean the seat covers as recommended;
see "Interior care".
Rdo not transport heavy loads on the seats.
Do not place sharp objects on the seat
cushions, e.g. knives, nails or tools. The
seats should only be occupied by passen-
gers, if possible.
Rwhen the seat heating is in operation, do
not cover the seats with insulating materi-
als, e.g. blankets, coats, bags, seat covers,
child seats or booster seats.
!Make sure that there are no objects in the
footwell under or behind the seats when mov-
ing the seats back. There is a risk that the
seats and/or the objects could be damaged.
iThe rear-compartment head restraints can
be removed (Ypage 102).
For more information, contact a qualified spe-
cialist workshop.
iRelated topic:
REASY-PACK Quickfold rear bench seat
(Ypage 281)
Seats99
Seats, steering wheel and mirrors
Z
Page 104 of 374

Installing and removing rear head
restraints
XReleaseth erear seat backrest and fol dit
slightly forward (Ypage 281).
XTo remove:pull thehead restrain tup to th e
stop.
XPress release catch :and pull th ehead
restrain tout of th eguides.
XTo re-install: insert thehead restrain tso that
th enotches on th ebar are on th elef twhen
viewed in th edirection of travel .
XPush thehead restrain tdown until you hear it
engage in position .
XFold backth erear seat backrest until it
engages.
Adjusting the 4-way lumbar support
:Raises th ebackrest contour
;Soften sth ebackrest contour
=Lowers th ebackrest contour
?Harden sth ebackrest contour
You can adjust th econtour of th efron tseat
backrest sindividually to provide optimum sup-
por tfor your back.
Adjusting the AMG Performance Seat
To adjust th econtour of th eseat and for
improve dlateral support ,you can individually
adjust th efron tseats.
Adjusting th esid ebolsters of th esea tcush -
ion
XTo set narrower: press button:.
XTo set wider: press button;.
To adjust th esid ebolsters of th esea tback -
res t
XTo set narrower: press button=.
XTo set wider: press button?.
Adjusting th esea tcushion lengt hmechani-
call y
XLifthandle Aand slide th eseat cushion
forward or back.
XReleas elever Aagain .
The seat cushion engages.
Switching the seat heating on/off
Switching on/off
GWARNIN G
Repeatedly switching on th eseat heating can
caus eth eseat cushion and backrest pads to
become ver yhot .The healt hof person swit h
limite dtemperature sensitivit yor alimite d
abilit yto reac tto excessively high tempera-
tures may be affecte dor they may eve nsuffer
burn-like injuries. Ther eis aris kof injury.
Therefore, do no tswitch th eseat heating on
repeatedly.
102Seats
Seats, steering wheel and mirrors
Page 109 of 374

For this reason, always make sure of the
actual distance from the road users traveling
behind by glancing over your shoulder.
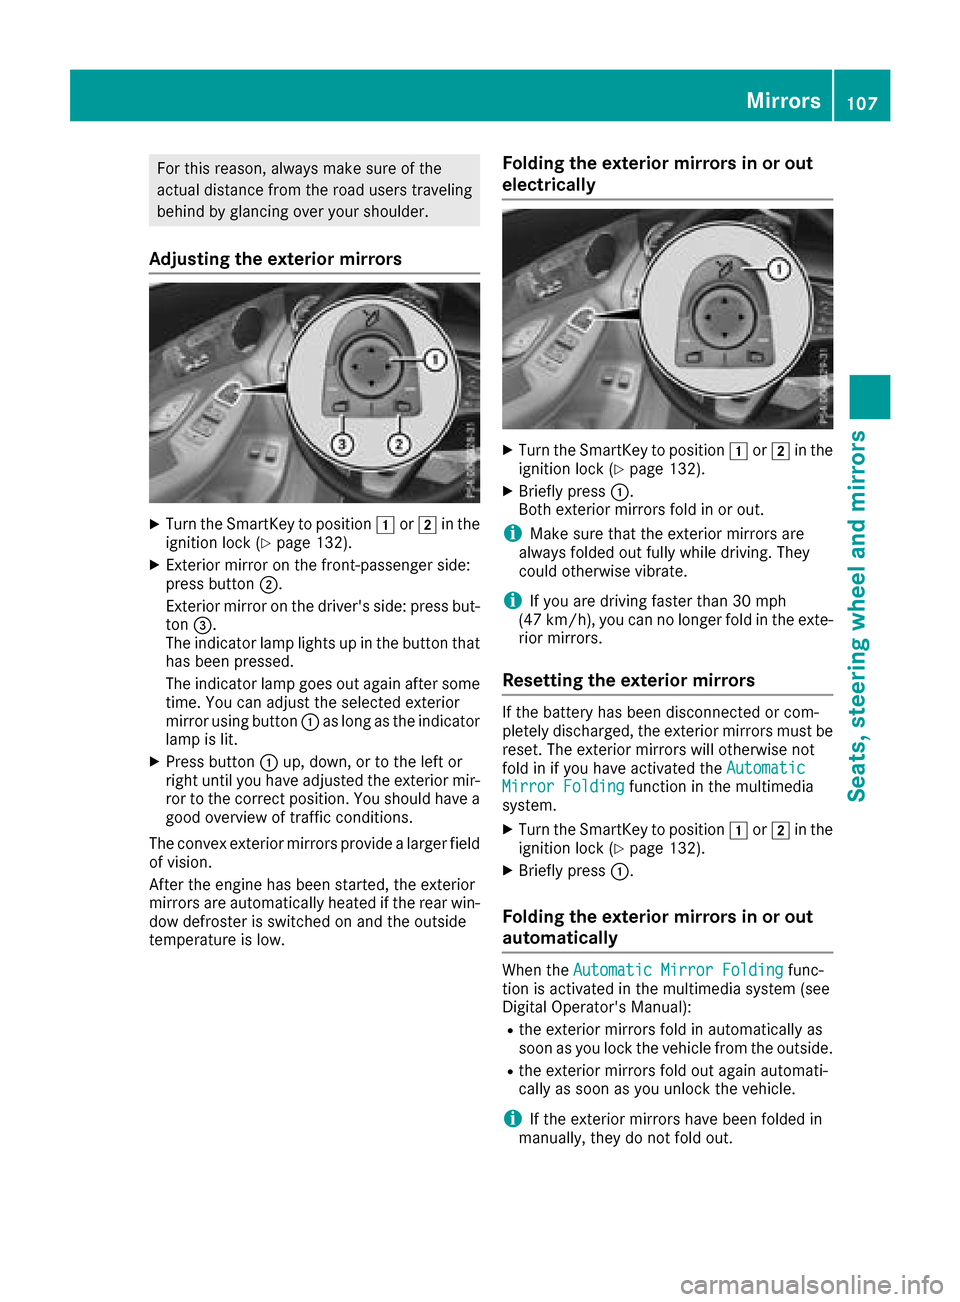
Adjusting the exterior mirrors
XTurn the SmartKey to position1or2 in the
ignition lock (Ypage 132).
XExterior mirror on the front-passenger side:
press button ;.
Exterior mirror on the driver's side: press but-
ton =.
The indicator lamp lights up in the button that
has been pressed.
The indicator lamp goes out again after some
time. You can adjust the selected exterior
mirror using button :as long as the indicator
lamp is lit.
XPress button :up, down, or to the left or
right until you have adjusted the exterior mir-
ror to the correct position. You should have a
good overview of traffic conditions.
The convex exterior mirrors provide a larger field of vision.
After the engine has been started, the exterior
mirrors are automatically heated if the rear win-
dow defroster is switched on and the outside
temperature is low.
Folding the exterior mirrors in or out
electrically
XTurn the SmartKey to position 1or2 in the
ignition lock (Ypage 132).
XBriefly press :.
Both exterior mirrors fold in or out.
iMake sure that the exterior mirrors are
always folded out fully while driving. They
could otherwise vibrate.
iIf you are driving faster than 30 mph
(47 km/h), you can no longer fold in the exte-
rior mirrors.
Resetting the exterior mirrors
If the battery has been disconnected or com-
pletely discharged, the exterior mirrors must be
reset. The exterior mirrors will otherwise not
fold in if you have activated the Automatic
Mirror Foldingfunction in the multimedia
system.
XTurn the SmartKey to position 1or2 in the
ignition lock (Ypage 132).
XBriefly press :.
Folding the exterior mirrors in or out
automatically
When theAutomatic Mirror Foldingfunc-
tion is activated in the multimedia system (see
Digital Operator's Manual):
Rthe exterior mirrors fold in automatically as
soon as you lock the vehicle from the outside.
Rthe exterior mirrors fold out again automati-
cally as soon as you unlock the vehicle.
iIf the exterior mirrors have been folded in
manually, they do not fold out.
Mirrors107
Seats, steering wheel and mirrors
Z