2017 MERCEDES-BENZ GLC SUV change wheel
[x] Cancel search: change wheelPage 211 of 374
Tachometer
!
Do not drive in the overrevving range, as this
could damage the engine.
The red band in the tachometer indicates the
engine's overrevving range.
The fuel supply is interrupted to protect the
engine when the red band is reached.
Outside temperature display
You should pay special attention to road condi-
tions when temperatures are around freezing
point.
Bear in mind that the outside temperature dis-
play indicates the temperature measured and
does not record the road temperature.
The outside temperature display is in the multi-
function display (
Ypage 210).
Changes in the outside temperature are dis-
played after a short delay.
Coolant temperature gauge
GWARNING
Opening the hood when the engine is over-
heated or when there is a fire in the engine
compartment could expose you to hot gases
or other service products. There is a risk of
injury.
Let an overheated engine cool down before
opening the hood. If there is a fire in the
engine compartment, keep the hood closed
and contact the fire department.
!A display message is shown if the coolant
temperature is too high.
If the coolant temperature is over 248 ‡
(120 †), do not continue driving. The engine
will otherwise be damaged.
The coolant temperature gauge is in the lower
section of the tachometer (
Ypage 36).
Under normal operating conditions and with the
specified coolant level, the coolant temperature
may rise to 248 ‡ (120 †).
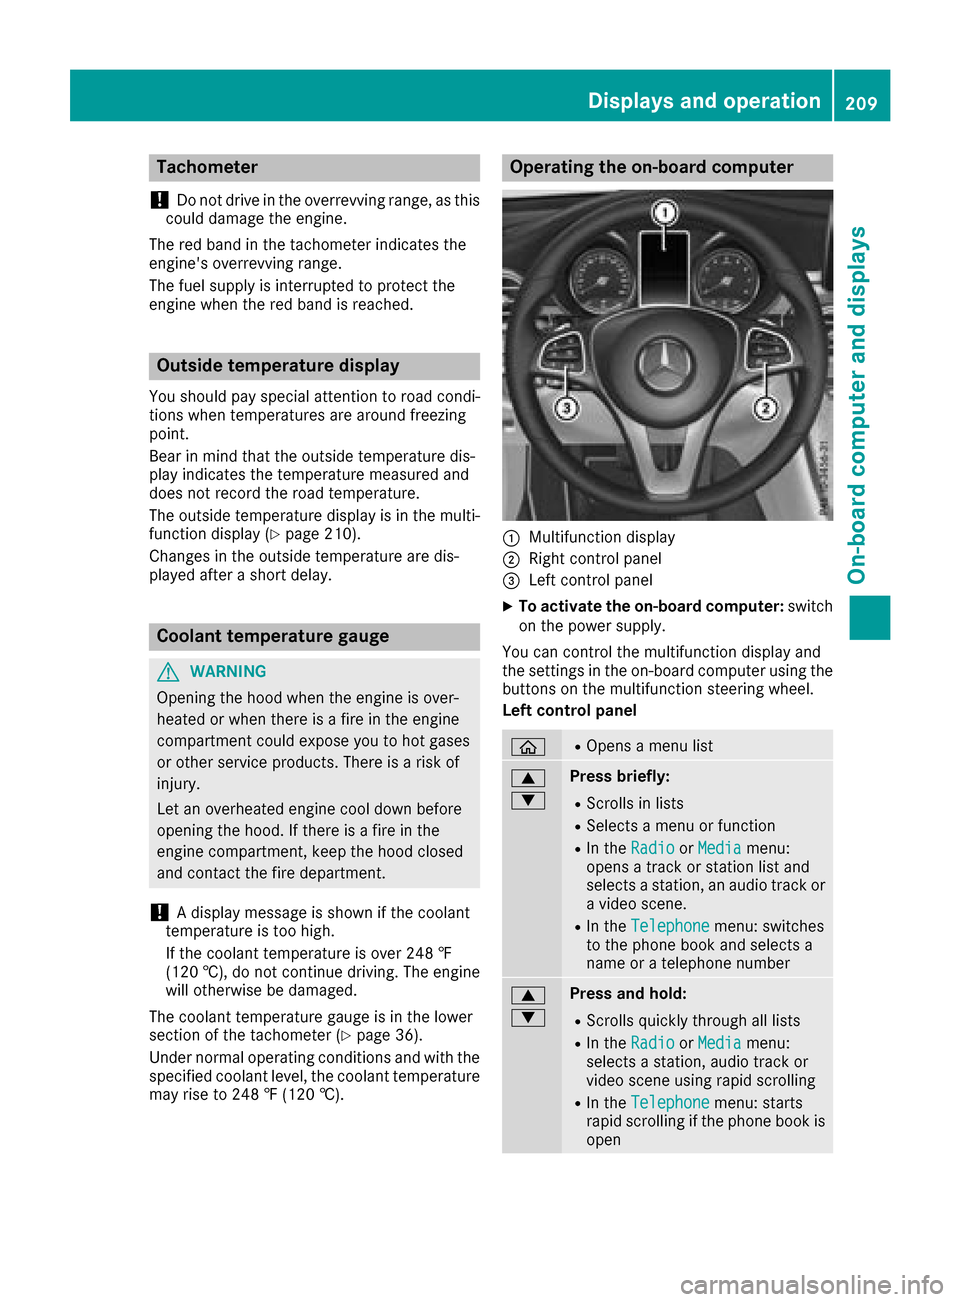
Operating the on-board computer
:Multifunction display
;Right control panel
=Left control panel
XTo activate the on-board computer: switch
on the power supply.
You can control the multifunction display and
the settings in the on-board computer using the
buttons on the multifunction steering wheel.
Left control panel
òROpens a menu list
9
:Press briefly:
RScrolls in lists
RSelects a menu or function
RIn the RadioorMediamenu:
opens a track or station list and
selects a station, an audio track or
a video scene.
RIn the Telephonemenu: switches
to the phone book and selects a
name or a telephone number
9
:Press and hold:
RScrolls quickly through all lists
RIn the RadioorMediamenu:
selects a station, audio track or
video scene using rapid scrolling
RIn the Telephonemenu: starts
rapid scrolling if the phone book is
open
Displays an doperation209
On-boa rd computer and displays
Z
Page 216 of 374
XConfirmbypressing aon the steering
wheel.
XPress the :or9 button to select the
digit al speedometer.
Resetting values
XPress the òbutton on the steering wheel
to open the menu list.
XPress :or9 on the steering wheel to
select the Tripmenu.
XConfirmbypressing aon the steering
wheel.
XPress the :or9 button to select the
function that you wishto reset.
XPress abriefly.
XPress :to select Yesand press ato
confirm.
You can reset the values of the foll owing func-
tions:
RTrip odometer
R"From Start" tr ipcomputer
R"From Reset" tr ipcomputer
RECO display
If you reset the values inthe ECO display, the
values inthe "From Start" tr ipcomputer are
also reset. Ifyou reset the values inthe "From
St art" tr ipcomputer, the values inthe ECO
displ ay are also reset.
Navigation system menu
Displaying navigation instructions
In the Navimenu, the multifunction display
shows navigation instructions. You can find fur-
ther information on navigation instructions in
the multimedia systeminthe Digital Operator's
Manual.
XSwit ch on the multimed iasystem.
XPress the òbutton on the steering wheel
to open the menu list.
XPress :or9 on the steering wheel to
select the Navimenu.
XConfirmbypressing aon the steering
wheel.
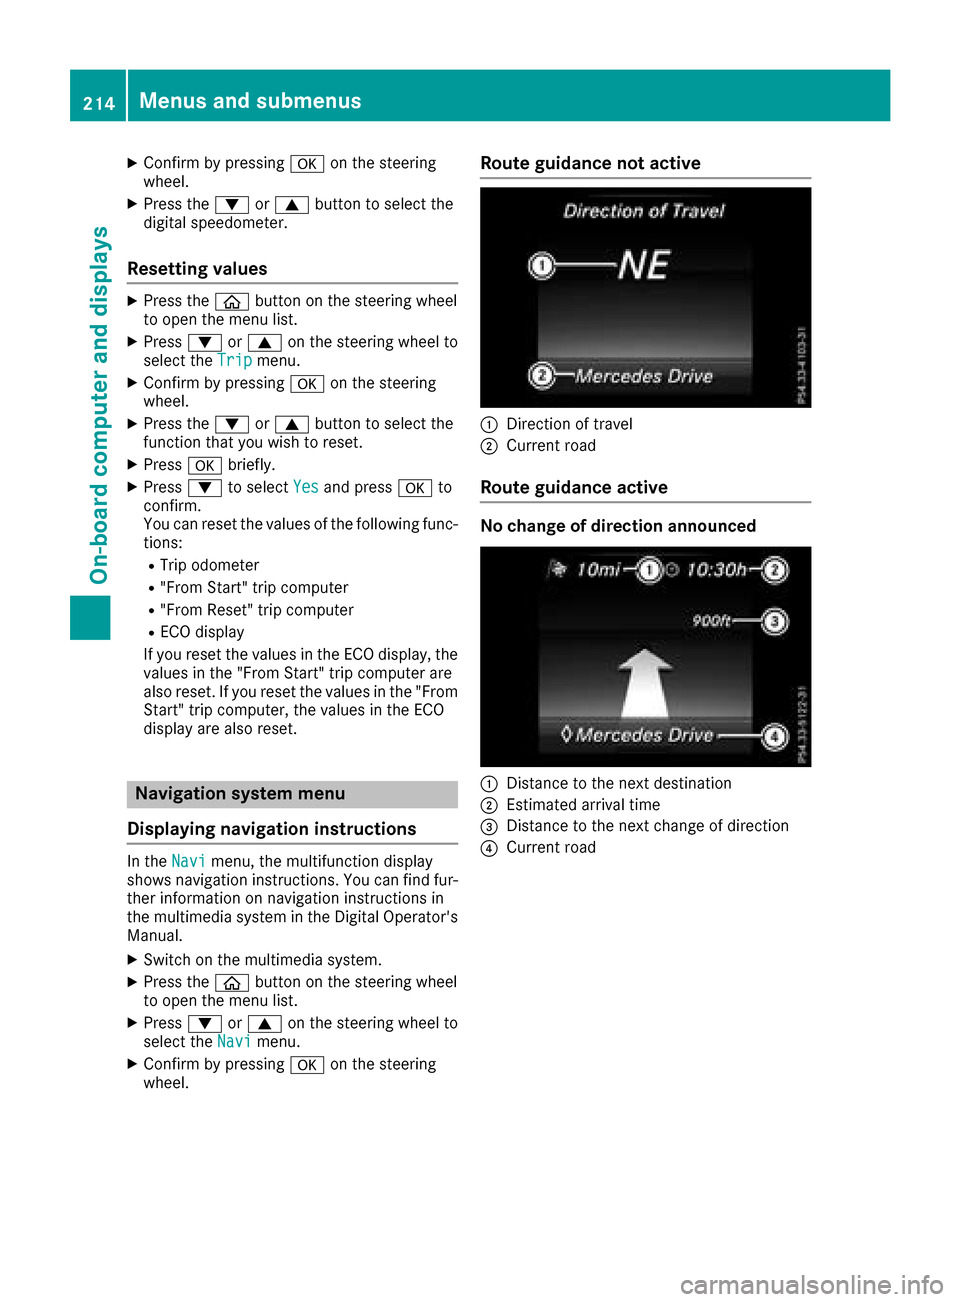
Route guidance not active
:Direction of travel
;Current road
Route guidance active
No change of direction announced
:Distance to the next destination
;Estimated arrival time
=Distance to the next change of direction
?Current road
214Menus and submenus
On-board computer and displays
Page 218 of 374
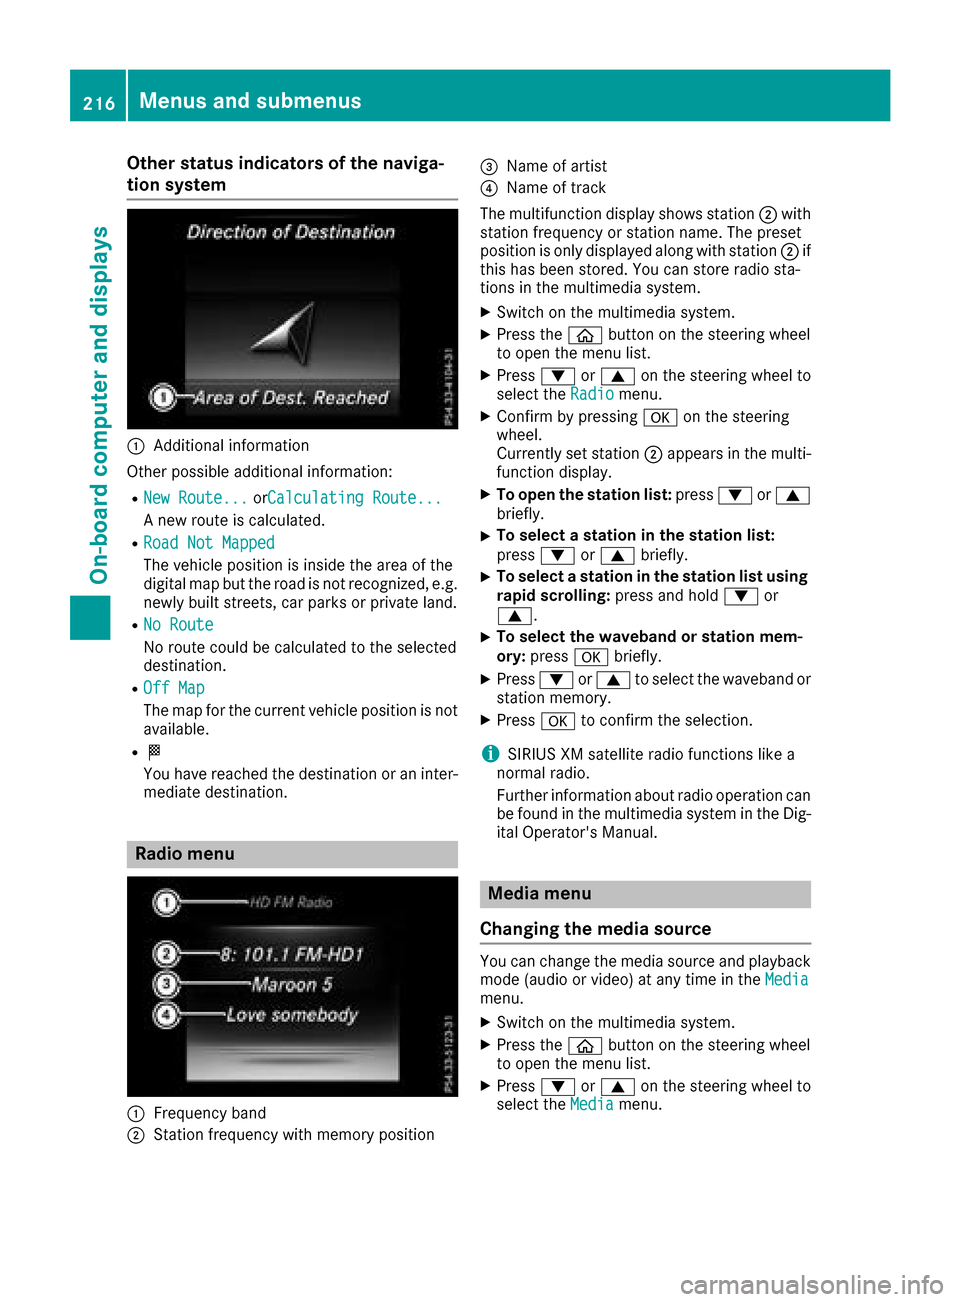
Other status indicators of the naviga-
tion system
:Additional information
Other possible additional information:
RNew Route...orCalculating Route...
A new route is calculated.
RRoad Not Mapped
The vehicle position is inside the area of the
digital map but the road is not recognized, e.g. newly built streets, car parks or private land.
RNo Route
No route could be calculated to the selected
destination.
ROff Map
The map for the current vehicle position is not
available.
RO
You have reached the destination or an inter-
mediate destination.
Radio menu
:Frequency band
;Station frequency with memory position
=Name of artist
?Name of track
The multifunction display shows station ;with
station frequency or station name. The preset
position is only displayed along with station ;if
this has been stored. You can store radio sta-
tions in the multimedia system.
XSwitch on the multimedia system.
XPress the òbutton on the steering wheel
to open the menu list.
XPress :or9 on the steering wheel to
select the Radiomenu.
XConfirm by pressing aon the steering
wheel.
Currently set station ;appears in the multi-
function display.
XTo open the station list: press:or9
briefly.
XTo select a station in the station list:
press :or9 briefly.
XTo select a station in the station list using
rapid scrolling: press and hold:or
9.
XTo select the waveband or station mem-
ory: press abriefly.
XPress :or9 to select the waveband or
station memory.
XPress ato confirm the selection.
iSIRIUS XM satellite radio functions like a
normal radio.
Further information about radio operation can
be found in the multimedia system in the Dig-
ital Operator's Manual.
Media menu
Changing the media source
You can change the media source and playback
mode (audio or video) at any time in the Media
menu.
XSwitch on the multimedia system.
XPress theòbutton on the steering wheel
to open the menu list.
XPress :or9 on the steering wheel to
select the Mediamenu.
216Menus and submenus
On-board computer and displays
Page 223 of 374
Activating/deactivating PRE-SAFE®
Brake
PRE‑S AF E®Brake is only available for vehicles
wit hth eDrivin gAssistanc epackage.
XPress th eò buttonon th esteering whee l
to open th emen ulist .
XPress th e: or9 buttonon th esteering
whee lto select th eSettingsmenu.
XConfir mby pressin ga on thesteering
wheel.
XUse : or9 to select th eDriveAssistsubmenu.
XPress ato confirm .
XPress:or9 to select PRE-SAFEBrake.
XPressato confirm .
The curren tselection appears.
XTo act ivate/deact ivate:press th ea but-
to nagain .
When PRE-SAF E
®Brake is deactivated, th e
æ symbol appear sin th emultifunction dis-
play in th eAssistanc eGraphi c
menu.
Fo rmor einformation on PRE ‑SAFE
®Brake ,see
(Ypage 73).
Activating/deactivating Blind Spot Assist
XPress theò buttonon th esteering whee l
to open th emen ulist .
XPress :or9 on thesteering whee lto
select th eSettingsmenu.
XConfir mby pressin ga on thesteering
wheel.
XPress :or9 to select th eDriveAs‐sis tsubmenu.
XPress ato confirm .
XPress:or9 to select Blind Spo tAssist.
XPressato confirm .
The curren tselection appears.
XTo act ivate/deact ivate:press th ea but-
to nagain .
Fo rfurther information about Blin dSpo tAssist ,
see (
Ypage 193).
Fo rfurther information about Activ eBlin dSpo t
Assist ,see (
Ypage 197).
Setting ATTENTION ASSIST
XPress th eò buttonon th esteering whee l
to open th emen ulist .
XPress th e: or9 buttonon th esteering
whee lto select th eSettingsmenu.
XConfir mby pressin ga on thesteering
wheel.
XUse : or9 to select th eDriveAssistsubmenu.
XPress ato confirm .
XPress:or9 to select ATTENTIONASSIST.
XPressato confirm .
XPress:or9 to select Off,Standardor Sensitive.
XPress th ea buttonto confirm th eselec-
tion.
When ATTENTI ONASSIST is deactivated, th e
é symbol appear sin th eAssistanc e
Graphicmenuin th emultifunction display.
Fo rfurther information about ATTENTI ON
ASSIST ,see (
Ypage 191).
Setting Lane Keeping Assist
XPress th eò buttonon th esteering whee l
to open th emen ulist .
XPress :or9 on thesteering whee lto
select th eSettingsmenu.
XConfir mby pressin ga on thesteering
wheel.
XPress :or9 to select th eDriveAs‐sis tsubmenu.
XPress ato confirm .
XPress:or9 to select LaneKeepin gAssist.
XPressato confirm .
The curren tselection StandardorAdaptiveappears.
XTo change th esetting: pressaagain.
Fo rfurther information about Lan eKeepin g
Assist ,see (
Ypage 195).
Fo rfurther information about Activ eLan eKeep-
ing Assist ,see (
Ypage 200).
Menus and submenus221
On-board computer and displays
Z
Page 224 of 374
Head-up display submenu
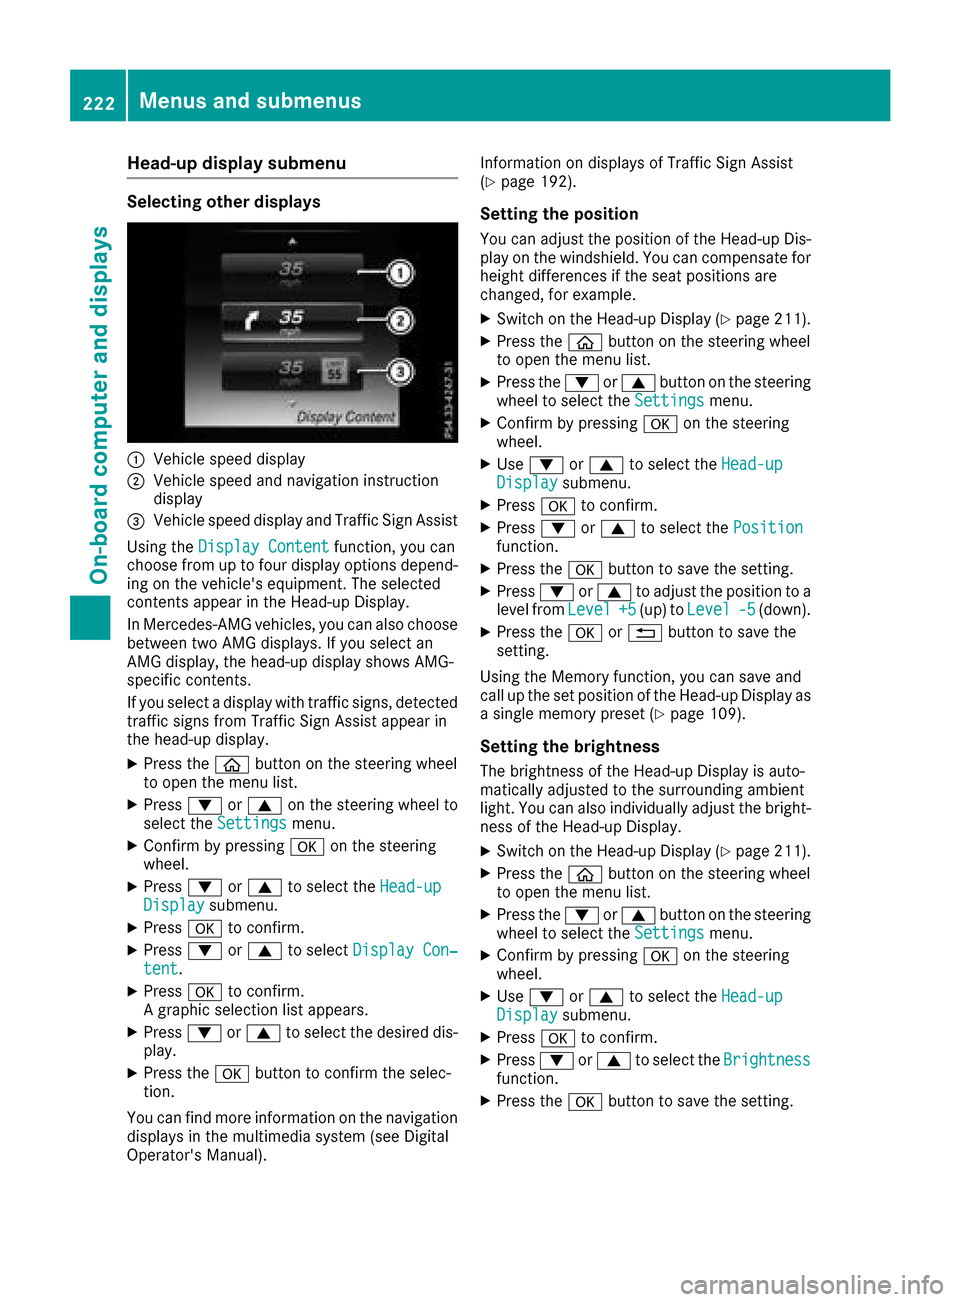
Selecting other displays
:Vehicle speed display
;Vehicle speed and navigation instruction
display
=Vehicle speed display and Traffic Sign Assist
Using the Display Content
function, you can
choose from up to four display options depend-
ing on the vehicle's equipment. The selected
contents appear in the Head-up Display.
In Mercedes-AMG vehicles, you can also choose
between two AMG displays. If you select an
AMG display, the head-up display shows AMG-
specific contents.
If you select a display with traffic signs, detected
traffic signs from Traffic Sign Assist appear in
the head-up display.
XPress the òbutton on the steering wheel
to open the menu list.
XPress :or9 on the steering wheel to
select the Settingsmenu.
XConfirm by pressing aon the steering
wheel.
XPress :or9 to select the Head-upDisplaysubmenu.
XPressato confirm.
XPress :or9 to select Display Con‐tent.
XPressato confirm.
A graphic selection list appears.
XPress :or9 to select the desired dis-
play.
XPress the abutton to confirm the selec-
tion.
You can find more information on the navigation
displays in the multimedia system (see Digital
Operator's Manual). Information on displays of Traffic Sign Assist
(
Ypage 192).
Setting the position
You can adjust the position of the Head-up Dis-
play on the windshield. You can compensate for
height differences if the seat positions are
changed, for example.
XSwitch on the Head-up Display (Ypage 211).
XPress the
òbutton on the steering wheel
to open the menu list.
XPress the :or9 button on the steering
wheel to select the Settingsmenu.
XConfirm by pressing aon the steering
wheel.
XUse : or9 to select the Head-upDisplaysubmenu.
XPressato confirm.
XPress :or9 to select the Positionfunction.
XPress theabutton to save the setting.
XPress :or9 to adjust the position to a
level from Level+5(up) toLevel-5(down).
XPress the aor% button to save the
setting.
Using the Memory function, you can save and
call up the set position of the Head-up Display as
a single memory preset (
Ypage 109).
Setting the brightness
The brightness of the Head-up Display is auto-
matically adjusted to the surrounding ambient
light. You can also individually adjust the bright-
ness of the Head-up Display.
XSwitch on the Head-up Display (Ypage 211).
XPress the òbutton on the steering wheel
to open the menu list.
XPress the :or9 button on the steering
wheel to select the Settingsmenu.
XConfirm by pressing aon the steering
wheel.
XUse : or9 to select the Head-upDisplaysubmenu.
XPressato confirm.
XPress :or9 to select the Brightnessfunction.
XPress theabutton to save the setting.
222Menus and submenus
On-board computer and displays
Page 252 of 374
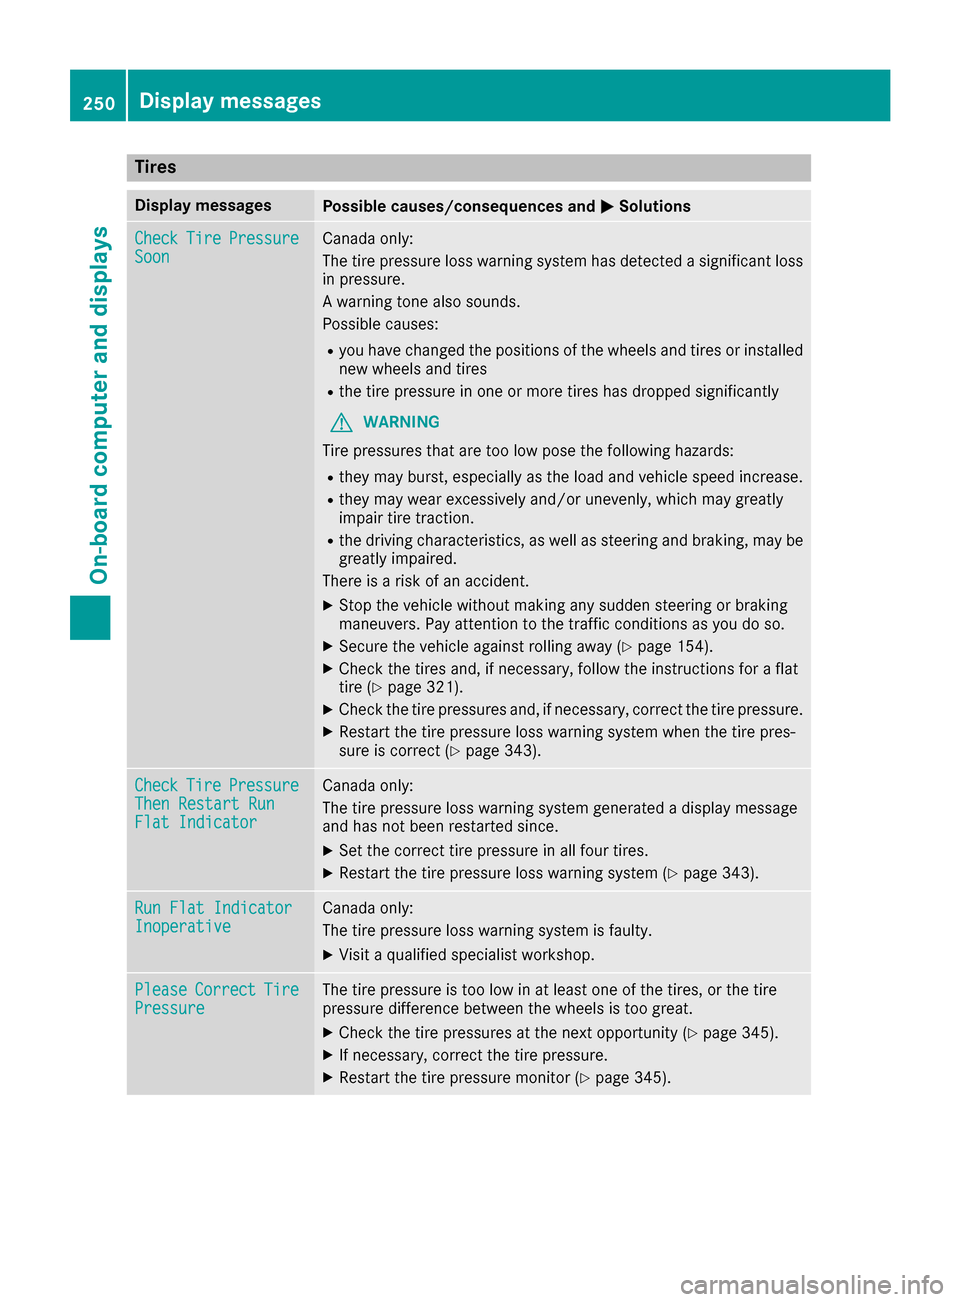
Tires
Display messagesPossible causes/consequences andMSolutions
CheckTirePressureSoonCanada only:
The tire pressure loss warning system has detected a significant loss
in pressure.
A warning tone also sounds.
Possible causes:
Ryou have changed the positions of the wheels and tires or installed
new wheels and tires
Rthe tire pressure in one or more tires has dropped significantly
GWARNING
Tire pressures that are too low pose the following hazards:
Rthey may burst, especially as the load and vehicle speed increase.
Rthey may wear excessively and/or unevenly, which may greatly
impair tire traction.
Rthe driving characteristics, as well as steering and braking, may be
greatly impaired.
There is a risk of an accident.
XStop the vehicle without making any sudden steering or braking
maneuvers. Pay attention to the traffic conditions as you do so.
XSecure the vehicle against rolling away (Ypage 154).
XCheck the tires and, if necessary, follow the instructions for a flat
tire (Ypage 321).
XCheck the tire pressures and, if necessary, correct the tire pressure.
XRestart the tire pressure loss warning system when the tire pres-
sure is correct (Ypage 343).
CheckTirePressureThen Restart RunFlat Indicator
Canada only:
The tire pressure loss warning system generated a display message
and has not been restarted since.
XSet the correct tire pressure in all four tires.
XRestart the tire pressure loss warning system (Ypage 343).
Run Flat IndicatorInoperativeCanada only:
The tire pressure loss warning system is faulty.
XVisit a qualified specialist workshop.
PleaseCorrectTirePressureThe tire pressure is too low in at least one of the tires, or the tire
pressure difference between the wheels is too great.
XCheck the tire pressures at the next opportunity (Ypage 345).
XIf necessary, correct the tire pressure.
XRestart the tire pressure monitor (Ypage 345).
250Displa y messages
On-board computer and displays
Page 257 of 374
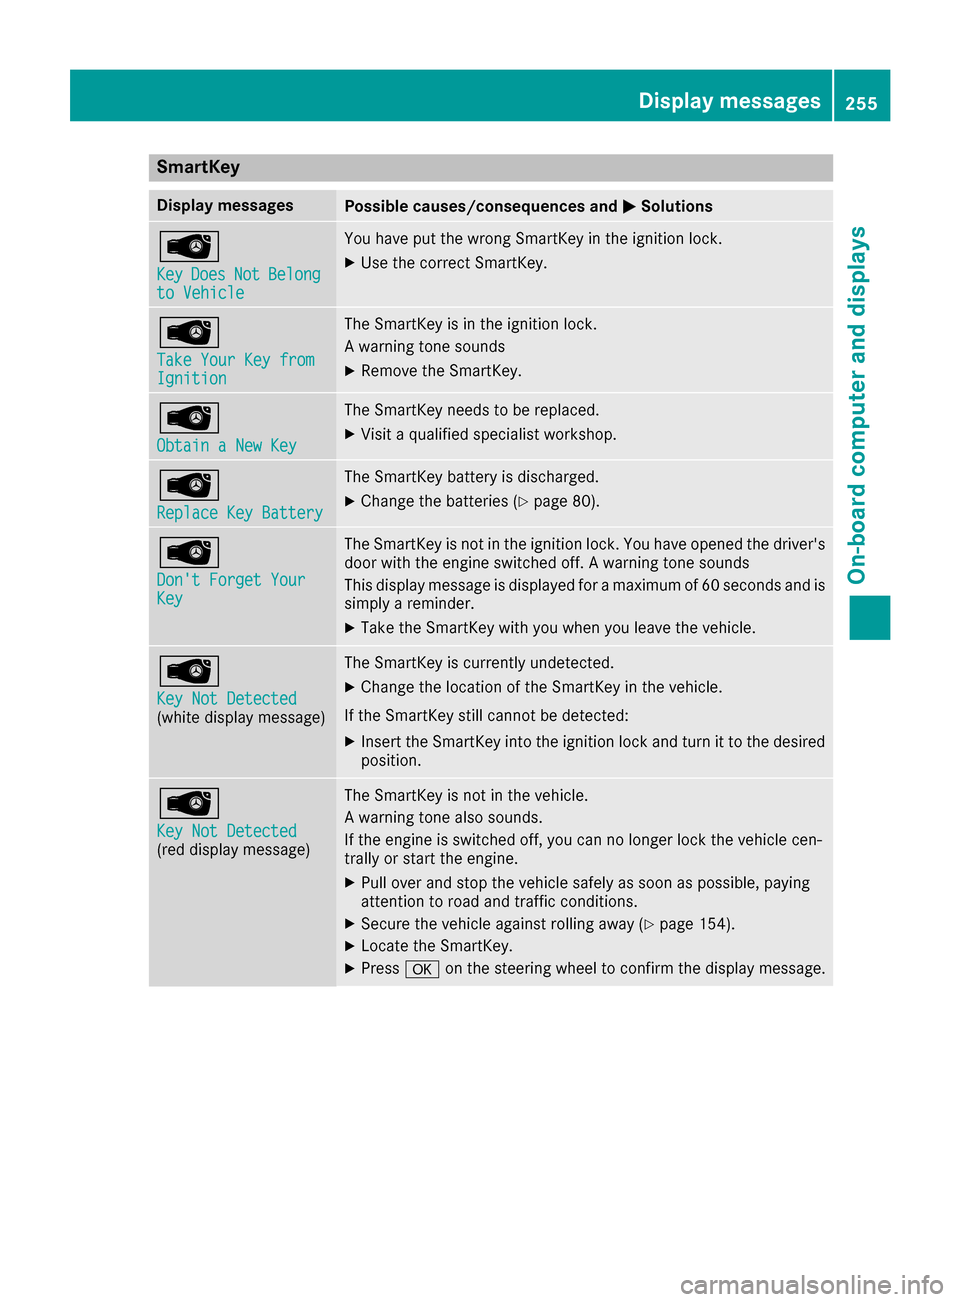
SmartKey
Display messagesPossible causes/consequences andMSolutions
Â
KeyDoesNotBelongto Vehicle
You have put the wrong SmartKey in the ignition lock.
XUse the correct SmartKey.
Â
Take Your Key fromIgnition
The SmartKey is in the ignition lock.
A warning tone sounds
XRemove the SmartKey.
Â
Obtain a New Key
The SmartKey needs to be replaced.
XVisit a qualified specialist workshop.
Â
Replace Key Battery
The SmartKey battery is discharged.
XChange the batteries (Ypage 80).
Â
Don't Forget YourKey
The SmartKey is not in the ignition lock. You have opened the driver's
door with the engine switched off. A warning tone sounds
This display message is displayed for a maximum of 60 seconds and is
simply a reminder.
XTake the SmartKey with you when you leave the vehicle.
Â
Key Not Detected(white display message)
The SmartKey is currently undetected.
XChange the location of the SmartKey in the vehicle.
If the SmartKey still cannot be detected:
XInsert the SmartKey into the ignition lock and turn it to the desired position.
Â
Key Not Detected(red display message)
The SmartKey is not in the vehicle.
A warning tone also sounds.
If the engine is switched off, you can no longer lock the vehicle cen-
trally or start the engine.
XPull over and stop the vehicle safely as soon as possible, paying
attention to road and traffic conditions.
XSecure the vehicle against rolling away (Ypage 154).
XLocate the SmartKey.
XPress aon the steering wheel to confirm the display message.
Display messages255
On-board computer and displays
Z
Page 271 of 374
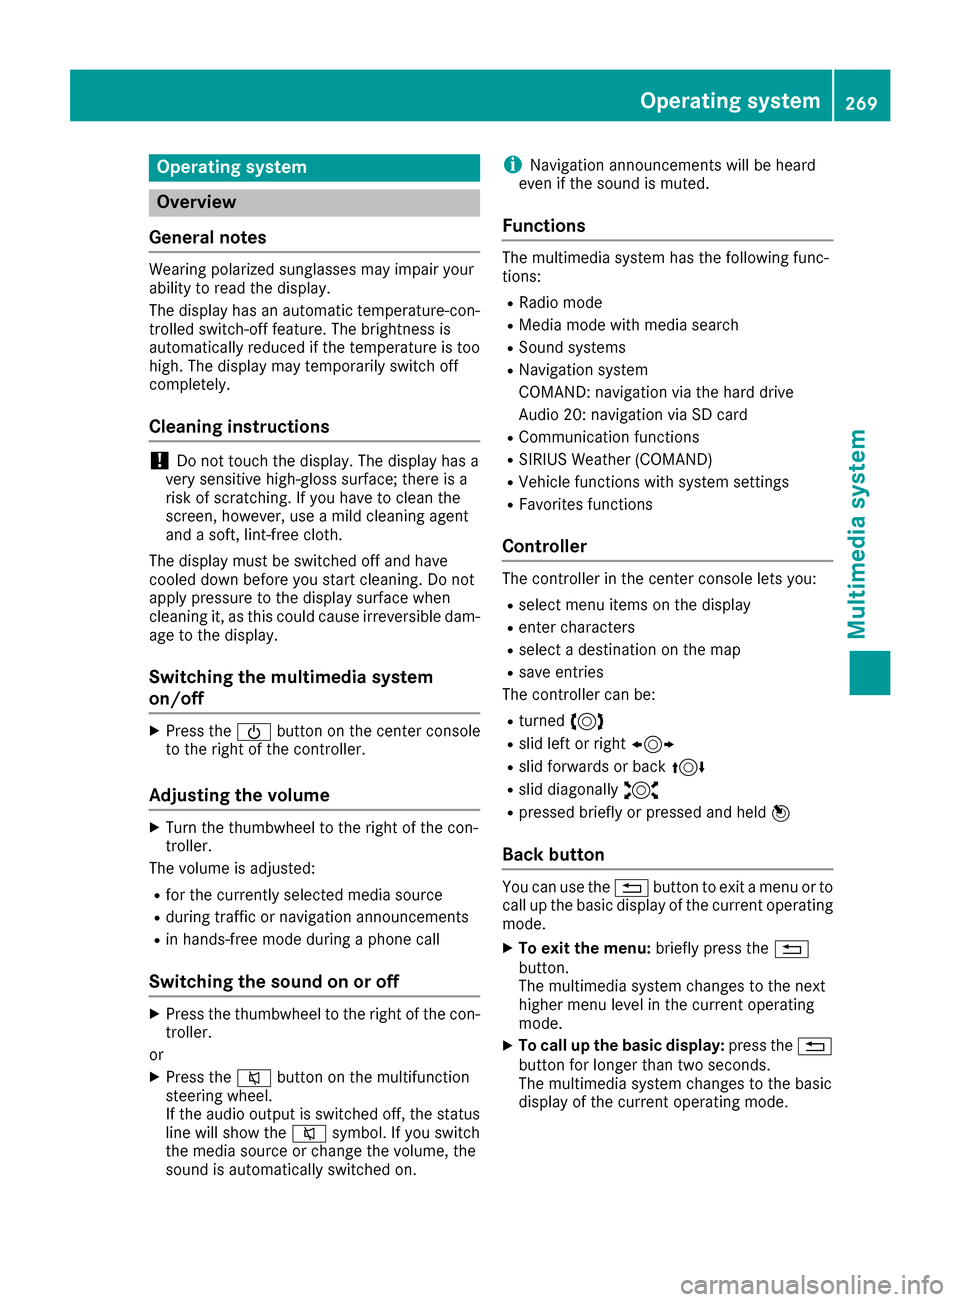
Operating system
Overview
General notes
Wearing polarized sunglasses may impair your
ability to read the display.
The display has an automatic temperature-con-
trolled switch-off feature. The brightness is
automatically reduced if the temperature is too
high. The display may temporarily switch off
completely.
Cleaning instructions
!Do not touch the display. The display has a
very sensitive high-gloss surface; there is a
risk of scratching. If you have to clean the
screen, however, use a mild cleaning agent
and a soft, lint-free cloth.
The display must be switched off and have
cooled down before you start cleaning. Do not
apply pressure to the display surface when
cleaning it, as this could cause irreversible dam-
age to the display.
Switching the multimedia system
on/off
XPress the Übutton on the center console
to the right of the controller.
Adjusting the volume
XTurn the thumbwheel to the right of the con-
troller.
The volume is adjusted:
Rfor the currently selected media source
Rduring traffic or navigation announcements
Rin hands-free mode during a phone call
Switching the sound on or off
XPress the thumbwheel to the right of the con-
troller.
or
XPress the 8button on the multifunction
steering wheel.
If the audio output is switched off, the status
line will show the 8symbol. If you switch
the media source or change the volume, the
sound is automatically switched on.
iNavigation announcements will be heard
even if the sound is muted.
Functions
The multimedia system has the following func-
tions:
RRadio mode
RMedia mode with media search
RSound systems
RNavigation system
COMAND: navigation via the hard drive
Audio 20: navigation via SD card
RCommunication functions
RSIRIUS Weather (COMAND)
RVehicle functions with system settings
RFavorites functions
Controller
The controller in the center console lets you:
Rselect menu items on the display
Renter characters
Rselect a destination on the map
Rsave entries
The controller can be:
Rturned 3
Rslid left or right 1
Rslid forwards or back 4
Rslid diagonally2
Rpressed briefly or pressed and held 7
Back button
You can use the%button to exit a menu or to
call up the basic display of the current operating
mode.
XTo exit the menu: briefly press the%
button.
The multimedia system changes to the next
higher menu level in the current operating
mode.
XTo call up the basic display: press the%
button for longer than two seconds.
The multimedia system changes to the basic
display of the current operating mode.
Operating system269
Multimedia system
Z