2017 MERCEDES-BENZ GLC SUV climate control
[x] Cancel search: climate controlPage 131 of 374
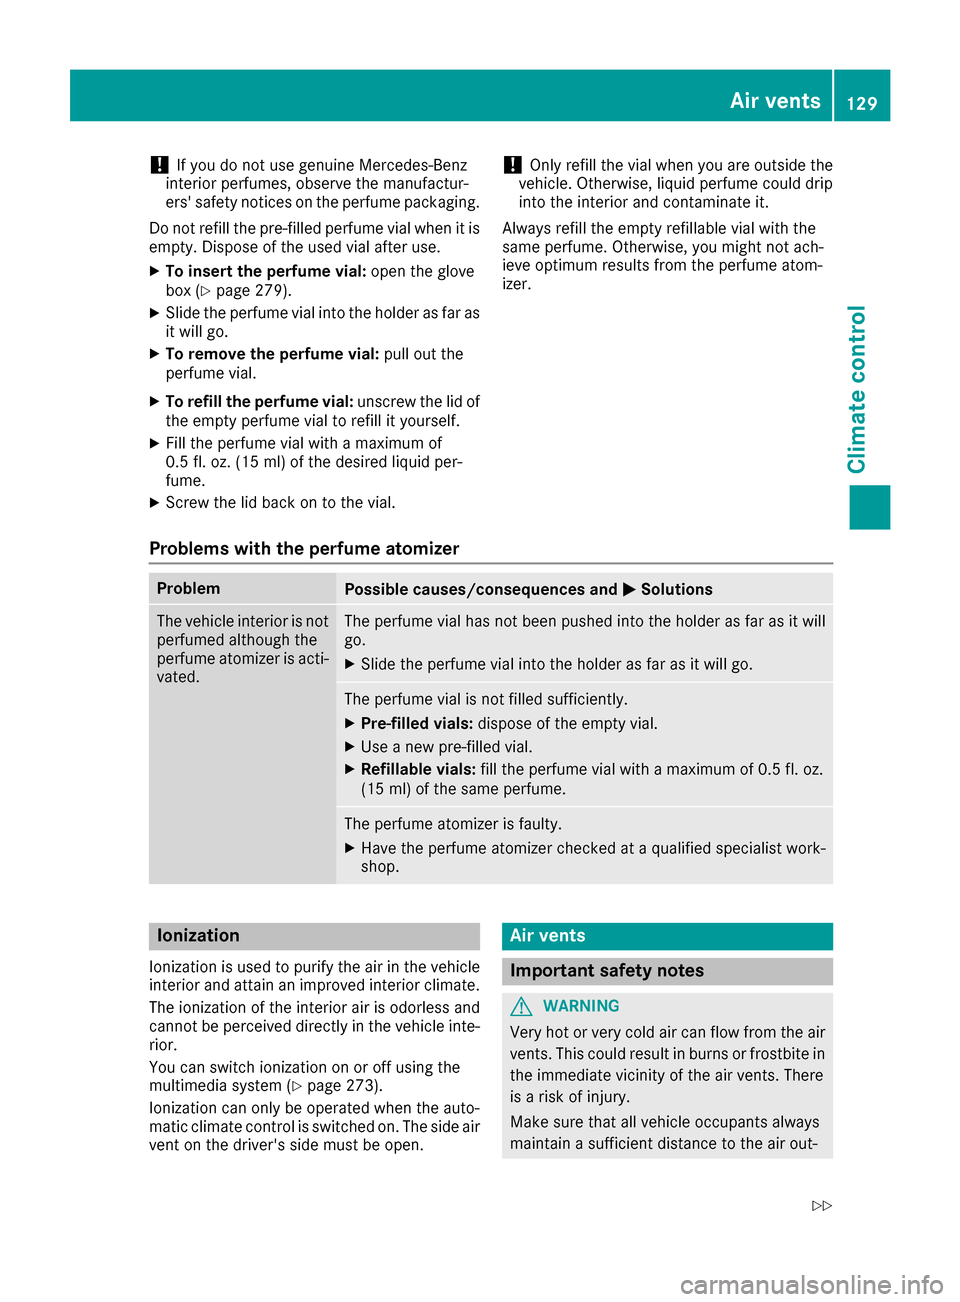
!If you do not use genuine Mercedes-Benz
interior perfumes, observe the manufactur-
ers' safety notices on the perfume packaging.
Do not refill the pre-filled perfume vial when it is
empty. Dispose of the used vial after use.
XTo insert the perfume vial: open the glove
box (Ypage 279).
XSlide the perfume vial into the holder as far as
it will go.
XTo remove the perfume vial: pull out the
perfume vial.
XTo refill the perfume vial: unscrew the lid of
the empty perfume vial to refill it yourself.
XFill the perfume vial with a maximum of
0.5 fl. oz. (15 ml) of the desired liquid per-
fume.
XScrew the lid back on to the vial.
!Only refill the vial when you are outside the
vehicle. Otherwise, liquid perfume could drip
into the interior and contaminate it.
Always refill the empty refillable vial with the
same perfume. Otherwise, you might not ach-
ieve optimum results from the perfume atom-
izer.
Problems with the perfume atomizer
ProblemPossible causes/consequences and MSolutions
The vehicle interior is not
perfumed although the
perfume atomizer is acti-
vated.The perfume vial has not been pushed into the holder as far as it will
go.
XSlide the perfume vial into the holder as far as it will go.
The perfume vial is not filled sufficiently.
XPre-filled vials:dispose of the empty vial.
XUse a new pre-filled vial.
XRefillable vials: fill the perfume vial with a maximum of 0.5 fl. oz.
(15 ml) of the same perfume.
The perfume atomizer is faulty.
XHave the perfume atomizer checked at a qualified specialist work-
shop.
Ionization
Ionization is used to purify the air in the vehicle
interior and attain an improved interior climate.
The ionization of the interior air is odorless and
cannot be perceived directly in the vehicle inte-
rior.
You can switch ionization on or off using the
multimedia system (
Ypage 273).
Ionization can only be operated when the auto-
matic climate control is switched on. The side air
vent on the driver's side must be open.
Air vents
Important safety notes
GWARNING
Very hot or very cold air can flow from the air
vents. This could result in burns or frostbite in
the immediate vicinity of the air vents. There
is a risk of injury.
Make sure that all vehicle occupants always
maintain a sufficient distance to the air out-
Air vents129
Climate control
Z
Page 132 of 374

lets. If necessary, redirect the airflow to
another area of the vehicle interior.
In order to ensure the direct flow of fresh air
through the air vents into the vehicle interior,
please observe the following notes:
Rkeep the air inlet between the windshield and
the hood free of blockages, such as ice, snow
or leaves.
Rnever cover the air vents or air intake grilles in
the vehicle interior.
Setting the air vents
Air vents are located:
Ron the left and right-hand side of the dash-
board
Rin the middle of the dashboard
Rin the rear center console, depending on the
equipment installed
Side air vent (example)
:Side window defroster vent
;Side air vent, left
=Control for left side air vent
XTo open or close: turn control=to the
counter-clockwise or clockwise as far as it will
go.
XTo adjust the air direction: hold side air
vent ;by control =and move it up or down
or to the left or right.
Adjusting the rear air vents (see the Digital
Operator's Manual).
130Air vents
Climate control
Page 136 of 374

GWARNING
Flammable materials introduced through
environmental influence or by animals can
ignite if in contact with the exhaust system or
parts of the engine that heat up. There is a risk
of fire.
Carry out regular checks to make sure that
there are no flammable foreign materials in
the engine compartment or in the exhaust
system.
General notes
Vehicles with a gasoline engine: the catalytic
converter is preheated for up to 30 seconds
after a cold start. The sound of the engine may
change during this time.
Automatic transmission
XShift the transmission to position j
(Ypage 141).
The transmission position indicator on the
multifunction display shows j
(
Ypage 142).
iYou can start the engine in transmission
position jand i.
Starting procedure with the SmartKey
To start the engine using the SmartKey instead
of the Start/Stop button, pull the Start/Stop
button out of the ignition lock.
XTo start a diesel engine: turn the SmartKey
to position 2in the ignition lock
(
Ypage 132).
The % preglow indicator lamp in the instru-
ment cluster lights up.
XTurn the SmartKey to position 3in the igni-
tion lock (Ypage 132) and release it as soon
as the engine is running.
iVehicles with a diesel engine: you can
start the engine without preglow if the engine
is warm.
If the engine will not start:
XRemove the SmartKey from the ignition lock.
XReinsert the SmartKey into the ignition lock
after a short waiting period.
XTurn the SmartKey to position 2in the igni-
tion lock (Ypage 132).
The indicator lamps in the instrument cluster
light up (
Ypage 256).
XTurn the SmartKey to position 3in the igni-
tion lock (Ypage 132) and release it as soon
as the engine is running.
Starting procedure with the Start/Stop
button
The Start/Stop button is only available on vehi-
cles with KEYLESS-GO or the KEYLESS-GO start
function.
The Start/Stop button can be used to start the
vehicle manually without inserting the SmartKey
into the ignition lock. The Start/Stop button
must be inserted in the ignition lock and the
SmartKey must be in the vehicle. This mode for starting the engine operates independently of
the ECO start/stop automatic engine start func-
tion.
You can start the engine if a valid SmartKey is in
the vehicle. Switch off the engine and always
take the SmartKey with you when leaving the
vehicle, even if you only leave it for a short time.Pay attention to the important safety notes.
XDepress the brake pedal and keep it
depressed.
XPress the Start/Stop button once
(Ypage 133).
Vehicles with a gasoline engine: the engine
starts.
Vehicles with a diesel engine: preglow is
activated and the engine starts.
Starting procedure via smartphone
Observe the important safety notes on starting
the engine (Ypage 133).
You can also start your engine via your smart-
phone from outside the vehicle. In this case, the
previously selected climate control setting is
activated. In this way you can cool or heat the
interior of the vehicle before starting the jour-
ney.
Only start the engine via your smartphone if it is
safe to start and run the engine where your vehi-
cle is parked.
Observe the legal stipulations in the area where your vehicle is parked. Engine start via smart-
phone may be limited to certain countries or
regions.
134Driving
Driving and parking
Page 141 of 374
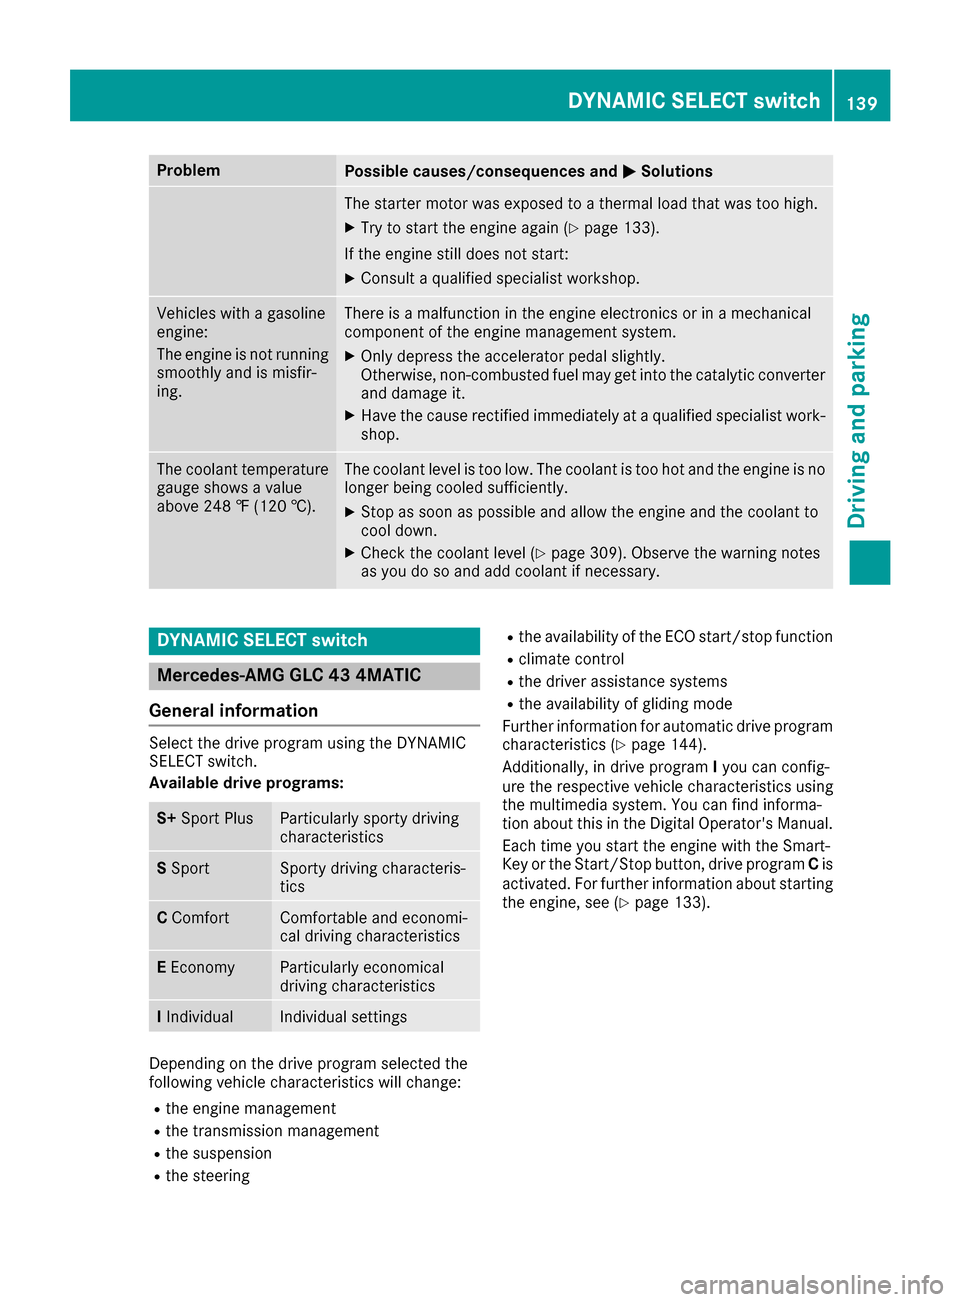
ProblemPossible causes/consequences andMSolutions
The starter motor was exposed to a thermal load that was too high.
XTry to start the engine again (Ypage 133).
If the engine still does not start:
XConsult a qualified specialist workshop.
Vehicles with a gasoline
engine:
The engine is not running
smoothly and is misfir-
ing.There is a malfunction in the engine electronics or in a mechanical
component of the engine management system.
XOnly depress the accelerator pedal slightly.
Otherwise, non-combusted fuel may get into the catalytic converter
and damage it.
XHave the cause rectified immediately at a qualified specialist work-
shop.
The coolant temperature
gauge shows a value
above 248 ‡ (120 †).The coolant level is too low. The coolant is too hot and the engine is no
longer being cooled sufficiently.
XStop as soon as possible and allow the engine and the coolant to
cool down.
XCheck the coolant level (Ypage 309). Observe the warning notes
as you do so and add coolant if necessary.
DYNAMIC SELECT switch
Mercedes-AMG GLC 43 4MATIC
General information
Select the drive program using the DYNAMIC
SELECT switch.
Available drive programs:
S+ Sport PlusParticularly sporty driving
characteristics
SSportSporty driving characteris-
tics
C ComfortComfortable and economi-
cal driving characteristics
EEconomyParticularly economical
driving characteristics
IIndividualIndividual settings
Depending on the drive program selected the
following vehicle characteristics will change:
Rthe engine management
Rthe transmission management
Rthe suspension
Rthe steering
Rthe availability of the ECO start/stop function
Rclimate control
Rthe driver assistance systems
Rthe availability of gliding mode
Further information for automatic drive program
characteristics (
Ypage 144).
Additionally, in drive program Iyou can config-
ure the respective vehicle characteristics using
the multimedia system. You can find informa-
tion about this in the Digital Operator's Manual.
Each time you start the engine with the Smart-
Key or the Start/Stop button, drive program Cis
activated. For further information about starting
the engine, see (
Ypage 133).
DYNAMIC SELECT switch139
Driving and parking
Z
Page 142 of 374
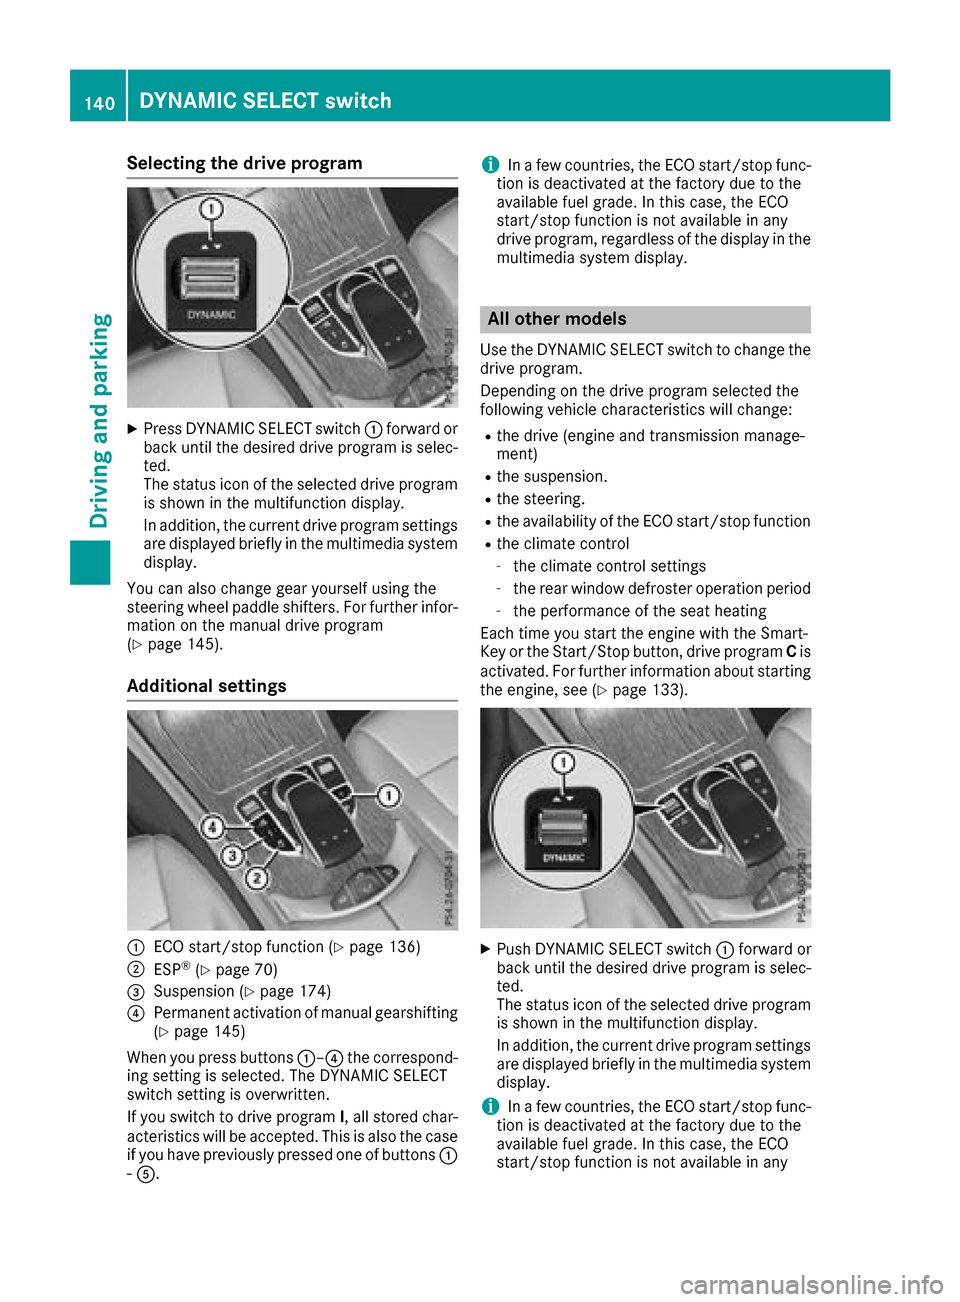
Selecting the drive program
XPress DYNAMIC SELECT switch:forward or
back until the desired drive program is selec-
ted.
The status icon of the selected drive program
is shown in the multifunction display.
In addition, the current drive program settings are displayed briefly in the multimedia system
display.
You can also change gear yourself using the
steering wheel paddle shifters. For further infor-
mation on the manual drive program
(
Ypage 145).
Additional settings
:ECO start/stop function (Ypage 136)
;ESP®(Ypage 70)
=Suspension (Ypage 174)
?Permanent activation of manual gearshifting
(Ypage 145)
When you press buttons :–?the correspond-
ing setting is selected. The DYNAMIC SELECT
switch setting is overwritten.
If you switch to drive program I, all stored char-
acteristics will be accepted. This is also the case if you have previously pressed one of buttons :
- A.
iIn a few countries, the ECO start/stop func-
tion is deactivated at the factory due to the
available fuel grade. In this case, the ECO
start/stop function is not available in any
drive program, regardless of the display in the
multimedia system display.
All other models
Use the DYNAMIC SELECT switch to change the drive program.
Depending on the drive program selected the
following vehicle characteristics will change:
Rthe drive (engine and transmission manage-
ment)
Rthe suspension.
Rthe steering.
Rthe availability of the ECO start/stop function
Rthe climate control
-the climate control settings
-the rear window defroster operation period
-the performance of the seat heating
Each time you start the engine with the Smart-
Key or the Start/Stop button, drive program Cis
activated. For further information about starting
the engine, see (
Ypage 133).
XPush DYNAMIC SELECT switch :forward or
back until the desired drive program is selec-
ted.
The status icon of the selected drive program
is shown in the multifunction display.
In addition, the current drive program settings
are displayed briefly in the multimedia system
display.
iIn a few countries, the ECO start/stop func-
tion is deactivated at the factory due to the
available fuel grade. In this case, the ECO
start/stop function is not available in any
140DYNAMIC SELECT switch
Driving and parking
Page 146 of 374

reduces load change reactions and is conducive
to a sporty driving style. The sound generated by
the double-clutch function depends on the drive
program selected.
Kickdown
Use kickdown for maximum acceleration.
XDepress the accelerator pedal beyond the
pressure point.
The automatic transmission shifts to a lower
gear depending on the engine speed.
XEase off the accelerator pedal once the
desired speed is reached.
The automatic transmission shifts back up.
Gliding mode (Mercedes-AMG vehicles)
Gliding mode is characterized by the following:
RThe combustion engine is disconnected from
the drive train.
RThe engine speed corresponds to the idling
speed.
RThe multifunction display shows the status
icon:for the drive program's status icon.
In drive programs Eand C, you can deactivate
and activate gliding mode using the ECO button
(
Ypage 137).
Gliding mode can be activated under the follow-
ing conditions:
Rthe speed is within a suitable range.
Rthe course of the road is suitable, e.g. there
are no steep up or downhill gradients.
Ryou are no longer depressing the accelerator
pedal.
Gliding mode is deactivated under the following conditions:
Ryou depress the accelerator pedal.
Ryou depress the brake pedal.
Ryou use the DIRECT SELECT lever to switch
the transmission position (Ypage 141).
Ryou switch to drive program S+orS
(Ypage 139).
Ryou activate manual gearshifting
(Ypage 145).
Ryou leave the suitable speed range.
iIf you have selected the "Comfort" setting
for the drive (engine management) in drive
program I, you can also activate gliding mode.
You can find information about this in the Dig-
ital Operator's Manual.
Towing a trailer
XDrive in the middle of the engine speed range
on uphill gradients.
XManual shifting: depending on the uphill or
downhill gradient, shift into a gear
(
Ypage 145), in which the engine will run the
middle of the engine speed range.
This also applies if cruise control or
DISTRONIC PLUS is activated.
Drive programs
Drive program I (Individual)
In drive program Ithe following properties of the
drive program can be selected:
Rthe drive (engine and transmission manage-
ment)
Rthe suspension
Rthe steering
Rthe availability of the ECO start/stop function
Rthe climate control:
Information about configuring drive program I
with the multimedia system can be found under
"DYNAMIC SELECT" in the vehicle's Digital
Operator's Manual.
iTo permanently select the gears in drive
program Iusing the steering wheel paddle
shifters, select the M(manual) setting for the
drive.
Drive program S+ (Sport Plus)
Drive program S+is characterized by the fol-
lowing:
Rthe vehicle exhibits particularly sporty driving
characteristics.
Rthe vehicle pulls away in first gear.
Rthe automatic transmission shifts up later.
the fuel consumption possibly being higher as
144Automatic transmission
Driving and parking
Page 147 of 374
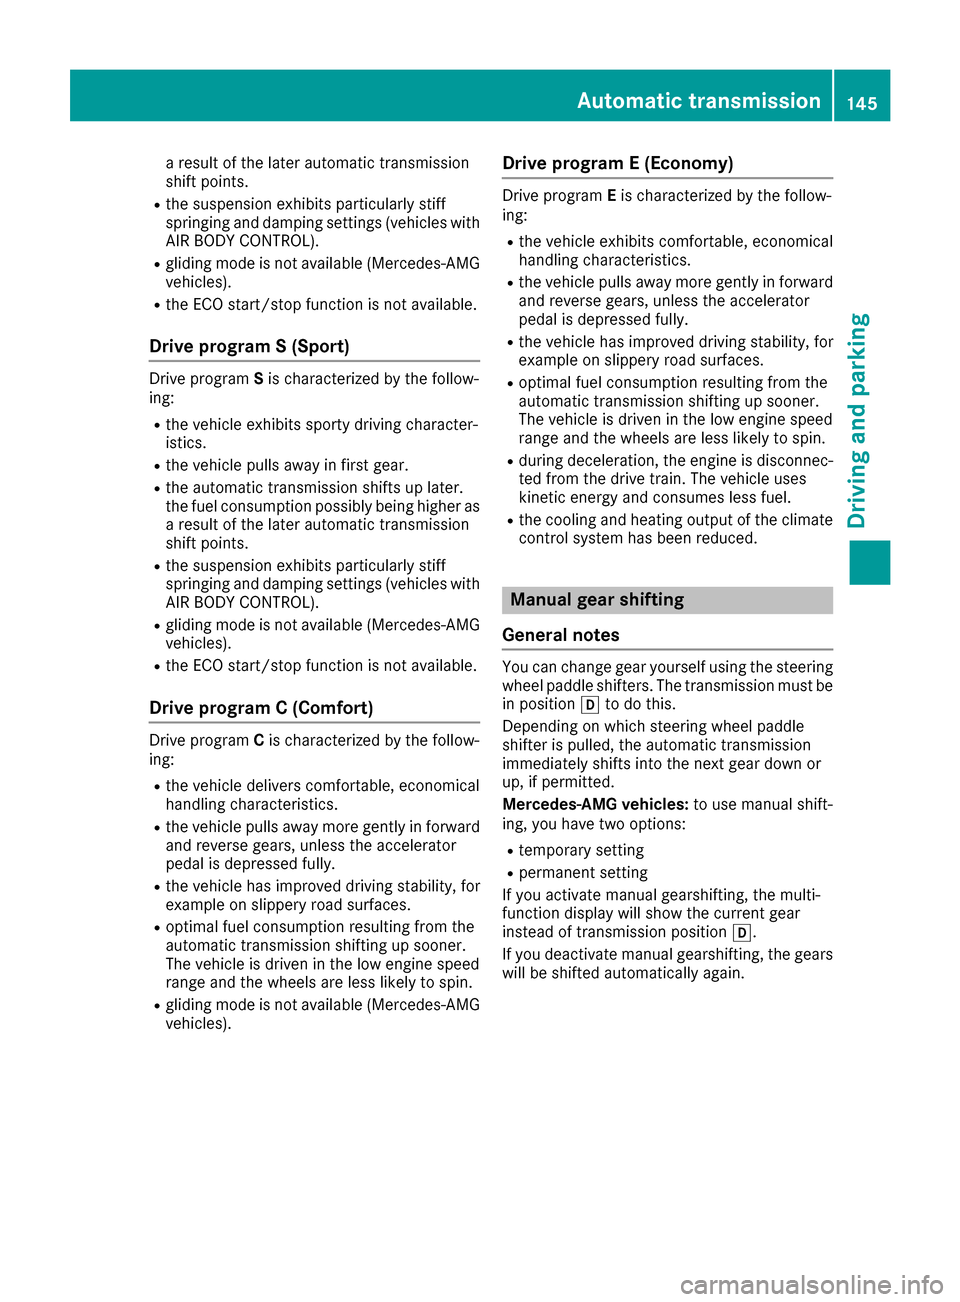
a result of the later automatic transmission
shift points.
Rthe suspension exhibits particularly stiff
springing and damping settings (vehicles withAIR BODY CONTROL).
Rgliding mode is not available (Mercedes-AMG
vehicles).
Rthe ECO start/stop function is not available.
Drive program S (Sport)
Drive program Sis characterized by the follow-
ing:
Rthe vehicle exhibits sporty driving character-
istics.
Rthe vehicle pulls away in first gear.
Rthe automatic transmission shifts up later.
the fuel consumption possibly being higher as
a result of the later automatic transmission
shift points.
Rthe suspension exhibits particularly stiff
springing and damping settings (vehicles with
AIR BODY CONTROL).
Rgliding mode is not available (Mercedes-AMG
vehicles).
Rthe ECO start/stop function is not available.
Drive program C (Comfort)
Drive program Cis characterized by the follow-
ing:
Rthe vehicle delivers comfortable, economical
handling characteristics.
Rthe vehicle pulls away more gently in forward
and reverse gears, unless the accelerator
pedal is depressed fully.
Rthe vehicle has improved driving stability, for
example on slippery road surfaces.
Roptimal fuel consumption resulting from the
automatic transmission shifting up sooner.
The vehicle is driven in the low engine speed
range and the wheels are less likely to spin.
Rgliding mode is not available (Mercedes-AMG
vehicles).
Drive program E (Economy)
Drive program Eis characterized by the follow-
ing:
Rthe vehicle exhibits comfortable, economical
handling characteristics.
Rthe vehicle pulls away more gently in forward
and reverse gears, unless the accelerator
pedal is depressed fully.
Rthe vehicle has improved driving stability, for
example on slippery road surfaces.
Roptimal fuel consumption resulting from the
automatic transmission shifting up sooner.
The vehicle is driven in the low engine speed
range and the wheels are less likely to spin.
Rduring deceleration, the engine is disconnec- ted from the drive train. The vehicle uses
kinetic energy and consumes less fuel.
Rthe cooling and heating output of the climate
control system has been reduced.
Manual gear shifting
General notes
You can change gear yourself using the steering
wheel paddle shifters. The transmission must be
in position hto do this.
Depending on which steering wheel paddle
shifter is pulled, the automatic transmission
immediately shifts into the next gear down or
up, if permitted.
Mercedes-AMG vehicles: to use manual shift-
ing, you have two options:
Rtemporary setting
Rpermanent setting
If you activate manual gearshifting, the multi-
function display will show the current gear
instead of transmission position h.
If you deactivate manual gearshifting, the gears
will be shifted automatically again.
Automatic transmission145
Driving and parking
Z
Page 208 of 374
When overtaking, pay particular attention to the
extended length of your vehicle/trailer combi-
nation.
Due to the length of the vehicle/trailer combi-
nation, you require additional road space when
overtaking before you can change back to the
original lane.
If the automatic transmission repeatedly shifts
between gears on uphill or downhill gradients,
shift to a lower gear.
Driving in a lower gear and at a reduced speed
decreases the risk of engine damage.
If the coolant temperature increases signifi-
cantly when climate control is switched on,
switch climate control off.
Coolant heat can also be dissipated by opening
the windows and switching the ventilation
blower and the interior temperature to the high-
est level.
Decoupling a trailer
GWARNING
If you uncouple a trailer with the overrun
brake engaged, you could trap your hand
between the vehicle and the trailer drawbar.
There is a risk of injury.
Do not uncouple a trailer if the overrun brake
is engaged.
GWARNING
Vehicles with level control:
The vehicle is lowered as soon as you discon-
nect the trailer cable. This could result in your
limbs or those of other people that are
between the vehicle body and tires or under-
neath the vehicle being trapped. There is a
risk of injury.
Make sure that nobody is in the immediate
vicinity of the wheel housings or under the
vehicle when you disconnect the trailer cable.
!Do not disconnect a trailer with an engaged
overrun brake. Otherwise, your vehicle could
be damaged by the rebounding of the overrun
brake.
XApply the vehicle's parking brake manually.
XShift the transmission to position j.
XClose all doors and the tailgate.
XSwitch off the engine.
XSecure the vehicle and trailer against rolling
away.
XRemove the trailer cable.
XRemove the safety chains, if there are any.
XUncouple the trailer.
Removing the ball coupling
XObserve the manufacturer's installation
instructions.
XPress the protective cap into the ball coupling
recess.
XMake sure that the protective cap is firmly in
place.
Observe the loading guidelines (
Ypage 278)
and the safety notes regarding stowage spaces
(
Ypage 278).
Information on cleaning and care of the trailer
tow hitch (
Ypage 316).
Trailer power supply
!
Accessories with a maximum power con-
sumption of 180 W can be connected to the
permanent power supply.
You must not charge a trailer battery using the
power supply.
The trailer socket of your vehicle is equipped at
the factory with a permanent power supply.
The permanent power supply is supplied via
trailer socket pin 4.
The trailer's permanent power supply is
switched off in the event of low vehicle supply
voltage and after six hours at the latest.
A qualified specialist workshop can provide
more information about installing the trailer
electrics.
Permissible trailer loads and trailer
drawbar noseweights
Weight specifications
The gross trailer weight is calculated as the
weight of the trailer plus the weight of the load
and the trailer's equipment.
206Towing a trailer
Driving and parking