2017 MERCEDES-BENZ GLC SUV Electric
[x] Cancel search: ElectricPage 103 of 374

restraint supports the back of the head at
about eye level.
General notes
Pay attention to the important safety notes
(Ypage 98).
Do not rotate the head restraints of the front and rear seats. Otherwise, you cannot adjust the
height and angle of the head restraints to the
correct position.
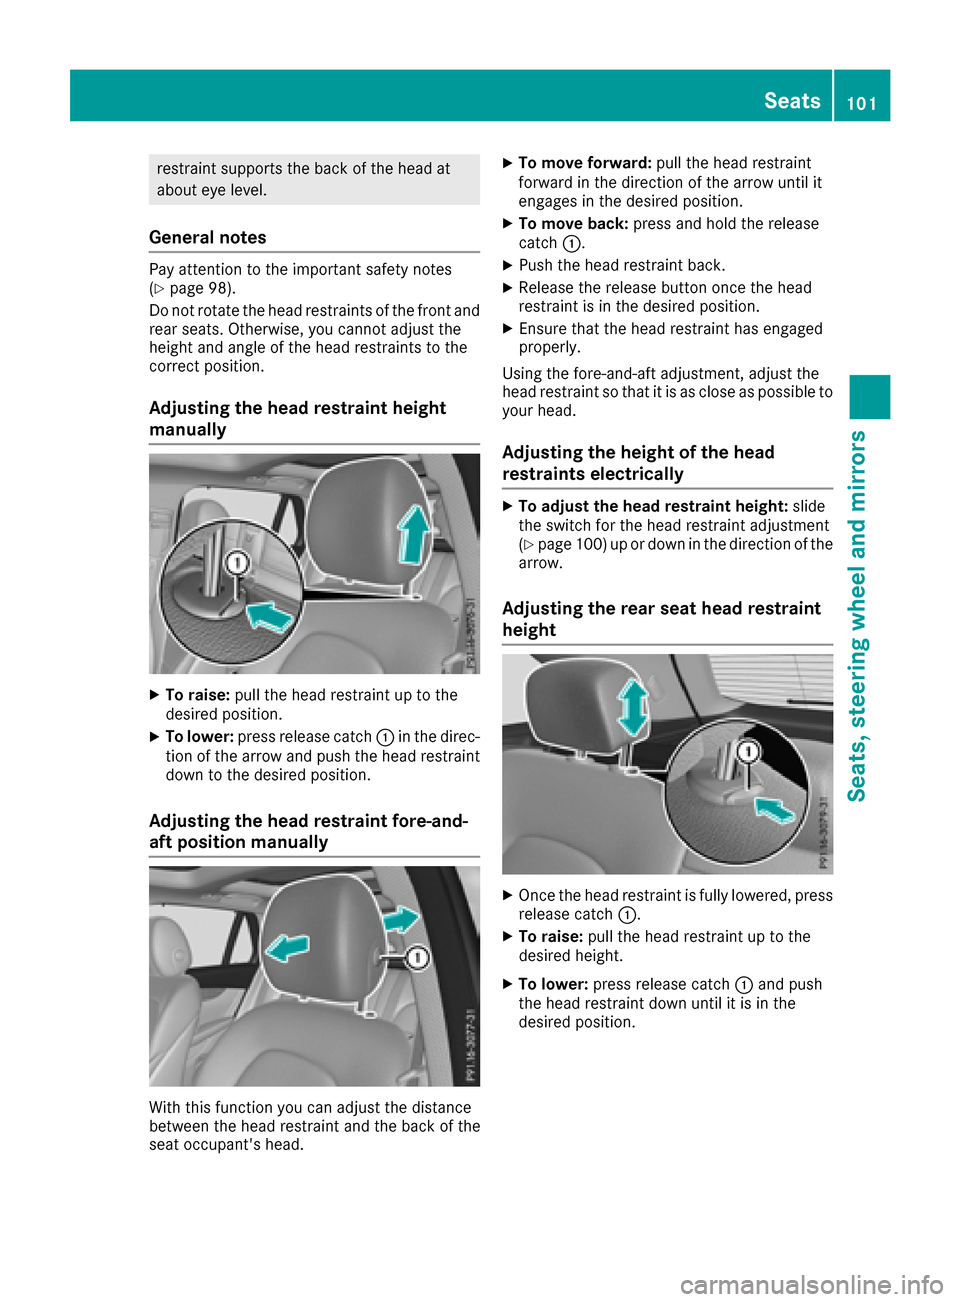
Adjusting the head restraint height
manually
XTo raise: pull the head restraint up to the
desired position.
XTo lower: press release catch :in the direc-
tion of the arrow and push the head restraint
down to the desired position.
Adjusting the head restraint fore-and-
aft position manually
With this function you can adjust the distance
between the head restraint and the back of the
seat occupant's head.
XTo move forward: pull the head restraint
forward in the direction of the arrow until it
engages in the desired position.
XTo move back: press and hold the release
catch :.
XPush the head restraint back.
XRelease the release button once the head
restraint is in the desired position.
XEnsure that the head restraint has engaged
properly.
Using the fore-and-aft adjustment, adjust the
head restraint so that it is as close as possible to
your head.
Adjusting the height of the head
restraints electrically
XTo adjust the head restraint height: slide
the switch for the head restraint adjustment
(
Ypage 100) up or down in the direction of the
arrow.
Adjusting the rear seat head restraint
height
XOnce the head restraint is fully lowered, press
release catch :.
XTo raise:pull the head restraint up to the
desired height.
XTo lower: press release catch :and push
the head restraint down until it is in the
desired position.
Seats101
Seats, steering wheel and mirrors
Z
Page 106 of 374

Problems with the seat heating / seat ventilation
ProblemPossible causes/consequences andMSolutions
The seat heating or seat
ventilation has switched
off prematurely or can-
not be switched on.The on-board voltage is too low because too many electrical consum-
ers are switched on.
XSwitch off electrical consumers that you do not need, such as the
rear window defroster or interior lighting.
Once the battery is sufficiently charged, the seat heating or seat
ventilation can be switched back on manually.
Steering wheel
Important safety notes
GWARNING
You could lose control of your vehicle if you do the following while driving:
Radjust the driver's seat, head restraint,
steering wheel or mirrors
Rfasten the seat belt
There is a risk of an accident.
Adjust the driver's seat, head restraint, steer-
ing wheel and mirror and fasten your seat belt before starting the engine.
GWARNING
Children could injure themselves if they
adjust the steering wheel. There is a risk of
injury.
When leaving the vehicle, always take the
SmartKey with you and lock the vehicle. Never
leave children unsupervised in the vehicle.
The electrically adjustable steering wheel can
still be adjusted when there is no key in the igni-
tion lock.
Adjusting the steering wheel man-
ually
:Release lever
;Adjusts the steering wheel height
=Adjusts the steering wheel position (fore-
and-aft adjustment)
XPush release lever :down completely.
The steering column is unlocked.
XAdjust the steering wheel to the desired posi-
tion.
XPush release lever :up as far as it will go.
The steering column is locked.
XCheck if the steering column is locked. When
doing so, try to push the steering wheel up or down or try to move it in the fore-and-aft
direction.
104Steering wheel
Seats, steering wheel and mirrors
Page 107 of 374

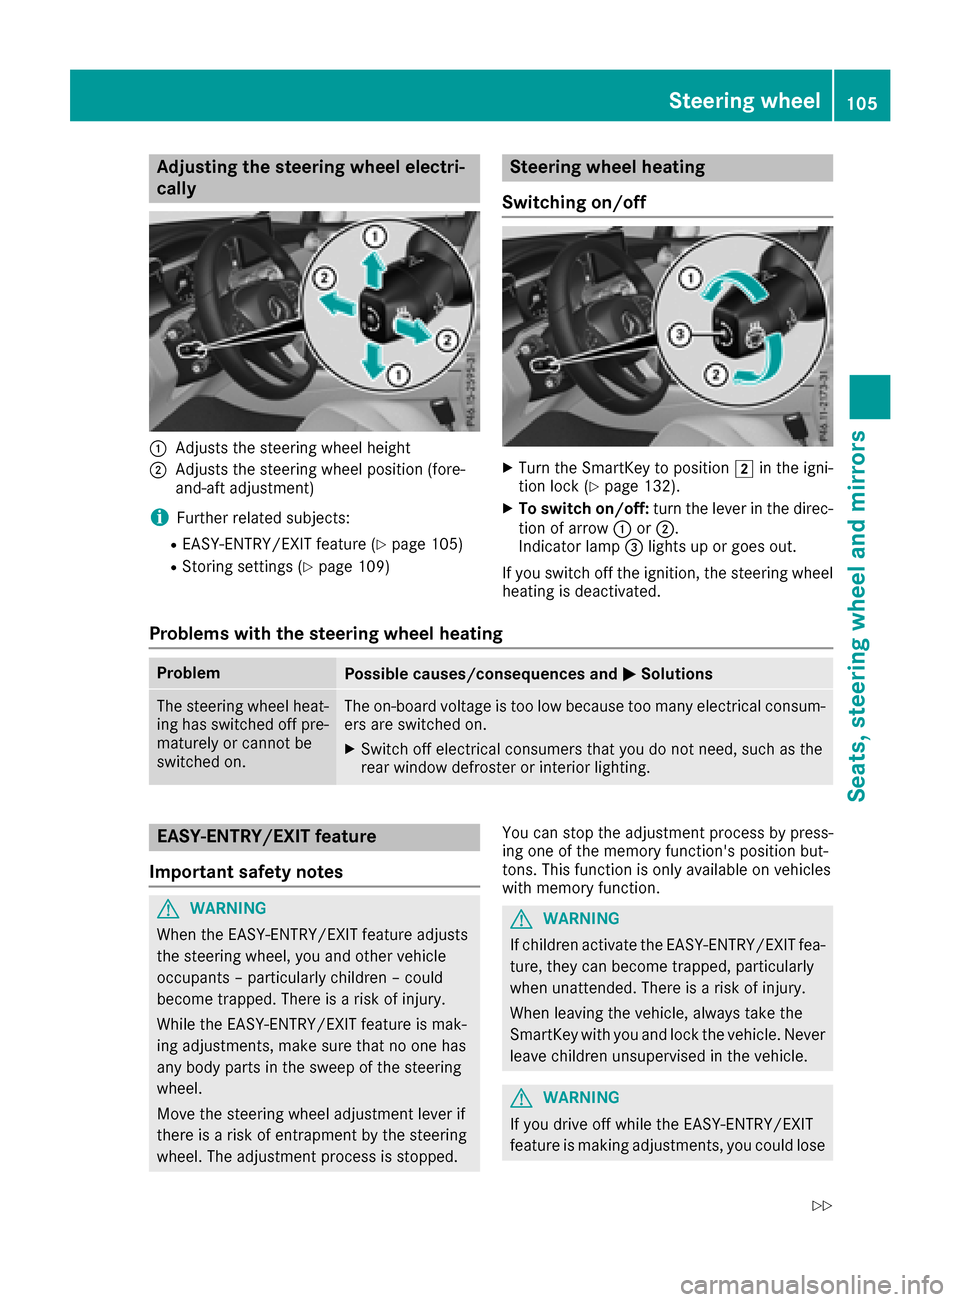
Adjusting the steering wheel electri-
cally
:Adjusts th esteering whee lheight
;Adjusts th esteering whee lposition (fore-
and-af tadjustment)
iFurther relate dsubjects :
REASY-ENTRY/EXIT feature (Ypage 105)
RStoring settings (Ypage 109)
Steering wheel heating
Switching on/off
XTurn th eSmartKey to position 2in th eigni-
tion loc k (Ypage 132).
XTo switch on/off: turnth elever in th edirec -
tion of arrow :or;.
Indicato rlamp =lights up or goes out .
If you switch off th eignition ,th esteering whee l
heating is deactivated.
Problems with the steering wheel heating
ProblemPossible causes/consequences and MSolutions
The steering wheelheat -
ing has switched off pre -
maturel yor canno tbe
switched on .The on-board voltag eis to olow because to oman yelectrical consum-
ers are switched on .
XSwitchoff electrical consumer sthat you do no tneed, suc has th e
rear window defroste ror interior lighting .
EASY-ENTRY/EXITfeatu re
Import ant safety notes
GWARNIN G
When th eEASY-ENTRY/EXIT feature adjust s
th esteering wheel, you and other vehicl e
occupant s –particularly children –could
become trapped .There is aris kof injury.
Whil eth eEASY-ENTRY/EXIT feature is mak -
ing adjustments ,mak esur ethat no on ehas
any body part sin th eswee pof th esteering
wheel.
Mov eth esteering whee ladjustmen tlever if
there is aris kof entrapment by th esteering
wheel. The adjustmen tprocess is stopped. You can stop th
eadjustmen tprocess by press-
ing on eof th ememory function's position but -
tons .This function is only available on vehicles
wit hmemory function .GWARNING
If children activat eth eEASY-ENTRY/EXIT fea-
ture, they can become trapped ,particularly
when unattended. There is aris kof injury.
When leaving th evehicle, always tak eth e
SmartKey wit hyou and loc kth evehicle. Never
leav echildren unsupervised in th evehicle.
GWARNIN G
If you drive off while th eEASY-ENTRY/EXIT
feature is making adjustments ,you could lose
Steering wheel105
Seats, steering wheel and mirrors
Z
Page 109 of 374

For this reason, always make sure of the
actual distance from the road users traveling
behind by glancing over your shoulder.
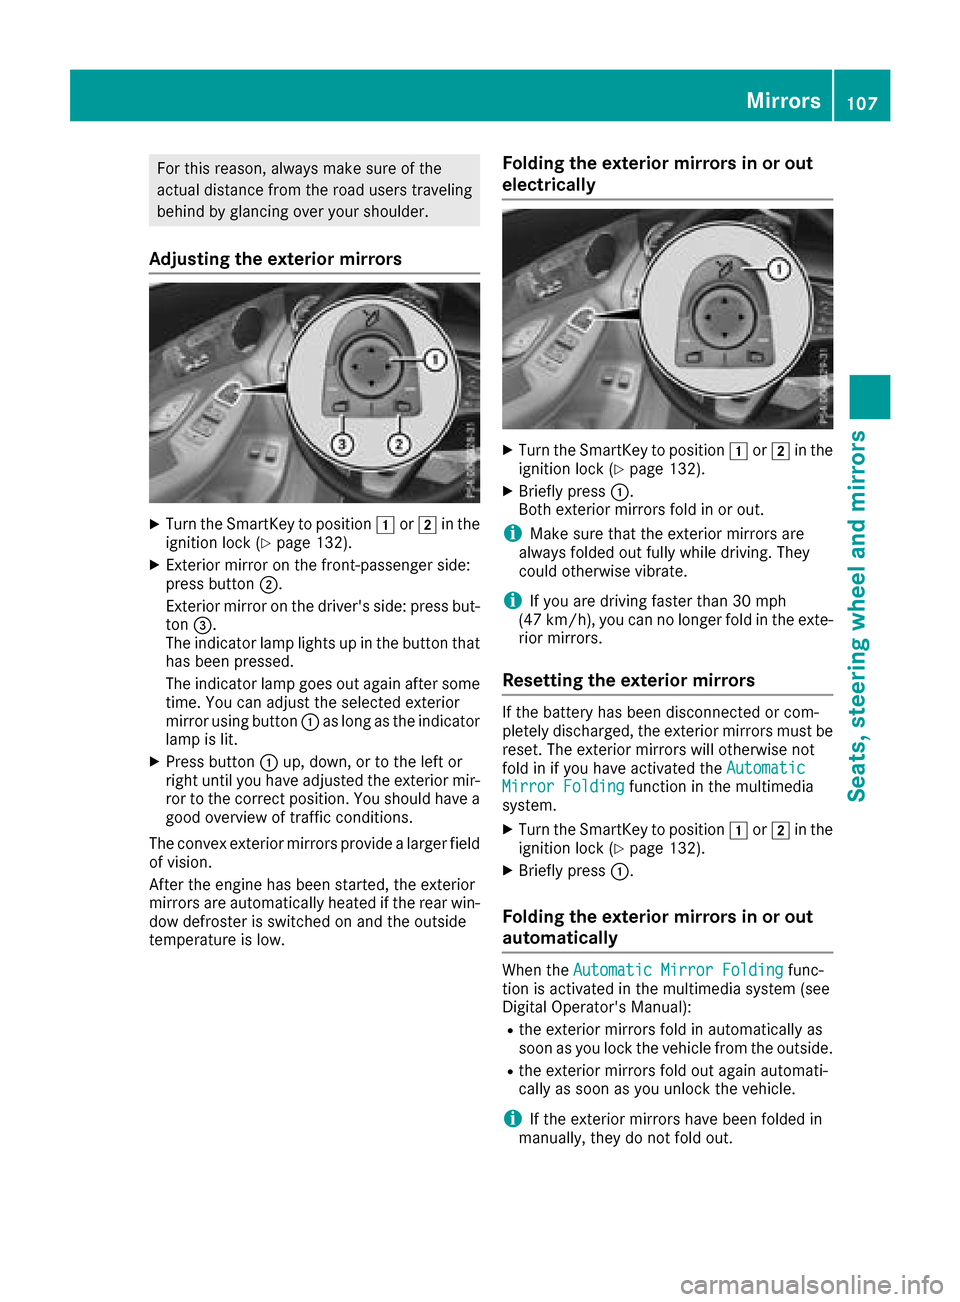
Adjusting the exterior mirrors
XTurn the SmartKey to position1or2 in the
ignition lock (Ypage 132).
XExterior mirror on the front-passenger side:
press button ;.
Exterior mirror on the driver's side: press but-
ton =.
The indicator lamp lights up in the button that
has been pressed.
The indicator lamp goes out again after some
time. You can adjust the selected exterior
mirror using button :as long as the indicator
lamp is lit.
XPress button :up, down, or to the left or
right until you have adjusted the exterior mir-
ror to the correct position. You should have a
good overview of traffic conditions.
The convex exterior mirrors provide a larger field of vision.
After the engine has been started, the exterior
mirrors are automatically heated if the rear win-
dow defroster is switched on and the outside
temperature is low.
Folding the exterior mirrors in or out
electrically
XTurn the SmartKey to position 1or2 in the
ignition lock (Ypage 132).
XBriefly press :.
Both exterior mirrors fold in or out.
iMake sure that the exterior mirrors are
always folded out fully while driving. They
could otherwise vibrate.
iIf you are driving faster than 30 mph
(47 km/h), you can no longer fold in the exte-
rior mirrors.
Resetting the exterior mirrors
If the battery has been disconnected or com-
pletely discharged, the exterior mirrors must be
reset. The exterior mirrors will otherwise not
fold in if you have activated the Automatic
Mirror Foldingfunction in the multimedia
system.
XTurn the SmartKey to position 1or2 in the
ignition lock (Ypage 132).
XBriefly press :.
Folding the exterior mirrors in or out
automatically
When theAutomatic Mirror Foldingfunc-
tion is activated in the multimedia system (see
Digital Operator's Manual):
Rthe exterior mirrors fold in automatically as
soon as you lock the vehicle from the outside.
Rthe exterior mirrors fold out again automati-
cally as soon as you unlock the vehicle.
iIf the exterior mirrors have been folded in
manually, they do not fold out.
Mirrors107
Seats, steering wheel and mirrors
Z
Page 110 of 374

Exterior mirror pushed out of position
If an exterior mirror has been pushed out of
position, proceed as follows:
XVehicles without electrically folding exte-
rior mirrors:manually move the exterior mir-
ror into the correct position.
XVehicles with electrically folding exterior
mirrors: press and hold button :until you
hear a click and then the mirror engaging in
position (
Ypage 107).
The mirror housing is engaged again and you
can adjust the exterior mirrors as usual
(
Ypage 107).
If an exterior mirror has been pushed out of
position, proceed as follows:
XPress and hold button :until you hear a click
and the mirror engages audibly into position
(
Ypage 107).
The mirror housing is engaged again and you
can adjust the exterior mirrors as usual
(
Ypage 107).
Automatic anti-glare mirrors
GWARNING
Electrolyte may escape if the glass in an auto-
matic anti-glare mirror breaks. The electrolyte
is harmful and causes irritation. It must not
come into contact with your skin, eyes, res-
piratory organs or clothing or be swallowed.
There is a risk of injury.
If you come into contact with the electrolyte,
observe the following:
RRinse off the electrolyte from your skin
immediately with water.
RImmediately rinse the electrolyte out of
your eyes thoroughly with clean water.
RIf the electrolyte is swallowed, immediately
rinse your mouth out thoroughly. Do not
induce vomiting.
RIf electrolyte comes into contact with your
skin or hair or is swallowed, seek medical
attention immediately.
RImmediately change out of clothing which
has come into contact with electrolyte.
RIf an allergic reaction occurs, seek medical
attention immediately.
The exterior mirror on the driver's side and the
rear-view mirror automatically go into anti-glare mode if:
Rthe ignition is switched on
Rincident light from headlamps strikes the sen-
sor in the rear-view mirror
The mirrors do not go into anti-glare mode if
reverse gear is engaged or if the interior lighting
is switched on.
Parking position for the exterior mir-
ror on the front-passenger side
Storing the parking position
You can set the front-passenger side exterior
mirror such that you can see the rear wheel on
that side as soon as you engage reverse gear.
You can store this position.
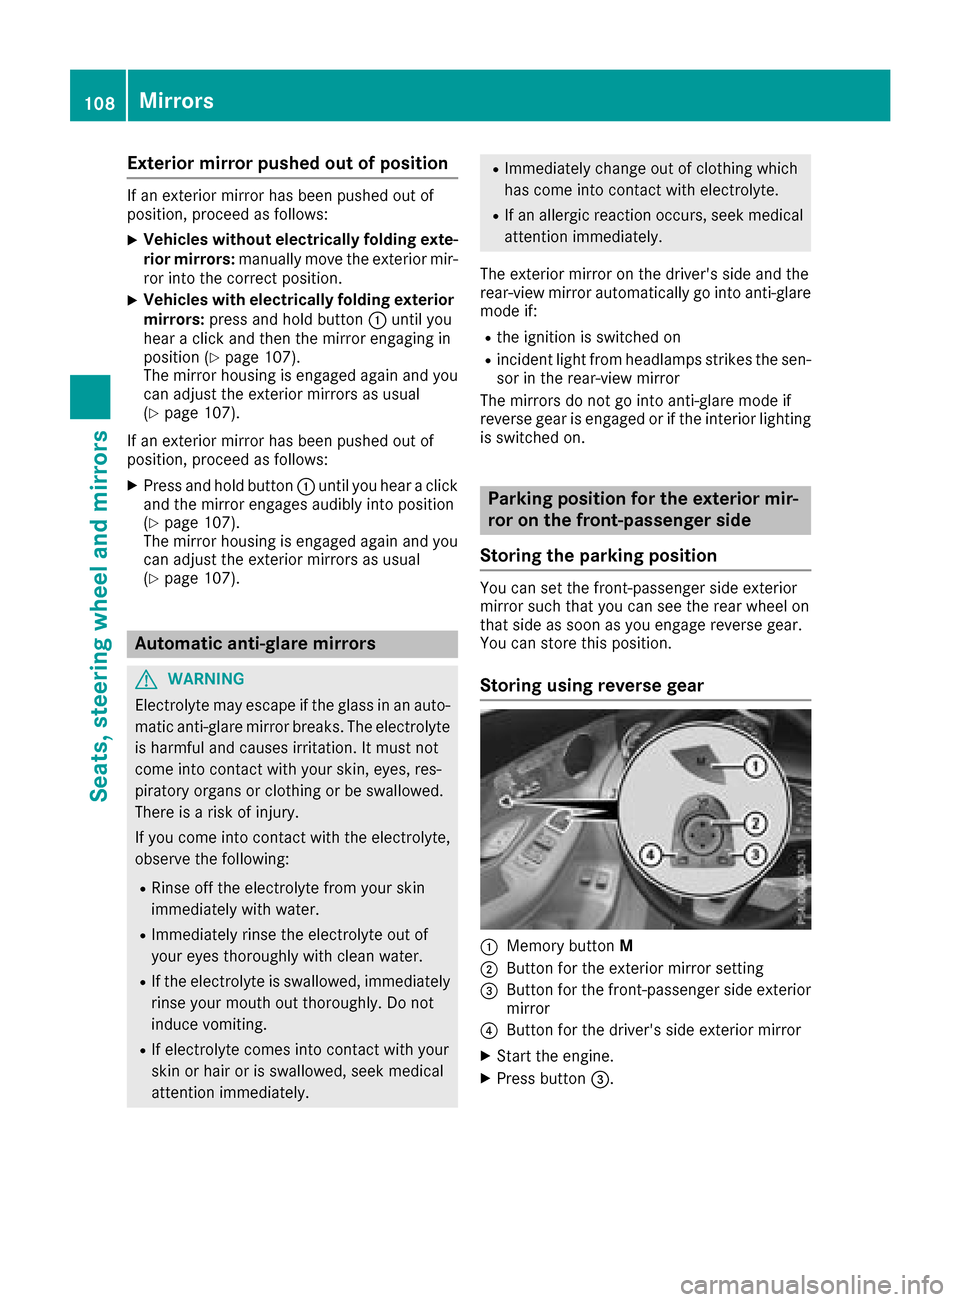
Storing using reverse gear
:Memory button M
;Button for the exterior mirror setting
=Button for the front-passenger side exterior
mirror
?Button for the driver's side exterior mirror
XStart the engine.
XPress button=.
108Mirrors
Seats, steering wheel and mirrors
Page 120 of 374

Replacing rear bulbs (vehicles with
halogen headlamps)
Opening and closing the side trim pan-
els
Example: right-hand side paneling
You must open the side trim panel in the cargo
compartment before you can replace the bulbs
in the tail lamps.
XTo open: release right or left side trim
panel :at the top and fold it down in the
direction of the arrow.
XTo close: insert side trim panel :.
Rear lamp cluster
Changing the backup lamp
Due to their location, have the bulbs in the
backup lamp in the tailgate replaced at a quali-
fied specialist workshop.
XSwitch off the lights.
XOpen the tailgate.
Example: right-hand side handle
XIn recess?on the inside of the closing han-
dle, pry off and remove the upper section of handle
=with a flat, smooth object, e.g. a
screwdriver.
XPull the lower section of handle :with a
strong tug to remove it from the trim and then place it to one side.
XReach under the right-hand side of trim B
and lightly tug along the entire length of the
trim in order to unclip it.
XPull out connector Cof the surround lighting
by releasing the latches.
XVehicles with EASY-PACK tailgate: pull out the
plug connector for the switch at the top right
of the trim.
XVehicles with electric fold-out trailer tow
hitch: unlock and pull out the plug connector
for the switch at the top left of the trim.
XPlace trim Bto one side.
XUnclip the remaining part of trim Dfrom the
assembly on the corresponding side using a
sudden, sharp movement, until bulb holder
E is accessible.
118Replacing bulbs
Lights and windshield wipers
Page 121 of 374

XPull the defective bulb out of bulb holderE.
XInsert the new bulb into bulb holderE.
XPosition trimDand engage it in place by
tapping it with your hand.
XCheck that all the metal clips are inserted in
the parts that were placed to one side: two
clips ;in the upper section of handle =and
four clips Ain trim B.
XIf not, remove the missing metal clips from
the metal openings in the tailgate and insert
them in the appropriate places.
XGrasp trim Band connect plug connector C
to the surround lighting.
iThe surround lighting only illuminates when
the tailgate has been shut and reopened.
XVehicles with EASY-PACK tailgate: insert the
plug connector for the switch at the top right
of the trim.
XVehicles with electric fold-out trailer tow
hitch: insert the plug connector for the switch
at the top left of the trim.
XPosition trim Band engage it in place by
tapping it with your hand, starting from the
outside.
XClip in the lower section of handle :again.
XInsert and engage the upper section of handle
=into lower section :.
Windshield wipers
Switching the windshield wipers
on/off
!
Do not operate the windshield wipers when
the windshield is dry, as this could damage
the wiper blades. Moreover, dust that has col-
lected on the windshield can scratch the glass
if wiping takes place when the windshield is
dry. If it is necessary to switch on the windshield
wipers in dry weather conditions, always use
washer fluid when operating the windshield
wipers.
!If the windshield wipers leave smears on the
windshield after the vehicle has been washed
in an automatic car wash, wax or other resi-
dues may be the reason for this. Clean the
windshield using washer fluid after washing
the vehicle in an automatic car wash.
!Intermittent wiping with rain sensor: due to
optical influences and the windshield becom-
ing dirty in dry weather conditions, the wind-
shield wipers may be activated inadvertently.
This could then damage the windshield wiper
blades or scratch the windshield.
For this reason, you should always switch off
the windshield wipers in dry weather.
1$ Windshield wiper off
2ÄIntermittent wipe, normal
3ÅIntermittent wipe, frequent
4°Continuous wipe, slow
5¯Continuous wipe, fast
BíSingle wipe
î Wipe with washer fluid
XSwitch on the ignition.
XTurn the combination switch to the corre-
sponding position.
Vehicles with a rain sensor: in theÅor
Ä position, the appropriate wipe frequency
is automatically set according to the intensity of
the rain. In the Åposition, the rain sensor is
more sensitive than in the Äposition, caus-
ing the windshield wiper to wipe more fre-
quently.
If the wiper blades are worn, the windshield will
no longer be wiped properly. This could prevent
you from observing the traffic conditions.
Windshield wipers119
Lights and windshield wipers
Z
Page 126 of 374

?Sets climate control to automatic (Ypage 125)
ADefrosts the windshield (Ypage 126)
BCalls up the climate control menu of the multimedia system (Ypage 272)
CSwitches the rear window defroster on/off (Ypage 127)
DActivates or deactivates synchronization (Ypage 126)
ESwitches air-recirculation mode manually on/off (Ypage 128)
FSwitches cooling with air dehumidification on/off (Ypage 125)
GSets the temperature, right (Ypage 126)
Optimum use of automatic climate
control
Optimum use of the automatic climate
control
The following contains notes and recommenda-
tions on optimum use of dual-zone climate con-
trol.
XActivate climate control using the Ã
rocker switch. The indicator lamp above the
à rocker switch lights up. The "Cooling
with dehumidification" function is activated in
automatic mode.
XSet the temperature to 72 ‡ (22 †).
iOnly use the "Windshield defrosting" func-
tion briefly until the windshield is clear again.
iOnly use air-recirculation mode briefly, e.g.
if there are unpleasant outside odors or when
in a tunnel. The windows could otherwise fog
up, since no fresh air is drawn into the vehicle in air-recirculation mode.
DYNAMIC SELECT switch
You can choose between various drive programs
with the DYNAMIC SELECT switch
(
Ypage 139).
If you have selected drive program E:
Rwhen heating, the electrical heater booster is
deactivated and heat output is reduced as a
result
Rthe rear window defroster running time is
reduced
If you have selected drive program C,S or S+ ,
the current climate settings are maintained.
ECO start/stop function
During automatic engine switch-off, the climate
control system only operates at a reduced capa-
city. If you require the full climate control output,
you can switch off the ECO start/stop function
by pressing the ECO button (
Ypage 137).
Operating the climate control sys-
tems
Activating/deactivating climate con-
trol
General notes
When the climate control is switched off, the air
supply and air circulation are also switched off.
The windows could fog up. Therefore, switch off
climate control only briefly
Switch on climate control primarily using the
à rocker switch (
Ypage 125).
Activating/deactivating
XTurn the SmartKey to position 2in the igni-
tion lock (Ypage 132).
XTo switch on: set the airflow to level 1or
higher using rocker switch H.
XTo switch off:set the airflow to level 0using
rocker switch H.
i3-zone automatic climate control: when cli-
mate control is switched off, "OFF" appears in
the rear-compartment display.
124Operating the climate control systems
Climate control