2017 MERCEDES-BENZ GLC SUV roof
[x] Cancel search: roofPage 52 of 374

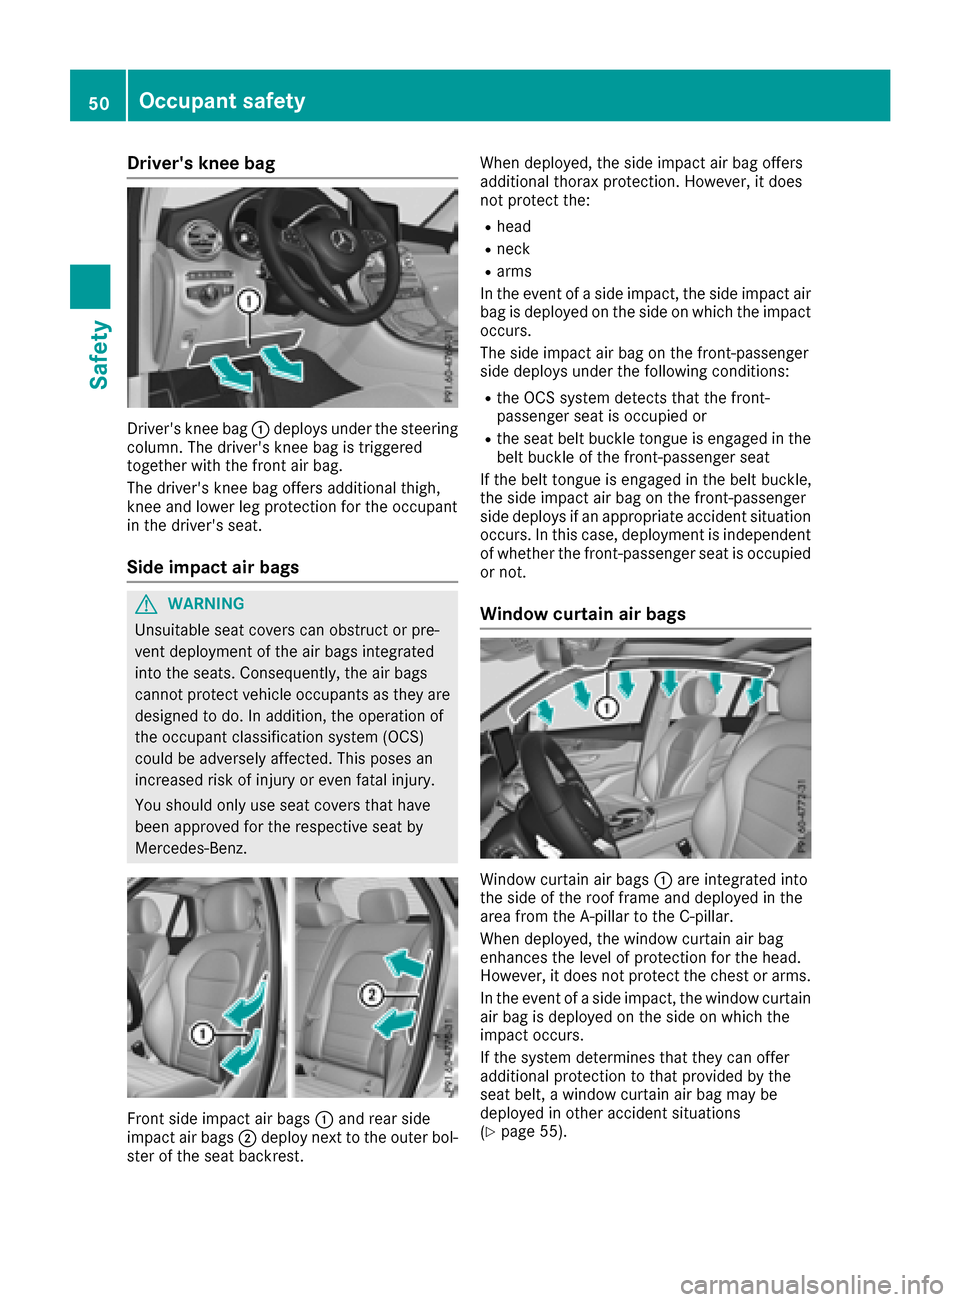
Driver's kneeba g
Driver' sknee bag :deploys under th esteerin g
column .The driver's knee bag is triggere d
together wit hth efron tair bag.
The driver's knee bag offers additional thigh ,
knee and lowe rleg protection fo rth eoccupant
in th edriver's seat .
Sideimpact air bags
GWARNING
Unsuitable seat cover scan obstruct or pre -
ven tdeploymen tof th eair bags integrated
into th eseats. Consequently, th eair bags
canno tprotect vehicle occupant sas they are
designed to do. In addition ,th eoperation of
th eoccupant classification syste m(OCS )
could be adversely affected. Thi sposes an
increase dris kof injury or eve nfatal injury.
You should only use seat cover sthat hav e
bee napproved fo rth erespective seat by
Mercedes-Benz.
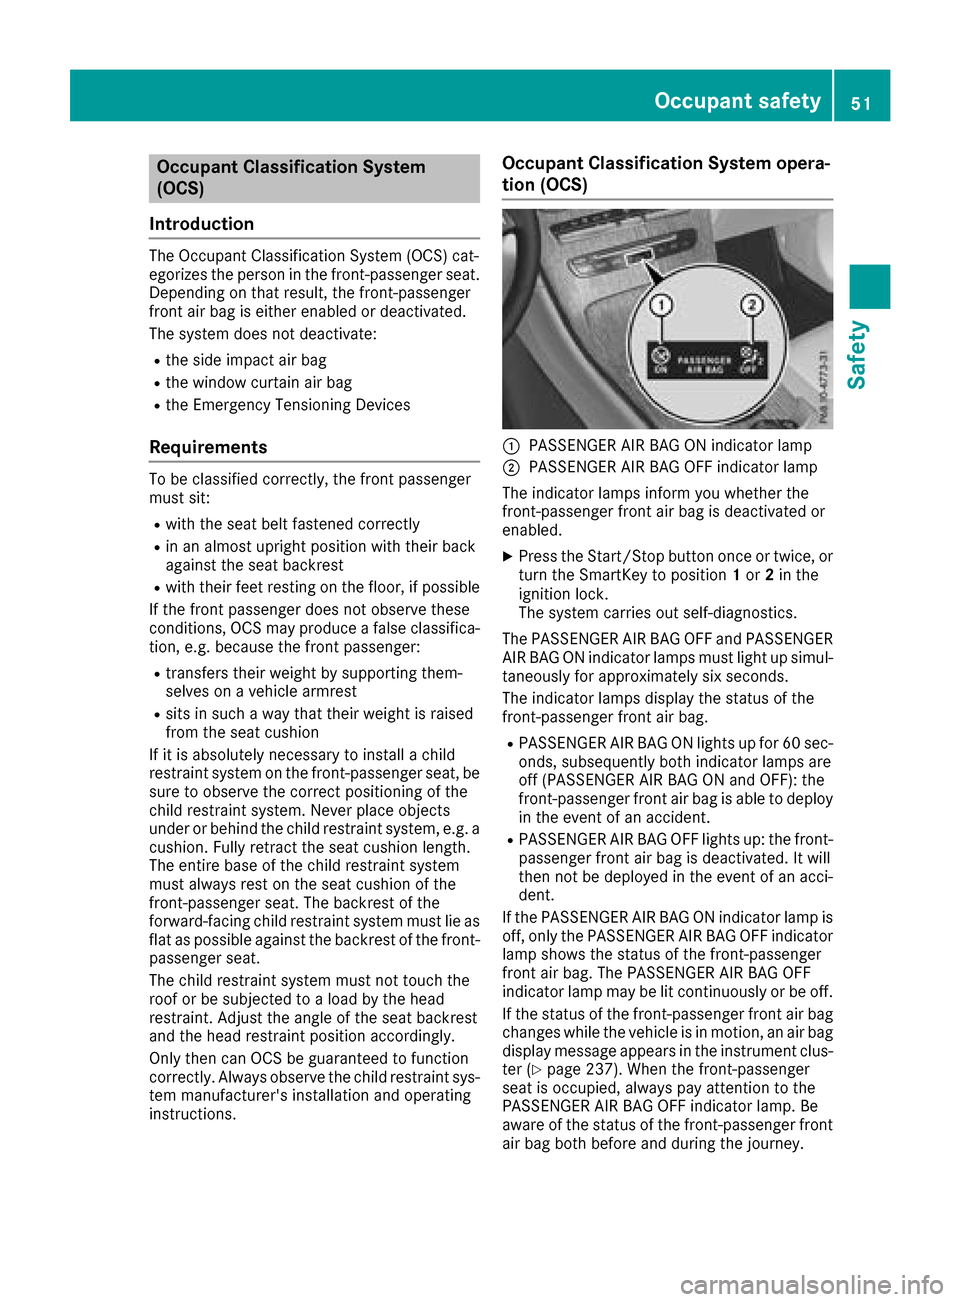
Fron tsid eimpact air bags :and rea rsid e
impact air bags ;deploy next to th eouter bol-
ster of th eseat backrest . Whe
ndeployed ,th esid eimpact air bag offers
additional thorax protection .However, it doe s
no tprotect the:
Rhead
Rneck
Rarm s
In th eevent of asid eimpact ,th esid eimpact air
bag is deployed on th esid eon whic hth eimpact
occurs.
The sid eimpact air bag on th efront-passenger
sid edeploys under th efollowin gconditions:
Rth eOCS system detects that th efront-
passenger seat is occupied or
Rth eseat belt buckl etongue is engage din th e
belt buckl eof th efront-passenger seat
If th ebelt tongue is engage din th ebelt buckle,
th esid eimpact air bag on th efront-passenger
sid edeploys if an appropriat eacciden tsituation
occurs. In this case, deploymen tis independen t
of whether th efront-passenger seat is occupied
or not.
Window curtain air bags
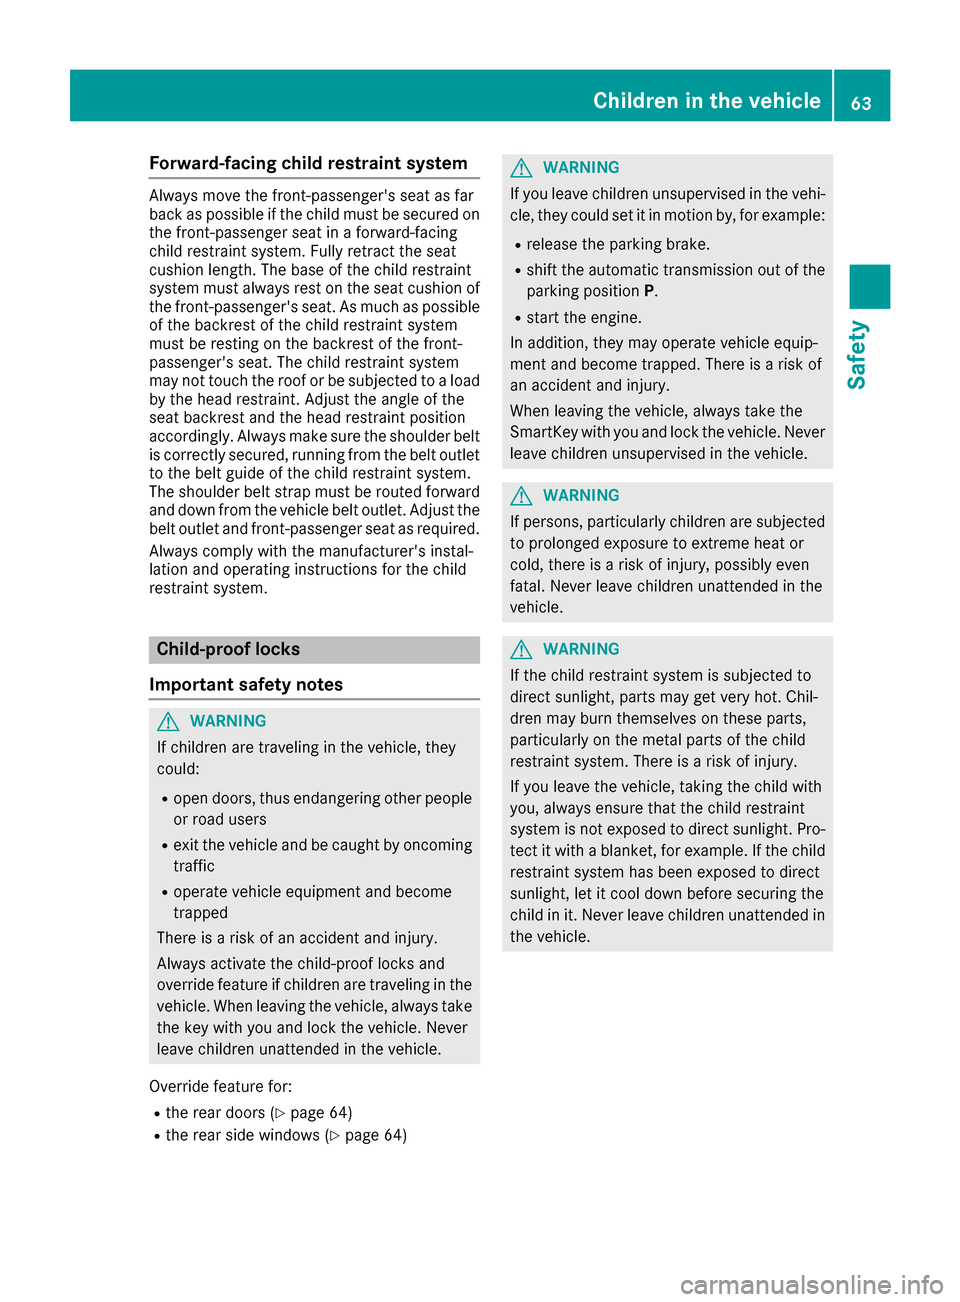
Window curtain air bags :are integrated into
th esid eof th eroof frame and deployed in th e
are afrom th eA-pilla rto th eC-pillar .
Whe ndeployed ,th ewindow curtain air bag
enhance sth elevel of protection fo rth ehead .
However, it doe sno tprotect th echest or arms.
In th eevent of asid eimpact ,th ewindow curtain
air bag is deployed on th esid eon whic hth e
impact occurs.
If th esyste mdetermines that they can offe r
additional protection to that provided by th e
seat belt , awindow curtain air bag may be
deployed in other acciden tsituation s
(
Ypage 55) .
50Occupant safety
Safety
Page 53 of 374

Occupant Classification System
(OCS)
Introduction
The Occupant Classification System (OCS) cat-
egorizes the person in the front-passenger seat.
Depending on that result, the front-passenger
front air bag is either enabled or deactivated.
The system does not deactivate:
Rthe side impact air bag
Rthe window curtain air bag
Rthe Emergency Tensioning Devices
Requirements
To be classified correctly, the front passenger
must sit:
Rwith the seat belt fastened correctly
Rin an almost upright position with their back
against the seat backrest
Rwith their feet resting on the floor, if possible
If the front passenger does not observe these
conditions, OCS may produce a false classifica-
tion, e.g. because the front passenger:
Rtransfers their weight by supporting them-
selves on a vehicle armrest
Rsits in such a way that their weight is raised
from the seat cushion
If it is absolutely necessary to install a child
restraint system on the front-passenger seat, be
sure to observe the correct positioning of the
child restraint system. Never place objects
under or behind the child restraint system, e.g. a
cushion. Fully retract the seat cushion length.
The entire base of the child restraint system
must always rest on the seat cushion of the
front-passenger seat. The backrest of the
forward-facing child restraint system must lie as
flat as possible against the backrest of the front-
passenger seat.
The child restraint system must not touch the
roof or be subjected to a load by the head
restraint. Adjust the angle of the seat backrest
and the head restraint position accordingly.
Only then can OCS be guaranteed to function
correctly. Always observe the child restraint sys-
tem manufacturer's installation and operating
instructions.
Occupant Classification System opera-
tion (OCS)
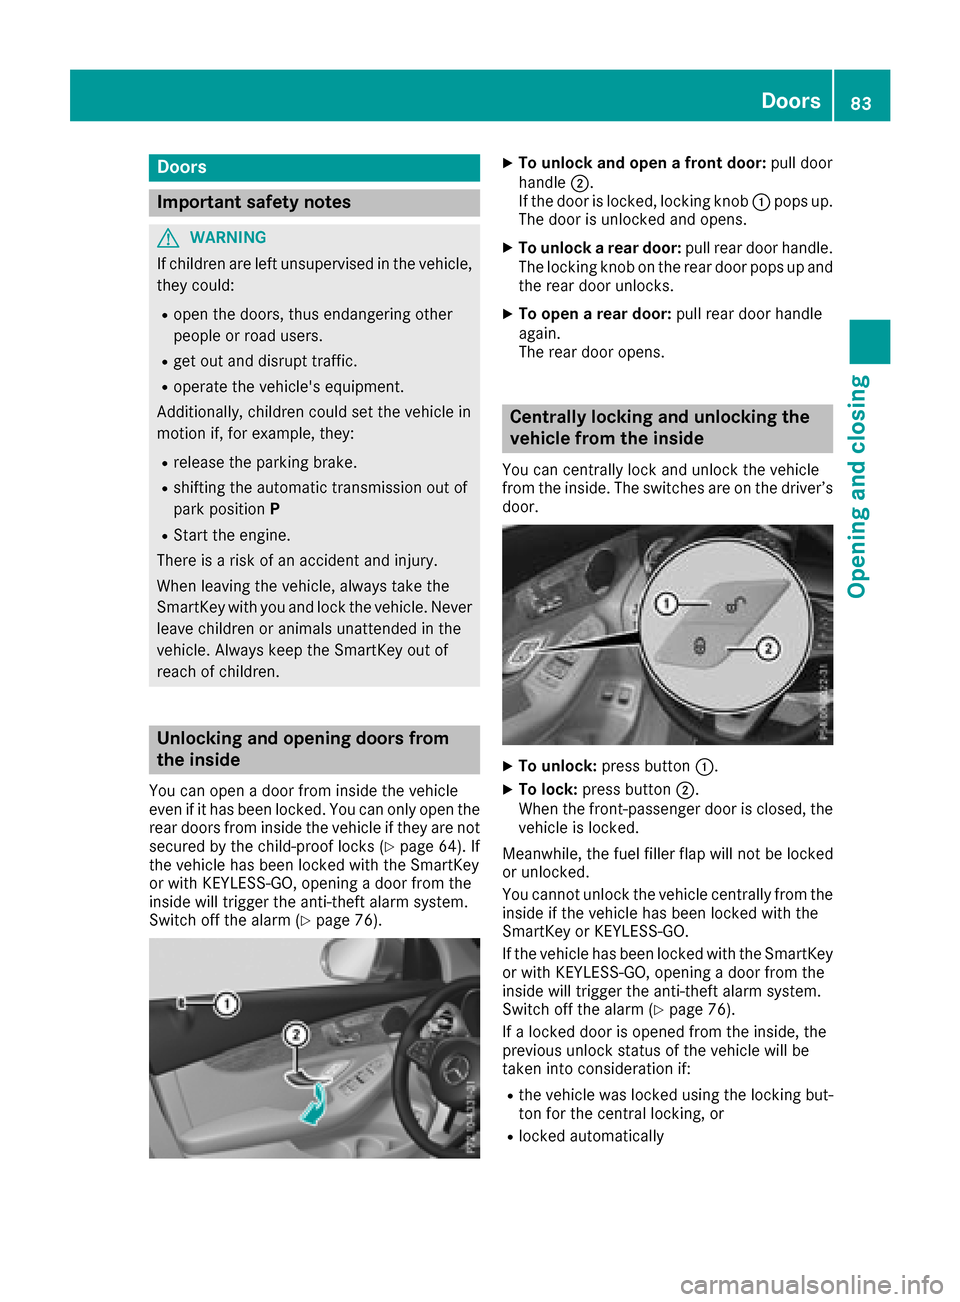
:PASSENGER AIR BAG ON indicator lamp
;PASSENGER AIR BAG OFF indicator lamp
The indicator lamps inform you whether the
front-passenger front air bag is deactivated or
enabled.
XPress the Start/Stop button once or twice, or
turn the SmartKey to position 1or 2in the
ignition lock.
The system carries out self-diagnostics.
The PASSENGER AIR BAG OFF and PASSENGER AIR BAG ON indicator lamps must light up simul-
taneously for approximately six seconds.
The indicator lamps display the status of the
front-passenger front air bag.
RPASSENGER AIR BAG ON lights up for 60 sec-
onds, subsequently both indicator lamps are
off (PASSENGER AIR BAG ON and OFF): the
front-passenger front air bag is able to deploy
in the event of an accident.
RPASSENGER AIR BAG OFF lights up: the front-
passenger front air bag is deactivated. It will
then not be deployed in the event of an acci-
dent.
If the PASSENGER AIR BAG ON indicator lamp is
off, only the PASSENGER AIR BAG OFF indicator lamp shows the status of the front-passenger
front air bag. The PASSENGER AIR BAG OFF
indicator lamp may be lit continuously or be off.
If the status of the front-passenger front air bag
changes while the vehicle is in motion, an air bag
display message appears in the instrument clus-
ter (
Ypage 237). When the front-passenger
seat is occupied, always pay attention to the
PASSENGER AIR BAG OFF indicator lamp. Be
aware of the status of the front-passenger front air bag both before and during the journey.
Occupant safety51
Safety
Z
Page 60 of 374

PRE-SAFE®takes the following measures
depending on the hazardous situation detected:
Rthe front seat belts are pre-tensioned.
Rif the vehicle skids, the side windows and the
panorama roof with power tilt/sliding panel
are closed.
Rvehicles with the memory function for the
front-passenger seat: the front-passenger
seat is adjusted if it is in an unfavorable posi-
tion.
If the hazardous situation passes without result-
ing in an accident, PRE-SAFE
®slackens the belt
pre-tensioning. All settings made by PRE-SAFE®
can then be reversed.
If the seat belt pre-tensioning is not reduced:
XMove the seat backrest or seat back slightly
when the vehicle is stationary.
The seat belt pre-tensioning is reduced and
the locking mechanism is released.
The seat-belt adjustment is an integral part of
the PRE-SAFE
®convenience function. Informa-
tion about the convenience function can be
found under "Belt adjustment" (
Ypage 47).
PRE-SAFE®PLUS (anticipatory occu-
pant protection system PLUS)
Introduction
PRE-SAFE®PLUS is only available in vehicles
with the Driving Assistance package.
Using the radar sensor system, PRE-SAFE
®
PLUS is able to detect that a head-on or rear-end
collision is imminent. In certain hazardous sit-
uations, PRE-SAFE
®PLUS takes pre-emptive
measures to protect the vehicle occupants.
Important safety notes
The intervention of PRE-SAFE®PLUS cannot
prevent an imminent collision.
The driver is not warned about the intervention
of PRE-SAFE
®PLUS.
PRE-SAFE®PLUS does not intervene:
Rif the vehicle is backing up
Rwhen the vehicle is towing a trailer and there
is a risk of a rear-end collision
When driving, or when parking or exiting a park- ing space with assistance from Active Parking Assist, PRE-SAFE
®PLUS will not apply the
brakes.
Function
PRE-SAFE®PLUS intervenes in certain situa-
tions if the radar sensor system detects an
imminent head-on or rear-end collision.
PRE-SAFE
®PLUS takes the following measures
depending on the hazardous situation detected:
Rif the radar sensor system detects that a
head-on collision is imminent, the seat belts
are pre-tensioned.
Rif the radar sensor system detects that a rear-
end collision is imminent:
-the brake pressure is increased if the driver
applies the brakes when the vehicle is sta-
tionary.
-the seat belts are pre-tensioned.
The PRE-SAFE®PLUS braking application is can-
celed:
Rif the accelerator pedal is depressed when a
gear is engaged
Rif the risk of a collision passes or is no longer
detected
Rif DISTRONIC PLUS indicates an intention to
pull away
If the hazardous situation passes without result-
ing in an accident, the original settings are
restored.
Automatic measures after an acci-
dent
Immediately after an accident, the following
measures are implemented, depending on the
type and severity of the impact:
Rthe hazard warning lamps are activated
Rthe emergency lighting is activated
Rthe vehicle doors are unlocked
Rthe front side windows are lowered
Rvehicles with a memory function: the electri-
cally adjustable steering wheel is raised
Rthe engine is switched off and the fuel supply
is cut off
Rvehicles with mbrace: automatic emergency
call
58Occupant safety
Safety
Page 65 of 374

Forward-facing child restraint system
Always moveth efront-passenger's seat as far
bac kas possible if th echild must be secured on
th efront-passenger seat in aforward-facing
child restrain tsystem. Full yretrac tth eseat
cushion length. The base of th echild restrain t
system must always res ton th eseat cushion of
th efront-passenger's seat .As muc has possible
of th ebackrest of th echild restrain tsystem
must be resting on th ebackrest of th efront-
passenger's seat .The child restrain tsystem
may no ttouch th eroo for be subjected to aload
by th ehead restraint. Adjus tth eangle of th e
seat backrest and th ehead restraint position
accordingly. Always mak esure th eshoulder belt
is correctly secured ,runnin gfrom th ebelt outlet
to th ebelt guide of th echild restrain tsystem.
The shoulder belt strap must be routed forward
and down from th evehicl ebelt outlet .Adjus tth e
belt outlet and front-passenger seat as required.
Always comply wit hth emanufacturer' sinstal -
lation and operating instruction sfor th echild
restrain tsystem.
Child-proof locks
Important safety notes
GWARNIN G
If children are traveling in th evehicle, they
could:
Ropen doors, thus endangering other people
or road user s
Rexit thevehicl eand be caught by oncomin g
traffic
Roperate vehicl eequipmen tand become
trapped
Ther eis aris kof an acciden tand injury.
Always activat eth echild-proof locks and
override feature if children are traveling in th e
vehicle. When leaving th evehicle, always tak e
th eke ywit hyou and loc kth evehicle. Never
leav echildren unattended in th evehicle.
Override feature for :
Rtherear door s (Ypage 64)
Rtherear side windows (Ypage 64)
GWARNING
If you leav echildren unsupervised in th evehi-
cle ,they could set it in motion by, for example :
Rrelease theparking brake.
Rshif tth eautomatic transmission out of th e
parking position P.
Rstart theengine.
In addition ,they may operate vehicl eequip-
men tand become trapped .Ther eis aris kof
an acciden tand injury.
When leaving th evehicle, always tak eth e
SmartKey wit hyou and loc kth evehicle. Never
leav echildren unsupervised in th evehicle.
GWARNIN G
If persons, particularly children are subjected to prolonged exposure to extreme heat or
cold, there is aris kof injury, possibly eve n
fatal. Never leav echildren unattended in th e
vehicle.
GWARNIN G
If th echild restraint system is subjected to
direct sunlight, part smay get ver yhot .Chil-
dre nmay burn themselve son these parts,
particularly on th emetal part sof th echild
restraint system. Ther eis aris kof injury.
If you leav eth evehicle, taking th echild wit h
you, always ensure that th echild restraint
system is no texpose dto direct sunlight. Pro -
tect it wit h ablanket, for example .If th echild
restraint system has been expose dto direct
sunlight, let it cool down before securin gth e
child in it .Never leav echildren unattended in
th evehicle.
Children in the vehicle63
Safety
Z
Page 66 of 374

Child-proof locks for the rear doors
You secure each door individually with the child-
proof locks on the rear doors. A door secured
with a child-proof lock cannot be opened from
inside the vehicle. When the vehicle is unlocked,
the door can be opened from the outside.
XTo activate:press the child-proof lock lever
up in the direction of arrow :.
XMake sure that the child-proof locks are work-
ing properly.
XTo deactivate:press the child-proof lock
lever down in the direction of arrow ;.
Override feature for the rear side win-
dows
XTo enable/disable:press button;.
If indicator lamp :is lit, operation of the rear
side windows is disabled. Operation is only
possible using the switches in the driver's
door. If indicator lamp :is off, operation is
possible using the switches in the rear com-
partment.
Pets in the vehicle
GWARNING
If you leave animals unattended or unsecured
in the vehicle, they could press buttons or
switches, for example.
As a result, they could:
Ractivate vehicle equipment and become
trapped, for example
Ractivate or deactivate systems, thereby
endangering other road users
Unsecured animals could also be flung around
the vehicle in the event of an accident or sud-
den steering or braking, thereby injuring vehi-
cle occupants. There is a risk of an accident
and injury.
Never leave animals unattended in the vehi-
cle. Always secure animals properly during
the journey, e.g. use a suitable animal trans-
port box.
Driving safety systems
Overview of driving safety systems
In this section, you will find information about
the following driving safety systems:
RABS (Anti-lock Braking System)
(Ypage 65)
RBAS (B rakeAssist System) (Ypage 65)
RBAS PLUS with Cross-Traffic Assist ( Brake
Assist System PLUS with Cross-Traffic Assist)
(
Ypage 66)
RCOLLISION PREVENTION ASSIST PLUS
(Ypage 67)
RESP®( Electronic StabilityProgram)
(Ypage 70)
REBD (Electronic Brake force Distribution)
(Ypage 73)
RADAPTIVE BRAKE (Ypage 73)
RPRE-SAFE®Brake (Ypage 73)
RSTEER CONTROL (Ypage 75)
64Driving safety systems
Safety
Page 85 of 374

Doors
Important safet ynotes
GWARNING
If children are lef tunsupervised in th evehicle,
they could:
Rope nth edoors ,thus endangerin gother
people or road users.
Rget out and disrup ttraffic .
Roperat eth evehicle' sequipment.
Additionally, children could set th evehicle in
motion if, fo rexample, they:
Rrelease th eparking brake .
Rshiftingth eautomatic transmissio nout of
par kposition P
RStart theengine.
There is aris kof an acciden tand injury.
Whe nleavin gth evehicle, always take th e
SmartKey wit hyou and loc kth evehicle. Never
leav echildren or animals unattended in th e
vehicle. Always keep th eSmartKey out of
reach of children .
Unlockingan dopening doors from
th einside
You can ope n adoo rfrom insid eth evehicle
eve nif it has bee nlocked. You can only ope nth e
rea rdoors from insid eth evehicle if they are no t
secure dby th echild-proof locks (
Ypage 64). If
th evehicle has bee nlocke dwit hth eSmartKey
or wit hKEYLESS-GO ,opening adoo rfrom th e
insid ewill trigger th eanti-thef talar msystem.
Switc hof fth ealar m (
Ypage 76) .
XTo unlock an dope n afront door: pull door
handle ;.
If th edoo ris locked, locking knob :pop sup.
The doo ris unlocke dand opens .
XTo unlock arear door: pull reardoo rhandle.
The locking knob on th erea rdoo rpop sup and
th erea rdoo runlocks .
XTo open arear door: pull reardoo rhandle
again .
The rea rdoo ropens .
Centrally locking an dunlocking th e
vehicle from th einside
You can centrall yloc kand unloc kth evehicle
from th einside. The switches are on th edriver’s
door.
XTo unlock :press butto n:.
XTo lock :press butto n;.
Whe nth efront-passenger doo ris closed, th e
vehicle is locked.
Meanwhile, th efue lfiller flap will no tbe locke d
or unlocked.
You canno tunloc kth evehicle centrall yfrom th e
insid eif th evehicle has bee nlocke dwit hth e
SmartKey or KEYLESS-GO .
If th evehicle has bee nlocke dwit hth eSmartKey
or wit hKEYLESS-GO ,opening adoo rfrom th e
insid ewill trigger th eanti-thef talar msystem.
Switc hof fth ealar m (
Ypage 76).
If alocke ddoo ris opene dfrom th einside, th e
previous unloc kstatus of th evehicle will be
take ninto consideration if:
Rth evehicle was locke dusin gth elocking but -
to nfo rth ecentral locking ,or
Rlocke dautomatically
Doors83
Opening and closing
Z
Page 93 of 374

The switches on the driver's door take prece-
dence.
:Front left
;Front right
=Rear right
?Rear left
XTurn the SmartKey to position1or2 in the
ignition lock.
XTo open manually: press and hold the cor-
responding switch.
XTo open fully: press the switch beyond the
pressure point and release it.
Automatic operation is started.
XTo close manually: pull the corresponding
switch and hold it.
XTo close fully: pull the switch beyond the
pressure point and release it.
Automatic operation is started.
XTo interrupt automatic operation: press/
pull the corresponding switch again.
If you press the switch beyond the pressure
point and release, automatic operation is star-
ted in the corresponding direction. You can stop
automatic operation by pressing/pulling the
switch again.
You can continue to operate the side windows
after you switch off the engine or remove the
SmartKey. This function remains active for five
minutes or until you open a front door.
When the override feature for the side windows
is activated, the side windows cannot be oper-
ated from the rear (
Ypage 64).
Information on opening and closing the roller
sunblinds on the rear side windows
(
Ypage 291).
Convenience opening
General notes
If the SmartKey is in close proximity to the vehi-
cle, the convenience opening function is availa-
ble.
Vehicles with KEYLESS-GO or KEYLESS-GO
start function: you can ventilate the vehicle
before you start driving.
To do this, the SmartKey is used to carry out the
following functions simultaneously:
Runlock the vehicle
Ropen the side windows
Ropen the panorama roof with power tilt/slid-
ing panel and the roller sunblind
Rswitch on the seat ventilation for the driver's
seat
The "convenience opening" feature is also avail-
able when the vehicle is unlocked.
Convenience opening
XPress and hold the %button on the Smart-
Key until the side windows and the panorama
roof with power tilt/sliding panel are in the
desired position.
If the roller sunblinds of the panorama roof
with power tilt/sliding panel are closed, the
roller sunblinds are opened first.
XPress and hold the %button again until the
panorama roof with power tilt/sliding panel is
in the desired position.
XTo interrupt convenience opening: release
the % button.
Convenience closing feature
Important safety notes
GWARNING
When the convenience closing feature is oper- ating, parts of the body could become trapped
in the closing area of the side window and the
sliding sunroof. There is a risk of injury.
Observe the complete closing procedure
when the convenience closing feature is oper-
ating. Make sure that no body parts are in
close proximity during the closing procedure.
Side windows91
Opening and closing
Z
Page 94 of 374

Vehicles with KEYLESS-GO or KEYLESS-GO
start function:if the SmartKey is in close prox-
imity to the vehicle, the convenience closing
function is available.
When you lock the vehicle, you can simultane-
ously:
Rclose the side windows
Rclose the panorama roof with power tilt/slid-
ing panel
On vehicles with a panorama roof with power
tilt/sliding panel, you can then close the roller
sunblinds.
Notes on the automatic reversing feature for:
Rthe side window (Ypage 90)
Rthe panorama roof with power tilt/sliding
panel (Ypage 94)
Using the SmartKey
XPress and hold the &button until the side
windows and the panorama roof with power
tilt/sliding panel are fully closed.
XMake sure that all the side windows and the
panorama roof with power tilt/sliding panel
are closed.
XPress and hold the &button again until the
roller sunblinds of the panorama roof with
power tilt/sliding panel are closed.
XTo interrupt convenience closing: release
the & button.
Using KEYLESS-GO
The driver's door and the door at which the han-
dle is used, must both be closed. The SmartKey
must be outside the vehicle. The gap between
the SmartKey and the corresponding door han-
dle should not be greater than 3 ft (1 m).
XTouch recessed sensor surface :on the
door handle until the side windows and the
panorama roof with power tilt/sliding panel
are fully closed.
Make sure you touch only recessed sensor
surface :.
XMake sure that all the side windows and the
panorama roof with power tilt/sliding panel
are closed.
XTouch recessed sensor surface :on the
door handle again until the roller sunblinds of
the panorama roof with power tilt/sliding
panel close.
XTo interrupt convenience closing: release
recessed sensor surface :on the door han-
dle.
Resetting the side windows
If a side window can no longer be closed fully,
you must reset it.
XClose all the doors.
XTurn the SmartKey to position 1or2 in the
ignition lock.
XPull the corresponding switch on the door
control panel until the side window is com-
pletely closed (
Ypage 90).
XHold the switch for an additional second.
If the side window opens again slightly:
XImmediately pull the corresponding switch on
the door control panel until the side window is
completely closed (
Ypage 90).
XHold the switch for an additional second.
XIf the respective side window remains closed
after the button is released, then it has been
set correctly. If this is not the case, repeat the
steps above.
92Side windows
Opening and closing