2017 MERCEDES-BENZ GLC SUV reset
[x] Cancel search: resetPage 96 of 374
GWARNING
At high speeds the raised sliding sunroof auto-
matically lowers slightly at the rear. This could
trap you or other persons. There is a risk of
injury. Make sure that nobody reaches into
the sweep of the sliding sunroof whilst the
vehicle is in motion.
If somebody becomes trapped, immediately
pull back the sliding sunroof switch. The slid-
ing sunroof lifts during opening.
!Only open the sliding sunroof if it is free of
snow and ice. Otherwise, malfunctions may
occur.
Do not allow anything to protrude from the
sliding sunroof. Otherwise, the seals could be
damaged.
!The weather can change abruptly. It could
start to rain or snow. Make sure that the slid- ing sunroof is closed when you leave the vehi-
cle. The vehicle electronics can be damaged if
water enters the vehicle interior.
Resonance noises can occur in addition to the
usual airflow noises when the sliding sunroof is
open. They are caused by minor pressure fluc-
tuations in the vehicle interior. Change the posi-
tion of the sliding sunroof or open a side window
slightly to reduce or eliminate these noises.
Sliding sunroof reversing feature
In the following section, the term "sliding sun-
roof" refers to the panorama roof with power
tilt/sliding panel.
The sliding sunroof is equipped with an auto-
matic reversing feature. If a solid object blocks
or restricts the sliding sunroof during the closing
process, the sliding sunroof opens again auto-
matically. The automatic reversing feature is
only an aid and is no substitute for your attention
when closing the sliding roof.
GWARNING
The reversing feature does not react:
Rto soft, light and thin objects, e.g. small fin-
gers
Rover the last 1/6 in (4 mm) of the closing
movement
Rduring resetting
Rwhen closing the sliding sunroof again man-
ually immediately after automatic reversing
This means that the reversing feature cannot
prevent someone being trapped in these sit-
uations. There is a risk of injury.
Make sure that no body parts are in close
proximity during the closing procedure.
If somebody becomes trapped:
Rrelease the switch immediately, or
Rpress the switch in any direction during the
automatic closing process
The closing process is stopped.
Operating the panorama roof with
power tilt/sliding panel
Opening and closing
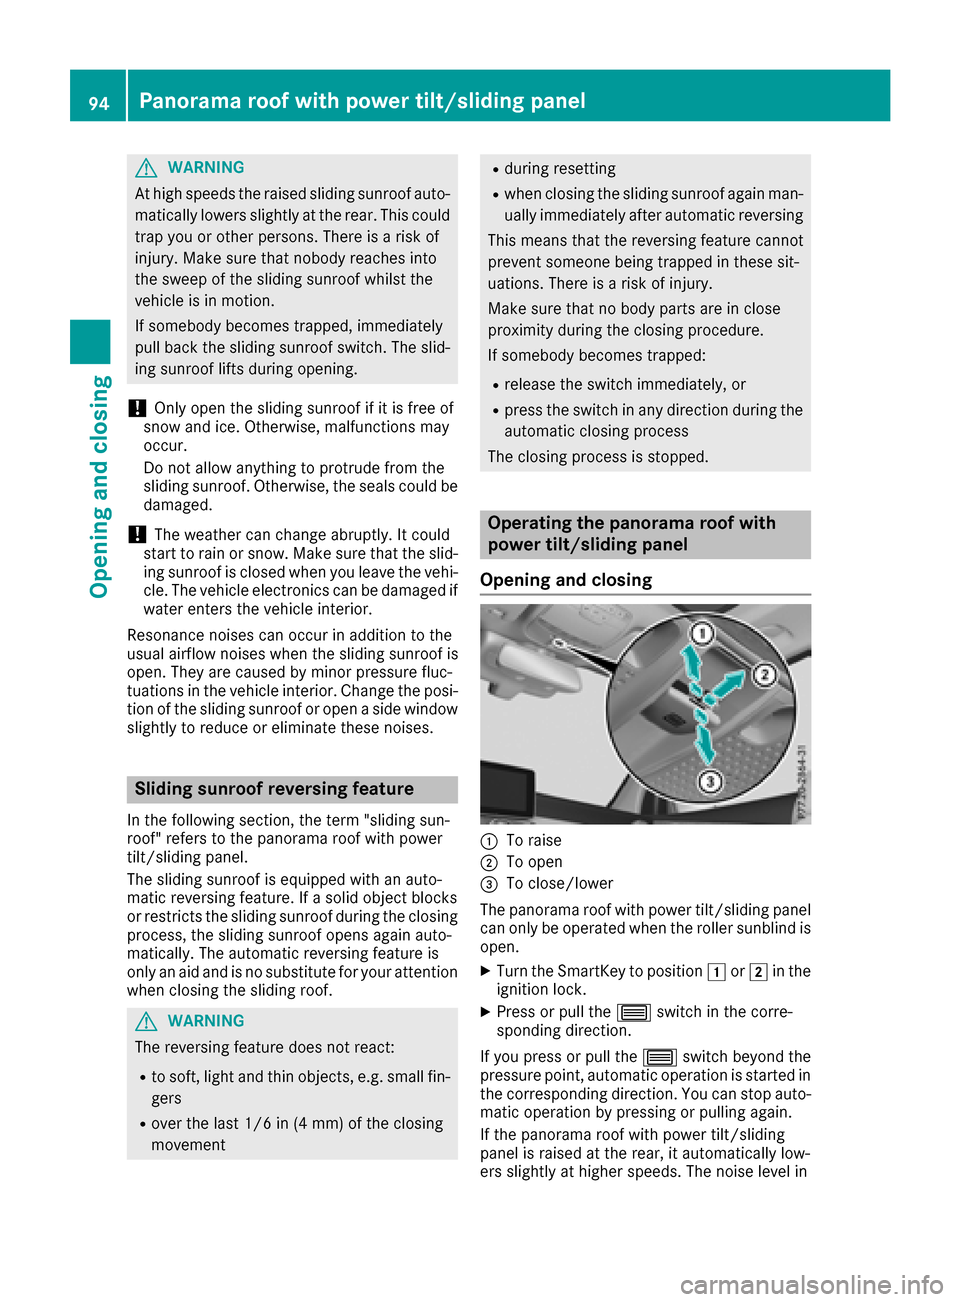
:To raise
;To open
=To close/lower
The panorama roof with power tilt/sliding panel
can only be operated when the roller sunblind is
open.
XTurn the SmartKey to position 1or2 in the
ignition lock.
XPress or pull the 3switch in the corre-
sponding direction.
If you press or pull the 3switch beyond the
pressure point, automatic operation is started in the corresponding direction. You can stop auto-
matic operation by pressing or pulling again.
If the panorama roof with power tilt/sliding
panel is raised at the rear, it automatically low-
ers slightly at higher speeds. The noise level in
94Panorama roof with power tilt/sliding panel
Opening and closing
Page 98 of 374
If somebody becomes trapped:
Rrelease the switch immediately, or
Rpress the switch in any direction during the
automatic closing process
The closing process is stopped.
Opening and closing the roller sun-
blinds
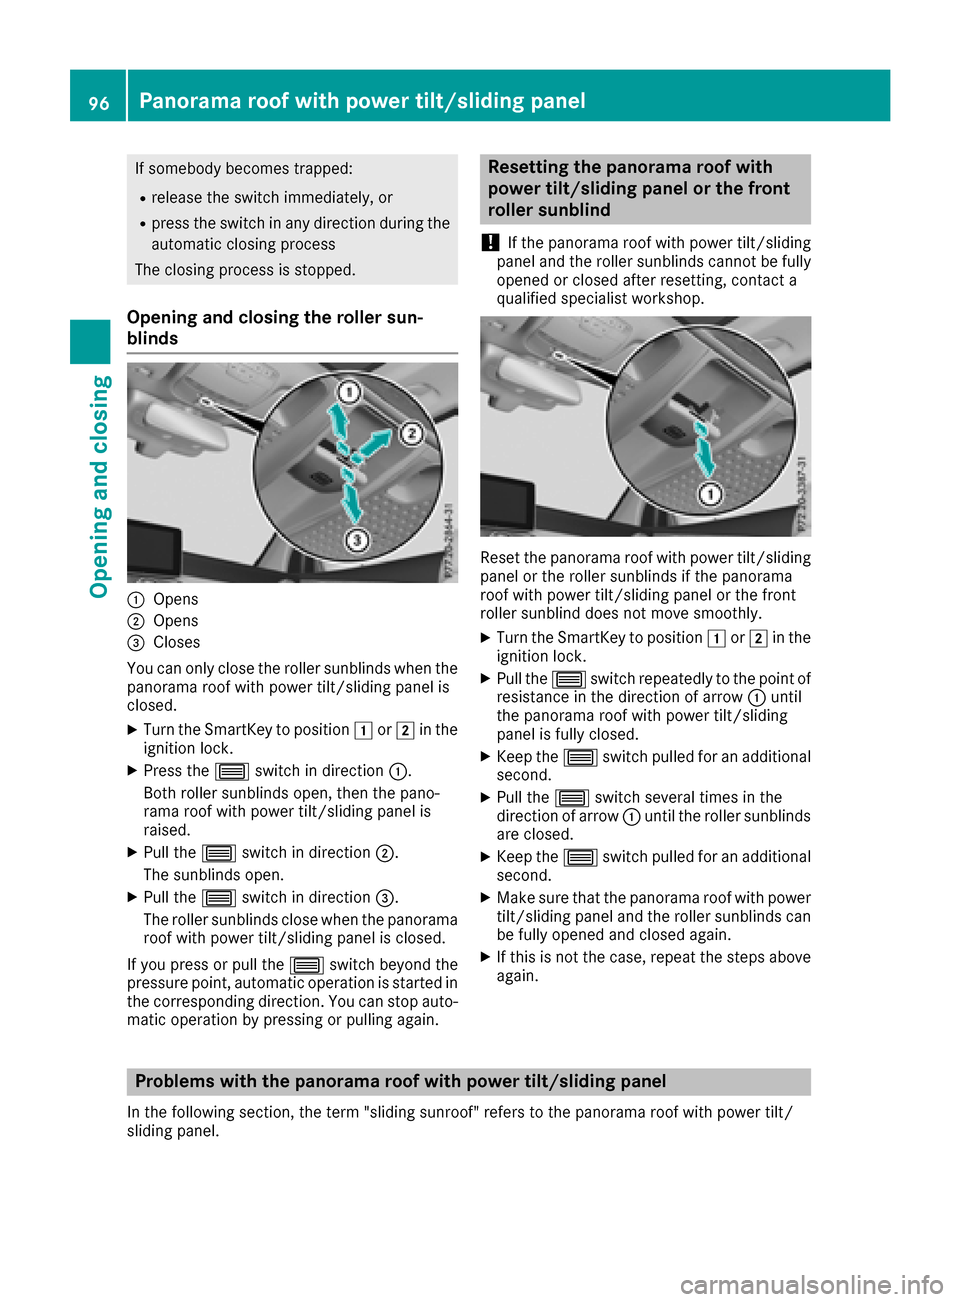
:Opens
;Opens
=Closes
You can only close the roller sunblinds when the
panorama roof with power tilt/sliding panel is
closed.
XTurn the SmartKey to position 1or2 in the
ignition lock.
XPress the 3switch in direction :.
Both roller sunblinds open, then the pano-
rama roof with power tilt/sliding panel is
raised.
XPull the 3switch in direction ;.
The sunblinds open.
XPull the 3switch in direction =.
The roller sunblinds close when the panorama
roof with power tilt/sliding panel is closed.
If you press or pull the 3switch beyond the
pressure point, automatic operation is started in
the corresponding direction. You can stop auto- matic operation by pressing or pulling again.
Resetting the panorama roof with
power tilt/sliding panel or the front
roller sunblind
!
If the panorama roof with power tilt/sliding
panel and the roller sunblinds cannot be fully
opened or closed after resetting, contact a
qualified specialist workshop.
Reset the panorama roof with power tilt/sliding
panel or the roller sunblinds if the panorama
roof with power tilt/sliding panel or the front
roller sunblind does not move smoothly.
XTurn the SmartKey to position 1or2 in the
ignition lock.
XPull the 3switch repeatedly to the point of
resistance in the direction of arrow :until
the panorama roof with power tilt/sliding
panel is fully closed.
XKeep the 3switch pulled for an additional
second.
XPull the 3switch several times in the
direction of arrow :until the roller sunblinds
are closed.
XKeep the 3switch pulled for an additional
second.
XMake sure that the panorama roof with power
tilt/sliding panel and the roller sunblinds can
be fully opened and closed again.
XIf this is not the case, repeat the steps above
again.
Problems with the panorama roof with power tilt/sliding panel
In the following section, the term "sliding sunroof" refers to the panorama roof with power tilt/
sliding panel.
96Panorama roof with power tilt/sliding panel
Opening and closing
Page 99 of 374
GWARNING
If you close the sliding sunroof again immediately after it has been blocked or reset, the sliding
sunroof closes with increased or maximum force. The reversing feature is then not active. Parts
of the body could be trapped in the closing area in the process. This poses an increased risk of
injury or even fatal injury.
Make sure that no parts of the body are in the closing area.
If somebody becomes trapped:
Rrelease the switch immediately, or
Rpress the switch in any direction during the automatic closing process
The closing process is stopped.
!If the sliding sunroof still cannot be opened or closed as a result of a malfunction, contact a
qualified specialist workshop.
ProblemPossible causes/consequences and MSolutions
The panorama roof with
power tilt/sliding panel
cannot be closed and
you cannot see the
cause.If the panorama roof with power tilt/sliding panel is obstructed during
closing and reopens again slightly:
XImmediately after it blocks, pull the3switch down again to the
point of resistance until the panorama roof with power tilt/sliding
panel is closed.
The panorama roof with power tilt/sliding panel is closed with more
force.
If the panorama roof with power tilt/sliding panel is obstructed again
during closing and reopens again slightly:
XImmediately after it blocks, pull the 3switch down again to the
point of resistance until the panorama roof with power tilt/sliding
panel is closed.
The panorama roof with power tilt/sliding panel is closed without
the automatic reversing feature.
Panorama roof with power tilt/sliding panel97
Opening and closing
Z
Page 109 of 374
For this reason, always make sure of the
actual distance from the road users traveling
behind by glancing over your shoulder.
Adjusting the exterior mirrors
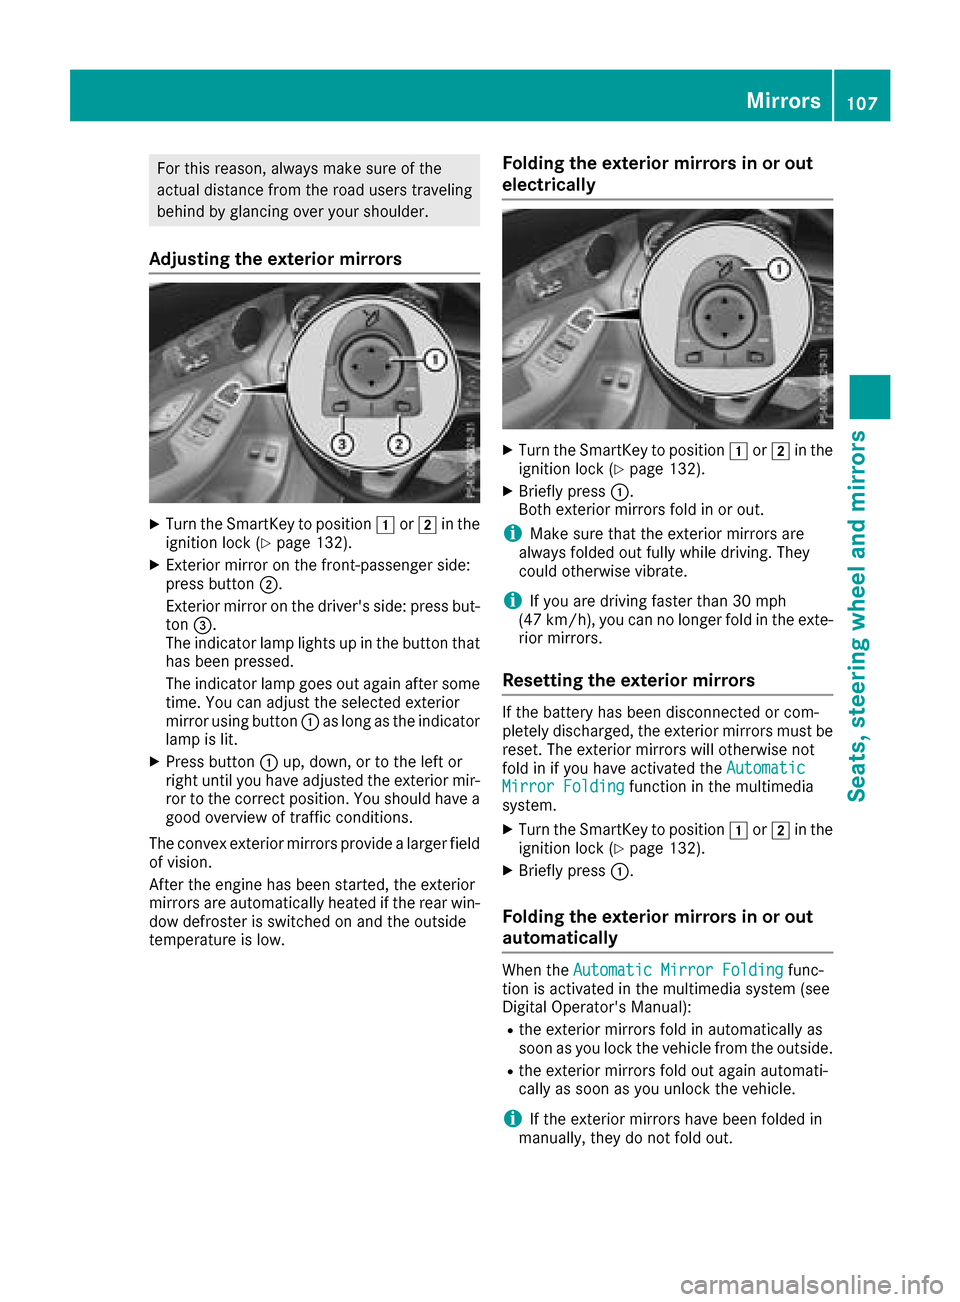
XTurn the SmartKey to position1or2 in the
ignition lock (Ypage 132).
XExterior mirror on the front-passenger side:
press button ;.
Exterior mirror on the driver's side: press but-
ton =.
The indicator lamp lights up in the button that
has been pressed.
The indicator lamp goes out again after some
time. You can adjust the selected exterior
mirror using button :as long as the indicator
lamp is lit.
XPress button :up, down, or to the left or
right until you have adjusted the exterior mir-
ror to the correct position. You should have a
good overview of traffic conditions.
The convex exterior mirrors provide a larger field of vision.
After the engine has been started, the exterior
mirrors are automatically heated if the rear win-
dow defroster is switched on and the outside
temperature is low.
Folding the exterior mirrors in or out
electrically
XTurn the SmartKey to position 1or2 in the
ignition lock (Ypage 132).
XBriefly press :.
Both exterior mirrors fold in or out.
iMake sure that the exterior mirrors are
always folded out fully while driving. They
could otherwise vibrate.
iIf you are driving faster than 30 mph
(47 km/h), you can no longer fold in the exte-
rior mirrors.
Resetting the exterior mirrors
If the battery has been disconnected or com-
pletely discharged, the exterior mirrors must be
reset. The exterior mirrors will otherwise not
fold in if you have activated the Automatic
Mirror Foldingfunction in the multimedia
system.
XTurn the SmartKey to position 1or2 in the
ignition lock (Ypage 132).
XBriefly press :.
Folding the exterior mirrors in or out
automatically
When theAutomatic Mirror Foldingfunc-
tion is activated in the multimedia system (see
Digital Operator's Manual):
Rthe exterior mirrors fold in automatically as
soon as you lock the vehicle from the outside.
Rthe exterior mirrors fold out again automati-
cally as soon as you unlock the vehicle.
iIf the exterior mirrors have been folded in
manually, they do not fold out.
Mirrors107
Seats, steering wheel and mirrors
Z
Page 111 of 374
XEngage reverse gear.
The exterior mirror on the front-passenger
side moves to the preset parking position.
XUse button;to adjust the exterior mirror to
a position that allows you to see the rear
wheel and the curb.
The parking position is stored.
iIf you shift the transmission to another posi-
tion, the exterior mirror on the front-
passenger side returns to the driving position.
Saving using the memory button
You can store the parking position of the exte-
rior mirror on the front-passenger side using
memory button M:. The reverse gear must not
be engaged.
XTurn the SmartKey to position 2in the igni-
tion lock (Ypage 132).
XPress button =.
XUse button;to adjust the exterior mirror to
a position that allows you to see the rear
wheel and the curb.
XPress memory button M: and one of the
arrows on button ;within three seconds.
The parking position is stored if the exterior
mirror does not move.
XIf the mirror moves out of position, repeat the
steps.
XAfter successfully storing, reset the driving
position of the exterior mirror.
Calling up a stored parking position set-
ting
XTurn the SmartKey to position 2in the igni-
tion lock (Ypage 132).
XAdjust the exterior mirror on the front-
passenger side using button =.
XEngage reverse gear.
The exterior mirror on the front-passenger
side moves to the stored parking position.
The exterior mirror on the front-passenger side
moves back to its original position:
Ras soon as you exceed a speed of 9 mph
(15 km/h)
Rabout ten seconds after you have disengaged
reverse gear
Rwhen you use button ?to select the exterior
mirror on the driver's side
Memory function
Important safety notes
GWARNING
If you use the memory function on the driver's side while driving, you could lose control of
the vehicle as a result of the adjustments
being made. There is a risk of an accident.
Only use the memory function on the driver's
side when the vehicle is stationary.
GWARNING
When the memory function adjusts the seat or steering wheel, you and other vehicle occu-
pants – particularly children – could become
trapped. There is a risk of injury.
While the memory function is making adjust-
ments, make sure that no one has any body
parts in the sweep of the seat or steering
wheel. If somebody becomes trapped, imme-
diately release the memory function position
button. The adjustment process is stopped.
GWARNING
Children could become trapped if they acti-
vate the memory function, particularly when
unattended. There is a risk of injury.
When leaving the vehicle, always take the
SmartKey with you and lock the vehicle. Never
leave children unsupervised in the vehicle.
The memory function can be used at any time,
e.g. even when the SmartKey is not in the igni-
tion lock.
Storing settings
With the memory function, you can store up to
three different settings, e.g. for three different
people.
The following settings are stored as a single
memory preset:
Rposition of the seat, backrest and head
restraint
Rdriver's side: position of the exterior mirrors
on the driver's and front-passenger sides
Rposition of the head-up display
Memory function109
Seats, steering wheel and mirrors
Z
Page 112 of 374
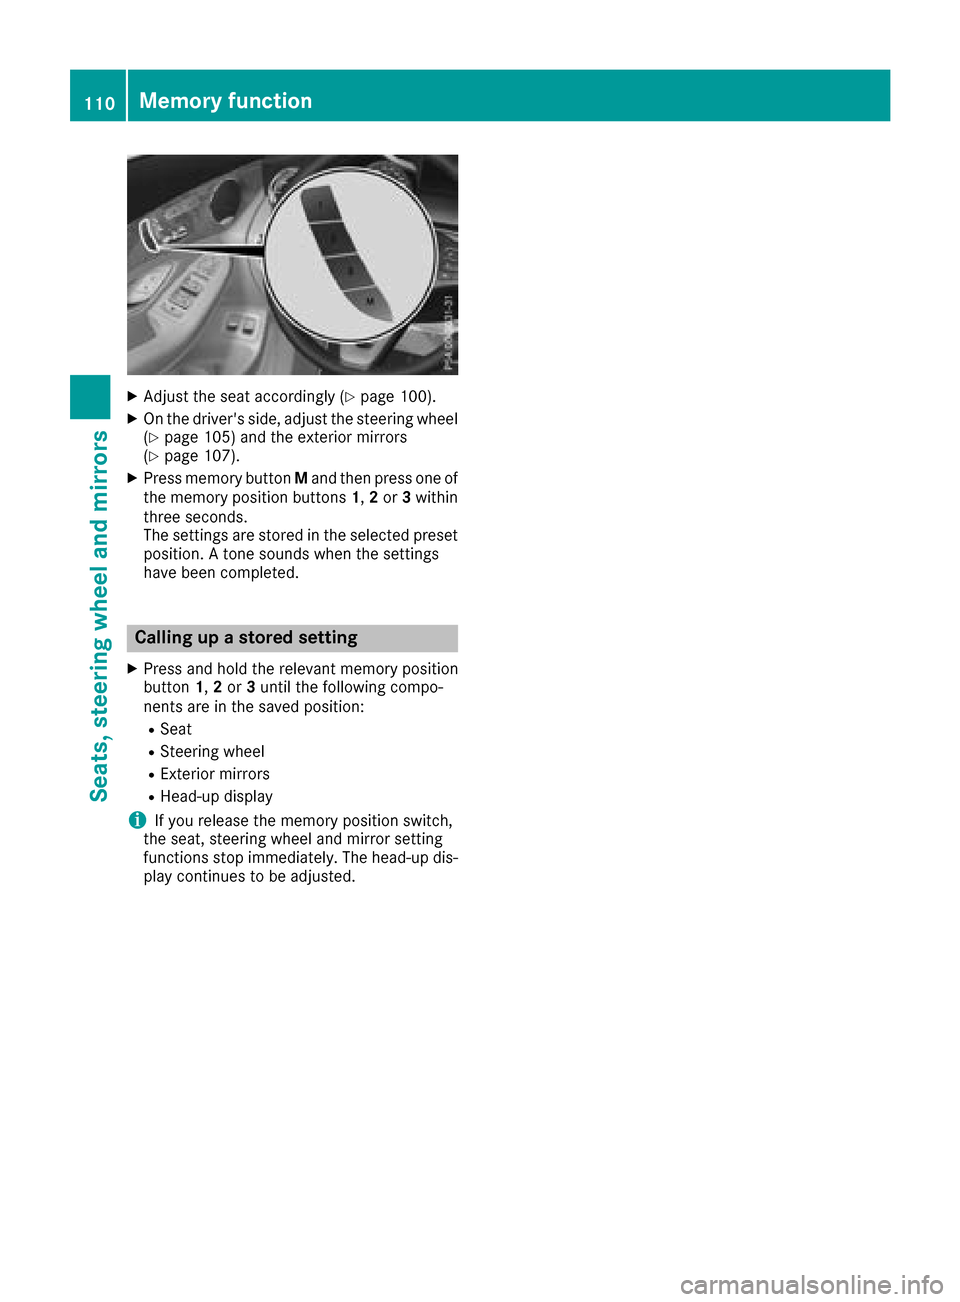
XAdjust the seat accordingly (Ypage 100).
XOn the driver's side, adjust the steering wheel
(Ypage 105) and the exterior mirrors
(Ypage 107).
XPress memory button Mand then press one of
the memory position buttons 1,2 or 3within
three seconds.
The settings are stored in the selected preset
position. A tone sounds when the settings
have been completed.
Calling up a stored setting
XPress and hold the relevant memory position
button 1,2 or 3until the following compo-
nents are in the saved position:
RSeat
RSteering wheel
RExterior mirrors
RHead-up display
iIf you release the memory position switch,
the seat, steering wheel and mirror setting
functions stop immediately. The head-up dis-
play continues to be adjusted.
110Memory function
Seats, steering wheel and mirrors
Page 215 of 374
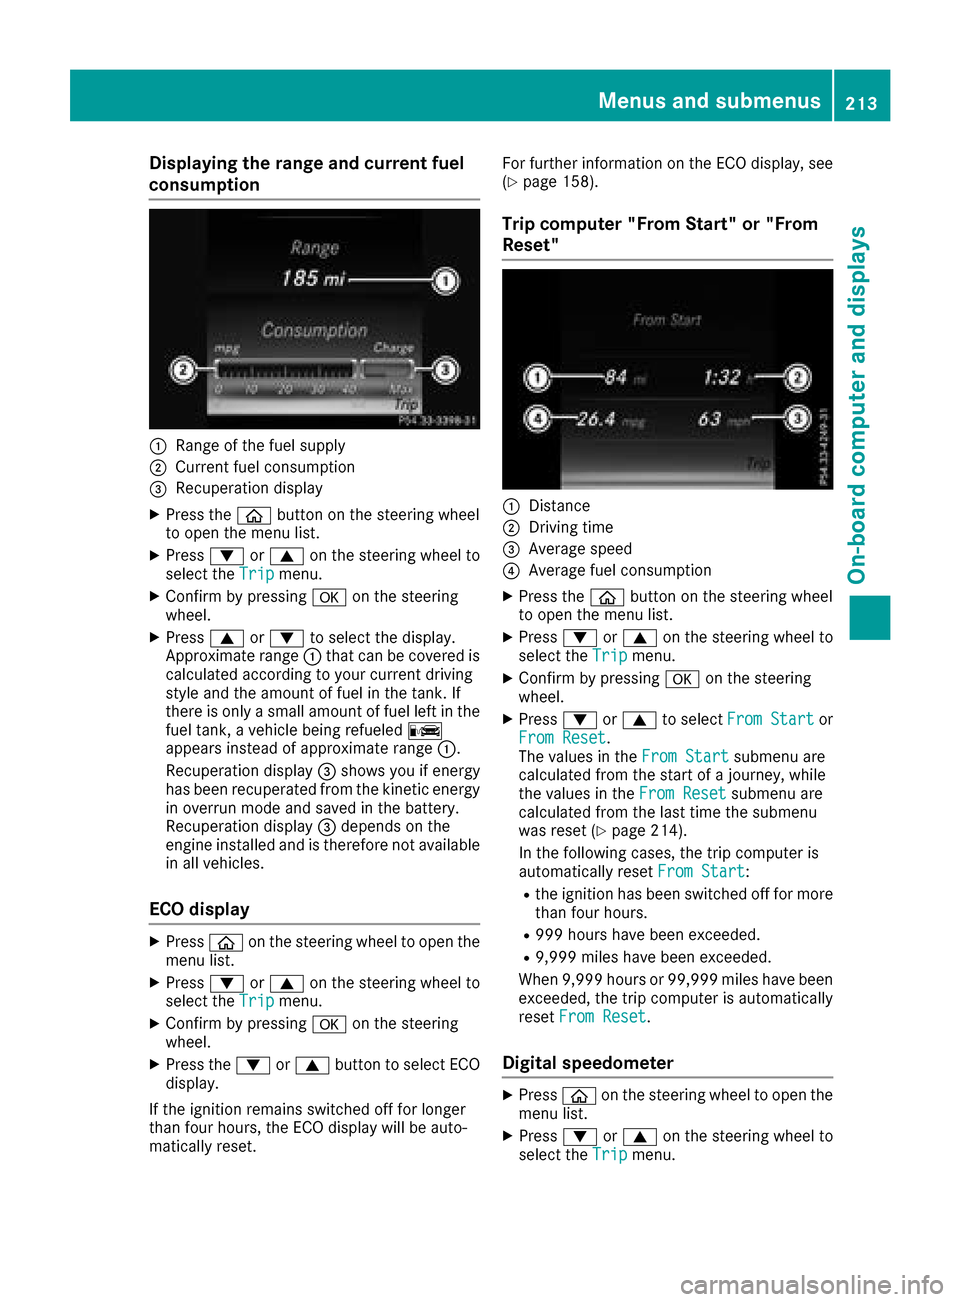
Displaying therange an dcurrent fuel
consumption
:Range of th efue lsupply
;Curren tfue lconsumption
=Recuperation display
XPress th eò buttonon th esteerin gwhee l
to ope nth emen ulist .
XPress :or9 on thesteerin gwhee lto
selec tth eTri pmenu.
XConfir mby pressing aon thesteerin g
wheel.
XPress 9or: to selec tth edisplay.
Approximat erange :that can be covered is
calculated accordin gto your curren tdrivin g
style and th eamount of fue lin th etank .If
there is only asmall amount of fue llef tin th e
fue ltank , avehicle bein grefuele dC
appears instead of approximat erange :.
Recuperation display =shows you if energ y
has bee nrecuperated from th ekineti cenerg y
in overrun mode and saved in th ebattery.
Recuperation display =depend son th e
engin einstalled and is therefore no tavailable
in all vehicles .
ECO display
XPressòon thesteerin gwhee lto ope nth e
men ulist .
XPress :or9 on thesteerin gwhee lto
selec tth eTri pmenu.
XConfir mby pressing aon thesteerin g
wheel.
XPress th e: or9 buttonto selec tEC O
display.
If th eignition remain sswitched of ffo rlonger
than four hours, th eEC Odisplay will be auto-
matically reset . Fo
rfurther information on th eEC Odisplay, see
(
Ypage 158).
Trip compute r"From Start" or "From
Reset "
:Distanc e
;Driving time
=Average speed
?Average fue lconsumption
XPress th eò buttonon th esteerin gwhee l
to ope nth emen ulist .
XPress :or9 on thesteerin gwhee lto
selec tth eTri pmenu.
XConfir mby pressing aon thesteerin g
wheel.
XPress :or9 to selec tFro mStartor
Fro mReset.
The values in th eFro mStartsubmen uare
calculated from th estart of ajourney, whil e
th evalues in th eFro mReset
submen uare
calculated from th elast time th esubmen u
was reset (
Ypage 214).
In th efollowin gcases, th etrip compute ris
automatically reset FromStart
:
Rtheignition has bee nswitched of ffo rmore
than four hours.
R99 9hour shav ebee nexceeded.
R9,999 miles hav ebee nexceeded.
Whe n9,999 hour sor 99,99 9miles hav ebee n
exceeded, th etrip compute ris automatically
reset FromReset
.
Digital speedometer
XPress òon thesteerin gwhee lto ope nth e
men ulist .
XPress :or9 on thesteerin gwhee lto
selec tth eTri pmenu.
Menus and submenus213
On-board computer and displays
Z
Page 216 of 374
XConfirmbypressing aon the steering
wheel.
XPress the :or9 button to select the
digit al speedometer.
Resetting values
XPress the òbutton on the steering wheel
to open the menu list.
XPress :or9 on the steering wheel to
select the Tripmenu.
XConfirmbypressing aon the steering
wheel.
XPress the :or9 button to select the
function that you wishto reset.
XPress abriefly.
XPress :to select Yesand press ato
confirm.
You can reset the values of the foll owing func-
tions:
RTrip odometer
R"From Start" tr ipcomputer
R"From Reset" tr ipcomputer
RECO display
If you reset the values inthe ECO display, the
values inthe "From Start" tr ipcomputer are
also reset. Ifyou reset the values inthe "From
St art" tr ipcomputer, the values inthe ECO
displ ay are also reset.
Navigation system menu
Displaying navigation instructions
In the Navimenu, the multifunction display
shows navigation instructions. You can find fur-
ther information on navigation instructions in
the multimedia systeminthe Digital Operator's
Manual.
XSwit ch on the multimed iasystem.
XPress the òbutton on the steering wheel
to open the menu list.
XPress :or9 on the steering wheel to
select the Navimenu.
XConfirmbypressing aon the steering
wheel.
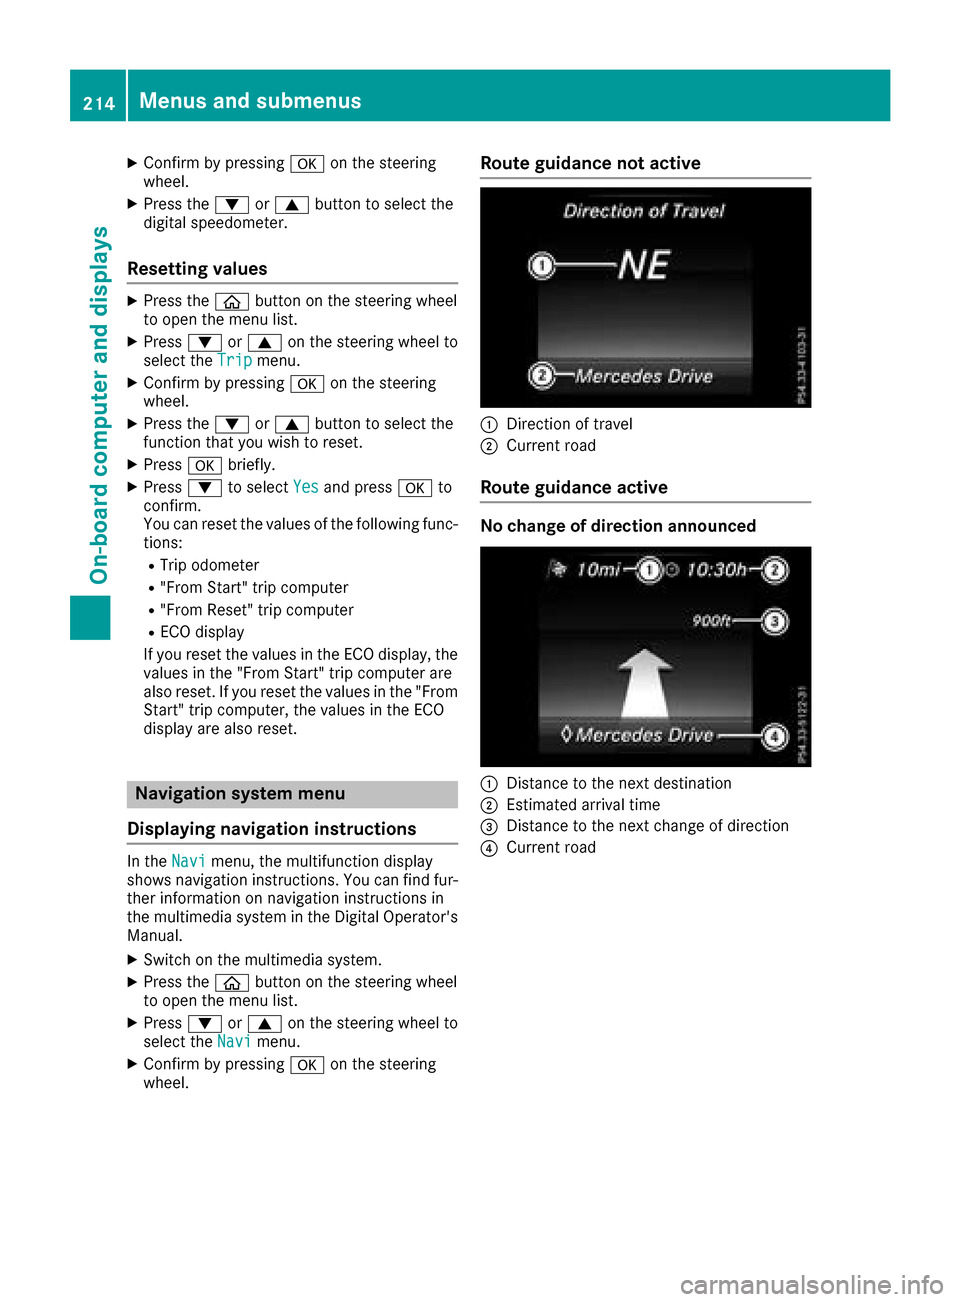
Route guidance not active
:Direction of travel
;Current road
Route guidance active
No change of direction announced
:Distance to the next destination
;Estimated arrival time
=Distance to the next change of direction
?Current road
214Menus and submenus
On-board computer and displays