2017 MERCEDES-BENZ GLC SUV interval
[x] Cancel search: intervalPage 162 of 374
When you take advantage of engine braking, a
drive wheel may not turn for some time, e.g.
on a slippery road surface. This could cause
damage to the drive train. This type of damage is not covered by the Mercedes-Benz war-
ranty.
Heavy and light loads
GWARNING
If you rest your foot on the brake pedal while
driving, the braking system can overheat. This increases the stopping distance and can even
cause the braking system to fail. There is a
risk of an accident.
Never use the brake pedal as a footrest. Never
depress the brake pedal and the accelerator
pedal at the same time.
!Depressing the brake pedal constantly
results in excessive and premature wear to
the brake pads.
If the brakes have been subjected to a heavy
load, do not stop the vehicle immediately. Drive
on for a short while. This allows the airflow to
cool the brakes more quickly.
Wet roads
If you have driven for a long time in heavy rain
without braking, there may be a delayed reac-
tion from the brakes when braking for the first
time. This may also occur after the vehicle has
been washed or driven through deep water.
You have to depress the brake pedal more
firmly. Maintain a greater distance from the
vehicle in front.
After driving on a wet road or having the vehicle
washed, brake firmly while paying attention to
the traffic conditions. This will warm up the
brake discs, thereby drying them more quickly
and protecting them against corrosion.
Limited braking performance on salt-
treated roads
If you drive on salted roads, a layer of salt resi-
due may form on the brake discs and brake
pads. This can result in a significantly longer
braking distance.
RIn order to prevent any salt build-up, apply the
brakes occasionally while paying attention to
the traffic conditions.
RCarefully depress the brake pedal and the
beginning and end of a journey.
RMaintain a greater distance to the vehicle
ahead.
Servicing the brakes
!The brake fluid level may be too low, if:
Rif the red brake warning lamp lights up in
the instrument cluster and
Ryou hear a warning tone while the engine is
running
Observe additional warning messages in the
multifunction display.
The brake fluid level may be too low due to
brake pad wear or leaking brake lines.
Have the brake system checked immediately. Consult a qualified specialist workshop to
arrange this.
!Vehicles with 4MATIC: function or per-
formance tests may only be carried out on a 2-
axle dynamometer. If you wish to operate the
vehicle on such a dynamometer, please con-
sult a qualified specialist workshop in
advance. You could otherwise damage the
drive train or the brake system.
!Vehicles with 4MATIC: the ESP®system
operates automatically. If the electric parking
brake is tested on a brake dynamometer, the
engine and ignition must be switched off: turn
the SmartKey in the ignition lock to position
u or1 or press the Start/Stop button
repeatedly in accordance with the given
SmartKey positions.
Braking triggered automatically by ESP
®may
cause severe damage to the brake system.
All checks and maintenance work on the brake
system must be carried out at a qualified spe-
cialist workshop.
Have brake pads installed and brake fluid
replaced at a qualified specialist workshop.
If the brake system has only been subject to
moderate loads, you should test the functional-
ity of your brakes at regular intervals.
Information on BAS (Brake Assist) (
Ypage 65)
and BAS PLUS (Brake Assist PLUS) (Ypage 66).
160Driving tips
Driving and parking
Page 225 of 374
XPress the:or9 button to adjust the
brightness to a level from Level+5(bright) to
Level -5(dark).
XPress the aor% button to save the
setting.
Light submenu
Switching the daytime running lamps on/
off
This function is not available in Canada.
XPress òon the steering wheel to open the
menu list.
XPress :or9 on the steering wheel to
select the Settingsmenu.
XConfirm by pressing aon the steering
wheel.
XPress :or9 to select the Lightssubmenu.
XPressato confirm.
XUsing :or9, select the DaytimeRunning Lightsfunction.
If the DaytimeRunningLightsfunction has
been switched on, the multifunction display
shows the cone of light and the Wsymbol
in yellow.
XPress the abutton to save the setting.
Further information on daytime running
lampsDaytime
RunningLights(Ypage 111).
Instrument cluster submenu
Selecting the distance unit
The DisplayUnitSpeed-/Odometerfunction
allows you to choose whether certain displays
appear in kilometers or miles in the multifunc-
tion display.
XPress the òbutton on the steering wheel
to open the menu list.
XPress the :or9 button on the steering
wheel to select the Settingsmenu.
XConfirm by pressing aon the steering
wheel.
XUse : or9 to select the InstrumentClustersubmenu.
XPressato confirm.
XPress :or9 to select the DisplayUnit Speed-/Odometerfunction.
The current setting kmorMilesappears.
XPress the abutton to save the setting.
The selected unit of measurement for distance
applies to:
RDigital speedometer in the Tripmenu
ROdometer and the trip odometer
RTrip computer
RCurrent consumption and the range
RNavigation instructions in the Navimenu
RCruise control
RDISTRONIC PLUS with Steering Assist and
Stop&Go Pilot
RASSYST PLUS service interval display
Switching the additional speedometer
on/off
If the additional speedometer is switched on,
the speed is shown in the status bar in the mul-
tifunction display instead of the outside tem-
perature.
The speed display is inverse to the speedome-
ter.
XPress theòbutton on the steering wheel
to open the menu list.
XPress the :or9 button on the steering
wheel to select the Settingsmenu.
XConfirm by pressing aon the steering
wheel.
XUse : or9 to select the InstrumentClustersubmenu.
XPressato confirm.
XUsing :or9, select the AdditionalSpeedometer [km/h]function.
The current selection appears.
XTo activate/deactivate: press theabut-
ton again.
Restoring the factory settings
XPress the òbutton on the steering wheel
to open the menu list.
XPress the :or9 button on the steering
wheel to select the Settingsmenu.
XConfirm by pressing aon the steering
wheel.
XUse : or9 to select the FactorySettingssubmenu.
Menus and submenus223
On-board computer and displays
Z
Page 310 of 374
When checking the oil level:
Rpark the vehicle on a level surface
Rthe engine should be switched off for approx-
imately five minutes if the engine is at normal
operating temperature
Rif the engine is not at normal operating tem-
perature, e.g. if the engine was only started
briefly, wait approximately 30 minutes before carrying out the measurement
Checking the oil level using the oil dip-
stick
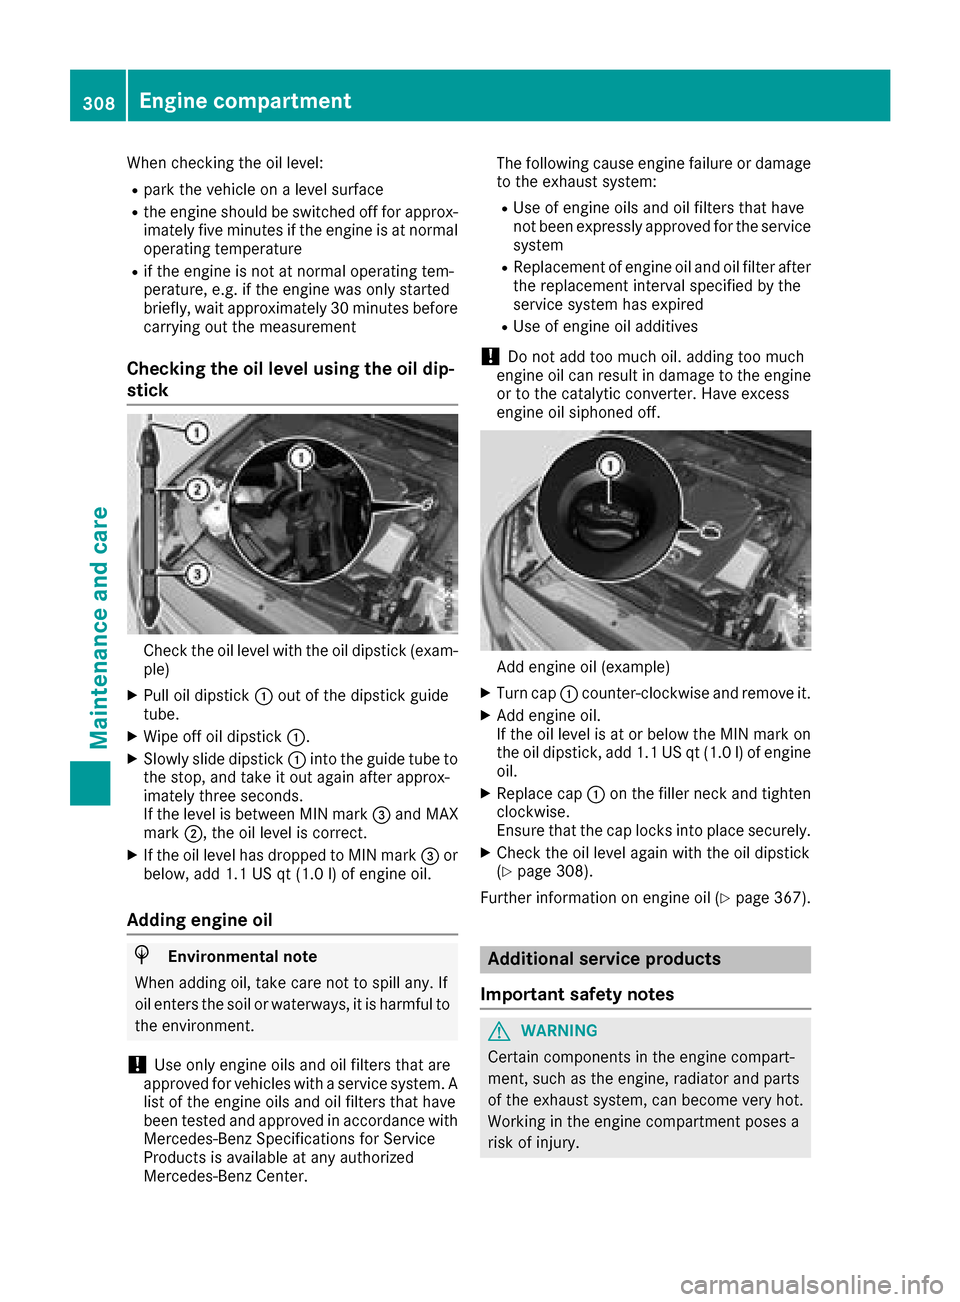
Check the oil level with the oil dipstick (exam-
ple)
XPull oil dipstick :out of the dipstick guide
tube.
XWipe off oil dipstick :.
XSlowly slide dipstick :into the guide tube to
the stop, and take it out again after approx-
imately three seconds.
If the level is between MIN mark =and MAX
mark ;, the oil level is correct.
XIf the oil level has dropped to MIN mark =or
below, add 1.1 US qt (1.0 l)of engine oil.
Adding engine oil
HEnvironmental note
When adding oil, take care not to spill any. If
oil enters the soil or waterways, it is harmful to
the environment.
!Use only engine oils and oil filters that are
approved for vehicles with a service system. A list of the engine oils and oil filters that have
been tested and approved in accordance with
Mercedes-Benz Specifications for Service
Products is available at any authorized
Mercedes-Benz Center. The following cause engine failure or damage
to the exhaust system:
RUse of engine oils and oil filters that have
not been expressly approved for the service
system
RReplacement of engine oil and oil filter after
the replacement interval specified by the
service system has expired
RUse of engine oil additives
!Do not add too much oil. adding too much
engine oil can result in damage to the engine
or to the catalytic converter. Have excess
engine oil siphoned off.
Add engine oil (example)
XTurn cap :counter-clockwise and remove it.
XAdd engine oil.
If the oil level is at or below the MIN mark on
the oil dipstick, add 1.1 US qt (1.0 l)of engine
oil.
XReplace cap :on the filler neck and tighten
clockwise.
Ensure that the cap locks into place securely.
XCheck the oil level again with the oil dipstick
(Ypage 308).
Further information on engine oil (
Ypage 367).
Additional service products
Important safety notes
GWARNING
Certain components in the engine compart-
ment, such as the engine, radiator and parts
of the exhaust system, can become very hot.
Working in the engine compartment poses a
risk of injury.
308Engine compartment
Maintenance and care
Page 312 of 374
Adding washer fluid to the windshield
washer system
GWARNING
Windshield washer concentrate could ignit eif
it comes int ocontact wit hhot engin ecompo -
nent sor th eexhaust system. There is aris kof
fir eand injury.
Mak esur ethat no windshield washer con-
centrat eis spilled next to th efiller neck .
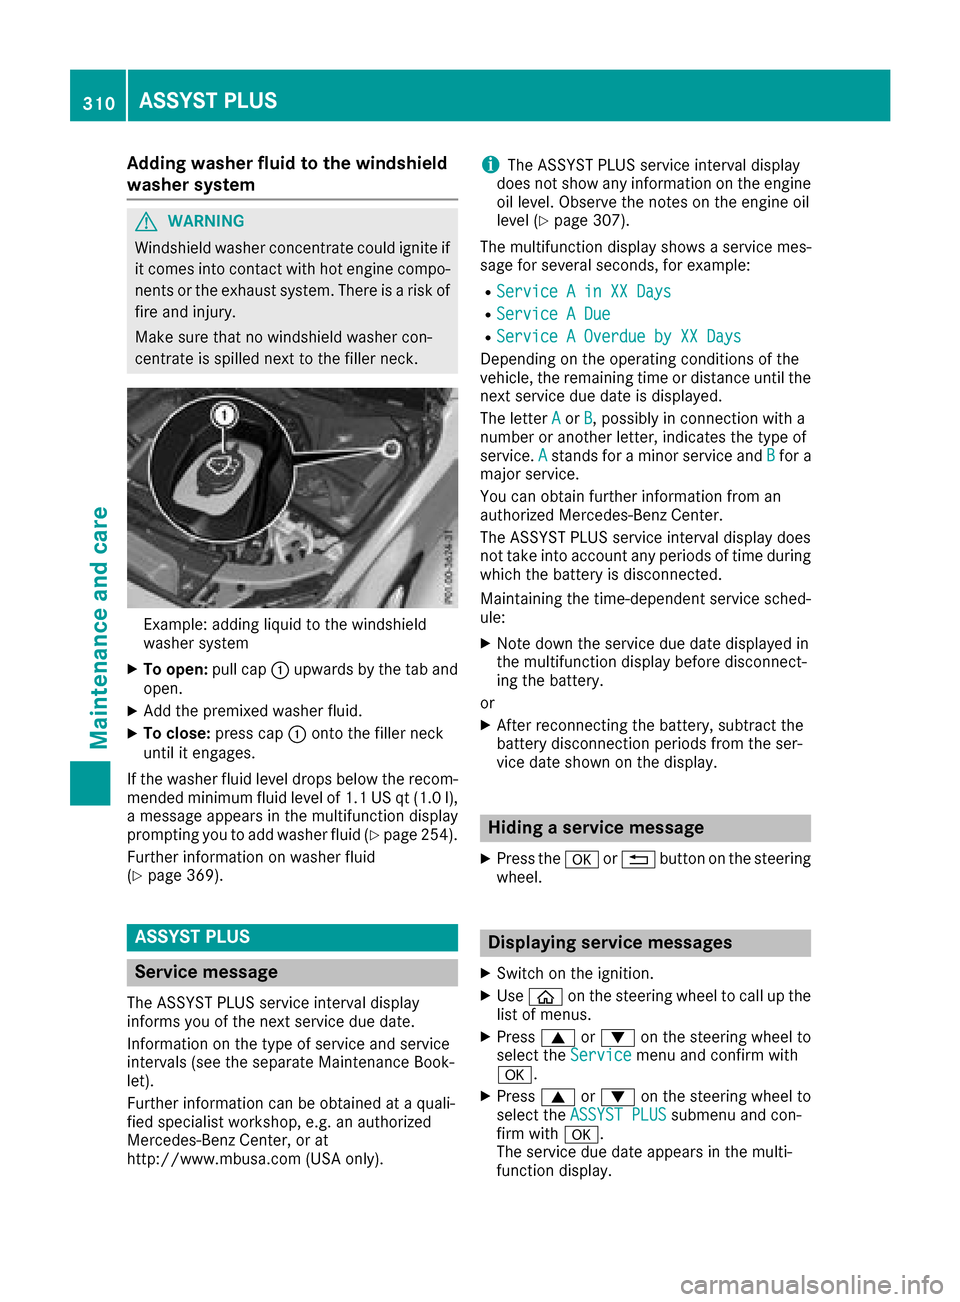
Example: addin gliquid to th ewindshield
washer system
XTo open :pull cap :upwards by th etab and
open .
XAddth epremixed washer fluid .
XTo close:press cap :onto th efiller neck
until it engages.
If th ewasher fluid level drops belo wtherecom-
mended minimum fluid level of 1. 1US qt (1. 0l),
a message appear sin th emultifunction display
prompting you to add washer fluid (
Ypage 254).
Further information on washer fluid
(
Ypage 369).
ASSYST PLUS
Service message
The ASSYS TPLU Sservic einterval display
inform syou of th enext servic edue date.
Information on th etyp eof servic eand servic e
intervals (see th eseparat eMaintenance Book -
let).
Further information can be obtained at aquali-
fie dspecialis tworkshop ,e.g. an authorize d
Mercedes-Benz Center, or at
http://www.mbusa.co m(US Aonly).
iThe ASSYS TPLU Sservic einterval display
does no tsho wany information on th eengin e
oil level. Observ eth enote son th eengin eoil
level (
Ypage 307).
The multifunction display shows aservic emes -
sage for several seconds, for example:
RServic e Ain XX Day s
RService ADue
RServic e AOverdu eby XX Day s
Dependingon th eoperating condition sof th e
vehicle, th eremaining time or distanc euntil th e
next servic edue dat eis displayed.
The lette rA
or B,possibl yin connection wit h a
number or another letter, indicates th etyp eof
service. A
standsfor aminor servic eand Bfora
major service.
You can obtain further information from an
authorize dMercedes-Benz Center.
The ASSYS TPLU Sservic einterval display does
no ttak eint oaccoun tany periods of time during
whic hth ebattery is disconnected.
Maintainin gth etime-dependen tservic esched-
ule:
XNot edown th eservic edue dat edisplayed in
th emultifunction display before disconnect -
ing th ebattery.
or
XAfte rreconnecting th ebattery, subtrac tth e
battery disconnection periods from th eser -
vic edat eshown on th edisplay.
Hiding a service message
XPress th ea or% buttonon th esteering
wheel.
Displaying service messages
XSwitc hon th eignition .
XUseò on thesteering whee lto call up th e
list of menus.
XPress 9or: on thesteering whee lto
select th eServic emenuand confirm wit h
a.
XPress 9or: on thesteering whee lto
select th eASSYST PLU Ssubmenuand con-
fir m wit ha.
The servic edue dat eappear sin th emulti-
function display.
310ASSYST PLUS
Maintenance and care
Page 313 of 374
Information about Service
Resetting the ASSYST PLUS service
interval display
!If th eASSYS TPLU Sservic einterval display
has been inadvertentl yreset ,this setting can
be correcte dat aqualified specialist work-
shop.
Hav eservic ewor kcarried out as describe din
th eMaintenance Booklet .This may otherwise
lead to increased wear and damag eto th e
major assemblies or th evehicle.
A qualified specialist workshop, e.g. an author-
ize dMercedes-Ben zCenter, will reset th e
ASSYS TPLU Sservic einterval display after th e
servic ewor khas been carried out .You can also
obtain further information on maintenance
work, for example.
Special service requirements
The specifie dmaintenance interval takes only
th enormal operation of th evehicl eint o
account. Under arduous operating condition sor
increased load on th evehicle, maintenance
wor kmust be carried out mor efrequently, for
example:
RRegular cit ydriving wit hfrequen tintermedi-
ate stops
RIf th evehicl eis primarily used to travel short
distances
RUse in mountainous terrain or on poor road
surfaces
Rif th eengin eis often lef tidlin gfor lon gperiods
Under these or similar conditions, have, for
example, th eair filter, engin eoil and oil filter
replace dor changed mor efrequently. Under
arduous operating conditions, th etires must be
checke dmor eoften .Further information can be
obtained at aqualified specialist workshop, e.g.
an authorize dMercedes-Ben zCenter.
Driving abroad
An extensive Mercedes-Ben zService network is
also available in other countries .You can obtain
further information from any authorize d
Mercedes-Ben zCenter.
Care
General notes
!
Fo rcleaning your vehicle, do no tuse any of
th efollowing:
Rdry, roug hor har dcloth s
Rabrasive cleaning agents
Rsolvents
Rcleaning agents containing solvents
Do no tscrub.
Do no ttouch th esurfaces or protective film s
wit hhar dobjects ,e.g. arin gor ice scraper.
You could otherwise scratch or damag eth e
surfaces and protective film .
!Do notpark your vehicl efor alon gperiod of
time directly after cleaning ,particularly after
cleaning th ewhee lrim wit hwhee lcleaner.
Whee lcleane rcan lead to th eincreased cor-
rosion of th ebrak edisc sand pads. Therefore,
driv efor afew minute safter cleaning .By
heating up th ebrakes, th ebrak edisc sand
pads dry. The vehicl ecan then be parked for a
lon gperiod of time.
HEnvironmental not e
Dispose of empty packaging and cleaning
cloth sin an environmentally responsible man -
ner.
Regular car eof your vehicl eis acondition for
retaining th equalit yin th elon gterm .
Use car eproducts and cleaning agents recom-
mended and approve dby Mercedes-Benz.
Washing the vehicle and cleaning the
paintwork
Automatic car wash
GWARNIN G
Braking efficiency is reduce dafter washing
th evehicle. Ther eis aris kof an accident.
Afte rth evehicl ehas been washed, brak e
carefully while payin gattention to th etraffic
condition suntil full braking power is restored .
!When DISTRONICPLU Sor th eHOLD func-
tion is activated, th evehicl ebrakes automat -
ically in certain situations.
Care311
Maintenance and care
Z
Page 317 of 374

!Clean the water drainage channels of the
windshield and the rear window at regular
intervals. Deposits such as leaves, petals and
pollen may under certain circumstances pre-
vent water from draining away. This can lead
to corrosion damage and damage to elec-
tronic components.
XClean the inside and outside of the windows
with a damp cloth and a cleaning product that is recommended and approved by Mercedes-
Benz.
Cleaning wiper blades
GWARNING
You could become trapped by the windshield wipers if they start moving while cleaning the
windshield or wiper blades. There is a risk of
injury.
Always switch off the windshield wipers and
the ignition before cleaning the windshield or
wiper blades.
!Do not pull the wiper blade. Otherwise, the
wiper blade could be damaged.
!Do not clean wiper blades too often and do
not rub them too hard. Otherwise, the graph-
ite coating could be damaged. This could
cause wiper noise.
!Hold the wiper arm securely when folding
back. The windshield could be damaged if the
wiper arm smacks against it suddenly.
XFold the windshield wiper arms away from the
windshield (Ypage 120).
XCarefully clean the wiper blades with a damp
cloth.
XFold the windshield wiper arms back again
before switching on the ignition.
Cleaning the exterior lighting
!Only use cleaning agents or cleaning cloths
which are suitable for plastic light lenses.
Unsuitable cleaning agents or cleaning cloths
could scratch or damage the plastic light len- ses.
XClean the plastic lenses of the exterior light-
ing using a wet sponge and a mild cleaning
agent, e.g. Mercedes-Benz car shampoo or
cleaning cloths.
Cleaning the mirror turn signals
!Only use cleaning agents or cleaning cloths
that are suitable for plastic lenses. Unsuitable
cleaning agents or cleaning cloths could
scratch or damage the plastic lenses of the
mirror turn signals.
XClean the plastic lenses of the mirror turn sig-
nals in the exterior mirror housing using a wet
sponge and mild cleaning agent, e.g.
Mercedes-Benz car shampoo or cleaning
cloths.
Cleaning the side running board
!Do not clean the aluminum inserts of the
side running board with alkaline or acidic
cleaners, such as wheel cleaner. Do not use
acidic wheel cleaners to remove brake dust.
The aluminum inserts could otherwise be
damaged.
Cleaning the sensors
!If you clean the sensors with a power
washer, make sure that you keep a distance
of at least 11.8 in (30 cm) between the vehicle
and the power washer nozzle. Information
about the correct distance is available from
the equipment manufacturer.
XClean sensors :of the driving systems with
water, car shampoo and a soft cloth.
Care315
Maintenance and care
Z
Page 328 of 374
RIt is particularly important to observe the
described order when connecting and dis-
connecting the jumper cables.
RNever connect or disconnect the battery
terminals while the engine is running.
GWARNING
Battery acid is caustic. There is a risk of injury.
Avoid contact with skin, eyes or clothing. Do
not inhale any battery gases. Do not lean over
the battery. Keep children away from batter-
ies. Wash away battery acid immediately with
plenty of clean water and seek medical atten-
tion.
All vehicles:
HEnvironmental note
Batteries contain dangerous
substances. It is against the
law to dispose of them with
the household rubbish. They
must be collected separately and recycled to protect the
environment.
Dispose of batteries in an
environmentally friendly
manner. Take discharged
batteries to a qualified spe-
cialist workshop or a special
collection point for used bat-
teries.
!Have the battery checked regularly at a
qualified specialist workshop.
Observe the service intervals in the Mainte-
nance Booklet or contact a qualified specialist
workshop for more information.
!Always have work on batteries carried out at
a qualified specialist workshop. Should it, in exceptional circumstances, be
absolutely necessary to disconnect the 12-
volt battery yourself, please observe the fol-
lowing:
RSecure the vehicle to prevent it from rolling
away.
RSwitch off the ignition.
RDisconnect the negative terminal first and
then the positive terminal.
The transmission is locked in position j
after disconnecting the battery.
After the work has been done, install the bat- tery and replace the cover of the positive ter-
minal clamp firmly.
Comply with safety precautions and take pro-
tective measures when handling batteries.
Risk of explosion.
Fire, open flames and smoking are
prohibited when handling the bat-
tery. Avoid creating sparks.
Electrolyte or battery acid is corro-
sive. Avoid contact with skin, eyes or
clothing.
Wear suitable protective clothing,
especially gloves, apron and face-
guard.
Immediately rinse electrolyte or acid
splashes off with clean water. Con-
tact a physician if necessary.
Wear eye protection.
Keep children away.
Observe this Operator's Manual.
For safety reasons, Mercedes-Benz recom-
mends that you only use batteries which have
been tested and approved for your vehicle by
Mercedes-Benz. These batteries provide
increased impact protection to prevent vehicle
occupants from suffering acid burns should the
battery be damaged in the event of an accident.
326Battery (vehicle)
Breakdown assistance
Page 358 of 374
Weight of optional extras
The combined weight of those optional extras
that weigh more than the replaced standard
parts and more than 5 lbs (2.3 kg). These
optional extras, such as high-performance
brakes, level control, a roof rack or a high-per-
formance battery, are not included in the curb
weight and the weight of the accessories.
TIN (Tire Identification Number)
This is a unique identifier which can be used by
a tire manufacturer to identify tires, for example
for a product recall, and thus identify the pur-
chasers. The TIN is made up of the manufactur-
er's identity code, tire size, tire type code and
the manufacturing date.
Load bearing index
The load bearing index (also load index) is a code
that contains the maximum load bearing capa-
city of a tire.
Traction
Traction is the result of friction between the tires
and the road surface.
Treadwear indicators
Narrow bars (tread wear bars) that are distrib-
uted over the tire tread. If the tire tread is level
with the bars, the wear limit of áin (1.6 mm)
has been reached.
Occupant distribution
The distribution of occupants in a vehicle at their
designated seating positions.
Total load limit
Nominal load and luggage load plus 68 kg
(150 lbs) multiplied by the number of seats in
the vehicle.
Changing a wheel
Flat tire
The "Breakdown assistance" section
(Ypage 321) contains information and notes on
how to deal with a flat tire. Information on driv-
ing with MOExtended tires in the event of a flat
tire can be found under "MOExtended tires (tires
with run-flat characteristics" (
Ypage 321).
Rotating the wheels
GWARNING
Interchanging the front and rear wheels may
severely impair the driving characteristics if
the wheels or tires have different dimensions. The wheel brakes or suspension components
may also be damaged. There is a risk of acci-
dent.
Rotate front and rear wheels only if the wheels and tires are of the same dimensions.
!On vehicles equipped with a tire pressure
monitor, electronic components are located
in the wheel.
Tire-mounting tools should not be used near
the valve. This could damage the electronic
components.
Only have tires changed at a qualified spe-
cialist workshop.
Always observe the instructions and safety
notes in the "Mounting a wheel" section
(
Ypage 357).
The wear patterns on the front and rear tires
differ, depending on the operating conditions.
Rotate the wheels before a clear wear pattern
has formed on the tires. Front tires typically
wear more on the shoulders and the rear tires in
the center.
On vehicles that have the same size front and
rear wheels, you can rotate the tires according
to the intervals in the tire manufacturer's war-
ranty book in your vehicle documents. If no war-
ranty book is available, the tires should be rota- ted every 3,000 to 6,000 miles (5,000 to
10,000 km). Depending on tire wear, this may
be required earlier. Do not change the direction
of wheel rotation.
Clean the contact surfaces of the wheel and the
brake disc thoroughly every time a wheel is rota-
ted. Check the tire pressure and, if necessary,
restart the tire pressure loss warning system
(
Ypage 343) or the tire pressure monitor
(Ypage 345).
Direction of rotation
Tires with a specified direction of rotation have
additional benefits, e.g. if there is a risk of hydro- planing. These advantages can only be gained if
356Changing a wheel
Wheels and tires