2017 MERCEDES-BENZ GLC mph display
[x] Cancel search: mph displayPage 75 of 374
ESP ®
trailer stabilizationGeneral information If your vehicle/trailer combination begins to
swerve, ESP ®
assists you in this situation. ESP ®
slows the vehicle down by braking and limiting
the engine output until the vehicle/trailer com-
bination has stabilized.
Important safety notes
G WARNING
If road and weather conditions are poor,
trailer stabilization will not be able to prevent
the vehicle/trailer combination from swerv-
ing. Trailers with a high center of gravity can
tip over before ESP ®
can detect this. There is
a risk of an accident.
Always adapt your driving style to the prevail-
ing road and weather conditions.
If your vehicle with trailer (vehicle/trailer com-
bination) begins to lurch, you can only stabilize
the vehicle/trailer combination by depressing
the brake firmly.
ESP ®
trailer stabilization is active above speeds
of approximately 40 mph (65 km/h).
ESP ®
trailer stabilization does not work if ESP ®
is deactivated or malfunctioning.
Crosswind Assist
General information Strong crosswind gusts can impair the ability of
your vehicle to drive straight ahead. The cross-
wind driving assistance function integrated in
ESP ®
noticeably reduces these impairments.
ESP ®
intervenes automatically according to the
direction and intensity of the crosswinds affect-
ing your vehicle.
ESP ®
intervenes with stabilizing braking to
assist you in keeping the vehicle in the lane.
Crosswind Assist is active at vehicle speeds
above 50 mph (80 km/h) when driving straight
ahead or cornering gently.
Important safety notes
Crosswind Assist does not work if ESP ®
is
switched off or deactivated because of a mal-
function. EBD (electronic brake force distribu-
tion)
General information EBD monitors and controls the brake pressure
on the rear wheels to improve driving stability
while braking.
Important safety notes
i Observe the "Important safety notes" sec-
tion ( Y
page 65).
G WARNING
If EBD is malfunctioning, the rear wheels can
lock, e.g. under full braking. This increases the
risk of skidding and an accident.
You should therefore adapt your driving style
to the different handling characteristics. Have
the brake system checked at a qualified spe-
cialist workshop.
Observe information regarding indicator and
warning lamps ( Y
page 259) as well as display
messages ( Y
page 230).
ADAPTIVE BRAKE ADAPTIVE BRAKE enhances braking safety and
offers increased braking comfort. In addition to
the braking function, ADAPTIVE BRAKE also has
the HOLD function ( Y
page 171) and hill start
assist ( Y
page 136).
PRE-SAFE ®
Brake
General information PRE-SAFE ®
Brake can help you to minimize the
risk of a collision with a vehicle ahead or a
pedestrian, and reduce the effects of such a
collision. If PRE-SAFE ®
Brake has detected a risk
of collision, you will be warned visually and
acoustically as well as by automatic braking.
i Pay attention to the important safety notes
in the "Driving safety systems" section
( Y
page 65).
PRE ‑ SAFE ®
Brake is only available in vehicles
with the Driving Assistance Plus package.Driving safety systems 73
Safety Z
Page 155 of 374
To avoid transporting already opened refill con-
tainers in the vehicle, completely empty refill
bottles or canisters when filling the DEF tank, if
possible.
For further information on DEF, see
( Y
page 367).
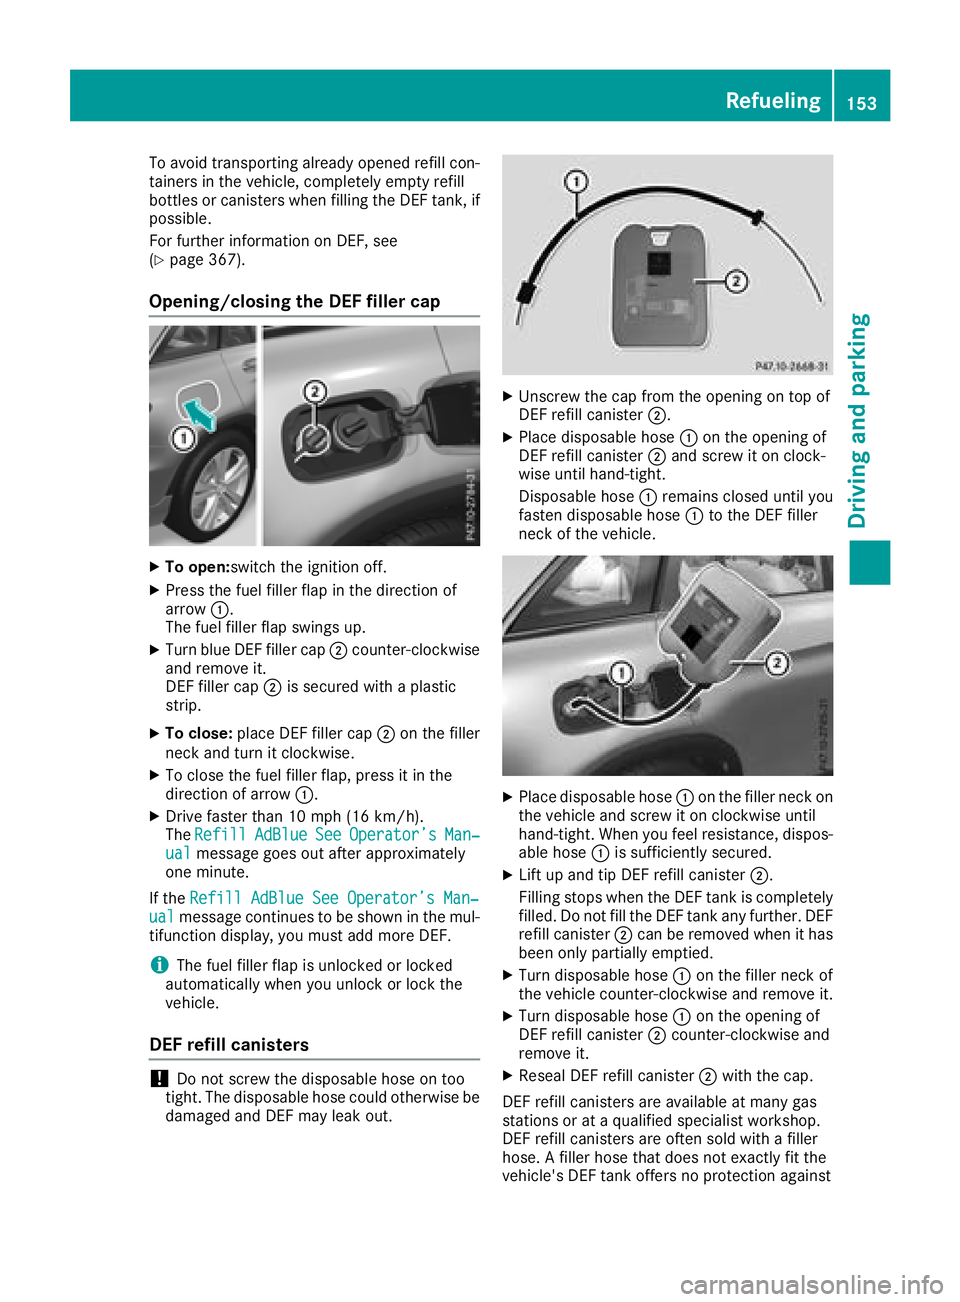
Opening/closing the DEF filler cap X
To open: switch the ignition off.X
Press the fuel filler flap in the direction of
arrow �C .
The fuel filler flap swings up. X
Turn blue DEF filler cap �D counter-clockwise
and remove it.
DEF filler cap �D is secured with a plastic
strip. X
To close: place DEF filler cap �D on the filler
neck and turn it clockwise. X
To close the fuel filler flap, press it in the
direction of arrow �C .X
Drive faster than 10 mph (16 km/h).
The Refill AdBlue See Operator’s Man‐
ual message goes out after approximately
one minute.
If the Refill AdBlue See Operator’s Man‐
ual message continues to be shown in the mul-
tifunction display, you must add more DEF.
i The fuel filler flap is unlocked or locked
automatically when you unlock or lock the
vehicle.
DEF refill canisters
! Do not screw the disposable hose on too
tight. The disposable hose could otherwise be
damaged and DEF may leak out. X
Unscrew the cap from the opening on top of
DEF refill canister �D .X
Place disposable hose �C on the opening of
DEF refill canister �D and screw it on clock-
wise until hand-tight.
Disposable hose �C remains closed until you
fasten disposable hose �C to the DEF filler
neck of the vehicle.
X
Place disposable hose �C on the filler neck on
the vehicle and screw it on clockwise until
hand-tight. When you feel resistance, dispos-
able hose �C is sufficiently secured. X
Lift up and tip DEF refill canister �D .
Filling stops when the DEF tank is completely
filled. Do not fill the DEF tank any further. DEF
refill canister �D can be removed when it has
been only partially emptied. X
Turn disposable hose �C on the filler neck of
the vehicle counter-clockwise and remove it. X
Turn disposable hose �C on the opening of
DEF refill canister �D counter-clockwise and
remove it. X
Reseal DEF refill canister �D with the cap.
DEF refill canisters are available at many gas
stations or at a qualified specialist workshop.
DEF refill canisters are often sold with a filler
hose. A filler hose that does not exactly fit the
vehicle's DEF tank offers no protection against Refueling 153
Driving and parking Z
Page 169 of 374
between your vehicle and the vehicle in front
becomes too small.
When you change lanes, DISTRONIC PLUS mon-
itors the left lane (on left-hand-drive vehicles) or
the right lane (on right-hand-drive vehicles).
Stopping
G WARNING
When leaving the vehicle, even if it is braked
only by DISTRONIC PLUS, it could roll away if: R
there is a malfunction in the system or in
the voltage supply. R
DISTRONIC PLUS has been deactivated
with the cruise control lever, e.g. by a vehi-
cle occupant or from outside the vehicle. R
the electrical system in the engine com-
partment, the battery or the fuses have
been tampered with. R
the battery is disconnected. R
the accelerator pedal has been depressed,
e.g. by a vehicle occupant.
There is a risk of an accident.
If you wish to exit the vehicle, always turn off
DISTRONIC PLUS and secure the vehicle
against rolling away.
For further information on deactivating
DISTRONIC PLUS ( Y
page 169).
If DISTRONIC PLUS detects that the vehicle in
front has stopped, it will cause your vehicle to
brake and come to a halt.
Once your vehicle is stationary, it remains sta-
tionary and you do not need to depress the
brake.
After a time, the electric parking brake secures
the vehicle and relieves the service brake.
Depending on the specified minimum distance,
your vehicle will come to a standstill at a suffi-
cient distance behind the vehicle in front. The
specified minimum distance is set using the
control on the cruise control lever. When DISTRONIC PLUS is activated, the trans-
mission is shifted automatically to position �] ,
if: R
the driver's seat belt is not fastened and the
driver's door is open. R
the engine is switched off, unless it is auto-
matically switched off by the ECO start/stop
function.
The electric parking brake secures the vehicle
automatically if DISTRONIC PLUS is activated
when the vehicle is stationary and: R
a system malfunction occurs. R
the power supply is insufficient.
If a malfunction occurs, the transmission may
also be shifted to position �] automatically.
Setting a speed X
Push the cruise control lever up �C for a
higher speed or down �D for a lower speed.X
To adjust the set speed in 1 mph incre-
ments (1 km/h increments): briefly push
the cruise control lever up �C or down �D to
the pressure point.
Every time the cruise control lever is pressed
up �C or down �D the last speed stored is
increased or reduced. X
To adjust the set speed in 5 mph incre-
ments (10 km/h increments): briefly push
the cruise control lever up �C or down �D
beyond the pressure point.
Every time the cruise control lever is pressed
up �C or down �D , the last speed stored is
increased or reduced.
i If you accelerate to overtake, DISTRONIC
PLUS adjusts the vehicle's speed back to the
last speed stored after you have finished over-
taking.
Setting a specified minimum distance You can set the specified minimum distance for
DISTRONIC PLUS by varying the time span
between one and two seconds. With this func-
tion, you can set the minimum distance that
DISTRONIC PLUS maintains to the vehicle in
front, depending on the driving speed. You can
see this distance in the multifunction display
( Y
page 168).
Make sure that you maintain the minimum dis-
tance to the vehicle in front as required by law.Driving systems 167
Driving and parking Z
Page 172 of 374
DISTRONIC PLUS with Steering Assist and
Stop&Go Pilot helps you keep the vehicle in the
center of the lane by means of moderate steer-
ing interventions in a speed range from
0–125 mph (0–200 km/h).
It monitors the area in front of your vehicle by
means of multifunction camera �C , at the top of
the windshield.
In a speed range from 0 - 37 mph (0 - 60 km/h),
Stop&Go Pilot focuses on the vehicle in front,
taking into account lane markings, e.g. when
you are following vehicles in a traffic jam.
At speeds of more than 37 mph (60 km/h),
Steering Assist focuses on clear lane markings
(left and right), only focusing on the vehicle in
front if clear lane markings are not present.
If these conditions are not present, Steering
Assist and Stop&Go Pilot cannot provide assis-
tance.
DISTRONIC PLUS must be active in order for the
function to be available.
Important safety notes If you fail to adapt your driving style, DISTRONIC
PLUS with Steering Assist and Stop&Go Pilot
can neither reduce the risk of an accident nor
override the laws of physics. It cannot take
account of road, weather and traffic conditions.
DISTRONIC PLUS with Steering Assist and
Stop&Go Pilot is only an ai d. Y ou are responsible
fo
r maintaining a safe distance to the vehicle in
front, for vehicle speed, for braking in good time
and for staying in lane.
DISTRONIC PLUS with Steering Assist and
Stop&Go Pilot does not detect road and traffic
conditions and does not detect all road users. If
you are following a vehicle which is driving
towards the edge of the road, your vehicle could
come into contact with the curb or other road
boundaries. Be particularly aware of other road
users, e.g. cyclists, that are directly next to your
vehicle.
Obstacles such as traffic pylons on the lane or
projecting out into the lane are not detected.
An inappropriate steering intervention, e.g. after
intentionally driving over a lane marking, can be
corrected at any time if you steer slightly in the
opposite direction.
DISTRONIC PLUS with Steering Assist and
Stop&Go Pilot cannot continuously keep your
vehicle in lane. In some cases, steering inter-
vention is not sufficient to bring the vehicle back
to the lane. In such cases, you must steer the vehicle yourself to ensure that it does not leave
the lane.
The system may be impaired or may not function
if: R
there is poor visibility, e.g. due to insufficient
i llumination of the road, or due to snow, rain,
fog or spray R
there is glare, e.g. from oncoming traffic, the
sun or reflection from other vehicles (e.g. if
the road surface is wet) R
the windshield is dirty, fogged up, damaged or
covered, for instance by a sticker, in the vicin-
ity of the camera R
there are no, several or unclear lane markings
for a lane, e.g. in areas with road construction
work R
the lane markings are worn away, dark or cov-
ered up, e.g. by dirt or snow R
the distance to the vehicle in front is too small
and the lane markings thus cannot be detec-
ted R
the lane markings change quickly, e.g. lanes
branch off, cross one another or merge R
the road is narrow and winding R
there are highly variable shade conditions on
the roadway
The system is switched to passive and no longer
assists you by performing steering interventions
if: R
you actively change lane R
you switch on the turn signal R
you take your hands off the steering wheel or
do not steer for a prolonged period of time
Steering Assist and Stop&Go Pilot are activated
again automatically after a lane chang e is com-
p leted.
Steering Assist and Stop&Go Pilot do not pro-
vide any support: R
on very sharp corners R
when a loss of tire pressure or a defective tire
has been detected and displayed
Pay attention also to the important safety notes
for DISTRONIC PLUS ( Y
page 164).
The steering interventions are carried out with a
limited steering moment. The system requires
the driver to keep his hands on the steering
wheel and to steer himself.
If you do not steer yourself or if you take your
hands off the steering wheel for a prolonged
period of time, the system will first alert you with170
Driving system s
Dr ivi ng an d parking
Page 175 of 374
Important safety notes
G WARNIN G
When th e vehicl e is bein g lowered, people
could become trapped if their limb s are
between th e vehicl e body and th e wheels or
underneat h th e vehicle. Ther e is a ris k of
injury.
Mak e sur e no on e is underneat h th e vehicl e or
in th e immediat e vicinity of th e whee l arches
when th e vehicl e is bein g lowered.
i If on e of th e door s is open , th e vehicl e is no t
lowered.
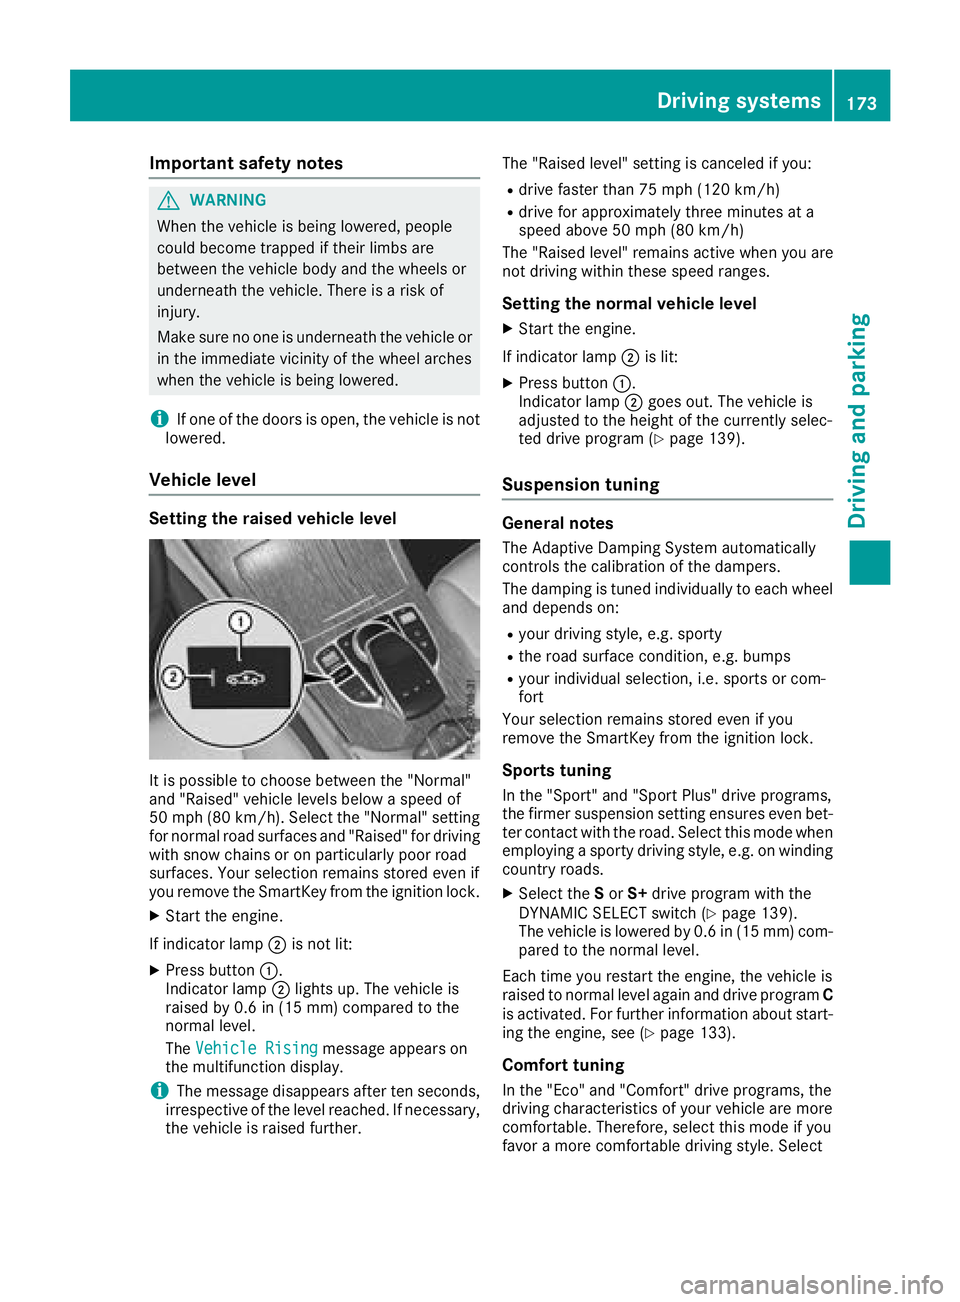
Vehicle level Setting the ra ised vehicle level
It is possible to choos e between th e "Normal"
and "Raised " vehicl e levels belo w a spee d of
50 mph (80 km/h). Selec t th e "Normal" setting
for normal road surfaces and "Raised " for driving
wit h snow chain s or on particularly poor road
surfaces. Your selection remain s store d eve n if
you remove th e SmartKey from th e ignition lock.X
Start th e engine.
If indicator lamp �D is no t lit :X
Press butto n �C .
Indicato r lamp �D lights up. The vehicl e is
raised by 0. 6 in (15 mm ) comp ared to the
normal level.
The Vehicle Rising
message appears on
the multifunction display.
i The message disappears after ten seconds,
irrespective of the level reached. If necessary,
the vehicle is raised further. The "Raised level" setting is canceled if you: R
drive faster than 75 mph (120 km/h) R
drive for approximately three minutes at a
speed above 50 mph (80 km/ h)
The "Raised level" remains active when you are
not driving within these speed ranges.
Setting the normal vehicle level X
Start the engine.
If indicator lamp �D is lit: X
Press button �C .
Indicator lamp �D goes out. The vehicle is
adjusted to the height of the currently selec-
ted drive program ( Y
page 139).
Suspension tuning General notes The Adaptive Damping System automatically
controls the calibration of the dampers.
The damping is tuned individually to each wheel
and depends on: R
your driving style, e.g. sporty R
the road surface condition, e.g. bumps R
your individual selection, i.e. sports or com-
fort
Your selection remains stored even if you
remove the SmartKey from the ignition lock.
Sports tuning In the "Sport" and "Sport Plus" drive programs,
the firmer suspension setting ensures even bet-
ter contact with the road. Select this mode when
employing a sporty driving style, e.g. on winding
country roads. X
Select the S or S+ drive program with the
DYNAMIC SELECT switch ( Y
page 139).
The vehicle is lowered by 0.6 in (15 mm) com-
pared to the normal level.
Each time you restart the engine, the vehicle is
raised to normal level again and drive program C
is activated. For further information about start-
ing the engine, see ( Y
page 133).
Comfort tuning
In the "Eco" and "Comfort" drive programs, the
driving characteristics of your vehicle are more
comfortable. Therefore, select this mode if you
favor a more comfortable driving style. SelectDriving systems 173
Driving and parking Z
Page 182 of 374
Active Parking Assist will only detect parking
spaces: R
parallel or at right angles to the direction of
travel R
that are parallel to the direction of travel and
at least 59 in (1.5 m) wid eR
that are parallel to the direction of travel and
at least 39.5 in (1.0 m) longer than your vehi-
cle R
at right angles to the direction of travel and at
least 39.5 in (1.0 m) wider than your vehicle
i Note that Active Parking Assist cannot
measure the size of a parking space if it is at
right angles to the direction of travel. You will
need to judge whether your vehicle will fit into
the parking space.
When driving at speeds below 19 mph
(30 km/h), you will see parking symbol �D as a
status indicator in the instrument cluster. When
a parking space has been detected, an arrow
towards the right or the left also appears. By
default, Active Parking Assist only displays park-
ing spaces on the front-passenger side. Parking
spaces on the driver's side are displayed as
soon as the turn signal on the driver's side is
activated. When parking on the driver's side,
this must remain switched on until you acknowl-
edge the use of Active Parking Assist by press-
ing the �v button on the multifunction steer-
ing wheel. The system automatically determines
whether the parking space is parallel or at right
angles to the direction of travel.
A parking space is displayed while you are driv-
ing past it, and until you are approximately 50 ft
(15 m) away from it.
Parking
G WARNING
If you leave the vehicle when it is only being
braked by Active Parking Assist it could roll
away if: R
there is a malfunction in the system or in
the voltage supply. R
the electrical system in the engine com-
partment, the battery or the fuses have
been tampered with. R
the battery is disconnected. R
the accelerator pedal has been depressed,
e.g. by a vehicle occupant.
There is a risk of an accident.
Before leaving the vehicle, always secure it
against rolling away.
i When PARKTRONIC detects obstacles,
Active Parking Assist brakes automatically
during the parking process. You are respon-
sible for braking in good time. X
Stop the vehicle when the parking space sym-
bol shows the desired parking space in the
instrument cluster. X
Shift the transmission to position �^ .
The Start Park Assist? Yes: OK No: �8
message appears in the multifunction display. X
To cancel the procedure: press the �8
button on the multifunction steering wheel or
pull away.
or X
To park using Active Parking Assist: press
the �v button on the multifunction steering
wheel.
The Park Assist Active Accelerate
and Brake Observe Surroundings mes-
sage appears in the multifunction display. X
Let go of the multifunction steering wheel. X
Back up the vehicle, being ready to brake at all
times. When backing up, drive at a speed
below approximately 6 mph (10 km/h). Oth-
erwise Active Parking Assist will be canceled.
Active Parking Assist brakes the vehicle to a
standstill when the vehicle approaches the
rear border of the parking space.
Maneuvering may be required in tight parking
spaces.
The Park Assist Active Select D Observe
Surroundings message appears in the multi-
function display. X
While the vehicle is stationary, shift the trans-
mission to position �[ .
Active Parking Assist immediately steers in
the other direction.180
Driving systems
Driving and parking
Page 183 of 374
The Park Assist Active Accelerate
and Brake Observe Surroundings mes-
sage appears in the multifunction display.
i You will achieve the best results by waiting
for the steering procedure to complete before
pulling away. X
Drive forwards and be ready to brake at all
times.
Active Parking Assist brakes the vehicle to a
standstill when the vehicle approaches the
rear border of the parking space.
Maneuvering may be required in tight parking
spaces.
The Park Assist Active Select R Observe
Surroundings message appears in the multi-
function display.
As soon as the parking procedure is complete,
the Park Assist Switched Off message
appears and a warning tone sounds. The vehicle
is now parked.
The vehicle is kept stationary without the driver
having to depress the brake pedal. The braking
effect is canceled when you depress the accel-
erator pedal.
Active Parking Assist no longer supports you
with steering interventions and brake applica-
tions. When Active Parking Assist is finished,
you must steer and brake again yourself.
PARKTRONIC is still available.
Parking tips: R
The way your vehicle is positioned in the park-
ing space after parking is dependent on vari-
ous factors. These include the position and
shape of the vehicles parked in front and
behind it and the conditions of the location. It
may be the case that Active Parking Assist
guides you too far into a parking space, or not
far enough into it. In some cases, it may also
lead you across or onto the curb. If necessary,
you should cancel the parking procedure with
Active Parking Assist. R
You can also preselect transmission position
�[ . The vehicle redirects and does not drive
as far into the parking space. Should the
transmission change take place too early, the
parking procedure will be canceled. A sensi-
ble parking position can no longer be ach-
ieved from this position. Exiting a parking space In order that Active Parking Assist can support
you when you exit the parking space: R
the border of the parking space must be high
enough at the front and the rear. A curb is too
small, for example. R
the border of the parking space must not be
too wide. Your vehicle can be maneuvered
into a position at a maximum of 45° to the
starting position in the parking space. R
a maneuvering distance of at least 3.3 ft
(1.0 m) must be available.
Active Parking Assist can only assist you with
exiting a parking space if you have parked the
vehicle parallel to the direction of travel using
Active Parking Assist.
i If PARKTRONIC detects obstacles, Active
Parking Assist brakes automatically whilst the
vehicle exits the parking space. You are
responsible for braking in good time. X
Start the engine. X
Release the electric parking brake. X
Switch on the turn signal in the direction you
are pulling away. X
Shift the transmission to position �[ or �^ .
The Start Park Assist? Yes: OK No: �8
message appears on the multifunction dis-
play. X
To cancel the procedure: press the �8
button on the multifunction steering wheel or
pull away.
or X
To exit a parking space using Active Park-
ing Assist: press the �v button on the mul-
tifunction steering wheel.
The Park Assist Active Accelerate
and Brake Observe Surroundings mes-
sage appears on the multifunction display. X
Let go of the multifunction steering wheel. X
Pull away, being ready to brake at all times. Do
not exceed a maximum speed of approx-
imately 6 mph (10 km/ h) when exiting a park-
ing space. Otherwise Active Parking Assist
will be canceled. X
Depending on the message or as required,
shift the transmission to position �[ or �^ .
Active Parking Assist immediately steers in
the other direction. The Park Assist
Active Accelerate and Brake ObserveDriving systems 181
Driving and parking Z
Page 184 of 374
Surroundings message appears on the mul-
tifunction display.
i You will achieve the best results by waiting
for the steering procedure to complete before
pulling away.
If you back up after activation, the steering
wheel is moved to the straight-ahead posi-
tion. X
Drive forward and back up as prompted by the
PARKTRONIC warning displays, several times
if necessary.
Once you have exited the parking space com-
pletely, the steering wheel is moved to the
straight-ahead position. You hear a tone and the
Park Assist Switched Off message appears
on the multifunction display. You will then have
to steer and merge into traffic on your own.
PARKTRONIC is still available. You can take over
the steering before the vehicle has exited the
parking space completely. This is useful if you
recognize that it is already possible to pull out of
the parking space.
Canceling Active Parking Assist X
Stop the movement of the multifunction
steering wheel or steer yourself.
Active Parking Assist will be canceled at once.
The Park Assist Canceled message
appears in the multifunction display.
or X
Press the PARKTRONIC button ( Y
page 177).
PARKTRONIC is switched off and Active Park-
ing Assist is immediately canceled. The Park
Assist Canceled message appears in the
multifunction display.
Active Parking Assist is canceled automatically
if: R
the electric parking brake is engaged R
transmission position �] is selectedR
parking using Active Parking Assist is no lon-
ger possible R
you are driving faster than 6 mph (10 km/h) R
a wheel spins, ESP ®
intervenes or fails. In
such cases the �