2017 MERCEDES-BENZ GLC dashboard
[x] Cancel search: dashboardPage 14 of 374
Front wheel arch cover
Installing/removing ...................... .1 17
Fuel
Additives ........................................ 366
Consumption statistics .................. 213
Displaying the current consump-
tion ................................................ 213
Displaying the range ..................... .2 13
Driving tips ................................... .1 57
E10 ................................................ 365
Fuel gauge ....................................... 36
Gasoline ......................................... 365
Grade (gasoline) ............................ 365
Important safety notes .................. 365
Low outside temperatures ............. 367
Problem (malfunction) ................... 151
Quality (diesel) ............................... 366
Refueling ........................................ 148
Tank content/reserve fuel ............. 365
Fuel filler flap
Closing ........................................... 150
Fuel filter (display message) ............ 243
Fuel level
Calling up the range (on-board
computer) ...................................... 213
Fuel tank
Capacity ........................................ 365
Problem (malfunction) ................... 151
Fuses
Allocation chart ............................. 334
Before changing ............................. 333
Dashboard fuse box ....................... 334
Fuse box in the cargo compart-
ment .............................................. 334
Fuse box in the engine compart-
ment .............................................. 334
Fuse box in the front-passenger
footwell .......................................... 334
Important safety notes .................. 333
G
G-Meter (on-board computer,
Mercedes-AMG vehicles) .................. 224
Garage door opener
Clearing the memory ..................... 305
General notes ................................ 302
Important safety notes .................. 302 Opening/closing the garage doo r. .3 04
Problems when programming ....... .3 04
Programming (button in the rear-
view mirror) ................................... 303
Synchronizing the rolling code ....... 303
Gasoline ............................................. 365
Gear indicator (on-board com-
puter, Mercedes-AMG vehicles) ....... 224
Genuine parts ...................................... 27
Glove box .......................................... .2 79
Google™ Local Search
see also Digital Operator's Man-
ual ................................................. .2 68
H HANDS-FREE ACCESS .......................... 87
Handwriting recognition
Switching text reader function
on/off ............................................ 271
Touchpad ....................................... 270
Hazard warning lamps ..................... .1 13
Head restraints
Adjusting (electrically) ................... 101
Adjusting (manually) ..................... .1 01
Adjusting (rear) .............................. 101
Adjusting the fore-and-aft posi-
tion manually ................................. 101
General notes ................................ 101
Important safety notes .................. 100
Installing/removing (rear) .............. 102
Head-up display
Adjusting the brightness ................ 222
Displays and operating .................. 211
Function/notes ............................ .2 11
Important safety notes .................. 211
Selecting displays .......................... 222
Setting the position ....................... 222
Storing settings (memory func-
tion) ............................................... 109
Headlamps
Display message ............................ 239
Fogging up ..................................... 114
see Automatic headlamp mode
Heating
see Climate control
High beam flasher ............................ .1 1212
Index
Page 54 of 374
G WARNING
If the PASSENGER AIR BAG OFF indicator
lamp is lit, the front-passenger front air bag is
disabled. It will not be deployed in the event of
an accident and cannot perform its intended
protective function. A person in the front-
passenger seat could then, for example, come
into contact with the vehicle's interior, espe-
cially if the person is sitting too close to the
dashboard. This poses an increased risk of
injury or even fatal injury.
When the front-passenger seat is occupied,
always ensure that: R
the classification of the person in the front-
passenger seat is correct and the front-
passenger front air bag is enabled or disa-
bled in accordance with the person in the
front-passenger seat R
the front-passenger seat has been moved
back as far back as possible. R
the person is seated correctly.
Make sure, both before and during the jour-
ney, that the status of the front-passenger
front air bag is correct.
G WARNING
If you secure a child in a rearward-facing child
restraint system on the front-passenger seat
and the PASSENGER AIR BAG OFF indicator
lamp is off, the front-passenger front air bag
may deploy in the event of an accident. The
child could be struck by the air bag. This poses
an increased risk of injury or even fatal injury.
Make sure that the front-passenger front air
bag has been disabled. The PASSENGER AIR
BAG OFF indicator lamp must be lit.
If the PASSENGER AIR BAG OFF indicator lamp
stays off, do not install a rearward-facing child
restraint system on the front-passenger seat.
You can find more information on OCS under
"Problems with the Occupant Classification Sys-
tem" ( Y
page 54). G WARNING
If you secure a child in a forward-facing child
restraint system on the front-passenger seat
and you position the front-passenger seat too
close to the dashboard, in the event of an
accident, the child could: R
come into contact with the vehicle's inte-
rior if the PASSENGER AIR BAG OFF indi-
cator lamp is lit, for example R
be struck by the air bag if the PASSENGER
AIR BAG OFF indicator lamp is off
This poses an increased risk of injury or even
fatal injury.
Always move the front-passenger seat as far
back as possible and fully retract the seat
cushion length. Always make sure that the
shoulder belt strap is correctly routed from
the vehicle belt sash guide to the shoulder
belt guide on the child restraint system. The
shoulder belt strap must be routed forwards
and downwards from the vehicle belt sash
guide. If necessary, adjust the vehicle belt
sash guide and the front-passenger seat
accordingly. Always observe the child
restraint system manufacturer's installation
instructions.
If OCS determines that: R
the front-passenger seat is unoccupied, the
PASSENGER AIR BAG OFF indicator lamp
lights up after the system self-test and
remains lit. This indicates that the front-
passenger front air bag is deactivated. R
the front-passenger seat is occupied by a
child of up to twelve months old, in a standard
child restraint system, the PASSENGER AIR
BAG OFF indicator lamp lights up after the
system self-test and remains lit. This indi-
cates that the front-passenger front air bag is
deactivated.
But even in the case of a twelve-month-old
child, in a standard child restraint system, the
PASSENGER AIR BAG OFF indicator lamp can
go out after the system self-test. This indi-
cates that the front-passenger front air bag is
activated. The result of the classification is
dependent on, among other factors, the child
restraint system and the child's stature. It is52
Occupant safety
Safety
Page 132 of 374
lets. If necessary, redirect the airflow to
another area of the vehicle interior.
In order to ensure the direct flow of fresh air
through the air vents into the vehicle interior,
please observe the following notes: R
keep the air inlet between the windshield and
the hood free of blockages, such as ice, snow
or leaves. R
never cover the air vents or air intake grilles in
the vehicle interior.
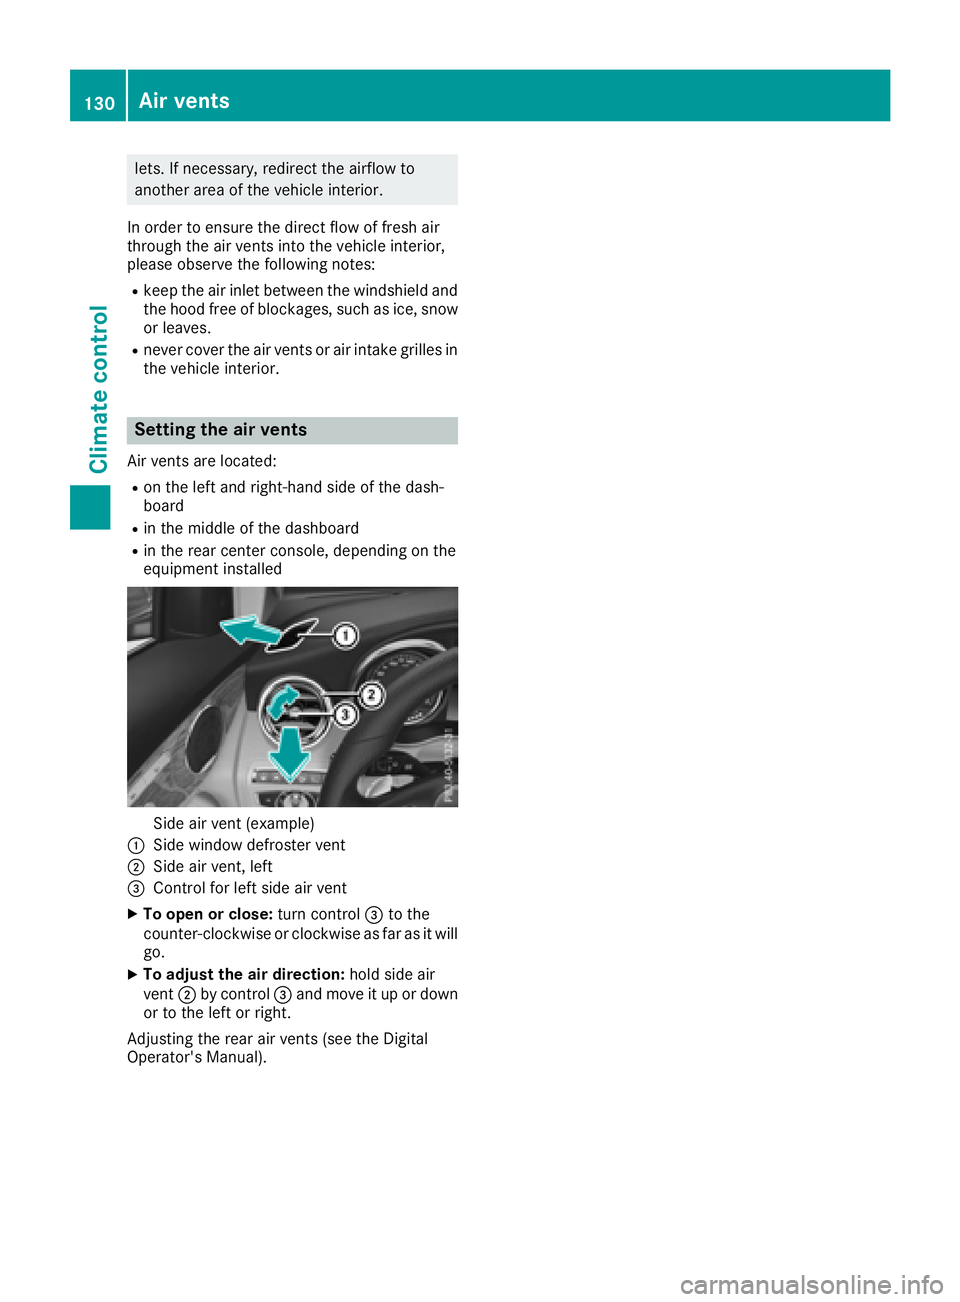
Setting the air vents Air vents are located: R
on the left and right-hand side of the dash-
board R
in the middle of the dashboard R
in the rear center console, depending on the
equipment installed
Side air vent (example)�C
Side window defroster vent�D
Side air vent, left�
Page 282 of 374
Depending on the vehicle's equipment, the fol-
lowing may be in the stowage space: R
an SD card slot R
a multimedia connector unit with two USB
ports, e.g. for iPod ®
, iPhone ®
or MP3 player
(see the Digital Operator's Manual) R
a mobile phone bracket R
a small stowage space in the upper front sec-
tion
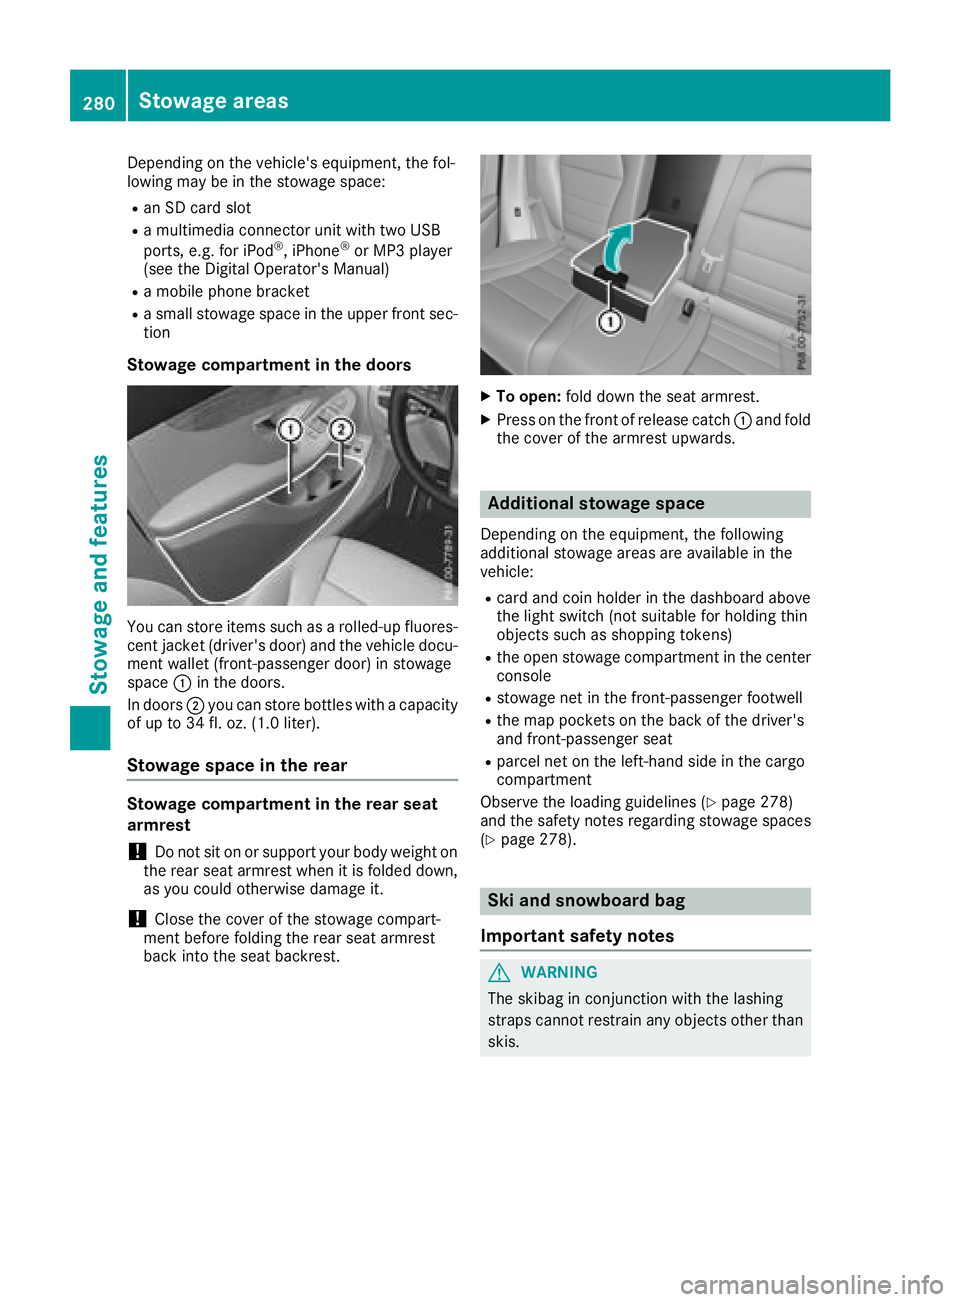
Stowage compartment in the doors
You can store items such as a rolled-up fluores-
cent jacket (driver's door) and the vehicle docu-
ment wallet (front-passenger door) in stowage
space �C in the doors.
In doors �D you can store bottles with a capacity
of up to 34 fl. oz. (1.0 liter).
Stowage space in the rear
Stowage compartment in the rear seat
armrest
! Do not sit on or support your body weight on
the rear seat armrest when it is folded down,
as you could otherwise damage it.
! Close the cover of the stowage compart-
ment before folding the rear seat armrest
back into the seat backrest. X
To open: fold down the seat armrest. X
Press on the front of release catch �C and fold
the cover of the armrest upwards.
Additional stowage space Depending on the equipment, the following
additional stowage areas are available in the
vehicle: R
card and coin holder in the dashboard above
the light switch (not suitable for holding thin
objects such as shopping tokens) R
the open stowage compartment in the center
console R
stowage net in the front-passenger footwell R
the map pockets on the back of the driver's
and front-passenger seat R
parcel net on the left-hand side in the cargo
compartment
Observe the loading guidelines ( Y
page 278)
and the safety notes regarding stowage spaces
( Y
page 278).
Ski and snowboard bag
Important safety notes
G WARNING
The skibag in conjunction with the lashing
straps cannot restrain any objects other than
skis.280
Sto wag e areas
Stowag e an d features
Page 336 of 374
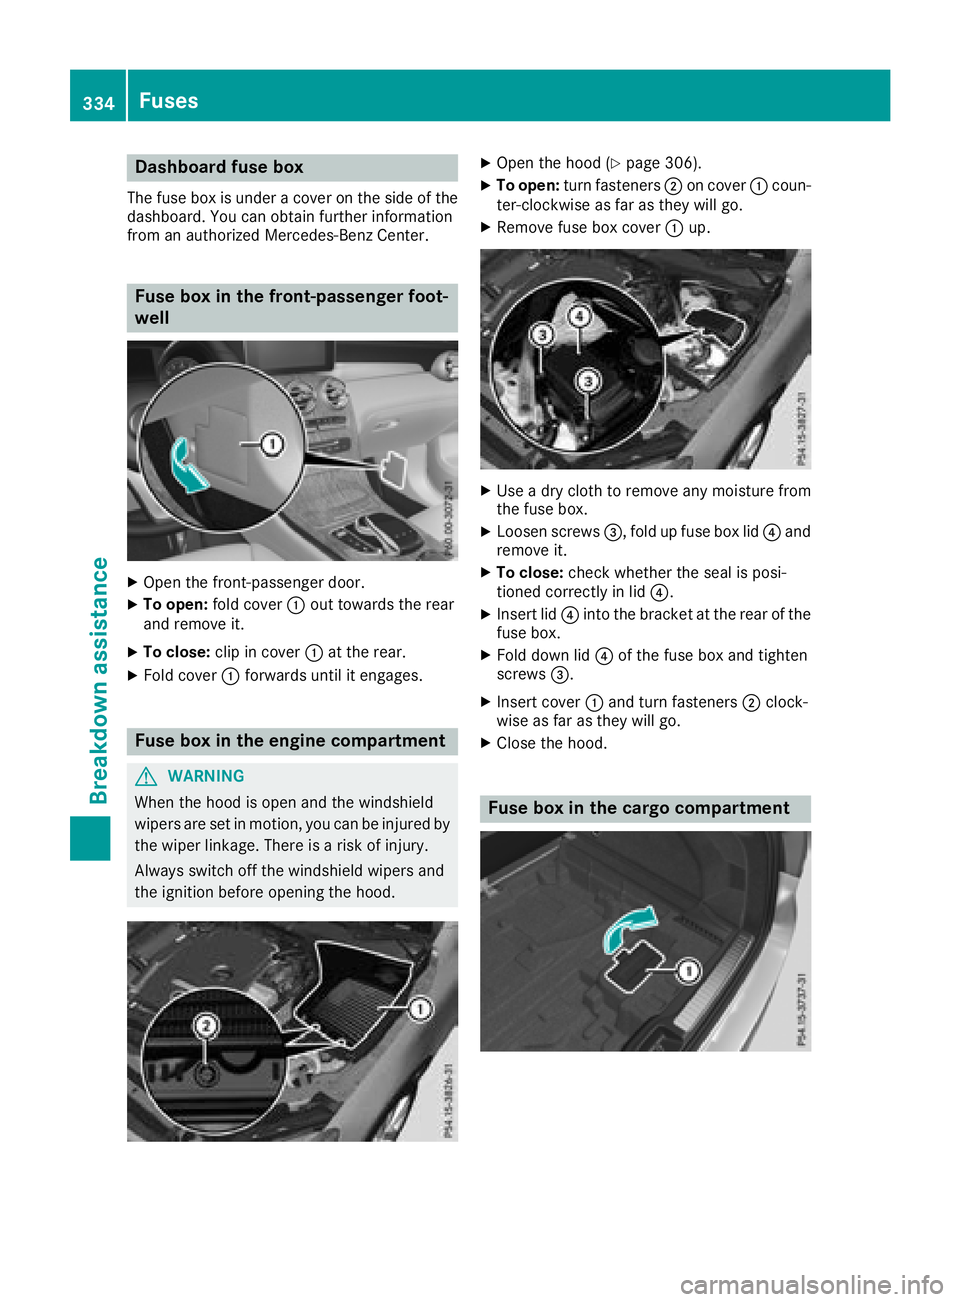
Dashboar d fuse boxThe fus e box is under a cover on th e sid e of th e
dashboard. You can obtain further information
from an authorized Mercedes-Ben z Center.
Fus e box in th e front-passenger foot -
well X
Ope n th e front-passenger door.X
To open: fold cover �C out toward s th e rea r
and remov e it .X
To close : clip in cover �C at th e rear.X
Fold cover �C forwards until it engages.
Fus e box in th e engin e compartment
G WARNING
Whe n th e hoo d is ope n and th e windshield
wipers are set in motion , you can be injured by
th e wipe r linkage. There is a ris k of injury.
Always switch of f th e windshield wipers and
th e ignition befor e opening th e hood. X
Ope n th e hoo d ( Y
page 306).X
To open: turn fasteners �D on cover �C coun-
ter-clockwise as far as they will go. X
Remov e fus e box cover �C up.
X
Use a dry clot h to remov e any moisture from
th e fus e box . X
Loosen screw s �