2017 MERCEDES-BENZ GLC stop start
[x] Cancel search: stop startPage 310 of 374
When checking the oil level: R
park the vehicle on a level surface R
the engine should be switched off for approx-
imately five minutes if the engine is at normal
operating temperature R
if the engine is not at normal operating tem-
perature, e.g. if the engine was only started
briefly, wait approximately 30 minutes before
carrying out the measurement
Checking the oil level using the oil dip-
stick
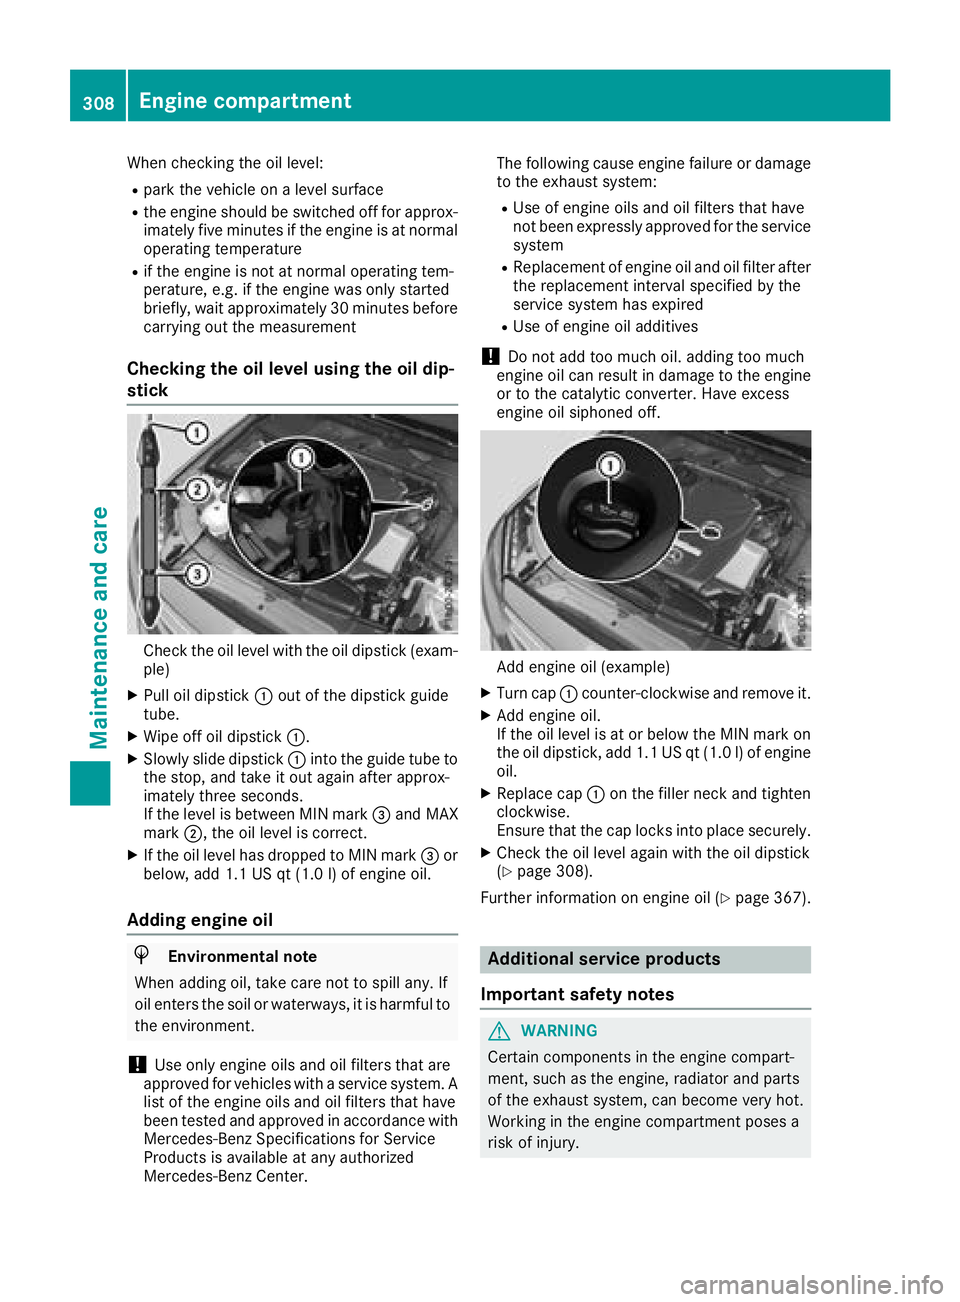
Check the oil level with the oil dipstick (exam-
ple) X
Pull oil dipstick �C out of the dipstick guide
tube. X
Wipe off oil dipstick �C .X
Slowly slide dipstick �C into the guide tube to
the stop, and take it out again after approx-
imately three seconds.
If the level is between MIN mark �
Page 311 of 374
Where possible, let the engine cool down and
touch only the components described in the
following.
G WARNING
The engine compartment contains moving
components. Certain components, such as
the radiator fan, may continue to run or start
again suddenly when the ignition is off. There
is a risk of injury.
If you need to do any work inside the engine
compartment: R
switch off the ignition R
never reach into the area where there is a
risk of danger from moving components,
such as the fan rotation area R
remove jewelry and watches R
keep items of clothing and hair, for exam-
ple, away from moving parts
G WARNING
The cooling system is pressurized, particularly
when the motor is warm. If you open the cap,
you could be scalded if hot coolant sprays out.
There is a risk of injury.
Let the engine cool down before you open the
cap. Wear gloves and eye protection. Slowly
open the cap to relieve pressure.
G WARNING
Opening the hood when the engine is over-
heated or when there is a fire in the engine
compartment could expose you to hot gases
or other service products. There is a risk of
injury.
Let an overheated engine cool down before
opening the hood. If there is a fire in the
engine compartment, keep the hood closed
and contact the fire department. Checking coolant level
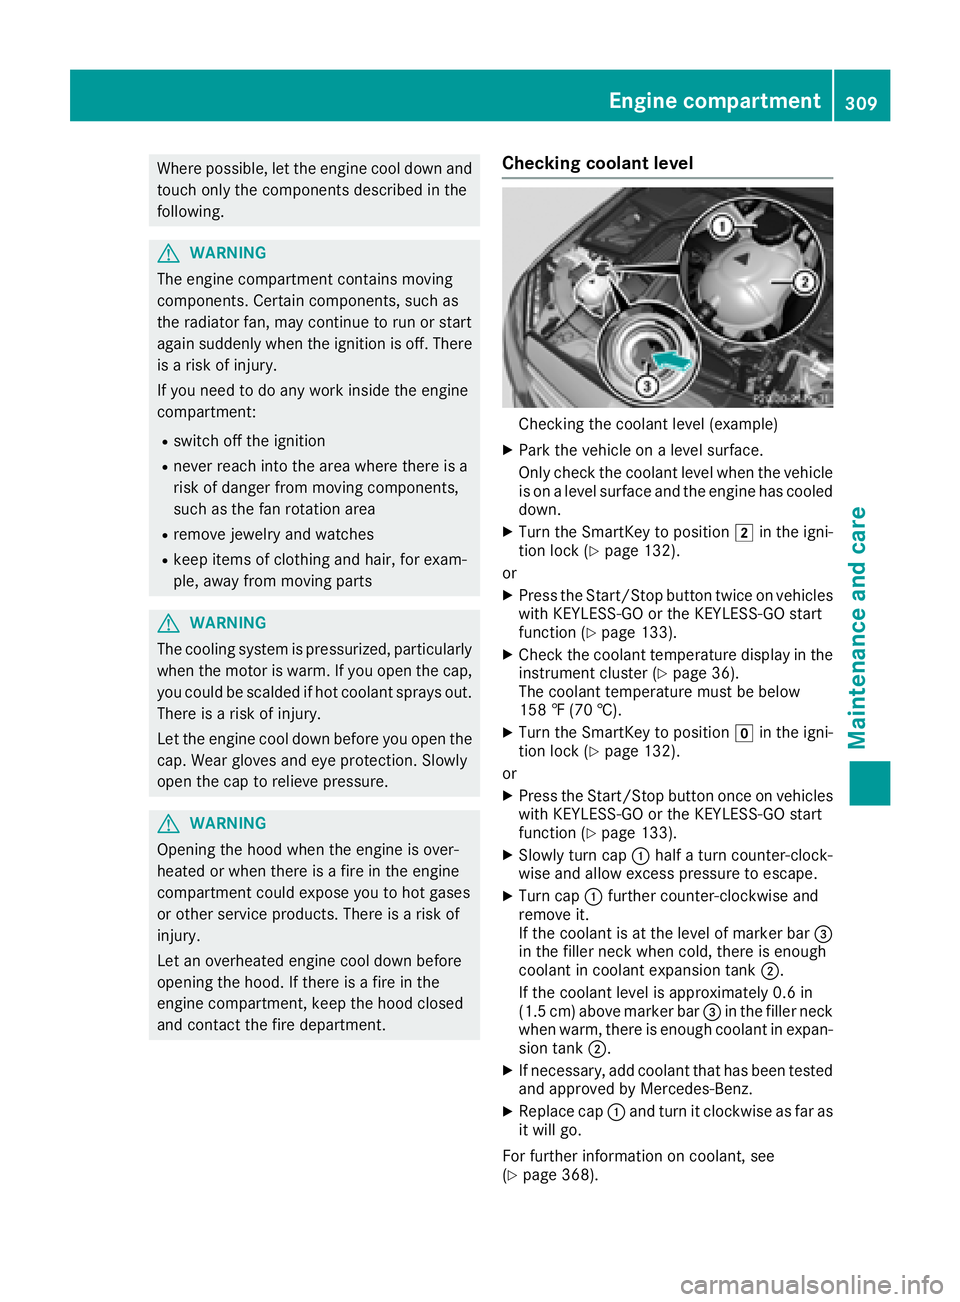
Checking the coolant level (example) X
Park the vehicle on a level surface.
Only check the coolant level when the vehicle
is on a level surface and the engine has cooled
down. X
Turn the SmartKey to position �H in the igni-
tion lock ( Y
page 132).
or X
Press the Start/Stop button twice on vehicles
with KEYLESS-GO or the KEYLESS-GO start
function ( Y
page 133). X
Check the coolant temperature display in the
instrument cluster ( Y
page 36).
The coolant temperature must be below
158 ‡ (70 †). X
Turn the SmartKey to position �Z in the igni-
tion lock ( Y
page 132).
or X
Press the Start/Stop button once on vehicles
with KEYLESS-GO or the KEYLESS-GO start
function ( Y
page 133). X
Slowly turn cap �C half a turn counter-clock-
wise and allow excess pressure to escape. X
Turn cap �C further counter-clockwise and
remove it.
If the coolant is at the level of marker bar �
Page 314 of 374
To avoid damage to the vehicle, deactivate
DISTRONIC PLUS and the HOLD function in
the following or similar situations: R
when towing the vehicle R
in the car wash
! Never clean your vehicle in a Touchless
Automatic Car Wash as these use special
cleaning agents. These cleaning agents can
damage the paintwork or plastic parts.
! Make sure that: R
the side windows and sliding sunroof are
closed completely R
the blower is switched off R
the windshield wiper switch is in position 0R
the 360° camera or the rear view camera is
deactivated
The vehicle may otherwise be damaged.
! If the SmartKey is within the rear detection
range of KEYLESS-GO, the following situa-
tions, for example, could lead to the uninten-
tional opening of the tailgate: R
using a car wash R
using a power washer
Make sure that the SmartKey is at least 3 m
away from the vehicle.
! If the SmartKey is within the rear detection
range of KEYLESS-GO, the following situa-
tions, for example, could lead to the uninten-
tional opening of the tailgate: R
using a car wash R
using a power washer
Make sure that the SmartKey is at least 10 ft
(3 m) away from the vehicle.
! Make sure that the automatic transmission
is in neutral position �\\ when washing your
vehicle in a tow-through car wash. The vehicle
may otherwise be damaged. R
Operating with the SmartKey:
Do not remove the SmartKey from the igni-
tion lock. Do not open the driver's door
when the engine is switched off or at very
low speeds. Otherwise, when in transmis-
sion position �[ or �^ , the automatic
transmission will automatically switch to
park position �] and block the wheels.R
Operating with the Start/Stop button:
Do not open the driver's door when the
engine is switched off or at very low speeds. Otherwise, when in transmission
position �[ or �^ , the automatic transmis-
sion will automatically switch to park posi-
tion �] and block the wheels.
Observe the following to make sure that the
automatic transmission stays in neutral position
�\\ :
Operating with the SmartKey and Start/Stop
button: X
Make sure that the ignition is switched on. X
Make sure that the vehicle is stationary. X
Depress and hold the brake pedal.
Operating with the Start/Stop button only: X
Engage park position �] .X
Release the brake pedal. X
Remove Start/Stop button from ignition lock
( Y
page 133). X
Insert the SmartKey into the ignition lock. X
Switch on the ignition. X
Depress and hold the brake pedal.
Operating with the SmartKey and Start/Stop
button: X
Shift to neutral �\\ .X
Release the brake pedal. X
Release the electric parking brake, if neces-
sary. X
Switch off the ignition and leave the SmartKey
in the ignition lock.
You can wash the vehicle in an automatic car
wash from the very start.
If the vehicle is very dirty, pre-wash it before
cleaning it in an automatic car wash.
After using an automatic car wash, wipe off wax
from the windshield and the wiper blades. This
will prevent smears and reduce wiping noises
caused by residue on the windshield.
Washing by hand In some countries, washing by hand is only
allowed at specially equipped washing bays.
Observe the legal requirements in each country. X
Do not use hot water and do not wash the
vehicle in direct sunlight. X
Use a soft sponge to clean. X
Use a mild cleaning agent, such as a car
shampoo approved by Mercedes-Benz.312
Care
Maintenance and care
Page 318 of 374
Cleaning the rear view camera and 360°
camera
! Do not clean the camera lens and the area
around the rear view camera or 360° camera
with a power washer.
X
Make sure that the vehicle is stationary. X
Turn the SmartKey to position �G or �H in the
ignition lock ( Y
page 132).
or X
Press the Start/Stop button once or twice on
vehicles with KEYLESS-GO or the KEYLESS-
GO start function ( Y
page 133).X
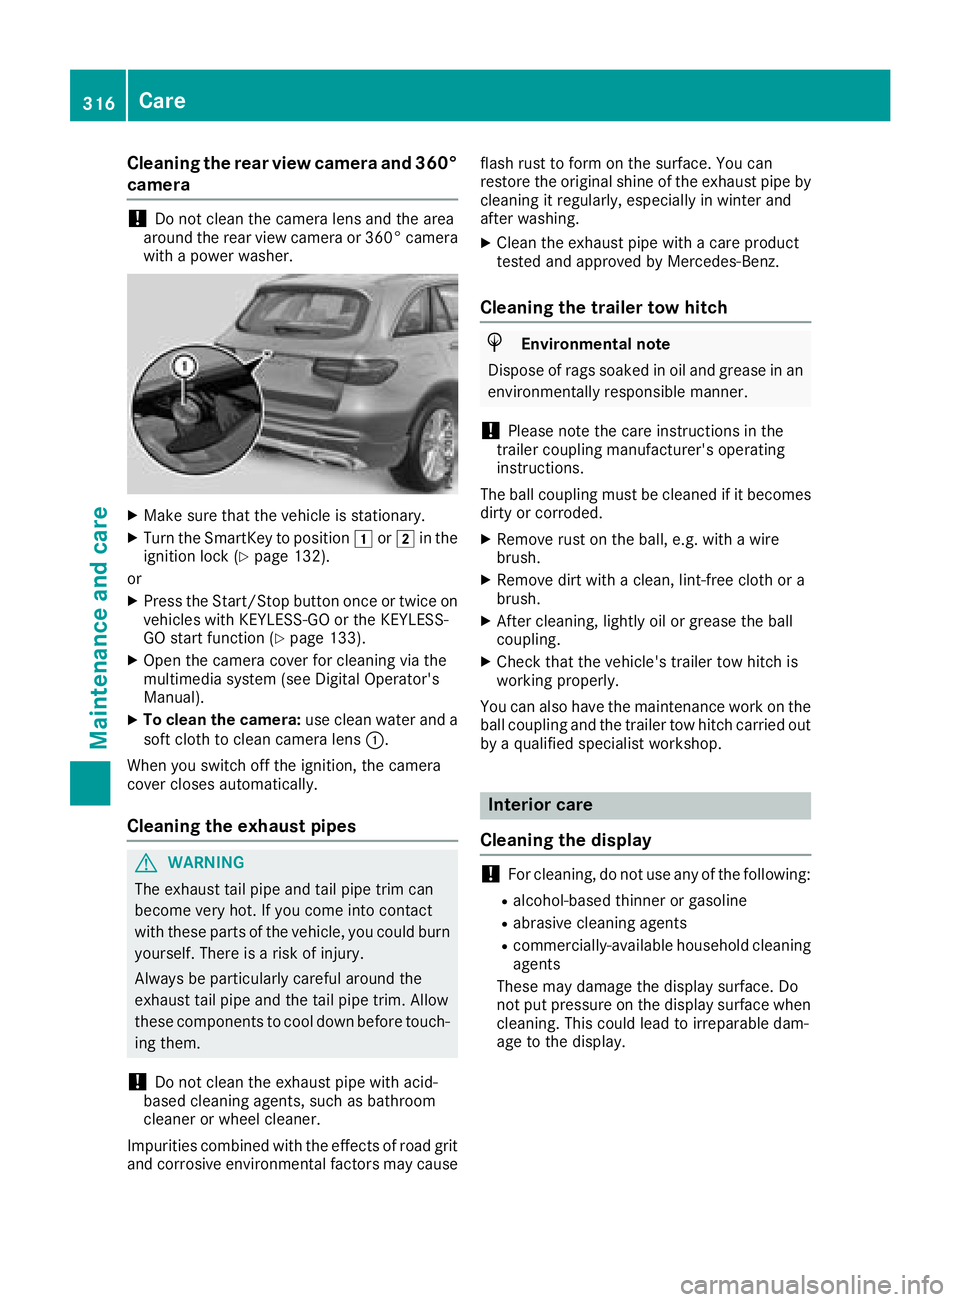
Open the camera cover for cleaning via the
multimedia system (see Digital Operator's
Manual). X
To clean the camera: use clean water and a
soft cloth to clean camera lens �C .
When you switch off the ignition, the camera
cover closes automatically.
Cleaning the exhaust pipes
G WARNING
The exhaust tail pipe and tail pipe trim can
become very hot. If you come into contact
with these parts of the vehicle, you could burn
yourself. There is a risk of injury.
Always be particularly careful around the
exhaust tail pipe and the tail pipe trim. Allow
these components to cool down before touch-
ing them.
! Do not clean the exhaust pipe with acid-
based cleaning agents, such as bathroom
cleaner or wheel cleaner.
Impurities combined with the effects of road grit
and corrosive environmental factors may cause flash rust to form on the surface. You can
restore the original shine of the exhaust pipe by
cleaning it regularly, especially in winter and
after washing. X
Clean the exhaust pipe with a care product
tested and approved by Mercedes-Benz.
Cleaning the trailer tow hitch
H Environmental note
Dispose of rags soaked in oil and grease in an
environmentally responsible manner.
! Please note the care instructions in the
trailer coupling manufacturer's operating
instructions.
The ball coupling must be cleaned if it becomes
dirty or corroded. X
Remove rust on the ball, e.g. with a wire
brush. X
Remove dirt with a clean, lint-free cloth or a
brush. X
After cleaning, lightly oil or grease the ball
coupling. X
Check that the vehicle's trailer tow hitch is
working properly.
You can also have the maintenance work on the
ball coupling and the trailer tow hitch carried out
by a qualified specialist workshop.
Interior care
Cleaning the display
! For cleaning, do not use any of the following: R
alcohol-based thinner or gasoline R
abrasive cleaning agents R
commercially-available household cleaning
agents
These may damage the display surface. Do
not put pressure on the display surface when
cleaning. This could lead to irreparable dam-
age to the display.316
Care
Maintenance and care
Page 323 of 374
Flat tire
Preparing the vehicle Your vehicl e may be equipped with:R
MOExtended tires (tires wit h run-flat proper -
ties) ( Y
page 321)
Vehicl e preparation is no t necessar y on vehi-
cle s wit h MOExtended tiresR
a TIREFI T kit ( Y
page 320)
Vehicles equipped wit h MOExtended tires are
no t equipped wit h a TIREFI T kit at th e factory. It
is therefor e recommended that you additionally
equip your vehicl e wit h a TIREFI T kit if you moun t
tires that do no t feature run-flat properties, e.g.
winte r tires . A TIREFI T kit may be obtained from
a qualified specialist workshop.
Information on changing and mounting wheels
( Y
page 357). X
Stop th e vehicl e on solid, non-slippery and
leve l ground , as far away as possible from
traffic. X
Switc h on th e hazard warning lamps.X
Secur e th e vehicl e against rollin g away
( Y
page 154). X
If possible , brin g th e fron t wheels int o th e
straight-ahead position .X
Switc h off th e engine.X
Remove th e SmartKey from th e ignition lock.
or, in vehicles wit h KEYLESS-GO start-function
or KEYLESS ‑ GOX
Open th e driver' s door .
The vehicl e electronics are no w in position
�
Page 324 of 374
you use th e proper siz e and typ e (summer or
winte r tires).
Vehicles equipped wit h MOExtended tires are
no t equipped wit h a TIREFI T ki t at th e factory. It
is therefor e recommended that you additionally
equip your vehicl e wit h a TIREFI T ki t if you moun t
tires that do no t feature run-flat properties, e.g.
winte r tires . A TIREFI T ki t may be obtained from
a qualified specialist workshop .
Impor tant safety notes
G WARNIN G
Whe n drivin g in emergenc y mode, th e drivin g
characteristics deteriorate , e.g. when corner-
ing, accelerating quickl y and when braking.
There is a ris k of an accident.
Do no t exceed th e state d maximum speed.
Avoid abrup t steerin g and drivin g maneuvers ,
and drivin g ove r obstacles (curbs , potholes,
off-road). This applies in particular to a laden
vehicle.
Stop drivin g in emergenc y mod e if:R
you hear bangin g noises .R
th e vehicl e start s to shake.R
you see smok e and smell rubber.R
ES P ®
is intervenin g constantly.R
there are tears in th e sidewalls of th e tire.
Afte r drivin g in emergenc y mode, hav e th e
whee l rim s checke d at a qualified specialist
workshop wit h regard to their further use. The
defective tire mus t be replaced in every case.
TIREFIT kit
Impor tant safety notesTIREFI T is a tire sealant .
You can use TIREFI T to seal punctures of up to
0.16 in (4 mm), particularl y those in th e tire
tread. You can use TIREFI T at outside tempera-
tures down to �
Page 335 of 374
Notes on 4MATIC vehicles
! Vehicles with 4MATIC must not be towed
with either the front or the rear axle raised, as
doing so will damage the transmission.
Vehicles with 4MATIC may either be towed away
with both axles on the ground or be loaded up
and transported.
If the vehicle's transmission, front, or rear axle is
damaged, have the vehicle transported on a
truck or trailer.
In the event of damage to the electrical sys-
tem: if the battery is defective, the automatic
transmission will be locked in position P . To shift
the automatic transmission to position N , you
must provide power to the vehicle's electrical
system in the same way as when jump-starting
( Y
page 328).
Have the vehicle transported on a transporter or
trailer.
Tow-starting (emergency engine
starting)
! Vehicles with automatic transmission must
not be tow-started. You could otherwise dam-
age the automatic transmission.
i You can find information on "Jump-starting"
under ( Y
page 328).
Fuses
Important safety notes
G WARNING
If you manipulate or bridge a faulty fuse or if
you replace it with a fuse with a higher amper-
age, the electric cables could be overloaded.
This could result in a fire. There is a risk of an
accident and injury.
Always replace faulty fuses with the specified
new fuses having the correct amperage.
Blown fuses must be replaced with fuses of the
same rating, which you can recognize by the
color and value. The fuse ratings are listed in the
fuse allocation chart.
The fuse allocation chart is on the fuse box in the
cargo compartment ( Y
page 334). If a newly inserted fuse also blows, have the
cause traced and rectified at a qualified special-
ist workshop, e.g. an authorized Mercedes-Benz
Center.
! Only use fuses that have been approved for
Mercedes-Benz vehicles and which have the
correct fuse rating for the system concerned.
Otherwise, components or systems could be
damaged.
! Make sure that no moisture can enter the
fuse box when the cover is open.
! When closing the cover, make sure that it is
lying correctly on the fuse box. Moisture seep-
ing i n or dirt could otherwise impair the oper-
a
tion of the fuses.
The fuses in your vehicle serve to close down
faulty circuits. If a fuse blows, all the compo-
nents on the circuit and their functions stop
operating.
Before changing a fuse Observe the important safety notes
( Y
page 333) X
Switch off the engine. X
Switch off all electrical consumers. X
Make sure that the ignition is switched off
( Y
page 133).
or X
When using the SmartKey, turn the SmartKey
to position �
Page 346 of 374
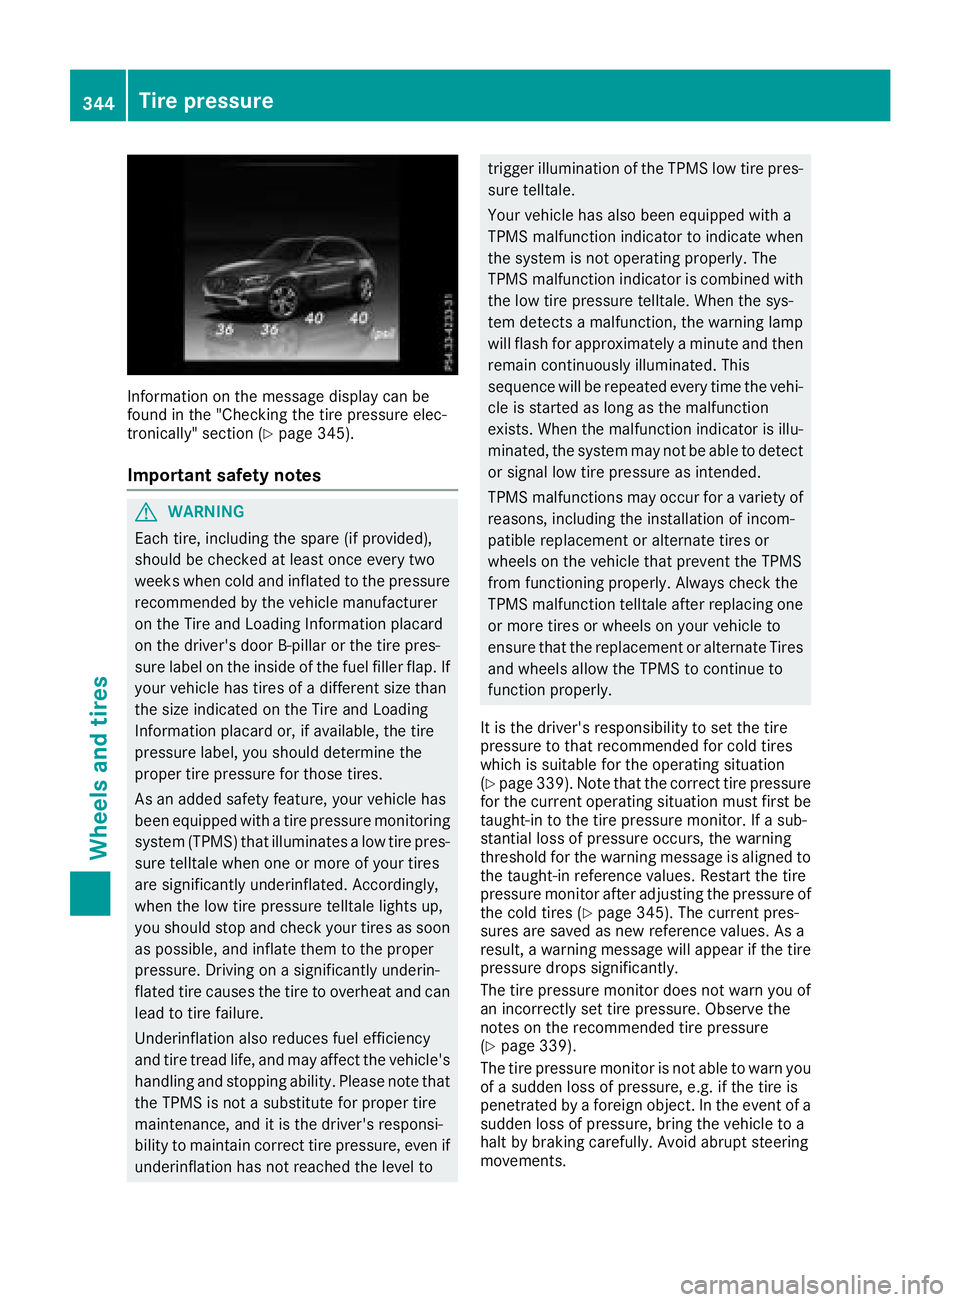
Information on the message display can be
found in the "Checking the tire pressure elec-
tronically" section ( Y
page 345).
Important safety notes
G WARNING
Each tire, including the spare (if provided),
should be checked at least once every two
weeks when cold and inflated to the pressure
recommended by the vehicle manufacturer
on the Tire and Loading Information placard
on the driver's door B-pillar or the tire pres-
sure label on the inside of the fuel filler flap. If
your vehicle has tires of a different size than
the size indicated on the Tire and Loading
Information placard or, if available, the tire
pressure label, you should determine the
proper tire pressure for those tires.
As an added safety feature, your vehicle has
been equipped with a tire pressure monitoring
system (TPMS) that illuminates a low tire pres-
sure telltale when one or more of your tires
are significantly underinflated. Accordingly,
when the low tire pressure telltale lights up,
you should stop and check your tires as soon
as possible, and inflate them to the proper
pressure. Driving on a significantly underin-
flated tire causes the tire to overheat and can
lead to tire failure.
Underinflation also reduces fuel efficiency
and tire tread life, and may affect the vehicle's
handling and stopping ability. Please note that
the TPMS is not a substitute for proper tire
maintenance, and it is the driver's responsi-
bility to maintain correct tire pressure, even if
underinflation has not reached the level to trigger illumination of the TPMS low tire pres-
sure telltale.
Your vehicle has also been equipped with a
TPMS malfunction indicator to indicate when
the system is not operating properly. The
TPMS malfunction indicator is combined with
the low tire pressure telltale. When the sys-
tem detects a malfunction, the warning lamp
will flash for approximately a minute and then
remain continuously illuminated. This
sequence will be repeated every time the vehi-
cle is started as long as the malfunction
exists. When the malfunction indicator is illu-
minated, the system may not be able to detect
or signal low tire pressure as intended.
TPMS malfunctions may occur for a variety of
reasons, including the installation of incom-
patible replacement or alternate tires or
wheels on the vehicle that prevent the TPMS
from functioning properly. Always check the
TPMS malfunction telltale after replacing one
or more tires or wheels on your vehicle to
ensure that the replacement or alternate Tires
and wheels allow the TPMS to continue to
function properly.
It is the driver's responsibility to set the tire
pressure to that recommended for cold tires
which is suitable for the operating situation
( Y
page 339). Note that the correct tire pressure
for the current operating situation must first be
taught-in to the tire pressure monitor. If a sub-
stantial loss of pressure occurs, the warning
threshold for the warning message is aligned to
the taught-in reference values. Restart the tire
pressure monitor after adjusting the pressure of
the cold tires ( Y
page 345). The current pres-
sures are saved as new reference values. As a
result, a warning message will appear if the tire
pressure drops significantly.
The tire pressure monitor does not warn you of
an incorrectly set tire pressure. Observe the
notes on the recommended tire pressure
( Y
page 339).
The tire pressure monitor is not able to warn you
of a sudden loss of pressure, e.g. if the tire is
penetrated by a foreign object. In the event of a
su dden loss of pressure, bring the vehicle to a
halt by braking carefully. Avoid abrupt steering
movements.344
Tire pressure
Wheels and tires