2017 MERCEDES-BENZ GLC roof
[x] Cancel search: roofPage 97 of 374
the vehicle interior is reduced as a result. At low
speeds it raises again automatically.
You can also temporarily deactivate automatic
lowering. To do so, press the �W switch. The
panorama roof with power tilt/sliding panel rai-
ses again automatically.
You can continue to operate the panorama roof
with power tilt/sliding panel after you switch off
the engine or remove the SmartKey. This func-
tion remains active for five minutes or until you
open a front door.
When a roof carrier is mounted the panorama
roof with power tilt/sliding panel cannot be
opened. The panorama roof with power tilt/slid-
ing panel can still be raised to allow ventilation
of the vehicle interior. If the panorama roof with
power tilt/sliding panel makes contact with a
roof carrier approved by Mercedes-Benz, the
sunroof will lower slightly but remain raised at
the rear.
Rain-closing feature The raised panorama roof with power tilt/sliding
panel automatically lowers when driving if it
starts to rain. The sliding sunroof is lowered
depending on: R
the road speed R
the intensity of the rain
You can manually cancel the automatic closing
procedure. Press or pull the �W switch in any
direction.
To raise the panorama roof with power tilt/slid-
ing panel again, press the �W switch in direc-
tion �C .
The rain-closing feature is then deactivated until
you: R
press or pull the �W switch in any direction
or R
turn the SmartKey to another position in the
ignition lock ( Y
page 132) Operating the roller sunblinds for the
panorama roof with power tilt/sliding
panel
Important safety notes
G WARNING
Parts of the body could become trapped
between the roller sunblind and frame or slid-
ing sunroof during automatic opening or clos-
ing. There is a risk of injury.
When opening or closing, make sure that no
body parts are in the sweep of the roller sun-
blind.
If somebody becomes trapped: R
release the switch immediately, or R
during automatic operation, push the
switch briefly in any direction
The opening or closing procedure will be stop-
ped.
The roller sunblinds shield the vehicle interior
from sunlight. The roller sunblinds can only be
opened and closed when the panorama roof
with power tilt/sliding panel is closed.
Roller sunblind reversing feature The roller sunblinds are equipped with an auto-
matic reversing feature. If a solid object blocks
or restricts a roller sunblind during the closing
process, the roller sunblind opens again auto-
matically. However, the automatic reversing
feature is only an aid and is not a substitute of
your attentiveness when closing the roller sun-
blind.
G WARNING
The reversing feature does not react in par-
ticular to soft, light and thin objects, e.g. small
fingers. This means that the reversing feature
cannot prevent someone being trapped in
these situations. There is a risk of injury.
When closing the roller sunblind, make sure
that no body parts are in the sweep area.Panorama roof wit h power tilt/sliding panel 95
Opening and closing Z
Page 99 of 374
G WARNING
If you close the sliding sunroof again immediately after it has been blocked or reset, the sliding
sunroof closes with increased or maximum force. The reversing feature is then not active. Parts
of the body could be trapped in the closing area in the process. This poses an increased risk of
injury or even fatal injury.
Make sure that no parts of the body are in the closing area.
If somebody becomes trapped: R
release the switch immediately, or R
press the switch in any direction during the automatic closing process
The closing process is stopped.
! If the sliding sunroof still cannot be opened or closed as a result of a malfunction, contact a
qualified specialist workshop.
Problem
Possible causes/consequences and �P Solutions
The panorama roof with
power tilt/sliding panel
cannot be closed and
you cannot see the
cause. If the panorama roof with power tilt/sliding panel is obstructed during
closing and reopens again slightly: X
Immediately after it blocks, pull the �W switch down again to the
point of resistance until the panorama roof with power tilt/sliding
panel is closed.
The panorama roof with power tilt/sliding panel is closed with more
force.
If the panorama roof with power tilt/sliding panel is obstructed again
during closing and reopens again slightly: X
Immediately after it blocks, pull the �W switch down again to the
point of resistance until the panorama roof with power tilt/sliding
panel is closed.
The panorama roof with power tilt/sliding panel is closed without
the automatic reversing feature.Panorama roof with power tilt/sliding panel 97
Opening and closing Z
Page 105 of 374
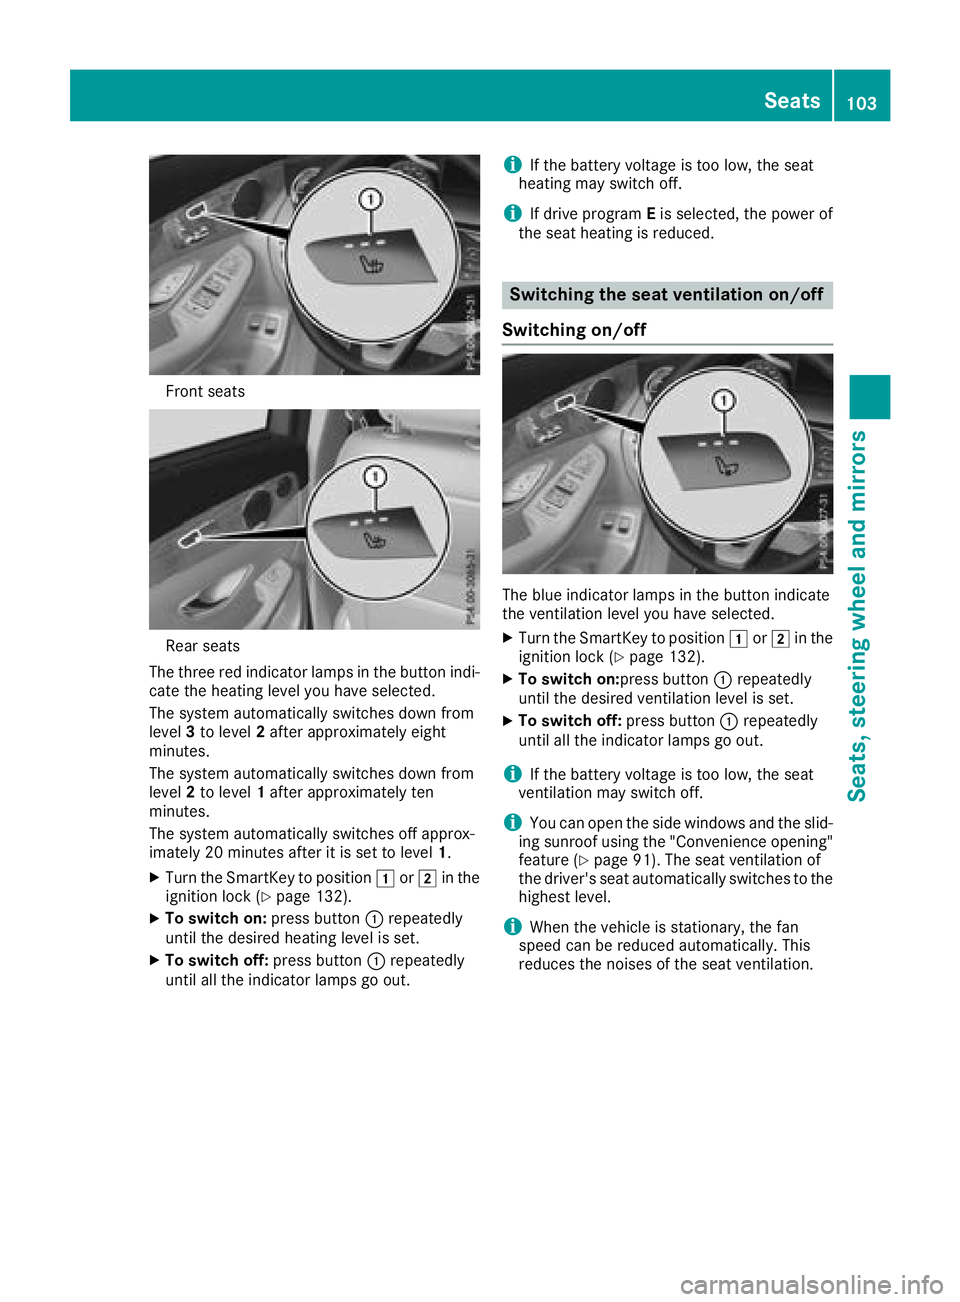
Front seats
Rear seats
The three red indicator lamps in the button indi-
cate the heating level you have selected.
The system automatically switches down from
level 3 to level 2 after approximately eight
minutes.
The system automatically switches down from
level 2 to level 1 after approximately ten
minutes.
The system automatically switches off approx-
imately 20 minutes after it is set to level 1 .X
Turn the SmartKey to position �G or �H in the
ignition lock ( Y
page 132).X
To switch on: press button �C repeatedly
until the desired heating level is set. X
To switch off: press button �C repeatedly
until all the indicator lamps go out. i If the battery voltage is too low, the seat
heating may switch off.
i If drive program E is selected, the power of
the seat heating is reduced.
Switching the seat ventilation on/off
Switching on/off
The blue indicator lamps in the button indicate
the ventilation level you have selected. X
Turn the SmartKey to position �G or �H in the
ignition lock ( Y
page 132). X
To switch on: press button �C repeatedly
until the desired ventilation level is set. X
To switch off: press button �C repeatedly
until all the indicator lamps go out.
i If the battery voltage is too low, the seat
ventilation may switch off.
i You can open the side windows and the slid-
ing sunroof using the "Convenience opening"
feature ( Y
page 91). The seat ventilation of
the driver's seat automatically switches to the
highest level.
i When the vehicle is stationary, the fan
speed can be reduced automatically. This
reduces the noises of the seat ventilation. Seats 103
Seats, steering wheel and mirrors Z
Page 125 of 374
Overview of climate control systems
General notes Observe the settings recommended on the fol-
lowing pages. The windows could otherwise fog
up.
To prevent the windows from fogging up: R
switch off climate control only briefly R
switch on air-recirculation mode only briefly R
switch on the cooling with air dehumidifica-
tion function R
activate the "Windshield defrosting" function
briefly, if required
Climate control regulates the temperature and
air humidity in the vehicle interior. The interior
filter cleans the air, thus improving the interior
climate.
The "Cooling with air dehumidification" function
is only available when the engine is running.
Optimum climate control is only achieved with
the side windows and roof closed.
If you start the engine using your smartphone,
the last selected climate control setting is reac-
tivated ( Y
page 134). The integrated filter filters out most particles of
dust and soot and completely filters out pollen.
It also reduces gaseous pollutants and odors. A
clogged filter reduces the amount of air supplied
to the vehicle interior. For this reason, you
should always observe the interval for replacing
the filter, which is specified in the Maintenance
Booklet. As it depends on environmental condi-
tions, e.g. heavy air pollution, the interval may
be shorter than stated in the Maintenance Book-
let.
i Ventilate the vehicle for a brief period during
warm weather, e.g. using the convenience
opening feature ( Y
page 91). This will speed
up the cooling process and the desired inte-
rior temperature will be reached more
quickly.
i It is possible that the blower may be activa-
ted automatically 60 minutes after the Smart-
Key has been removed depending on various
factors, e.g. the outside temperature. The
vehicle is then ventilated for 30 minutes to dry
the automatic climate control.
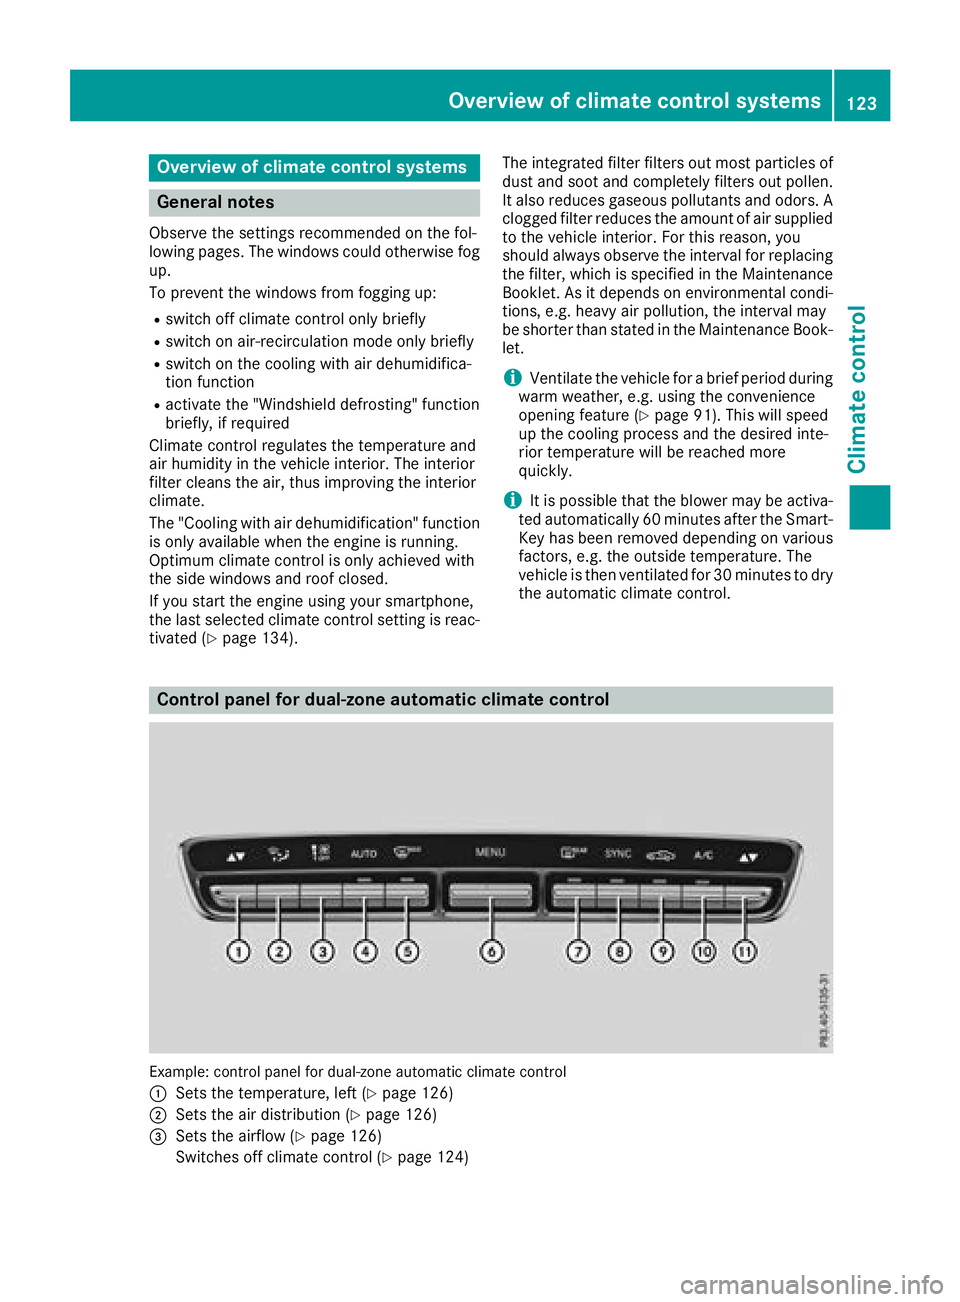
Control panel for dual-zone automatic climate control
Example: control panel for dual-zone automatic climate control
�C
Sets the temperature, left ( Y
page 126)
�D
Sets the air distribution ( Y
page 126)
�
Page 137 of 374
You can execute a maximum of two consecutive
starting attempts via your smartphone. If you
press the start/stop button or insert the Smart-
Key into the ignition lock, you can carry out two
more starting attempts with your smartphone.
The engine runs for ten minutes when starting
with the smartphone.
Once you have started the engine, you can
switch the engine off via your smartphone at any
time.
You can only start the engine via your smart-
phone if: R
the SmartKey is in the ignition lock R
park position �] is selectedR
the accelerator pedal is not depressed R
the anti-theft alarm system is not activated R
the panic alarm is not activated R
the hazard warning lamps are switched off R
the hood is closed R
the doors are closed and locked R
the windows and sliding sunroof are closed
Also make sure that: R
the fuel tank is sufficiently filled R
the starter battery has been sufficiently
charged
G WARNING
Limbs could be crushed or trapped if the
engine is started unintentionally during ser-
vice or maintenance work. There is a risk of
injury.
Always secure the engine against uninten-
tional starting before carrying out mainte-
nance or repair work.
Make sure that the engine cannot be started via
your smartphone before carrying out mainte-
nance or repairs. You can prevent an engine
start via your smartphone, for example, if you: R
switch on the hazard warning lamps R
do not lock the doors R
open a side window R
open the sliding sunroof Pulling away
General notes
G WARNING
If the engine speed is above the idling speed
and you engage transmission position D or R ,
the vehicle could pull away suddenly. There is
a risk of an accident.
When engaging transmission position D or R ,
always firmly depress the brake pedal and do
not simultaneously accelerate.
Depress the accelerator carefully when pulling
away.
The vehicle locks centrally once you have pulled
away. The locking knobs in the doors drop down.
You can open the doors from the inside at any
time.
You can also deactivate the automatic locking
feature, see the Digital Operator's Manual.
It is possible to shift the transmission from posi-
tion �] to the desired position only if you
depress the brake pedal. Only then is the park-
ing lock released. If you do not depress the
brake pedal, the DIRECT SELECT lever can still
be moved but the parking lock remains
engaged.
i Upshifts take place at higher engine speeds
after a cold start. This helps the catalytic con-
verter to reach its operating temperature
more quickly.
Information on the automatic release of the
electric parking brake ( Y
page 156).
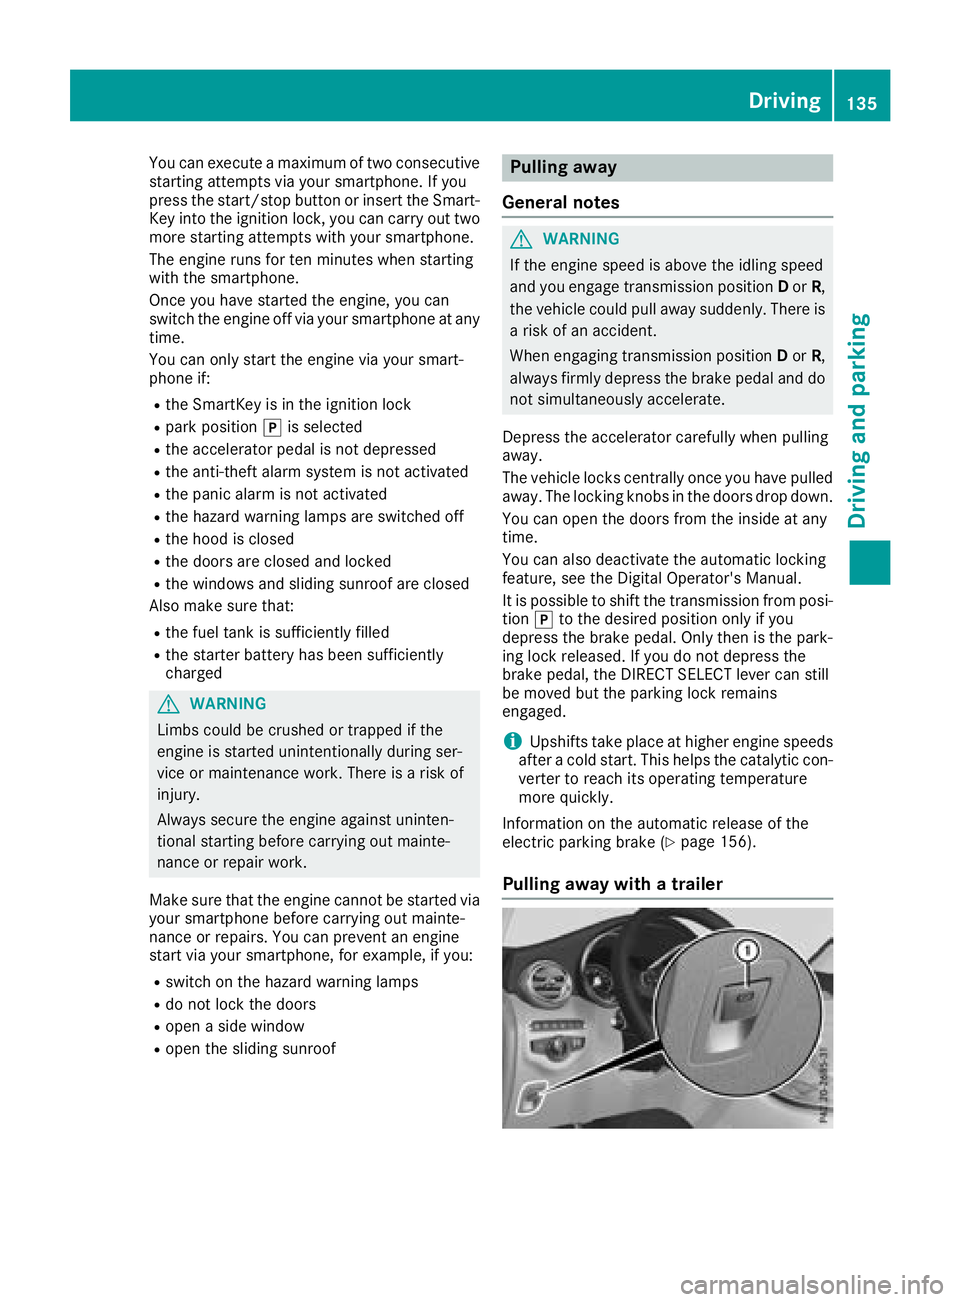
Pulling away with a trailer Driving 135
Driving and parking Z
Page 159 of 374
Emergency braking The vehicle can also be braked during an emer-
gency by using the electric parking brake. X
While driving, push handle �C of the electric
parking brake ( Y
page 156).
The vehicle is braked as long as you keep
handle �C of the electric parking brake
depressed. The longer electric parking brake
handle �C is depressed, the greater the brak-
ing force.
During braking: R
a warning tone sounds R
the Please Release Parking Brake mes-
sage appears R
the red �I (USA only) or �$ (Canada
only) indicator lamp in the instrument cluster
flashes
When the vehicle has been braked to a stand-
still, the electric parking brake is engaged.
Parking the vehicle for a long period If you leave the vehicle parked for longer than
four weeks, the battery may be damaged by
exhaustive discharging.
If you leave the vehicle parked for longer than six
weeks, the vehicle may suffer damage as a
result of lack of use. X
Visit a qualified specialist workshop and seek
advice.
i You can obtain information about trickle
chargers from a qualified specialist work-
shop.
Driving tips
General driving tips
Important safety notes
G WARNING
If you switch off the ignition while driving,
safety-relevant functions are only available
with limitations, or not at all. This could affect,
for example, the power steering and the brake
boosting effect. You will require considerably more effort to steer and brake. There is a risk
of an accident.
Do not switch off the ignition while driving.
G WARNING
If you operate mobile communication equip-
ment while driving, you will be distracted from
traffic conditions. You could also lose control
of the vehicle. There is a risk of an accident.
Only operate this equipment when the vehicle
is stationary.
Observe the legal requirements for the country
in which you are driving. Some jurisdictions pro-
hibit the driver from using a mobile phone while
driving a vehicle.
If you make a call while driving, always use
hands-free mode. Only operate the telephone
when the traffic situation permits. If you are
unsure, pull over to a safe location and stop
before operating the telephone.
Bear in mind that at a speed of only 30 mph
(approximately 50 km/h), the vehicle covers a
distance of 44 ft (approximately 14 m) per sec-
ond.
Drive sensibly – save fuel Observe the following tips to save fuel: X
The tires should always be inflated to the rec-
ommended tire pressure. X
Remove unnecessary loads. X
Remove roof racks when they are not needed. X
Warm up the engine at low engine speeds. X
Avoid frequent acceleration or braking. X
Have all maintenance work carried out as
indicated by the service intervals in the Main-
tenance Booklet or by the service interval dis-
play.
Fuel consumption also increases when driving in
cold weather, in stop-start traffic and in hilly ter-
rain.
Drinking and driving
G WARNING
Drinking and driving and/or taking drugs and
driving are very dangerous combinations.
Even a small amount of alcohol or drugs can Driving tips 157
Driving and parking Z
Page 163 of 374
For safety reasons, Mercedes-Benz recom-
mends only installing the following brake disks
and brake pads/linings: R
brake disks that have been approved by
Mercedes-Benz R
brake pads/linings that have been approved
by Mercedes-Benz or that are of an equivalent
standard of quality
Other brake disks or brake pads/linings can
compromise the safety of your vehicle.
Always replace all brake disks and brake pads/
linings on an axle at the same time. Always
install new brake pads/linings when replacing
brake disks.
The vehicle is equipped with lightweight brake
disks to which the wheel assembly with rim and
threaded connection is matched.
The use of brake disks other than those
approved by Mercedes-Benz can change the
track width and is subject to approval, if appli-
cable.
Shock-type loads when handling the brake
discs, such as when changing wheels, can lead
to a reduction in comfort when driving with light-
weight brake discs. Avoid shock-type loads on
the lightweight brake disks, particularly on the
brake plate.
Mercedes-Benz recommends that you only use
brake fluid that has been specially approved for
your vehicle by Mercedes-Benz, or which corre-
sponds to an equivalent quality standard. Brake
fluid which has not been approved for
Mercedes-Benz vehicles or which is not of an
equivalent quality could affect your vehicle's
operating safety.
Driving on wet roads
Hydroplaning If water has accumulated to a certain depth on
the road surface, there is a danger of hydro-
planing occurring, even if: R
you drive at low speeds R
the tires have adequate tread depth
For this reason, in the event of heavy rain or in
conditions in which hydroplaning may occur,
you must drive in the following manner: R
lower your speed R
avoid ruts R
avoid sudden steering movements R
brake carefully
Driving on flooded roads
! Bear in mind that vehicles traveling in front
or in the opposite direction create waves. This
may cause the maximum permissible water
depth to be exceeded.
Failure to observe these notes may result in
damage to the engine, electrical systems and
transmission.
If you have to drive on stretches of road on which
water has collected, please bear in mind that: R
in the case of standing water, the water level
may be no higher than the lower edge of the
vehicle body R
you should drive no faster than walking pace
Winter driving
G WARNING
If you shift down on a slippery road surface in
an attempt to increase the engine's braking
effect, the drive wheels could lose their grip.
There is an increased danger of skidding and
accidents.
Do not shift down for additional engine brak-
ing on a slippery road surface.
G DANGER
If the exhaust pipe is blocked or adequate
ventilation is not possible, poisonous gases
such as carbon monoxide (CO) may enter the
vehicle. This is the case, e.g. if the vehicle
becomes trapped in snow. There is a risk of
fatal injury.
If you leave the engine or the auxiliary heating
running, make sure the exhaust pipe and area
around the vehicle are clear of snow. To
ensure an adequate supply of fresh air, open a
window on the side of the vehicle that is not
facing into the wind.
Have your vehicle winter-proofed at a qualified
specialist workshop at the onset of winter.
Drive particularly carefully on slippery road sur-
faces. Avoid sudden acceleration, steering and Driving tips 161
Driving and parking Z
Page 292 of 374
An incorrectly secured roof carrier or roof load
may become detached from the vehicle. You
must therefore ensure that you observe the roof
carrier manufacturer's installation instructions.
Vehicles with a panorama roof with power
tilt/sliding panel: the panorama roof with
power tilt/sliding panel cannot be opened if a
roof carrier is installed. The panorama roof with
power tilt/sliding panel can still be raised to
allow ventilation of the vehicle interior. If the
panorama roof with power tilt/sliding panel
makes contact with a roof carrier approved by
Mercedes-Benz, the sunroof will lower slightly
but remain raised at the rear.
Attaching the roof carrier X
Secure the roof carrier to the roof rails. X
Observe the manufacturer's installation
instructions.
Features
Cup holder
Important safety notes
G WARNING
If you transport objects in the vehicle interior
and these are not adequately secured, they
could slip or be flung around and thereby
strike vehicle occupants. In addition, cup
holders, open stowage spaces and mobile
phone brackets may not always be able to
hold the objects placed in them in the event of
an accident. There is a risk of injury, particu-
larly in the event of sharp braking or sudden
changes of direction. R
Always stow objects in such a way that they
cannot be tossed about in these or similar
situations. R
Always make sure that objects do not pro-
trude out of the stowage spaces, luggage
nets or stowage nets. R
Ensure that closable stowage spaces are
shut before beginning your journey. R
Always stow and secure heavy, hard, poin-
ted, sharp-edged, fragile or large objects in
the cargo compartment. ! Only use the cup holders for containers of
the right size and which have lids. The drinks
could otherwise spill.
! Do not expose drinks bottles in the cup
holder in the center console to continuous,
strong and direct sunlight. The passenger
compartment in the area of the center con-
sole can otherwise be damaged by the con-
centrated and reflected sunlight.
Observe the loa ding guidelines ( Y
page 278).
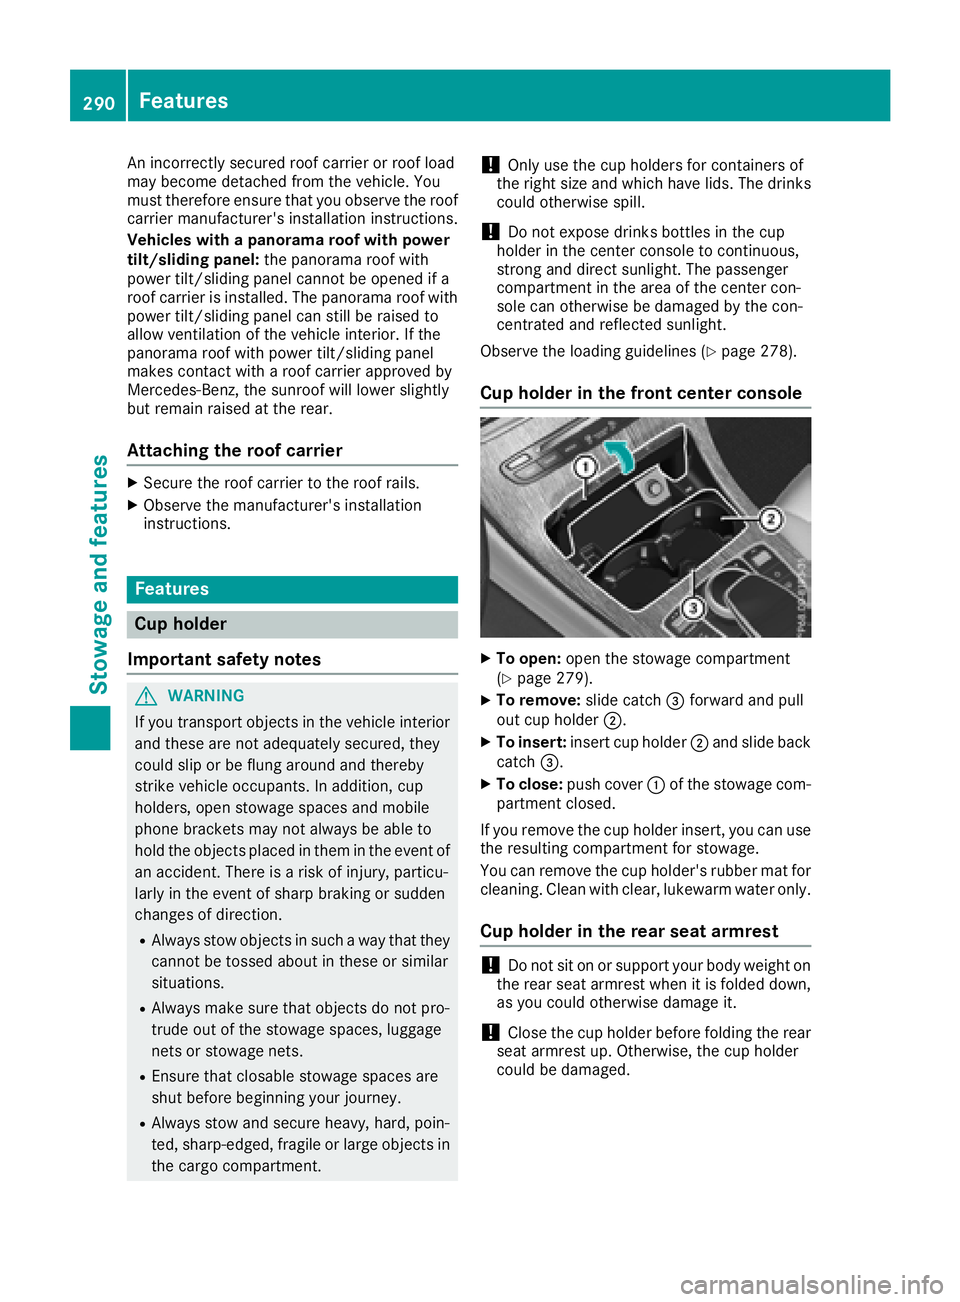
Cup holder in the front center console X
To open: open the stowage compartment
( Y
page 279). X
To remove: slide catch �