2017 MERCEDES-BENZ GLC buttons
[x] Cancel search: buttonsPage 8 of 374

Replacin g bulbs ............................ .1 18
Bag hook ............................................ 284
Ball coupling
Installing ........................................ 204
Removing ....................................... 206
BAS (Brake Assist System) ................. 65
BAS PLUS with Cross-Traffic Assist
(Brake Assist PLUS with Cross-
Traffic Assist)
Function/notes ................................ 66
Important safety notes .................... 66
Battery (SmartKey)
Checking .......................................... 80
Important safety notes .................... 80
Replacing ......................................... 80
Battery (vehicle)
Charging ........................................ 327
Display message ............................ 241
Important safety notes .................. 325
Jump starting ................................. 328
Blind Spot Assist
Activating/deactivating (on-
board computer) ............................ 221
Display message ............................ 246
Notes/function .............................. 193
see Active Blind Spot Assist
Blootooth ®
Connecting a different mobile
phone ............................................ 276
BlueTEC
see DEF
Bluetooth ®
Searching for a mobile phone ....... .2 75
see also Digital Operator's Man-
ual ................................................. .2 68
Telephony ...................................... 275
Brake Assist
see BAS (Brake Assist System)
Brake fluid
Display message ............................ 233
Notes ............................................. 368
Brake force distribution
see EBD (electronic brake force
distribution)
Brake linings
Display message ............................ 233 Brakes
ABS ................................................. .6 5
Adaptive Brake Assist ...................... 69
BAS .................................................. 65
BAS PLUS with Cross-Traffic
Assist ............................................... 66
Brake fluid (notes) ......................... 368
Display message ............................ 228
EBD .................................................. 73
Hill start as sist ............................... 136
HO LD function ............................... 171
Important safety notes .................. 159
Maintenance .................................. 160
Parking brake ................................ 155
Riding tips ...................................... 159
Warning lamp ................................. 258
Breakdown
Where will I find...? ........................ 319
see Flat tire
see Towing away
Brightness control (instrument
cluster lighting) ................................... 35
Buttons on the steering wheel ......... 209
C
California
Important notice for retail cus-
tomers and lessees .......................... 28
Calling up a malfunction
see Display messages
Calling up the climate control bar
Multimedia system ........................ 272
Calling up the climate control
menu
Multimedia system ........................ 272
Camera
see 360° camera
see Rear view camera
Car
see Vehicle
Care
360° camera ................................. 316
Car wash ........................................ 311
Carpets .......................................... 318
Display ........................................... 316
Exhaust pipe .................................. 316
Exterior lights ................................ 3156
Index
Page 22 of 374

Problem (malfunction) ..................... 81
Starting the engine ........................ 134
Smartphone
Starting the engine ........................ 134
SMS
see also Digital Operator's Man-
ual .................................................. 268
Snow chains ...................................... 338
Socket (12 V)
Cargo compartment ....................... 293
Center console .............................. 293
General notes ................................ 293
Rear compartment ........................ .2 93
Sound
Switching on/off ........................... 269
Special seat belt retractor .................. 59
Specialist workshop ............................ 31
Speed, controlling
see Cruise control
Speedometer
Activating/deactivating the addi-
tional speedometer ........................ 223
Digital ............................................ 213
In the Instrument cluster ................. 36
Segments ...................................... 208
Selecting the display unit .............. .2 23
SPORT handling mode
Deactivating/activating
(Mercedes-AMG vehicles) ................ 71
Warning lamp ................................. 261
Standing lamps
Display message ............................ 239
Switching on/off ........................... 112
Start button
Display message ............................ 256
Start/Stop button
Key positions ................................. 133
Starting the engine ........................ 134
Start/stop function
see ECO start/stop function
Starting (engine) ................................ 133
STEER CONTROL .................................. 75
Steering
Display message ............................ 254
Warning lamps ............................... 267
Steering Assist and Stop&Go Pilot .. 169 Steering Assist and Stop&Go Pilot
(DISTRONIC PLUS)
Display message ............................ 248
Steering assistant STEER CON-
TROL
see STEER CONTROL
Stee ring w heel
Adju sting (electrically) ................... 105
Adjusting (manually) ...................... 104
Button overview ............................... 37
Buttons (on-board computer) ......... 209
Cleaning ......................................... 317
EASY ENTRY/EXIT feature ............. 105
Important safety notes .................. 104
Storing settings (memory func-
tion) ............................................... 109
Steering wheel heating
Problem (malfunction) ................... 105
Switching on/off ........................... 105
Steering wheel paddle shifters ........ 145
Stop&Go Pilot and Steering Assist .. 169
Stopwatch (RACETIMER) ................... 225
Stowage areas ................................... 278
Stowage compartments
Armrest (under) ............................. 279
Center console .............................. 279
Cup holders ................................... 290
Door ............................................... 280
Eyeglasses compartment ............... 279
Glove box ....................................... 279
Important safety information ......... 278
Map pockets .................................. 280
Rear ............................................... 280
Stowage net ................................... 280
see Stowage areas
Stowage net ....................................... 280
Summer tires
In winter ........................................ 338
Sun visor ............................................ 291
Suspension settings
AIR BODY CONTROL ...................... 173
Suspension tuning
AMG sports suspension based on
AIR BODY CONTROL ...................... 174
SETUP (on-board computer,
Mercedes-AMG vehicles) ............... 22520
Index
Page 66 of 374
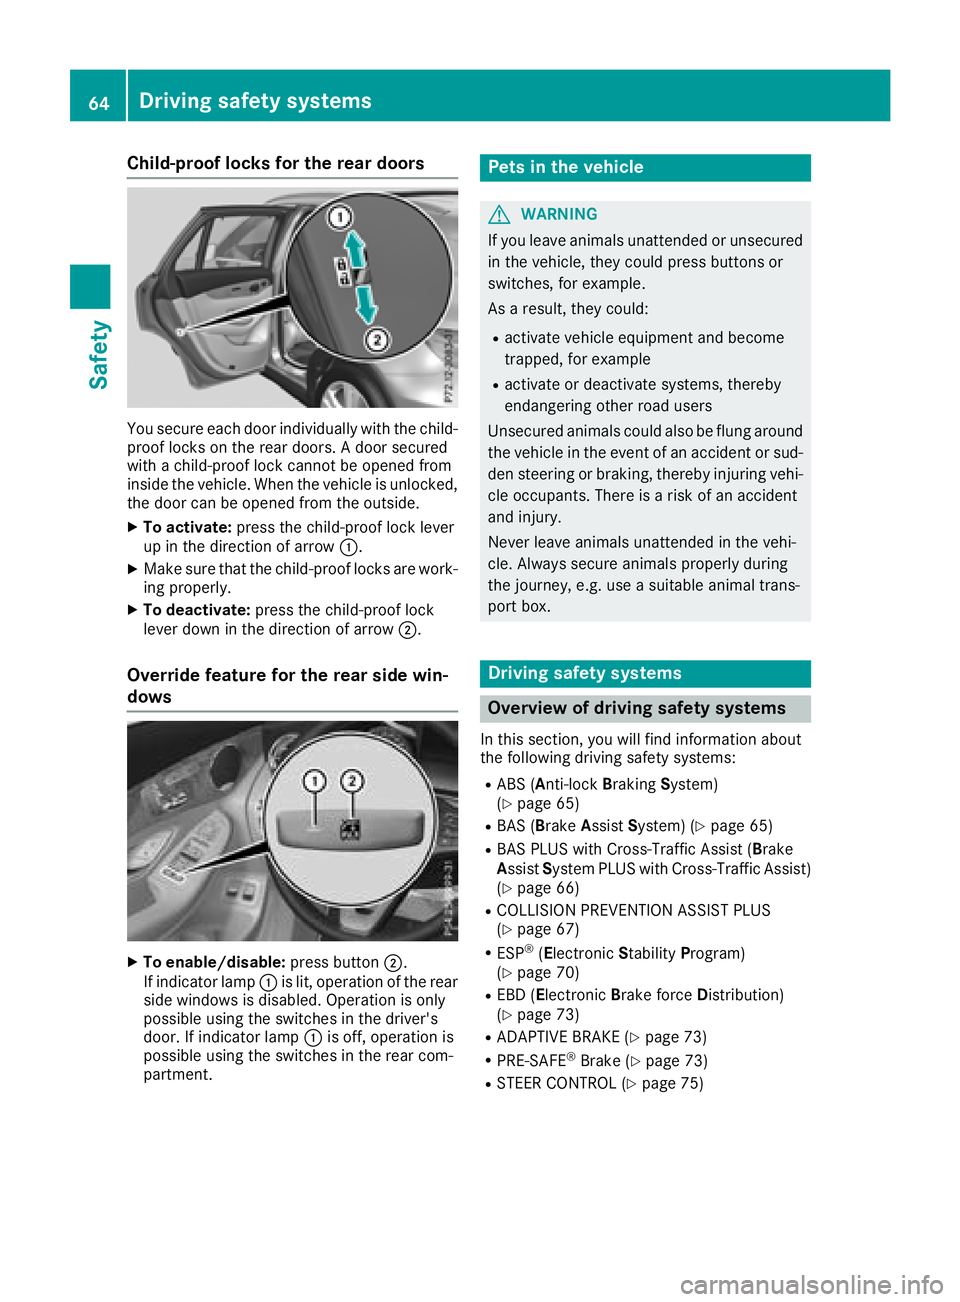
Child-proof locks for the rear doors
You secure each door individually with the child-
proof locks on the rear doors. A door secured
with a child-proof lock cannot be opened from
inside the vehicle. When the vehicle is unlocked,
the door can be opened from the outside. X
To activate: press the child-proof lock lever
up in the direction of arrow �C .X
Make sure that the child-proof locks are work-
ing properly. X
To deactivate: press the child-proof lock
lever down in the direction of arrow �D .
Override feature for the rear side win-
dows
X
To enable/disable: press button �D .
If indicator lamp �C is lit, operation of the rear
side windows is disabled. Operation is only
possible using the switches in the driver's
door. If indicator lamp �C is off, operation is
possible using the switches in the rear com-
partment. Pets in the vehicle
G WARNING
If you leave animals unattended or unsecured
in the vehicle, they could press buttons or
switches, for example.
As a result, they could: R
activate vehicle equipment and become
trapped, for example R
activate or deactivate systems, thereby
endangering other road users
Unsecured animals could also be flung around
the vehicle in the event of an accident or sud-
den steering or braking, thereby injuring vehi-
cle occupants. There is a risk of an accident
and injury.
Never leave animals unattended in the vehi-
cle. Always secure animals properly during
the journey, e.g. use a suitable animal trans-
port box.
Driving safety systems
Overview of driving safety systems In this section, you will find information about
the following driving safety systems: R
ABS ( A nti-lock B raking S ystem)
( Y
page 65) R
BAS ( B rake A ssist S ystem) ( Y
page 65)R
BAS PLUS with Cross-Traffic Assist ( B rake
A ssist S ystem PLUS with Cross-Traffic Assist)
( Y
page 66) R
COLLISION PREVENTION ASSIST PLUS
( Y
page 67) R
ESP ®
( E lectronic S tability P rogram)
( Y
page 70) R
EBD ( E lectronic B rake force D istribution)
( Y
page 73) R
ADAPTIVE BRAKE ( Y
page 73)R
PRE-SAFE ®
Brake ( Y
page 73)R
STEER CONTROL ( Y
page 75)64
Driving safety systems
Safety
Page 81 of 374
KEYLESS- GO start function
Gene ra l notesBear in min d that th e engin e can be started by
any of th e vehicl e occupant s if there is a Smart -
Key in th e vehicl e ( Y
page 134).
Changing the settings of the locking
system You can chang e th e setting s of th e locking sys-
tem. This mean s that only th e driver's door and
th e fuel filler flap are unlocke d when th e vehicl e
is unlocked. This is useful if you frequentl y travel
alone. X
To change th e setting: press and hold down
th e �6 and �7 buttons simultaneousl y
for approximately six seconds until th e bat -
tery chec k lamp ( Y
page 80) flashes twice .
If th e setting of th e locking system is changed
within th e signal range of th e vehicle, pressing
th e �7 or �6 button:R
locks or R
unlocks th e vehicl e
The SmartKey no w function s as follows :X
To unlock: press th e �6 butto n once .X
To unlock centrally: press th e �6 butto n
twice .X
To lock: press th e �7 button.X
To restor e th e factory settings: press and
hold th e �6 and �7 buttons simultane -
ousl y for approximately six seconds until th e
battery chec k lamp ( Y
page 80) flashes
twice .
The KEYLESS-GO function s can be changed as
follows :X
To unlock th e driver's door : touch th e inner
surfac e of th e door handle on th e driver's
door .X
To unlock centrally: touch th e inner surfac e
of th e door handle on th e front-passenger
door or th e re ar door .X
To lock centrally: touch th e outer sensor
surfac e on on e of th e door handles . Mechanical key
Gene ra l notesIf th e vehicl e can no longer be locke d or
unlocke d wit h th e SmartKey or KEYLESS-GO ,
use th e mechanical key.
If you use th e mechanical ke y to unloc k and
open th e driver's door , th e anti-thef t alarm sys-
te m will be triggered . Switc h off th e alarm
( Y
page 76) .
If you unloc k th e vehicl e usin g th e mechanical
key, th e fuel filler flap will no t be unlocke d auto -
matically. X
To unlock th e fuel filler flap: insert th e
SmartKey int o th e ignition lock.
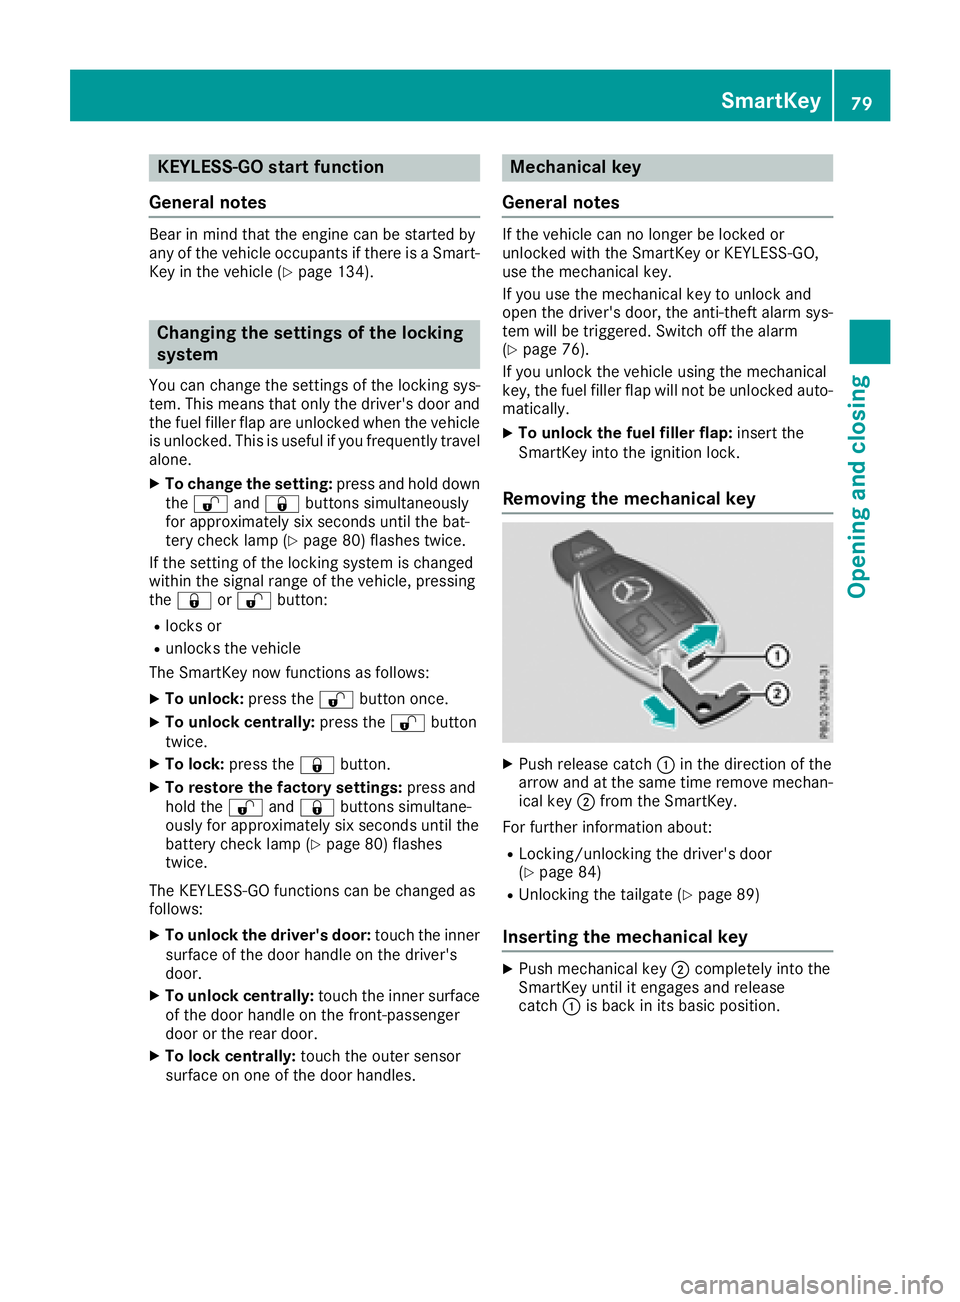
Removing the me chanical key
X
Push release catch �C in th e direction of th e
arrow and at th e sam e time remove mechan -
ical ke y �D from th e SmartKey.
Fo r further information about :R
Locking/unlocking th e driver's door
( Y
page 84 ) R
Unlocking th e tailgat e ( Y
page 89 )
Inserting the me chanical key X
Push mechanical ke y �D completely int o th e
SmartKey until it engage s and release
catch �C is bac k in it s basic position .SmartKey 79
Opening and closing Z
Page 86 of 374
The vehicle will be fully unlocked if it had previ-
ously been fully unlocked. If only the driver's
door had been previously unlocked, only the
door which has been opened from the inside is
unlocked.
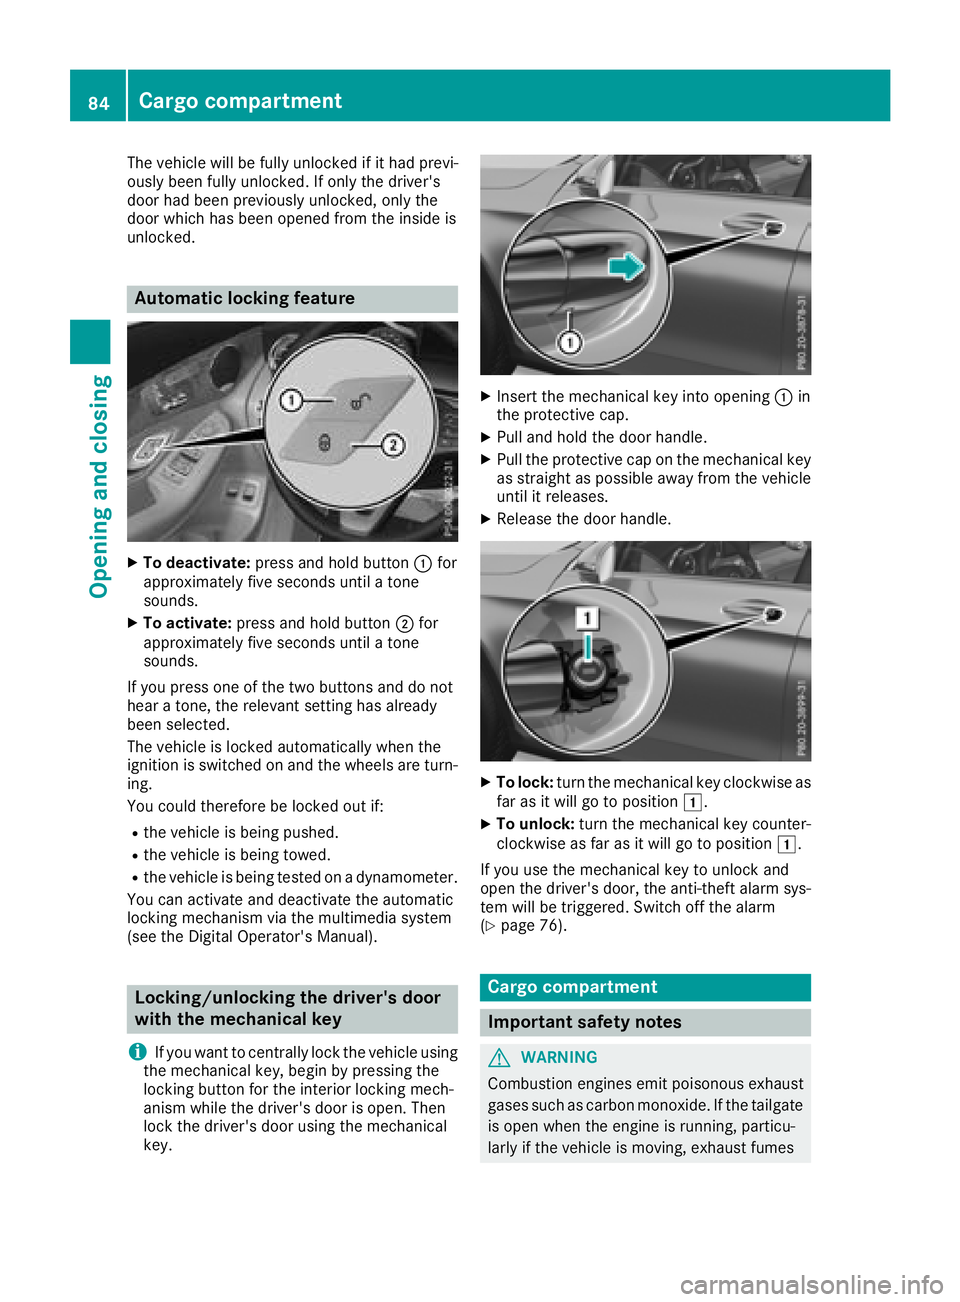
Automatic locking feature X
To deactivate: press and hold button �C for
approximately five seconds until a tone
sounds. X
To activate: press and hold button �D for
approximately five seconds until a tone
sounds.
If you press one of the two buttons and do not
hear a tone, the relevant setting has already
been selected.
The vehicle is locked automatically when the
ignition is switched on and the wheels are turn-
ing.
You could therefore be locked out if: R
the vehicle is being pushed. R
the vehicle is being towed. R
the vehicle is being tested on a dynamometer.
You can activate and deactivate the automatic
locking mechanism via the multimedia system
(see the Digital Operator's Manual).
Locking/unlocking the driver's door
with the mechanical key
i If you want to centrally lock the vehicle using
the mechanical key, begin by pressing the
locking button for the interior locking mech-
anism while the driver's door is open. Then
lock the driver's door using the mechanical
key. X
Insert the mechanical key into opening �C in
the protective cap. X
Pull and hold the door handle. X
Pull the protective cap on the mechanical key
as straight as possible away from the vehicle
until it releases. X
Release the door handle.
X
To lock: turn the mechanical key clockwise as
far as it will go to position �G .X
To unlock: turn the mechanical key counter-
clockwise as far as it will go to position �G .
If you use the mechanical key to unlock and
open the driver's door, the anti-theft alarm sys-
tem will be triggered. Switch off the alarm
( Y
page 76).
Cargo compartment
Important safety notes
G WARNING
Combustion engines emit poisonous exhaust
gases such as carbon monoxide. If the tailgate
is open when the engine is running, particu-
larly if the vehicle is moving, exhaust fumes84
Cargo compartment
Opening and closing
Page 101 of 374
of injury in the head and neck area, e.g. in the
event of an accident or when braking.
Always drive with the head restraints instal-
led. Before driving off, make sure for every
vehicle occupant that the center of the head
restraint supports the back of the head at
about eye level.
Do not rotate the head restraints of the front and
rear seats. Otherwise, you cannot adjust the
height and angle of the head restraints cor-
rectly.
Using the fore-and-aft adjustment, adjust the
head restraint so that it is as close as possible to
your head.
G WARNING
If the driver's seat is not engaged, it could
move unexpectedly while the vehicle is in
motion. This could cause you to lose control of
the vehicle. There is a risk of an accident.
Always make sure that the driver's seat is
engaged before starting the vehicle.
G WARNING
You could lose control of your vehicle if you do
the following while driving: R
adjust the driver's seat, head restraint,
steering wheel or mirrors R
fasten the seat belt
There is a risk of an accident.
Adjust the driver's seat, head restraint, steer-
ing wheel and mirror and fasten your seat belt
before starting the engine.
G WARNING
If you adjust the seat height carelessly, you or
other vehicle occupants could be trapped and
thereby injured. Children in particular could
accidentally press the electrical seat adjust-
ment buttons and become trapped. There is a
risk of injury.
While moving the seats, make sure that your
hands or other body parts do not get under the
lever assembly of the seat adjustment sys-
tem. G WARNING
The seat belt does not offer the intended level
of protection if you have not moved the back-
rest to an almost vertical position. When brak-
ing or in the event of an accident, you could
slide underneath the seat belt and sustain
abdomen or neck injuries, for example. This
poses an increased risk of injury or even fatal
injury.
Adjust the seat properly before beginning
your journey. Always ensure that the backrest
is in an almost vertical position and that the
shoulder section of your seat belt is routed
across the center of your shoulder.
! To avoid damage to the seats and the seat
heating, observe the following information: R
keep liquids from spilling on the seats. If
liquid is spilled on the seats, dry them as
soon as possible. R
if the seat covers are damp or wet, do not
switch on the seat heating. The seat heat-
ing should also not be used to dry the seats. R
clean the seat covers as recommended;
see "Interior care". R
do not transport heavy loads on the seats.
Do not place sharp objects on the seat
cushions, e.g. knives, nails or tools. The
seats should only be occupied by passen-
gers, if possible. R
when the seat heating is in operation, do
not cover the seats with insulating materi-
als, e.g. blankets, coats, bags, seat covers,
child seats or booster seats.
! Make sure that there are no objects in the
footwell under or behind the seats when mov-
ing the seats back. There is a risk that the
seats and/or the objects could be damaged.
i The rear-compartment head restraints can
be removed ( Y
page 102).
For more information, contact a qualified spe-
cialist workshop.
i Related topic: R
EASY-PACK Quickfold rear bench seat
( Y
page 281) Seats 99
Seats, steering wheel and mirrors Z
Page 112 of 374
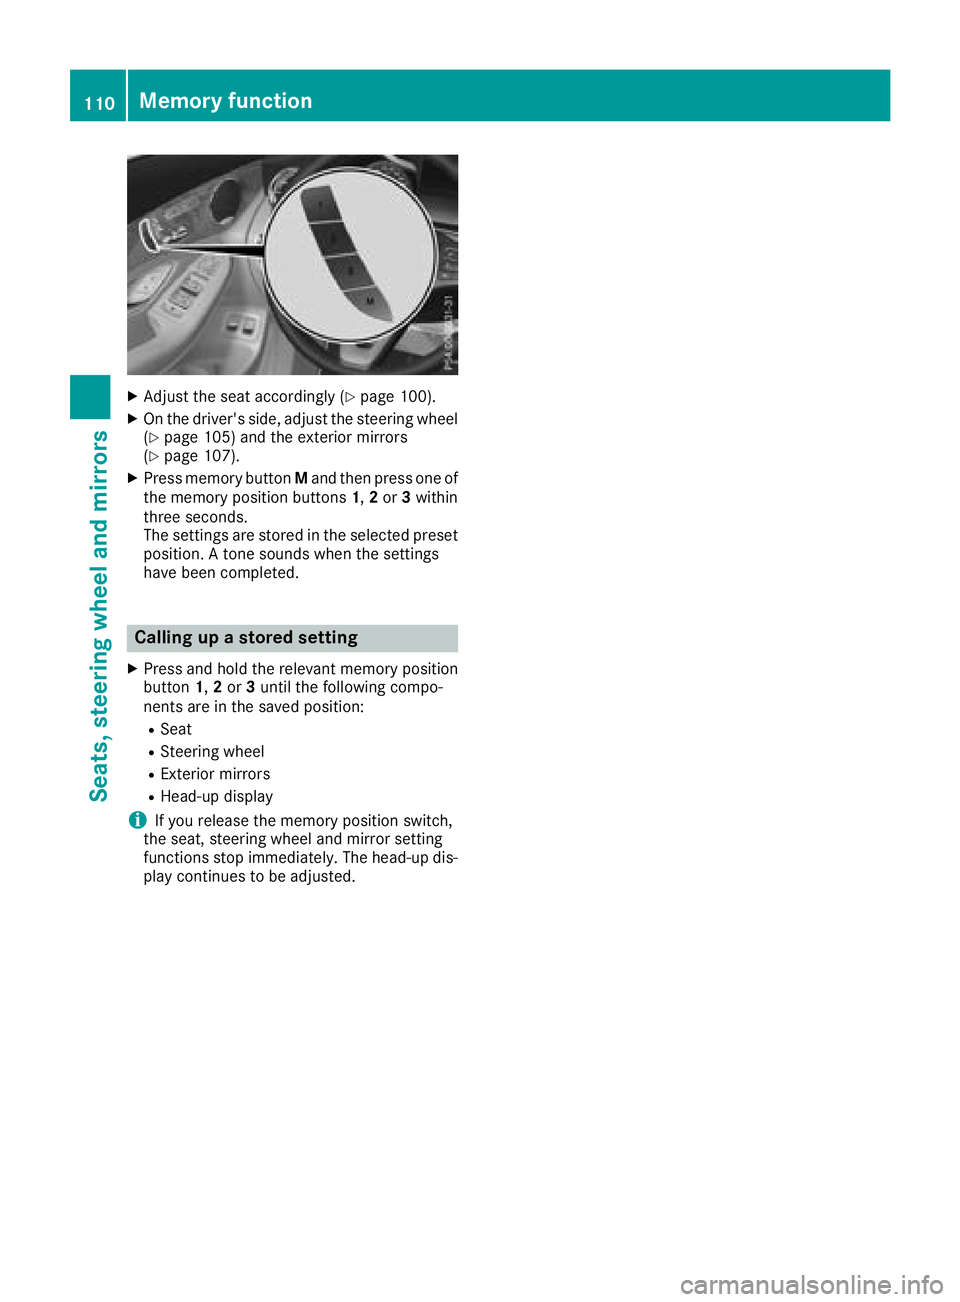
X
Adjust the seat accordingly ( Y
page 100).X
On the driver's side, adjust the steering wheel
( Y
page 105) and the exterior mirrors
( Y
page 107).X
Press memory button M and then press one of
the memory position buttons 1 , 2 or 3 within
three seconds.
The settings are stored in the selected preset
position. A tone sounds when the settings
have been completed.
Calling up a stored setting X
Press and hold the relevant memory position
button 1 , 2 or 3 until the following compo-
nents are in the saved position: R
Seat R
Steering wheel R
Exterior mirrors R
Head-up display
i If you release the memory position switch,
the seat, steering wheel and mirror setting
functions stop immediately. The head-up dis-
play continues to be adjusted.110
Memory function
Seats, steering wheel an d mirrors
Page 305 of 374
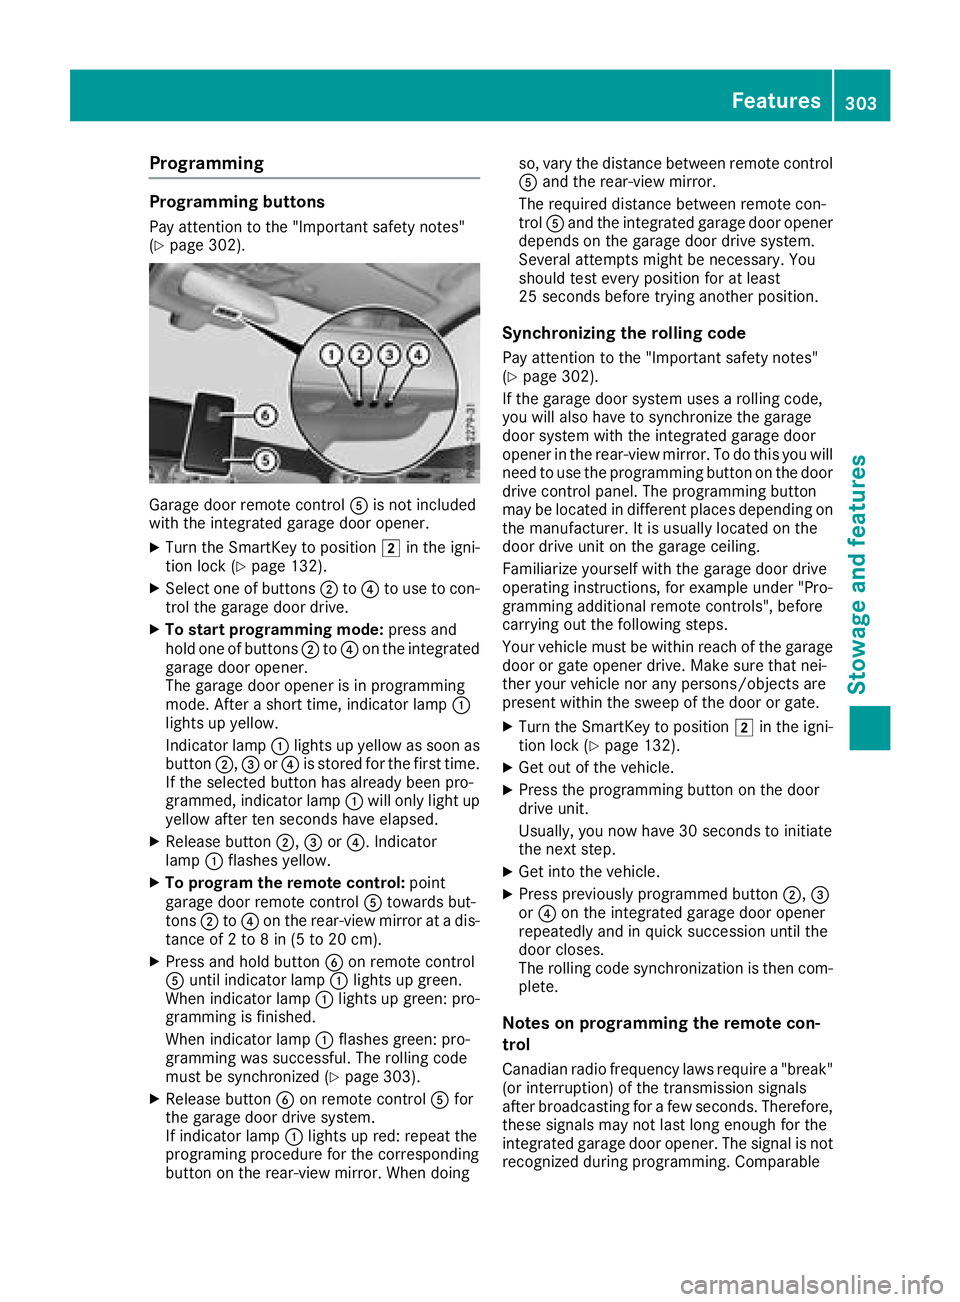
Programming Programming buttons Pay attention to the "Important safety notes"
( Y
page 302).
Garage door remote control �