2017 MERCEDES-BENZ GLC COUPE trailer
[x] Cancel search: trailerPage 201 of 370
which the maximum permissible speed for vehi-
cle/trailer combinations is above 60 mph
(100 km/h).
When towing a trailer, your vehicle's handling
characteristics will be different in comparison towhen driving without a trailer and it will con-
sume more fuel.
Shift to a lower gear on long and steep downhill
gradients.
This also applies to:
Ractivated DISTRONIC PLUS
Ractivated cruise control
This will use the braking effect of the engine, so that less braking will be required to maintain the
speed. This relieves the load on the brake sys-
tem and prevents the brakes from overheating
and wearing too quickly. If you need additional
braking, depress the brake pedal repeatedly
rather than continuously.
Driving tips
If the trailer swings from side to side:
XDo not accelerate.
XDo not counter-steer.
XBrake if necessary.
RMaintain a greater distance from the vehicle
in front than when driving without a trailer.
RAvoid braking abruptly. If possible, brake gen-tly at first to allow the trailer to run on. Then,
increase the braking force rapidly.
RThe values given for gradient-climbing capa-
bilities from a standstill refer to sea level.
When driving in mountainous areas, note that
the power output of the engine and, conse-
quently, the vehicle's gradient-climbing capa-
bility, decreases with increasing altitude.
Installing the ball coupling
GWARNING
If the ball coupling is not correctly installed
and secured, it could come loose while driving and endanger other road users. There is a risk
of an accident and injury.
Install and secure the ball coupling as descri-
bed in the ball coupling manufacturer's instal- lation instructions. Make sure that the ball
coupling is correctly installed and secured
before every journey.
GWARNING
If the ball coupling is not installed and secured
correctly the trailer may come loose. There is
a risk of an accident.
Install and secure the ball coupling as descri-
bed in the ball coupling installation instruc-
tions. Make sure that the ball coupling is
installed and secured correctly before every
journey.
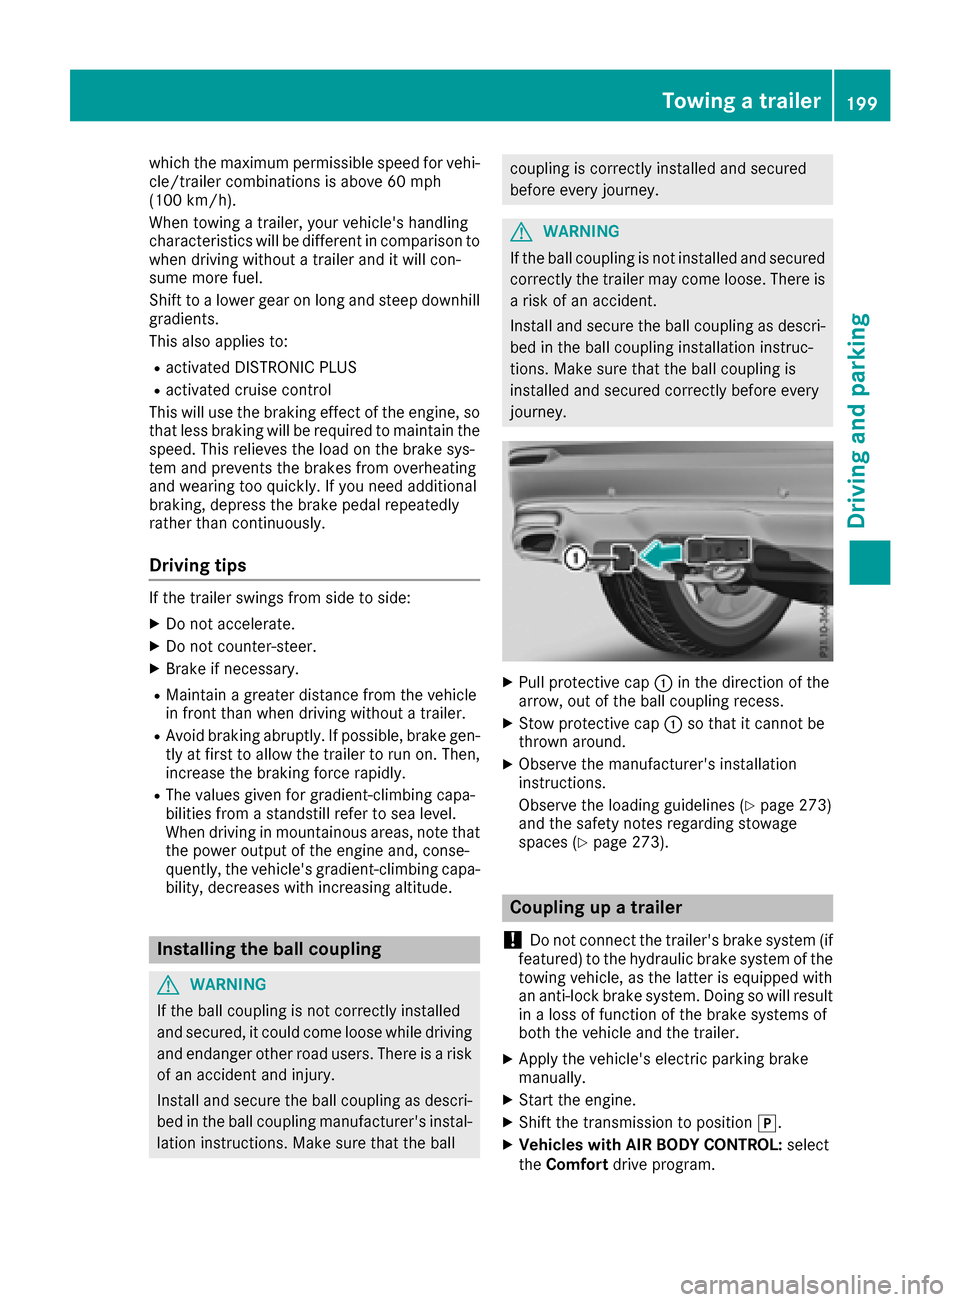
XPull protective cap :in the direction of the
arrow, out of the ball coupling recess.
XStow protective cap :so that it cannot be
thrown around.
XObserve the manufacturer's installation
instructions.
Observe the loading guidelines (
Ypage 273)
and the safety notes regarding stowage
spaces (
Ypage 273).
Coupling up a trailer
!
Do not connect the trailer's brake system (if
featured) to the hydraulic brake system of the
towing vehicle, as the latter is equipped with
an anti-lock brake system. Doing so will result
in a loss of function of the brake systems of
both the vehicle and the trailer.
XApply the vehicle's electric parking brake
manually.
XStart the engine.
XShift the transmission to position j.
XVehicles with AIR BODY CONTROL: select
the Comfort drive program.
Towing a trailer199
Driving and parking
Z
Page 202 of 370

XSwitch off the engine.
XClose the doors and tailgate.
XCouple up the trailer.
XEstablish the electrical connection between
the vehicle and the trailer.
XCheck that the trailer lighting system is work-
ing.
XPush the combination switch upwards/down-wards and check whether the corresponding
turn signal on the trailer flashes.
A trailer that is connected is recognized only
when the electrical connection is established
correctly and when the lighting system is work-
ing properly. The function of other systems also
depends on this, for example:
RESP®
RPARKTRONIC
RActive Parking Assist
RActive Blind Spot Assist
RActive Lane Keeping Assist
Vehicles with AIR BODY CONTROL: if you couple
up a trailer, the vehicle always remains at high-
way level. Observe the following note when cou-
pling up a trailer:
RUnless highway level has been set manually,
the vehicle is automatically lowered to high-
way level. If a speed of 5 mph (8 km/h) has
been reached, this may be the case.
These restrictions apply to accessories that are
supplied with power via the trailer socket in your
vehicle, e.g. a rear bicycle rack.
Observe the maximum permissible trailer
dimensions (width and length).
Most U.S. states and all Canadian provinces
require by law:
RSafety chains between the towing vehicle and
the trailer. The chains should be cross-wound
under the trailer drawbar. They must be fas-
tened to the vehicle's trailer coupling, not to
the bumper or the axle.
Leave enough play in the chains to make tight
cornering possible.
RA separate brake system for certain types of
trailer.
RSafety switch for braked trailers. Check the
specific legal requirements applicable to your state.
If the trailer becomes detached from the tow-
ing vehicle, the safety feature applies the
trailer brakes.
Towing a trailer
There are several legal requirements for towing
a trailer, e.g. the maximum permissible speed.
Make sure that your car/trailer combination
complies with the local regulations:
Rin your place of residence
Rat your destination
The police and local authorities can provide reli- able information.
To accumulate driving experience and accustom
yourself to the new handling characteristics,
practice the following at a location where there
is no traffic:
RCornering
RStopping
RBacking up
Check the following before the journey:
RTrailer tow hitch
RSafety switch for braked trailers
RSafety chains
RElectrical connections
RLighting system
RWheels and tires
RLoad securing
Adjust the exterior mirrors so that you have a
clear view of the rear section of the trailer.
If the trailer is equipped with electronically con-
trolled brakes, pull away carefully in the car/
trailer combination. Brake manually using the
brake controller and check whether the brakes
function correctly.
Regularly check that the load is secure.
When towing a trailer, your vehicle's handling
characteristics will be different in comparison
with when driving without a trailer.
The vehicle/trailer combination:
Ris heavier
Ris restricted in its acceleration and gradient-
climbing capability
Rhas an increased braking distance
Ris affected more by strong crosswinds
Rdemands more sensitive steering
Rhas a larger turning circle
Avoid sudden steering movements.
Avoid braking abruptly. If possible, brake gently
at first to allow the trailer to run on. Then,
increase the braking force rapidly.
200Towing a trailer
Driving and parking
Page 203 of 370

When overtaking, pay particular attention to the
extended length of your vehicle/trailer combi-
nation.
Due to the length of the vehicle/trailer combi-
nation, you require additional road space when
overtaking before you can change back to the
original lane.
If the automatic transmission repeatedly shifts
between gears on uphill or downhill gradients,
shift to a lower gear.
Driving in a lower gear and at a reduced speed
decreases the risk of engine damage.
If the coolant temperature increases signifi-
cantly when climate control is switched on,
switch climate control off.
Coolant heat can also be dissipated by opening
the windows and switching the ventilation
blower and the interior temperature to the high-
est level.
Decoupling a trailer
GWARNING
If you uncouple a trailer with the overrun
brake engaged, you could trap your hand
between the vehicle and the trailer drawbar.
There is a risk of injury.
Do not uncouple a trailer if the overrun brake
is engaged.
GWARNING
Vehicles with level control:
The vehicle is lowered as soon as you discon-
nect the trailer cable. This could result in your
limbs or those of other people that are
between the vehicle body and tires or under-
neath the vehicle being trapped. There is a
risk of injury.
Make sure that nobody is in the immediate
vicinity of the wheel housings or under the
vehicle when you disconnect the trailer cable.
!Do not disconnect a trailer with an engaged
overrun brake. Otherwise, your vehicle could
be damaged by the rebounding of the overrun
brake.
XApply the vehicle's parking brake manually.
XShift the transmission to position j.
XClose all doors and the tailgate.
XSwitch off the engine.
XSecure the vehicle and trailer against rolling
away.
XRemove the trailer cable.
XRemove the safety chains, if there are any.
XUncouple the trailer.
Removing the ball coupling
XObserve the manufacturer's installation
instructions.
XPress the protective cap into the ball coupling
recess.
XMake sure that the protective cap is firmly in
place.
Observe the loading guidelines (
Ypage 273)
and the safety notes regarding stowage spaces
(
Ypage 273).
Information on cleaning and care of the trailer
tow hitch (
Ypage 310).
Trailer power supply
!
Accessories with a maximum power con-
sumption of 180 W can be connected to the
permanent power supply.
You must not charge a trailer battery using the
power supply.
The trailer socket of your vehicle is equipped at
the factory with a permanent power supply.
The permanent power supply is supplied via
trailer socket pin 4.
The trailer's permanent power supply is
switched off in the event of low vehicle supply
voltage and after six hours at the latest.
A qualified specialist workshop can provide
more information about installing the trailer
electrics.
Permissible trailer loads and trailer
drawbar noseweights
Weight specifications
The gross trailer weight is calculated as the
weight of the trailer plus the weight of the load
and the trailer's equipment.
Towing a trailer201
Driving and parking
Z
Page 204 of 370
You will find permissible trailer loads under
"Technical data" (Ypage 365).
Loading a trailer
RWhen loading the trailer, make sure that nei-
ther the permissible gross trailer weight nor
the permissible gross vehicle weight are
exceeded. The permissible gross vehicle
weight is indicated on the identification plate
on the B-pillar on the driver's side of the vehi-
cle.
You can find the maximum permissible valueson the type plates of your vehicle and the
trailer. When calculating how much weight
the vehicle and trailer may carry, pay atten-
tion to the respective lowest values.
RThe trailer drawbar load on the ball coupling
must be added to the rear axle load to avoid
exceeding the permissible gross axle weight.
The permissible gross vehicle weight is indi-
cated on the identification plate on the B-pil-
lar on the driver's side of the vehicle.
Mercedes-Benz recommends a trailer load
where the trailer drawbar noseweight accounts
for 8% to 15% of the permissible gross trailer
weight.
Additional accessories, passengers and load
reduce the permissible trailer load and nose-
weight that your vehicle can tow.
Checking the vehicle and trailer weight
RHave the towing vehicle, including the driver,
passengers and load, and completely loaded
trailer weighed on a suitable weighing
machine. This will allow you to ensure that the
weights of the towing vehicle and trailer com-
ply with the maximum permissible values.
RCheck the gross axle weight rating of the front
and rear axles, the gross weight of the trailer
and trailer drawbar load.
202Towing a trailer
Driving and parking
Page 236 of 370
Display messagesPossible causes/consequences andMSolutions
Forfurther information about th eOccupant Classification System, see
(Ypage 50) .
Lights
Display messagesPossible causes/consequences and MSolutions
b
CheckLeftLowBeam(Example)
The bulb in question is malfunctioning .
XVisitaqualified specialist workshop .
or
XChec kwhether you are permitte dto replace th ebulb yourself
(Ypage 113).
iLE Dligh tsources: th edisplay message for th ecorrespondin g
lamp only appear swhen all th eLEDs in th elamp hav efailed.
b
Active HeadlampsInoperative
The active ligh tfunction is malfunctioning .
XVisitaqualified specialist workshop .
b
Malfunction SeeOperator’sManual
The exterio rlighting is malfunctioning .
XVisitaqualified specialist workshop .
Vehicles withtrailer to whitch : afusemay hav eblown .
XPull ove rand stop th evehicl esafely as soo nas possible, payin g
attention to roa dand traffic conditions.
XSecur eth evehicl eagainst rollin gaway (Ypage 149).
XCheckth efuses (Ypage 327).
XIf necessary, replace th eblown fuse. Observ eth ewarning notes.
If th edisplay message remain son show:
XVisit aqualified specialist workshop .
b
AutoLam pFunctionInoperative
The ligh tsensor is malfunctioning .
XVisitaqualified specialist workshop .
b
Switch Off Lights
You leaveth evehicl eand th elights are switched on . Awarning tone
also sounds.
XTurn th eligh tswitch to th eà position .
b
Switch On Headlamps
You are drivin gwit hlow-beam headlamp sswitched off .
XTurn theligh tswitch to th eL orà position .
234Display messages
On-board computer and displays
Page 242 of 370

Display messagesPossible causes/consequences andMSolutions
Á
Drive MoreSlowly
You canno tchang eth evehicl elevel. Possibl ecauses are:
RYou are drivin gto ofas tfor th eselected vehicl elevel
RYou are drivin gto ofas twit h a trailer or th etrailer-coupling socke tis
bein gused ,e.g. for abicycle rac k
XDrive moreslowly and then select th edesire dvehicl elevel again
(Ypage 168).
XObserv eth enote son towin g atrailer (Ypage 198).
Á
Compresso rIs Cool‐ing
You hav eselected ahigher vehicl elevel. The compressor first needs
to cool down because of frequen tlevel changes.
XDrive in amanne rappropriat efor th ecurren tvehicl elevel.
XMak esur ethat there is sufficien tground clearance .
XAllow thecompressor to cool down .
Whe nth ecompressor has cooled down ,th edisplay message dis-
appears. The vehicl ethen continues rising to th eselected level.
Á
Malfunction
AI R BODY CONTROL is malfunctioning .The vehicle's handlin gchar-
acteristics may be affected.
Mercedes-AMG vehicles: theAM Gsport ssuspension base don AI R
BODY CONTROL is malfunctioning .The vehicle's handlin gcharacter-
istics may be affected.
XDrive as appropriat efor th ecurren tvehicl elevel, but do no texceed
50 mph (80 km/h).
XMak esur ethat there is sufficien tground clearance .
XVisitaqualified specialist workshop .
LaneKeepin gAssistCurrently Unavaila‐ble See Operator' sManualorActiveLan eKeepin gAssistCurrently Unavaila‐ble See Operator' sManual
LaneKeepin gAssis tor Active Lan eKeepin gAssis tis deactivated and
temporarily inoperative.
Possibl ecauses are:
RThe windshield in th ecamera' sfield of vision is dirty.
RVisibilit yis impaire ddue to heav yrain ,snow or fog .
RThere havebeen no lan emarking sfor an extended period.
RThe lan emarking sare worn, dark or covered, e.g. by dir tor snow.
Whe nth ecauses state dabov eno longer apply, th edisplay message
disappears.
Lan eKeepin gAssis tor Active Lan eKeepin gAssis tis operational
again .
If th edisplay message does no tdisappear :
XPull overand stop th evehicl esafely as soo nas possible, payin g
attention to roa dand traffic conditions.
XSecur eth evehicl eagainst rollin gaway (Ypage 149).
XClean th ewindshield.
Lan eKeepin gAssistInoperativeor
ActiveLan eKeepin gAssist Inoperative
LaneKeepin gAssis tor Active Lan eKeepin gAssis tis malfunctioning .
XVisitaqualified specialist workshop .
240Display messages
On-board computer and displays
Page 312 of 370
Cleaning the rear view camera and 360°
camera
!Do not clean the camera lens and the area
around the rear view camera or 360° camera
with a power washer.
XMake sure that the vehicle is stationary.
XTurn the SmartKey to position 1or2 in the
ignition lock (Ypage 127).
or
XPress the Start/Stop button once or twice on
vehicles with KEYLESS-GO or the KEYLESS-
GO start function (
Ypage 128).
XOpen the camera cover for cleaning via the
multimedia system (see Digital Operator's
Manual).
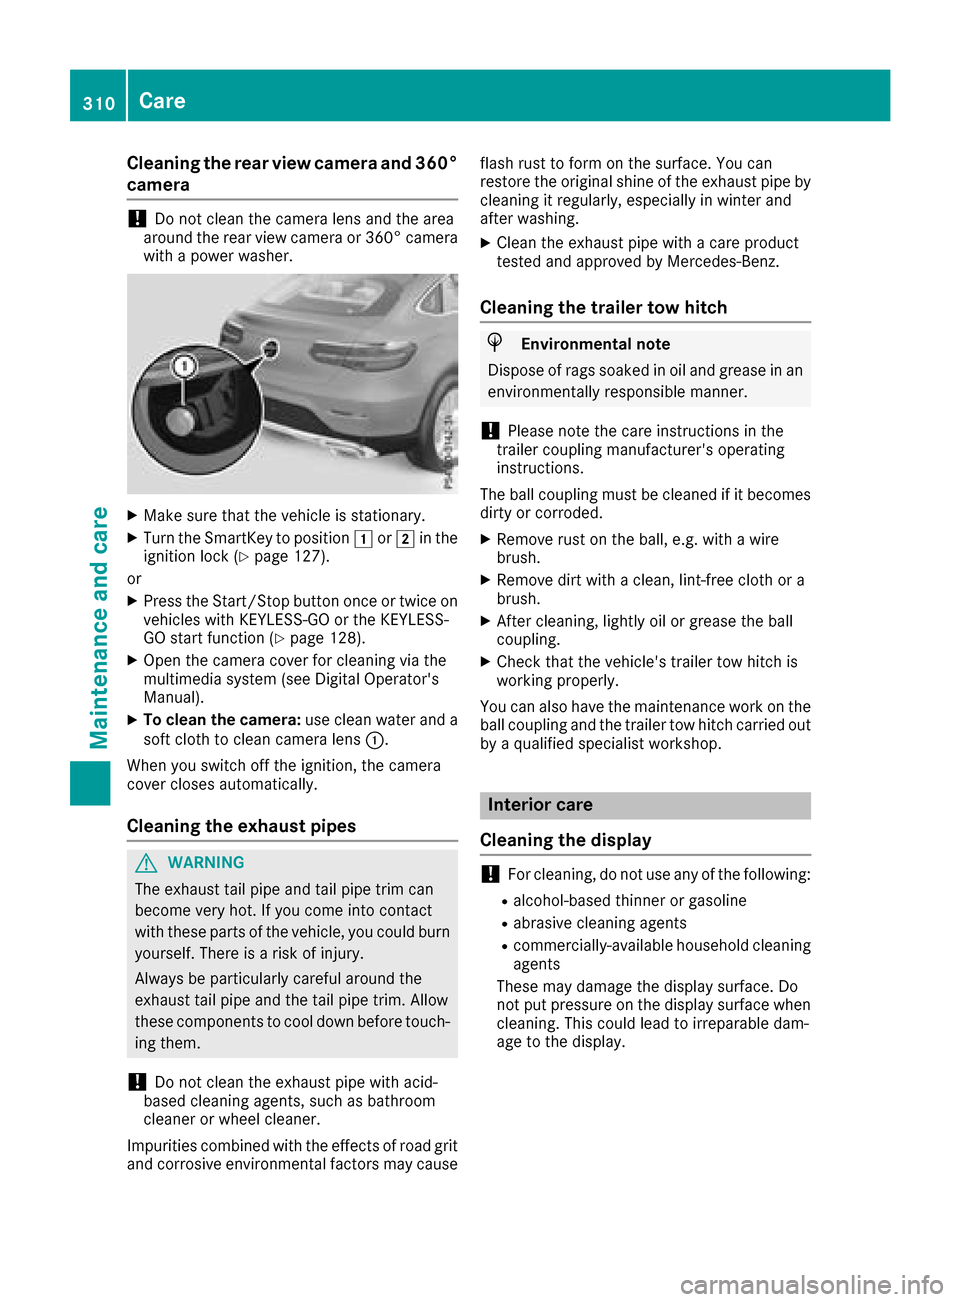
XTo clean the camera: use clean water and a
soft cloth to clean camera lens :.
When you switch off the ignition, the camera
cover closes automatically.
Cleaning the exhaust pipes
GWARNING
The exhaust tail pipe and tail pipe trim can
become very hot. If you come into contact
with these parts of the vehicle, you could burn
yourself. There is a risk of injury.
Always be particularly careful around the
exhaust tail pipe and the tail pipe trim. Allow
these components to cool down before touch-
ing them.
!Do not clean the exhaust pipe with acid-
based cleaning agents, such as bathroom
cleaner or wheel cleaner.
Impurities combined with the effects of road grit and corrosive environmental factors may cause flash rust to form on the surface. You can
restore the original shine of the exhaust pipe by
cleaning it regularly, especially in winter and
after washing.
XClean the exhaust pipe with a care product
tested and approved by Mercedes-Benz.
Cleaning the trailer tow hitch
HEnvironmental note
Dispose of rags soaked in oil and grease in an
environmentally responsible manner.
!Please note the care instructions in the
trailer coupling manufacturer's operating
instructions.
The ball coupling must be cleaned if it becomes dirty or corroded.
XRemove rust on the ball, e.g. with a wire
brush.
XRemove dirt with a clean, lint-free cloth or a
brush.
XAfter cleaning, lightly oil or grease the ball
coupling.
XCheck that the vehicle's trailer tow hitch is
working properly.
You can also have the maintenance work on the ball coupling and the trailer tow hitch carried out
by a qualified specialist workshop.
Interior care
Cleaning the display
!For cleaning, do not use any of the following:
Ralcohol-based thinner or gasoline
Rabrasive cleaning agents
Rcommercially-available household cleaning
agents
These may damage the display surface. Do
not put pressure on the display surface when cleaning. This could lead to irreparable dam-
age to the display.
310Care
Maintenance and care
Page 326 of 370
XConnect positive terminal:on your veh icleto positive terminal ;of donor battery Cusing the
jumper cable, Always begin with positive terminal :on your own vehicle first.
XStart the engine of the donor veh icleand run itat idling speed.
XConnect negative terminal =of donor battery Cto ground point ?of your vehicle using the
jumper cable, connecting the jumper cable to battery of other vehicle Cfirst.
XStart the engine.
XBefore disconnecting the jumper cables, let the engine run for several minutes.
XFirst, remove the jumper cables from ground point? and negative terminal =, then from pos-
itive clamp :and positive terminal ;. Begineach time at the contacts on your own vehicle first.
XClose cover Aof positive terminal :after removing jumper cables.
XFold panel Bshut.
XHave the battery checked at a qualified specialist workshop.
Jump-starting isnot cons idered to bea normal operating condition.
iJumper cables and further information regarding jump-starting can be obtained at any qualified
specialist workshop.
Towing and tow-starting
Important safety notes
GWARNING
Functions relevant to safety are restricted or
no longer availab leif:
Rthe engine isnot running.
Rthe brake system or the power steering is
malfunctioning.
Rthere isa malfunction inthe voltage supply
or the veh icle's electrical system.
If your veh icle is bein g towed, much more
force may benecessary to steer or brake.
There isa risk of an acc ident.
In such cases, use a tow bar. Before to wing,
make sure that the steering moves freely.
GWAR NING
You can no longer steer the veh icle ifthe
steering wheel lock has been engaged. There
is a risk of an acc ident.
Alwa ysswit ch off the ignition when to wingthe
veh icle wit h a tow cable or a tow bar.
GWARNING
When to wingor tow-starting another vehicle
and its weight isgreater than the permissible
gross weight of your vehicle, the:
Rthe to wingeye could detach itself
Rthe vehicle /trailer combination could roll-
over.
There is a risk of an accident.
When towing or tow-starting another vehicle,
its weight should not be greater than the per- missible gross weight of your vehicle.
Details on the permissible gross vehicle weight
of your vehicle can be found on the vehicle iden-
tification plate (
Ypage 357).
!When Active Brake Assist, Distance Pilot
DISTRONIC or the HOLD function is activated,
the vehicle brakes automatically in certain
situations.
To avoid damage to the vehicle, deactivate
these systems in the foll owing or similar sit-
uations:
Rwhen to wingthe vehicle
Rin the car wash
!Make sure that the electric parking brake is
released. Ifthe electric parking brake is faulty,
vis ita qualified specialist workshop.
!Only secure the tow rope or tow bar at the
to wing eyes, or the trailer tow hitch, if availa-
ble. You could otherwise damage the vehicle.
324Towing and tow-starting
Breakdown assistance