2017 MERCEDES-BENZ GLA SUV keyless
[x] Cancel search: keylessPage 98 of 369
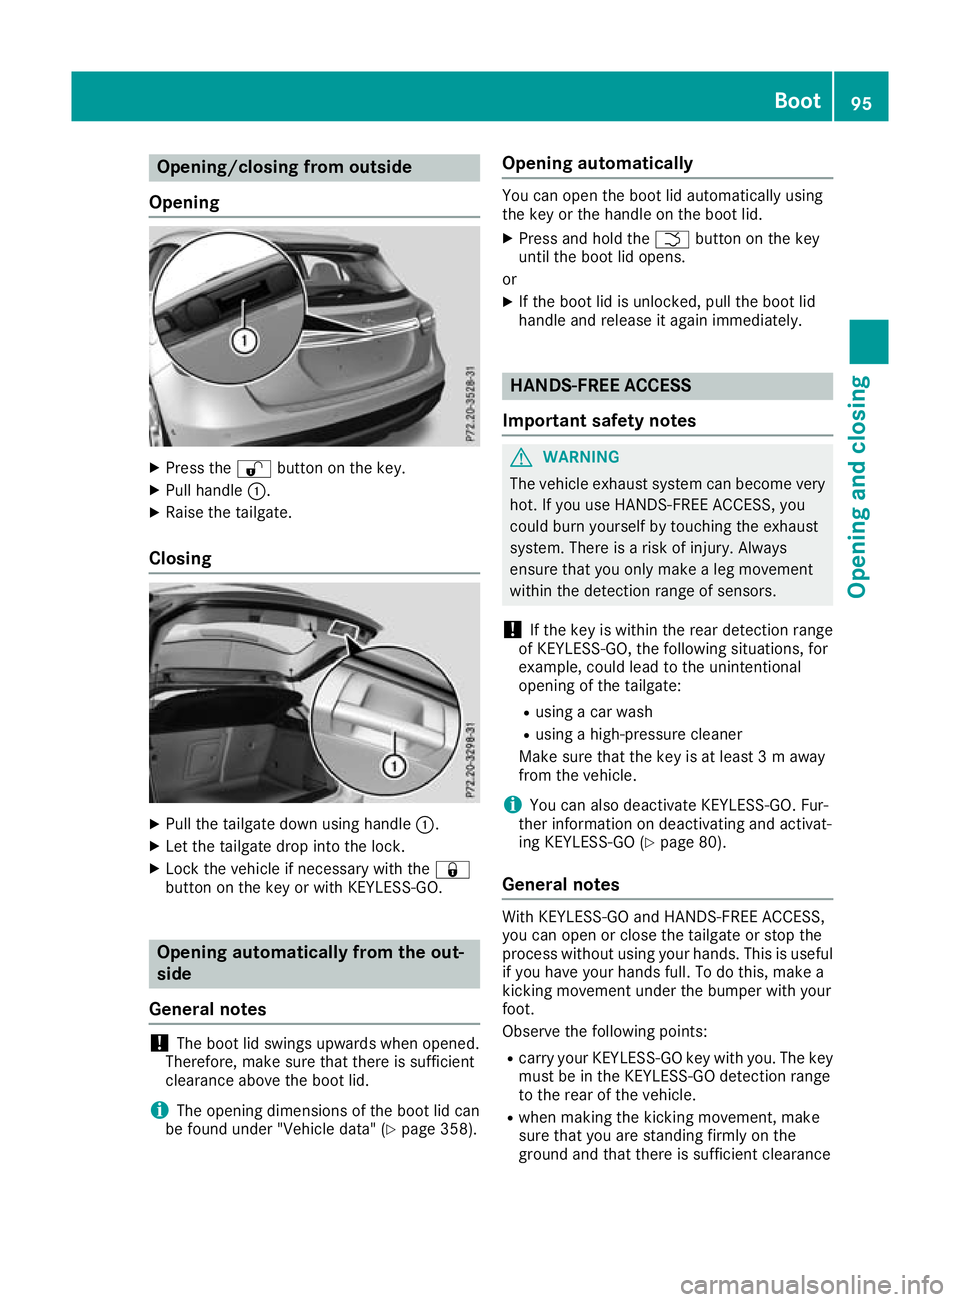
Opening/closing from outside
Opening X
Press the %button on the key.
X Pull handle :.
X Raise the tailgate.
Closing X
Pull the tailgate down using handle :.
X Let the tailgate drop into the lock.
X Lock the vehicle if necessary with the &
button on the key or with KEYLESS-GO. Opening automatically from the out-
side
General notes !
The boot lid swings upwards when opened.
Therefore, make sure that there is sufficient
clearance above the boot lid.
i The opening dimensions of the boot lid can
be found under "Vehicle data" (Y page 358).Opening automatically You can open the boot lid automatically using
the key or the handle on the boot lid.
X Press and hold the Fbutton on the key
until the boot lid opens.
or X If the boot lid is unlocked, pull the boot lid
handle and release it again immediately. HANDS-FREE ACCESS
Important safety notes G
WARNING
The vehicle exhaust system can become very
hot. If you use HANDS-FREE ACCESS, you
could burn yourself by touching the exhaust
system. There is a risk of injury. Always
ensure that you only make a leg movement
within the detection range of sensors.
! If the key is within the rear detection range
of KEYLESS-GO, the following situations, for
example, could lead to the unintentional
opening of the tailgate:
R using a car wash
R using a high-pressure cleaner
Make sure that the key is at least 3 m away
from the vehicle.
i You can also deactivate KEYLESS-GO. Fur-
ther information on deactivating and activat-
ing KEYLESS-GO (Y page 80).
General notes With KEYLESS-GO and HANDS-FREE ACCESS,
you can open or close the tailgate or stop the
process without using your hands. This is useful
if you have your hands full. To do this, make a
kicking movement under the bumper with your
foot.
Observe the following points:
R carry your KEYLESS-GO key with you. The key
must be in the KEYLESS-GO detection range
to the rear of the vehicle.
R when making the kicking movement, make
sure that you are standing firmly on the
ground and that there is sufficient clearance Boot
95Opening and closing Z
Page 99 of 369
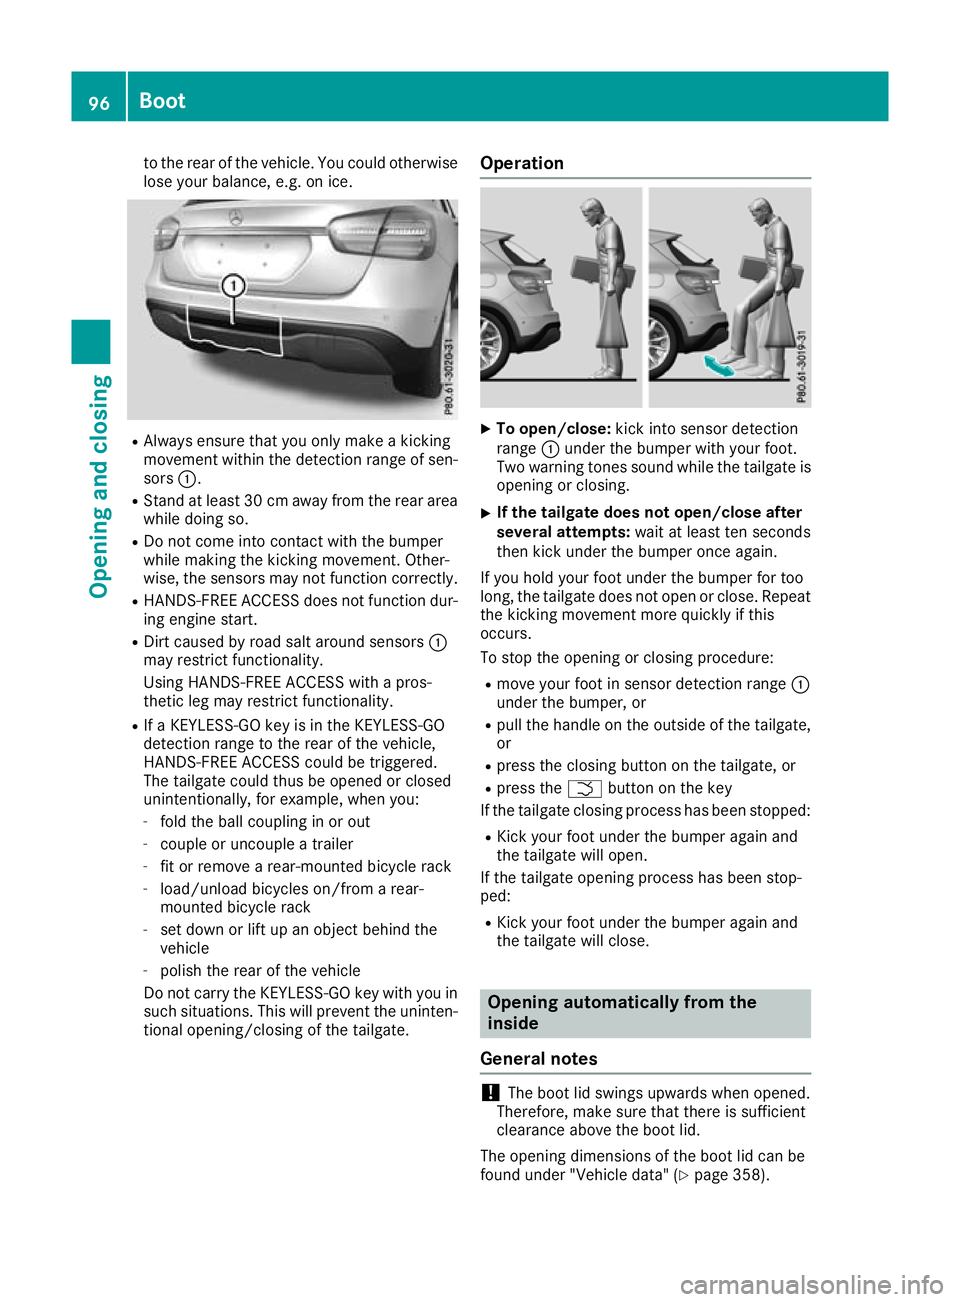
to the rear of the vehicle. You could otherwise
lose your balance, e.g. on ice. R
Always ensure that you only make a kicking
movement within the detection range of sen- sors :.
R Stand at least 30 cm away from the rear area
while doing so.
R Do not come into contact with the bumper
while making the kicking movement. Other-
wise, the sensors may not function correctly.
R HANDS-FREE ACCESS does not function dur-
ing engine start.
R Dirt caused by road salt around sensors :
may restrict functionality.
Using HANDS-FREE ACCESS with a pros-
thetic leg may restrict functionality.
R If a KEYLESS-GO key is in the KEYLESS-GO
detection range to the rear of the vehicle,
HANDS-FREE ACCESS could be triggered.
The tailgate could thus be opened or closed
unintentionally, for example, when you:
- fold the ball coupling in or out
- couple or uncouple a trailer
- fit or remove a rear-mounted bicycle rack
- load/unload bicycles on/from a rear-
mounted bicycle rack
- set down or lift up an object behind the
vehicle
- polish the rear of the vehicle
Do not carry the KEYLESS-GO key with you in such situations. This will prevent the uninten-tional opening/closing of the tailgate. Operation X
To open/close: kick into sensor detection
range :under the bumper with your foot.
Two warning tones sound while the tailgate is opening or closing.
X If the tailgate does not open/close after
several attempts: wait at least ten seconds
then kick under the bumper once again.
If you hold your foot under the bumper for too
long, the tailgate does not open or close. Repeat
the kicking movement more quickly if this
occurs.
To stop the opening or closing procedure:
R move your foot in sensor detection range :
under the bumper, or
R pull the handle on the outside of the tailgate,
or
R press the closing button on the tailgate, or
R press the Fbutton on the key
If the tailgate closing process has been stopped:
R Kick your foot under the bumper again and
the tailgate will open.
If the tailgate opening process has been stop-
ped:
R Kick your foot under the bumper again and
the tailgate will close. Opening automatically from the
inside
General notes !
The boot lid swings upwards when opened.
Therefore, make sure that there is sufficient
clearance above the boot lid.
The opening dimensions of the boot lid can be
found under "Vehicle data" (Y page 358).96
BootOpening and closing
Page 101 of 369
G
WARNING
If children operate the side windows they
could become trapped, particularly if they are left unsupervised. There is a risk of injury.
Activate the override feature for the rear side
windows. When leaving the vehicle, always
take the key with you and lock the vehicle.
Never leave children unattended in the vehi-
cle. Side window reversing feature
The side windows are equipped with an auto-
matic reversing feature. If a solid object blocks
or restricts a side window from travelling
upwards during the automatic closing process,
the side window opens again automatically. Dur-
ing the manual closing process, the side window
only opens again automatically after the corre-
sponding switch is released. The automatic
reversing feature is only an aid and is no substi- tute for your attention when closing a side win-
dow. G
WARNING
The reversing function does not react:
R to soft, light and thin objects, e.g. small fin-
gers
R while resetting
This means that the reversing feature cannot
prevent someone being trapped in these sit-
uations. There is a risk of injury.
When closing, make sure that no parts of the
body are in the closing area. If someone
becomes trapped, press the switch to open
the side window again. Opening and closing the side win-
dows
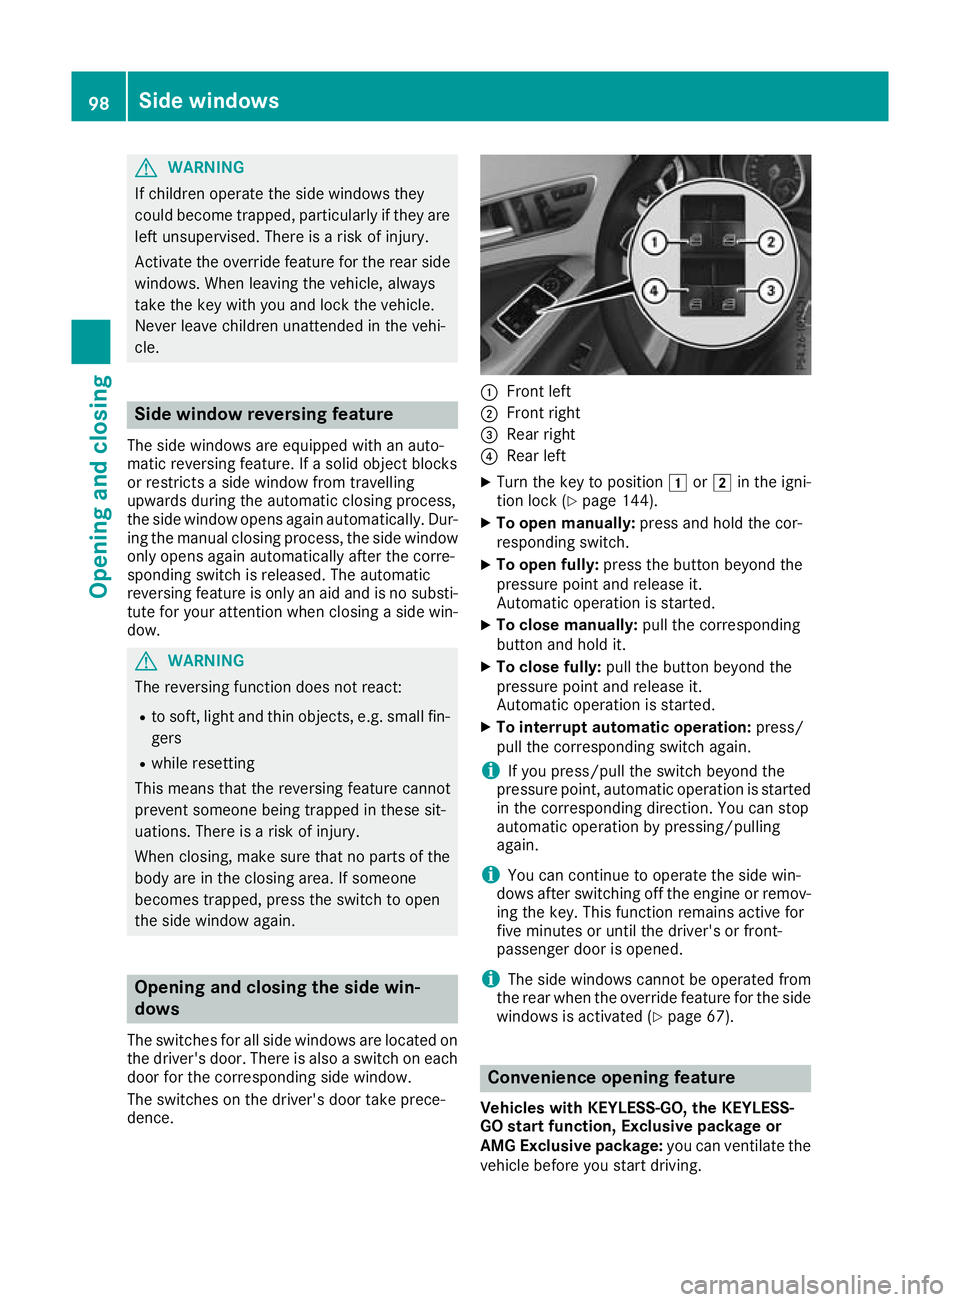
The switches for all side windows are located on
the driver's door. There is also a switch on each door for the corresponding side window.
The switches on the driver's door take prece-
dence. :
Front left
; Front right
= Rear right
? Rear left
X Turn the key to position 1or2 in the igni-
tion lock (Y page 144).
X To open manually: press and hold the cor-
responding switch.
X To open fully: press the button beyond the
pressure point and release it.
Automatic operation is started.
X To close manually: pull the corresponding
button and hold it.
X To close fully: pull the button beyond the
pressure point and release it.
Automatic operation is started.
X To interrupt automatic operation: press/
pull the corresponding switch again.
i If you press/pull the switch beyond the
pressure point, automatic operation is started
in the corresponding direction. You can stop
automatic operation by pressing/pulling
again.
i You can continue to operate the side win-
dows after switching off the engine or remov-
ing the key. This function remains active for
five minutes or until the driver's or front-
passenger door is opened.
i The side windows cannot be operated from
the rear when the override feature for the side
windows is activated (Y page 67). Convenience opening feature
Vehicles with KEYLESS-GO, the KEYLESS-
GO start function, Exclusive package or
AMG Exclusive package: you can ventilate the
vehicle before you start driving. 98
Side windowsOpening and closing
Page 102 of 369
The key can also be used to carry out the fol-
lowing functions simultaneously:
R unlock the vehicle
R open the side windows
R open the panorama sliding sunroof and the
roller sunblind
The convenience opening feature can only be
operated using the key.
The "Convenience opening" feature is also avail- able when the vehicle is unlocked.
X Vehicles with Exclusive package or AMG
Exclusive package but without KEYLESS-
GO and the KEYLESS-GO start function: for
the following operations, point the tip of the
key at the door handle on the driver's door.
The key must be close to the driver's door
handle.
i Vehicles with KEYLESS-GO or the KEY-
LESS-GO start function: the key must be in
close proximity to the vehicle.
X Press and hold the %button until the side
windows and the panorama sunroof are in the
desired position.
If the roller sunblind of the panorama sliding
sunroof is closed, the roller sunblind is
opened first.
X Press and hold the %button once more
until the panorama sliding sunroof reaches
the desired position.
X To interrupt convenience opening: release
the % button. Convenience closing feature
Important safety notes G
WARNING
When the convenience closing feature is oper- ating, parts of the body could become trapped
in the closing area of the side window and the
sliding sunroof. There is a risk of injury.
Observe the complete closing procedure
when the convenience closing feature is oper-
ating. When closing make sure that no parts of the body are in the closing area. Vehicles with KEYLESS-GO, the KEYLESS-
GO start function, Exclusive package or
AMG Exclusive package: at the same time you
can:
R lock the vehicle
R close the side windows
R close the panorama sliding sunroof
On vehicles with a panorama sliding sunroof,
you can then close the roller sunblind.
i Notes on the automatic reversing function
for:
R the side windows (Y page 98)
R the panorama sliding sunroof
(Y page 102)
R the roller sunblind (Y page 103)
Using the key X
Vehicles with Exclusive package or AMG
Exclusive package but without KEYLESS-
GO and the KEYLESS-GO start function:
for
the following operations, point the tip of the
key at the door handle on the driver's door.
The key must be close to the driver's door
handle.
i Vehicles with KEYLESS-GO or the KEY-
LESS-GO start function: the key must be in
close proximity to the vehicle.
X Press and hold the &button until the side
windows and the panorama sliding sunroof
are fully closed.
X Make sure that all the side windows and the
panorama sliding sunroof are closed.
On vehicles with a panorama sliding sunroof: X Press and hold the &button again until the
roller sunblind of the panorama sliding sun-
roof closes.
X To interrupt convenience closing: release
the & button.
Using KEYLESS-GO The driver's door and the door at which the han-
dle is used must both be closed. The key must beoutside the vehicle. The gap between the key
and the corresponding door handle should not
be greater than 1 m. Side windows
99Opening and closing Z
Page 128 of 369
Replacing the wiper blades
Important safety notes G
WARNING
If the windscreen wipers begin to move while
you are changing the wiper blades, you can be trapped by the wiper arm. There is a risk of
injury.
Always switch off the windscreen wipers and
ignition before changing the wiper blades.
! To avoid damaging the windscreen wiper
blades, make sure that you touch only the
wiper arm of the windscreen wiper.
! Never open the bonnet/tailgate if a wiper
arm is folded away from the windscreen/rear
window.
Never fold a windscreen wiper arm without a
wiper blade back onto the windscreen/rear
window.
Hold the windscreen wiper arm firmly when
you change the wiper blade. If you release the
wiper arm without a wiper blade and it falls
onto the windscreen/rear window, the wind-
screen/rear window may be damaged by the
force of the impact.
Mercedes-Benz recommends that you have
the wiper blades changed at a qualified spe-
cialist workshop.
Replacing the windscreen wiper blades Removing the wiper blades
X Vehicles without KEYLESS-GO or KEY-
LESS-GO start function:
remove the key
from the ignition lock.
X Vehicles with KEYLESS-GO or KEYLESS-
GO start function:
switch off the engine.
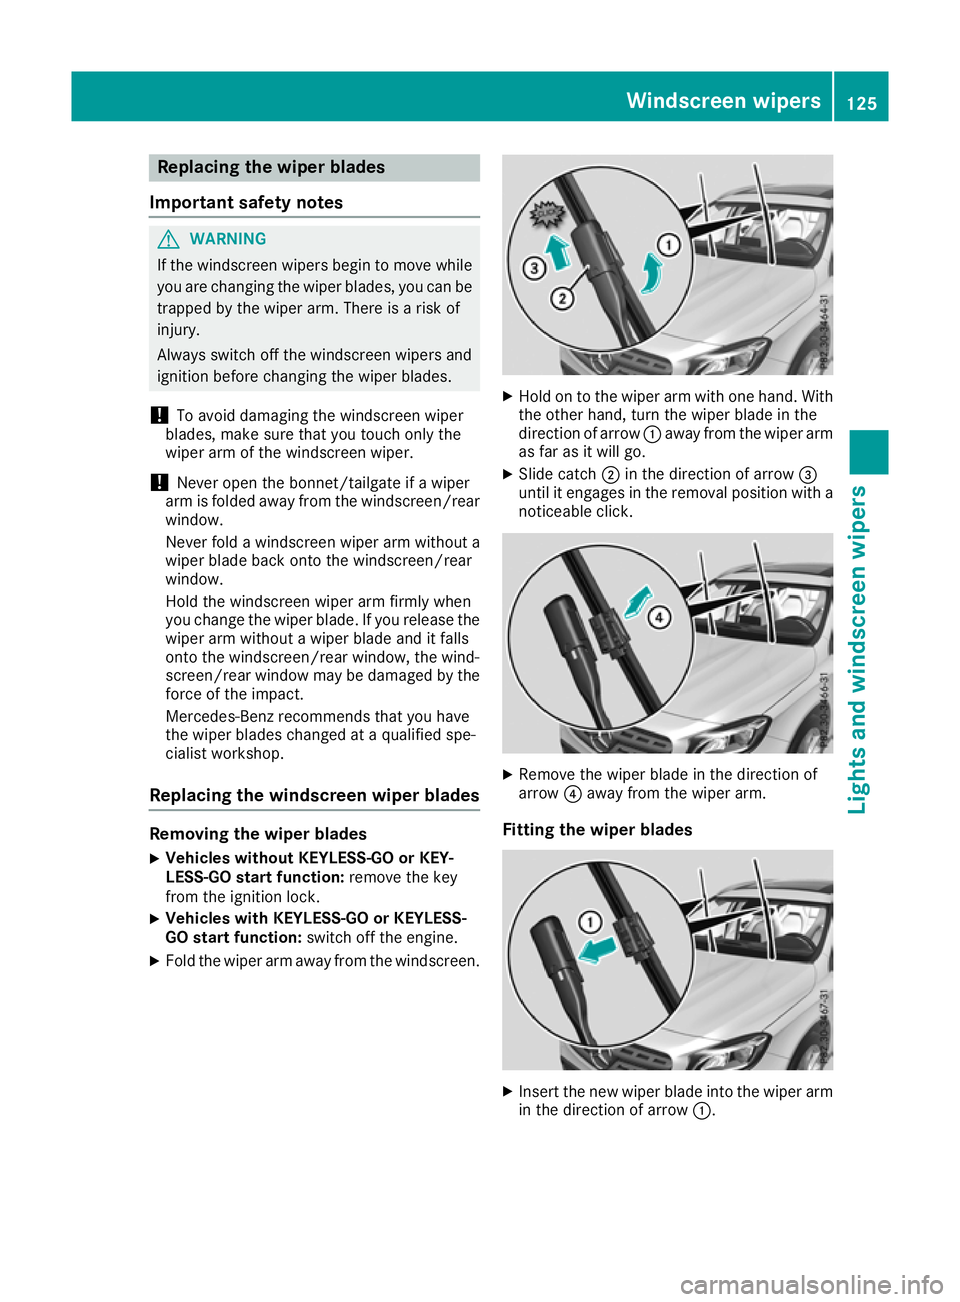
X Fold the wiper arm away from the windscreen. X
Hold on to the wiper arm with one hand. With
the other hand, turn the wiper blade in the
direction of arrow :away from the wiper arm
as far as it will go.
X Slide catch ;in the direction of arrow =
until it engages in the removal position with a noticeable click. X
Remove the wiper blade in the direction of
arrow ?away from the wiper arm.
Fitting the wiper blades X
Insert the new wiper blade into the wiper arm
in the direction of arrow :. Windscreen wipers
125Lights and windscreen wipers Z
Page 129 of 369
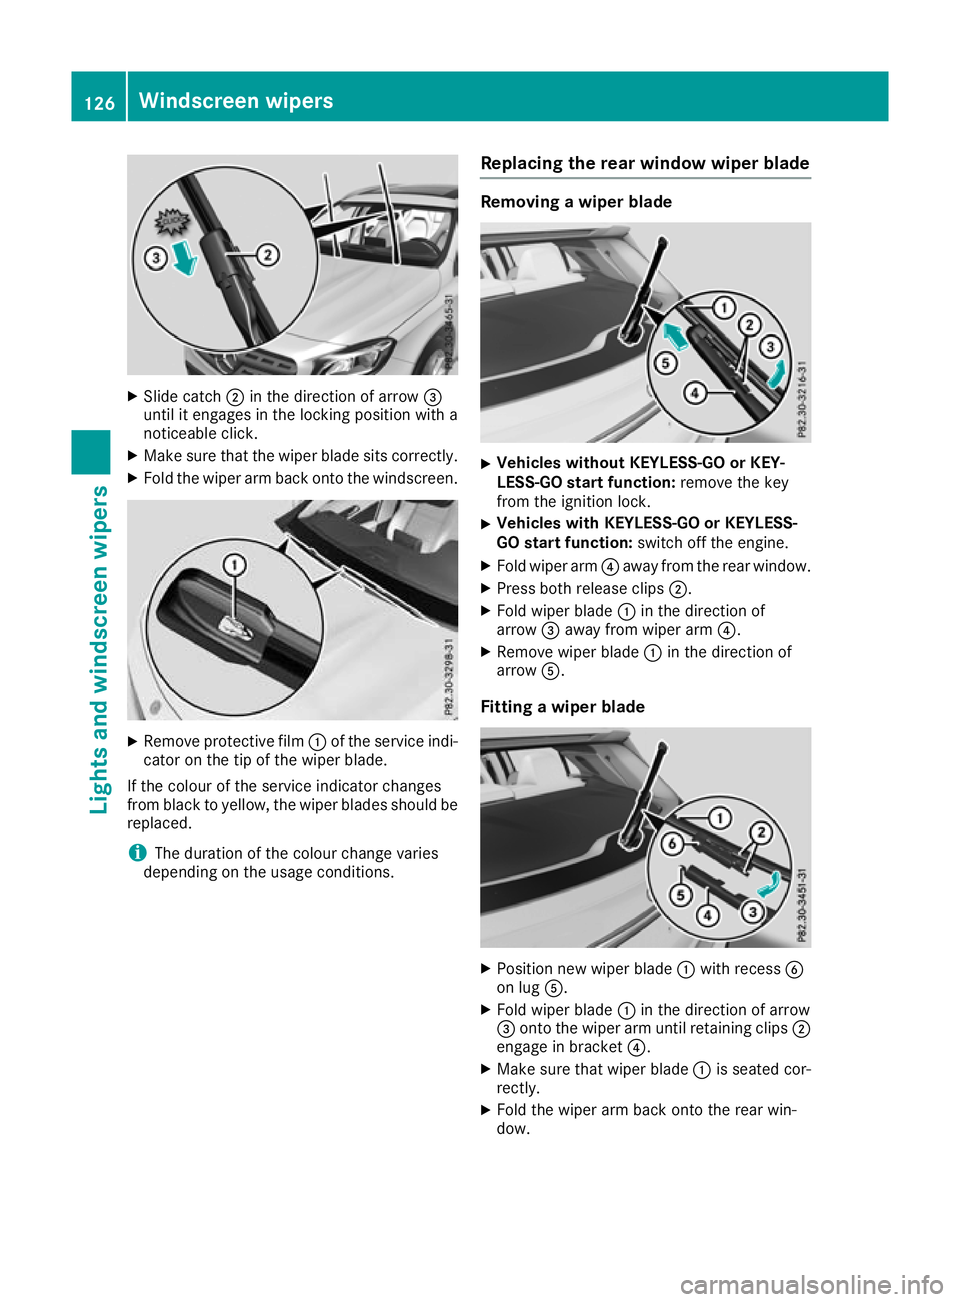
X
Slide catch ;in the direction of arrow =
until it engages in the locking position with a
noticeable click.
X Make sure that the wiper blade sits correctly.
X Fold the wiper arm back onto the windscreen. X
Remove protective film :of the service indi-
cator on the tip of the wiper blade.
If the colour of the service indicator changes
from black to yellow, the wiper blades should be replaced.
i The duration of the colour change varies
depending on the usage conditions. Replacing the rear window wiper blade Removing a wiper blade
X
Vehicles without KEYLESS-GO or KEY-
LESS-GO start function: remove the key
from the ignition lock.
X Vehicles with KEYLESS-GO or KEYLESS-
GO start function: switch off the engine.
X Fold wiper arm ?away from the rear window.
X Press both release clips ;.
X Fold wiper blade :in the direction of
arrow =away from wiper arm ?.
X Remove wiper blade :in the direction of
arrow A.
Fitting a wiper blade X
Position new wiper blade :with recess B
on lug A.
X Fold wiper blade :in the direction of arrow
= onto the wiper arm until retaining clips ;
engage in bracket ?.
X Make sure that wiper blade :is seated cor-
rectly.
X Fold the wiper arm back onto the rear win-
dow. 126
Windscreen wipersLights and windscreen wipers
Page 147 of 369
!
Do not warm up the engine when the vehicle
is stationary. Drive off immediately. Avoid
high engine speeds and driving at full throttle
until the engine has reached its operating
temperature.
Only shift the automatic transmission to the
desired drive position when the vehicle is sta- tionary.
Where possible, avoid spinning the drive
wheels when pulling away on slippery roads.
You could otherwise damage the drive train.
! Mercedes-AMG vehicles:
avoid full-load
operation and engine speeds greater than
5000 rpm when the engine is cold. This will
help to protect the engine and maintain
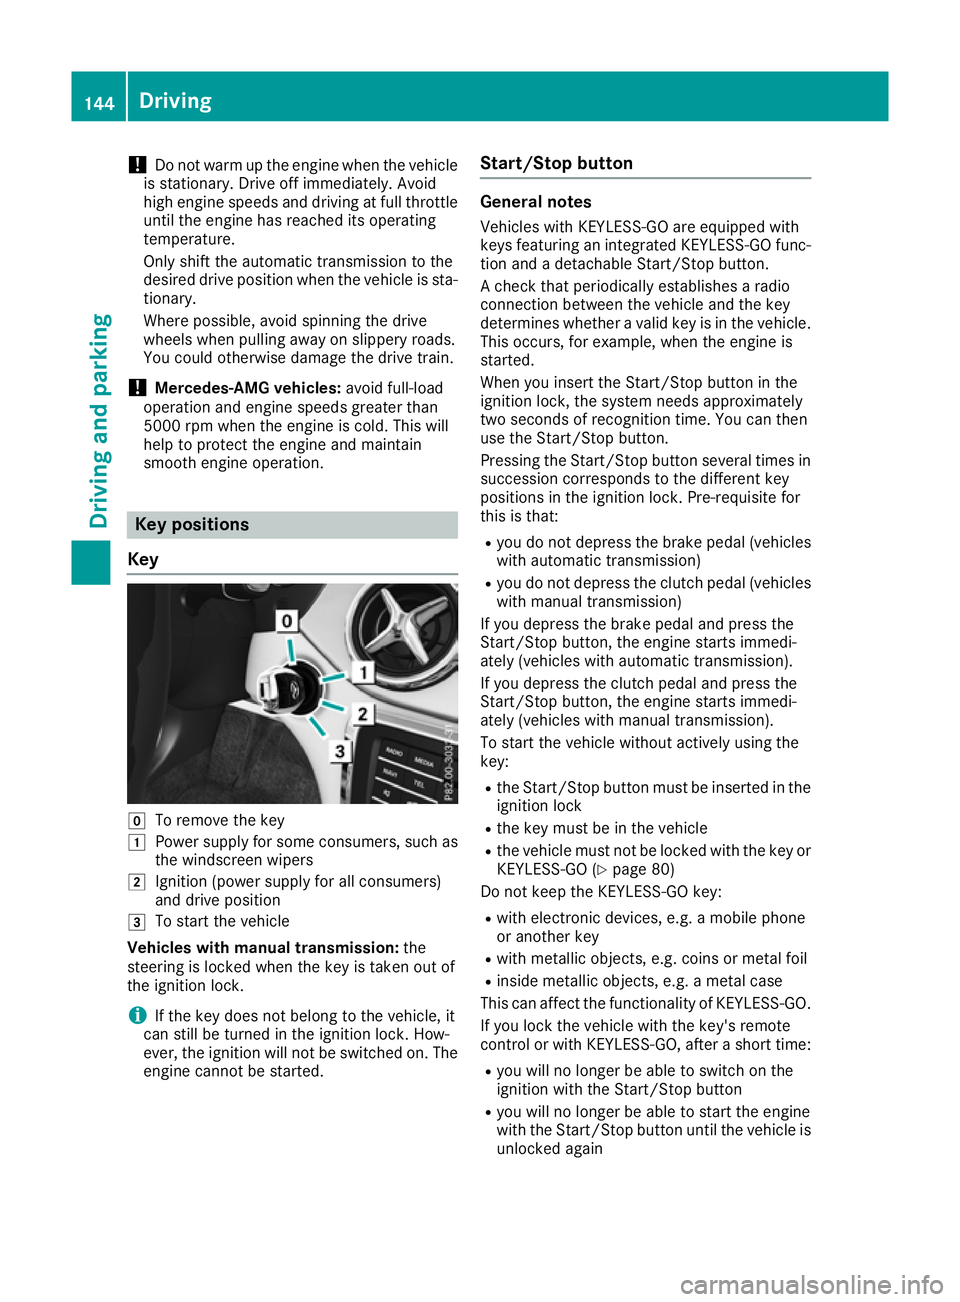
smooth engine operation. Key positions
Key g
To remove the key
1 Power supply for some consumers, such as
the windscreen wipers
2 Ignition (power supply for all consumers)
and drive position
3 To start the vehicle
Vehicles with manual transmission: the
steering is locked when the key is taken out of
the ignition lock.
i If the key does not belong to the vehicle, it
can still be turned in the ignition lock. How-
ever, the ignition will not be switched on. The engine cannot be started. Start/Stop button General notes
Vehicles with KEYLESS-GO are equipped with
keys featuring an integrated KEYLESS-GO func- tion and a detachable Start/Stop button.
A check that periodically establishes a radio
connection between the vehicle and the key
determines whether a valid key is in the vehicle.This occurs, for example, when the engine is
started.
When you insert the Start/Stop button in the
ignition lock, the system needs approximately
two seconds of recognition time. You can then
use the Start/Stop button.
Pressing the Start/Stop button several times in
succession corresponds to the different key
positions in the ignition lock. Pre-requisite for
this is that:
R you do not depress the brake pedal (vehicles
with automatic transmission)
R you do not depress the clutch pedal (vehicles
with manual transmission)
If you depress the brake pedal and press the
Start/Stop button, the engine starts immedi-
ately (vehicles with automatic transmission).
If you depress the clutch pedal and press the
Start/Stop button, the engine starts immedi-
ately (vehicles with manual transmission).
To start the vehicle without actively using the
key:
R the Start/Stop button must be inserted in the
ignition lock
R the key must be in the vehicle
R the vehicle must not be locked with the key or
KEYLESS-GO (Y page 80)
Do not keep the KEYLESS-GO key:
R with electronic devices, e.g. a mobile phone
or another key
R with metallic objects, e.g. coins or metal foil
R inside metallic objects, e.g. a metal case
This can affect the functionality of KEYLESS-GO.
If you lock the vehicle with the key's remote
control or with KEYLESS-GO, after a short time:
R you will no longer be able to switch on the
ignition with the Start/Stop button
R you will no longer be able to start the engine
with the Start/Stop button until the vehicle is
unlocked again 144
DrivingDriving and parking
Page 167 of 369
Always touch the vehicle body before opening
the fuel filler flap or touching the fuel pump
nozzle. This discharges any electrostatic
charge that may have built up. G
WARNING
Vehicles with a diesel engine:
If you mix diesel fuel with petrol, the flash
point of this fuel mixture is lower than that of pure diesel fuel. When the engine is running,
components in the exhaust system may over-
heat unnoticed. There is a risk of fire.
Never refuel with petrol. Never add petrol to
diesel fuel.
! Do not use diesel to refuel vehicles with a
petrol engine. Do not switch on the ignition if you accidentally refuel with the wrong fuel.
Otherwise, the fuel will enter the fuel system.
Even small amounts of the wrong fuel can
result in damage to the fuel system and the
engine. Notify a qualified specialist workshop
and have the fuel tank and fuel lines drained
completely.
! Do not use petrol to refuel vehicles with a
diesel engine. Do not switch on the ignition if you accidentally refuel with the wrong fuel.
Otherwise, fuel can enter the fuel system.
Even small amounts of the wrong fuel could
result in damage to the fuel system and the
engine. The repair costs are high. Notify a
qualified specialist workshop and have the
fuel tank and fuel lines drained completely.
! Overfilling the fuel tank could damage the
fuel system.
! Take care not to spill any fuel on painted
surfaces. You could otherwise damage the
paintwork.
! Use a filter when adding fuel from a fuel can.
The fuel lines and/or the fuel injection system could otherwise be blocked by particles fromthe fuel can.
Do not get back into the vehicle during the refu-
elling process; Otherwise, electrostatic charge
could build up again.
If you overfill the fuel tank, some fuel may spray out when you remove the fuel pump nozzle.
Further information on fuel and fuel quality
(Y page 352). Refuelling
General information Observe the important safety notes
(Y
page 163).
The fuel filler flap is unlocked/locked automat-
ically when you unlock/lock the vehicle with the
key.
The position of the fuel filler cap is displayed
æ in the instrument cluster. The arrow next
to the filling pump indicates the side of the vehi- cle.
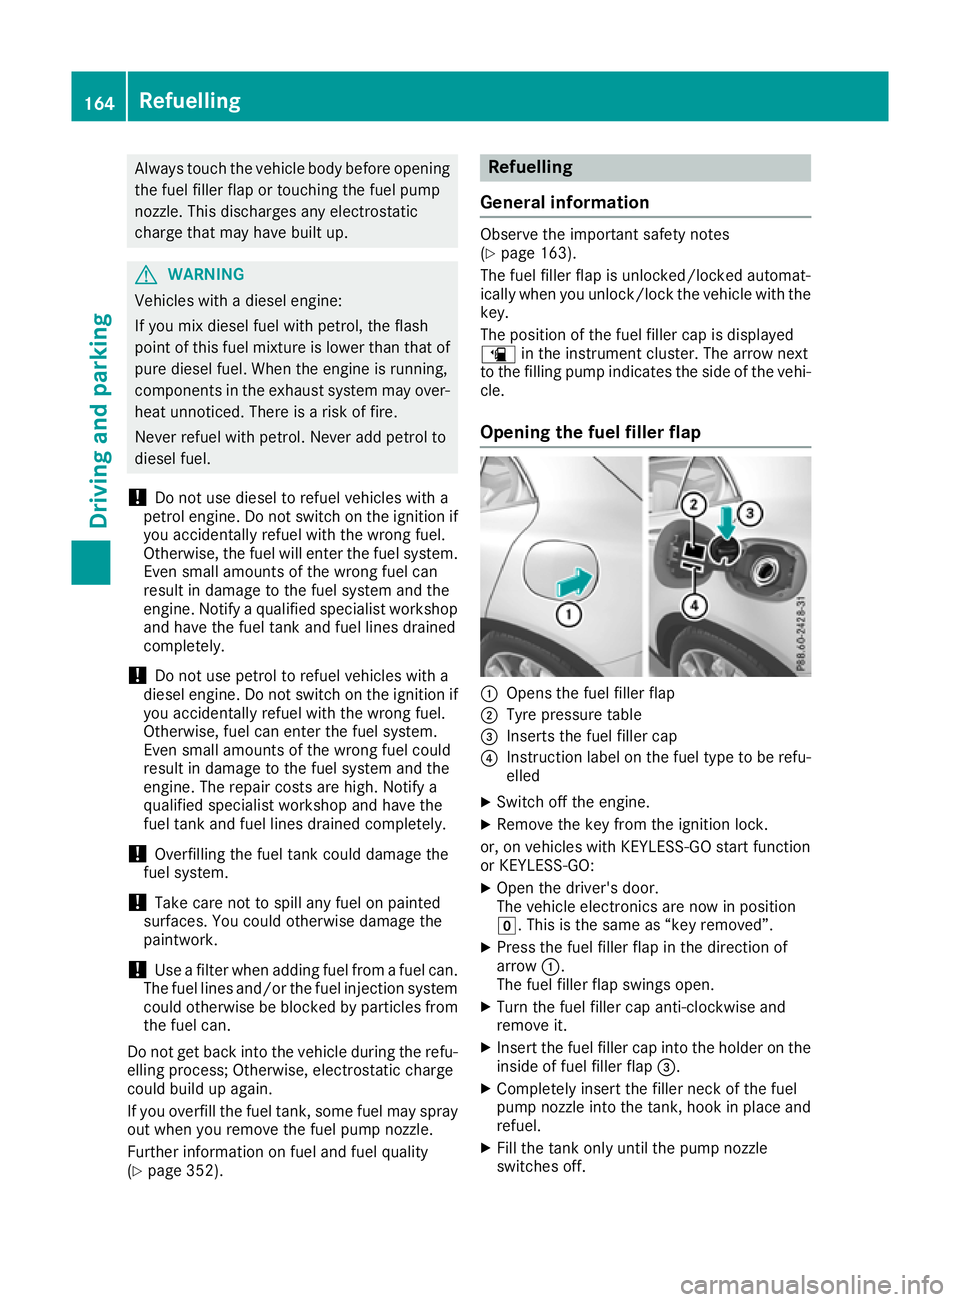
Opening the fuel filler flap :
Opens the fuel filler flap
; Tyre pressure table
= Inserts the fuel filler cap
? Instruction label on the fuel type to be refu-
elled
X Switch off the engine.
X Remove the key from the ignition lock.
or, on vehicles with KEYLESS-GO start function
or KEYLESS ‑GO:
X Open the driver's door.
The vehicle electronics are now in position
g. This is the same as “key removed”.
X Press the fuel filler flap in the direction of
arrow :.
The fuel filler flap swings open.
X Turn the fuel filler cap anti-clockwise and
remove it.
X Insert the fuel filler cap into the holder on the
inside of fuel filler flap =.
X Completely insert the filler neck of the fuel
pump nozzle into the tank, hook in place and
refuel.
X Fill the tank only until the pump nozzle
switches off. 164
RefuellingDriving an
d parking