2017 MERCEDES-BENZ GLA SUV instrument cluster
[x] Cancel search: instrument clusterPage 75 of 369
brakes are applied again, the brake lamps light
up continuously. The hazard warning lamps
switch off automatically if you travel faster than
10 km/ h.You can also switch off the hazard
warning lamps using the hazard warning button (Y page 118). ESP
®
(Electronic Stability Program)
General notes i
Observe the "Important safety notes" sec-
tion (Y page 68).
ESP ®
monitors driving stability and traction, i.e.
power transmission between the tyres and the
road surface.
If ESP ®
detects that the vehicle is deviating from
the direction desired by the driver, one or more
wheels are braked to stabilise the vehicle. The
engine output is also modified to keep the vehi- cle on the desired course within physical limits.
ESP ®
assists the driver when pulling away on
wet or slippery roads. ESP ®
can also stabilise
the vehicle during braking.
ETS/4ETS (Electronic Traction System) i
Observe the "Important safety notes" sec-
tion (Y page 68).
ETS traction control is part of ESP ®
. On vehicles
with 4MATIC, 4ETS is part of ESP ®
.
Traction control brakes the drive wheels indi-
vidually if they spin. This enables you to pull
away and accelerate on slippery surfaces, e.g. if the road surface is slippery on one side. In addi-
tion, more drive torque is transferred to the
wheel or wheels with traction.
Traction control remains active if you deactivate
ESP ®
.
Off-road 4ETS (Electronic Traction Sys-
tem) A 4ETS system specifically suited to off-road
terrain is activated automatically once the off-
road program is activated (Y page 192).
Important safety notes i
Observe the "Important safety notes" sec-
tion (Y page 68). G
WARNING
If ESP ®
is malfunctioning, ESP ®
is unable to
stabilise the vehicle. In addition, other driving
safety systems are switched off. This increa-
ses the risk of skidding and an accident.
Drive on carefully. Have ESP ®
checked at a
qualified specialist workshop.
Vehicles without 4MATIC: when towing your
vehicle with the front axle raised, it is important
that you observe the notes on ESP ®
(Y page 329).
If the å ESP®
OFF warning lamp lights up
continuously, ESP ®
is deactivated.
If the ÷ ESP®
warning lamp and the å
warning lamp are lit continuously, ESP ®
is not
available due to a malfunction.
Read the information on warning lamps
(Y page 269) and display messages that may be
shown in the instrument cluster (Y page 235).
Use only wheels with the recommended tyre
sizes. Only then will ESP ®
function properly.
Characteristics of ESP ® General information
If the ÷ ESP warning lamp goes out before
you begin the journey, ESP ®
is automatically
active.
If ESP ®
intervenes, the ÷ESP®
warning lamp
flashes on the instrument cluster.
If ESP ®
intervenes:
X Do not deactivate ESP ®
under any circum-
stances.
X When pulling away, depress the accelerator
pedal only as far as is necessary.
X Adapt your driving style to suit the prevailing
road and weather conditions.
ECO start/stop function
The ECO start/stop function switches the
engine off automatically if the vehicle stops
moving. When pulling away again, the engine
starts automatically. ESP ®
remains in its previ-
ously selected status. Example:if ESP®
was
deactivated before the engine was switched off,
ESP ®
remains deactivated when the engine is
switched on again. 72
Driving safety systemsSafety
Page 76 of 369
Activating/deactivating ESP
®
(except
Mercedes ‑AMG vehicles) Important safety notes
i Observe the "Important safety notes" sec-
tion (Y page 68).
You can select between the following ESP ®
sta-
tuses:
R ESP ®
is activated
R ESP ®
is deactivated. G
WARNING
If you deactivate ESP ®
, ESP ®
no longer sta-
bilises the vehicle. There is an increased risk
of skidding and an accident.
Only deactivate ESP ®
in the situations descri-
bed in the following.
The spinning of the wheels results in a cut for
better traction on loose surfaces.
It may be best to deactivate ESP ®
in the follow-
ing situations:
R when snow chains are used
R in deep snow
R on sand or gravel
i Activate ESP ®
as soon as the situations
described above no longer apply. ESP ®
will
otherwise not be able to stabilise the vehicle
if the vehicle starts to skid or a wheel starts to
spin.
Deactivating/activating ESP ®
You can deactivate or activate ESP ®
via the on-
board computer(Y page 227) .
ESP ®
deactivated:
The å ESP®
OFF warning lamp on the instru-
ment cluster lights up.
ESP ®
activated:
The å ESP®
OFF warning lamp on the instru-
ment cluster goes out.
Characteristics when ESP ®
is deactivated
If ESP ®
is deactivated and one or more wheels
start to spin, the ÷ESP®
warning lamp in the
instrument cluster flashes. In such situations,
ESP ®
will not stabilise the vehicle. If you deactivate ESP
®
:
R ESP ®
no longer improves driving stability
R engine torque is no longer limited and the
drive wheels may start to spin
R traction control is still activated
R Active Brake Assist is not available; it is not
activated even if you brake firmly with assis-
tance from ESP ®
R PRE-SAFE ®
is not available; it is not activated
even if you brake firmly with assistance from
ESP ®
R STEER CONTROL is no longer active
R ESP ®
still provides support when you brake
firmly
Deactivating/activating ESP ®
(Mercedes ‑AMG vehicles) Important safety notes
i Observe the "Important safety notes" sec-
tion (Y page 68).
You can select between the following ESP ®
sta-
tuses:
R ESP ®
is activated
R SPORT handling mode is activated
R ESP ®
is deactivated
ESP ®
is activated every time the engine is star-
ted, regardless of whether ESP ®
was deactiva-
ted before the engine was switched off. G
WARNING
When SPORT handling mode is activated,
there is a greater risk of skidding and acci-
dents.
Only activate SPORT handling mode in the sit- uations described in the following. G
WARNING
If you deactivate ESP ®
, ESP ®
no longer sta-
bilises the vehicle. There is an increased risk
of skidding and an accident.
Only deactivate ESP ®
in the situations descri-
bed in the following. Driving safety systems
73Safety Z
Page 77 of 369
In the following situations, it may be better to
activate SPORT handling mode or deactivate
ESP ®
:
R when snow chains are used
R in deep snow
R on sand or gravel
R on specially designated roads when the vehi-
cle's own oversteering and understeering
characteristics are desired
Driving in SPORT handling mode or without
ESP ®
requires a highly qualified and experi-
enced driver.
i Activate ESP ®
as soon as the situations
described above no longer apply. ESP ®
will
otherwise not be able to stabilise the vehicle
if the vehicle starts to skid or a wheel starts to
spin.
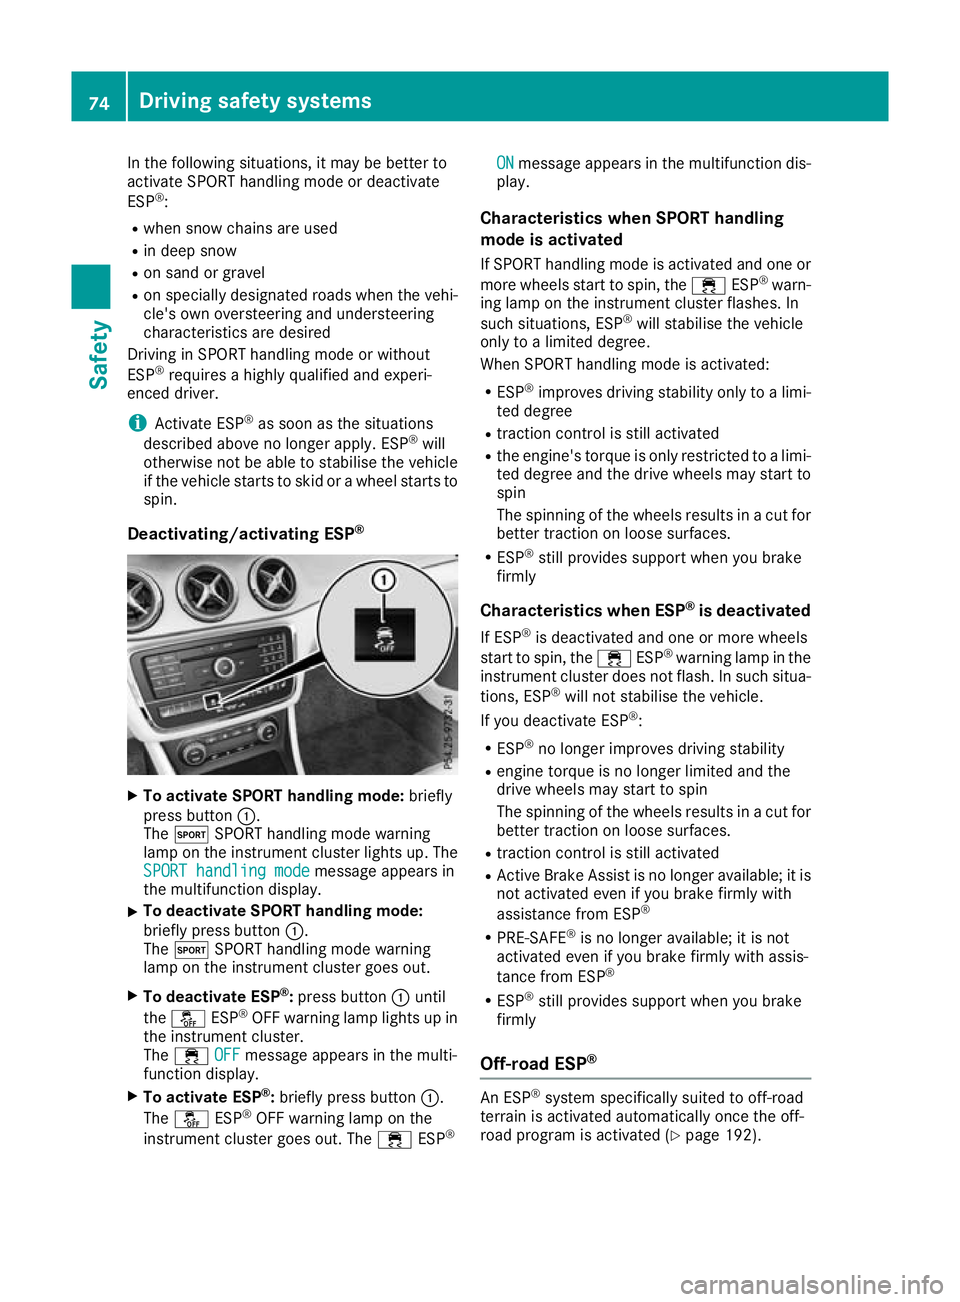
Deactivating/activating ESP ®X
To activate SPORT handling mode: briefly
press button :.
The M SPORT handling mode warning
lamp on the instrument cluster lights up. The
SPORT handling mode SPORT handling mode message appears in
the multifunction display.
X To deactivate SPORT handling mode:
briefly press button
:.
The M SPORT handling mode warning
lamp on the instrument cluster goes out.
X To deactivate ESP ®
:press button :until
the å ESP®
OFF warning lamp lights up in
the instrument cluster.
The ÷ OFF
OFF message appears in the multi-
function display.
X To activate ESP ®
:briefly press button :.
The å ESP®
OFF warning lamp on the
instrument cluster goes out. The ÷ESP® ON
ON message appears in the multifunction dis-
play.
Characteristics when SPORT handling
mode is activated
If SPORT handling mode is activated and one or more wheels start to spin, the ÷ESP®
warn-
ing lamp on the instrument cluster flashes. In
such situations, ESP ®
will stabilise the vehicle
only to a limited degree.
When SPORT handling mode is activated:
R ESP ®
improves driving stability only to a limi-
ted degree
R traction control is still activated
R the engine's torque is only restricted to a limi-
ted degree and the drive wheels may start to spin
The spinning of the wheels results in a cut for better traction on loose surfaces.
R ESP ®
still provides support when you brake
firmly
Characteristics when ESP ®
is deactivated
If ESP ®
is deactivated and one or more wheels
start to spin, the ÷ESP®
warning lamp in the
instrument cluster does not flash. In such situa-
tions, ESP ®
will not stabilise the vehicle.
If you deactivate ESP ®
:
R ESP ®
no longer improves driving stability
R engine torque is no longer limited and the
drive wheels may start to spin
The spinning of the wheels results in a cut for
better traction on loose surfaces.
R traction control is still activated
R Active Brake Assist is no longer available; it is
not activated even if you brake firmly with
assistance from ESP ®
R PRE-SAFE ®
is no longer available; it is not
activated even if you brake firmly with assis-
tance from ESP ®
R ESP ®
still provides support when you brake
firmly
Off-road ESP ® An ESP
®
system specifically suited to off-road
terrain is activated automatically once the off-
road program is activated (Y page 192).74
Driving safety systemsSafety
Page 109 of 369
Correct driver's seat position
G
WARNING
You could lose control of the vehicle while
driving if you:
R adjust the driver's seat, steering wheel or
mirrors
R fasten the seat belt
There is a risk of an accident.
Adjust the driver's seat, head restraint, steer-
ing wheel and mirrors and fasten your seat
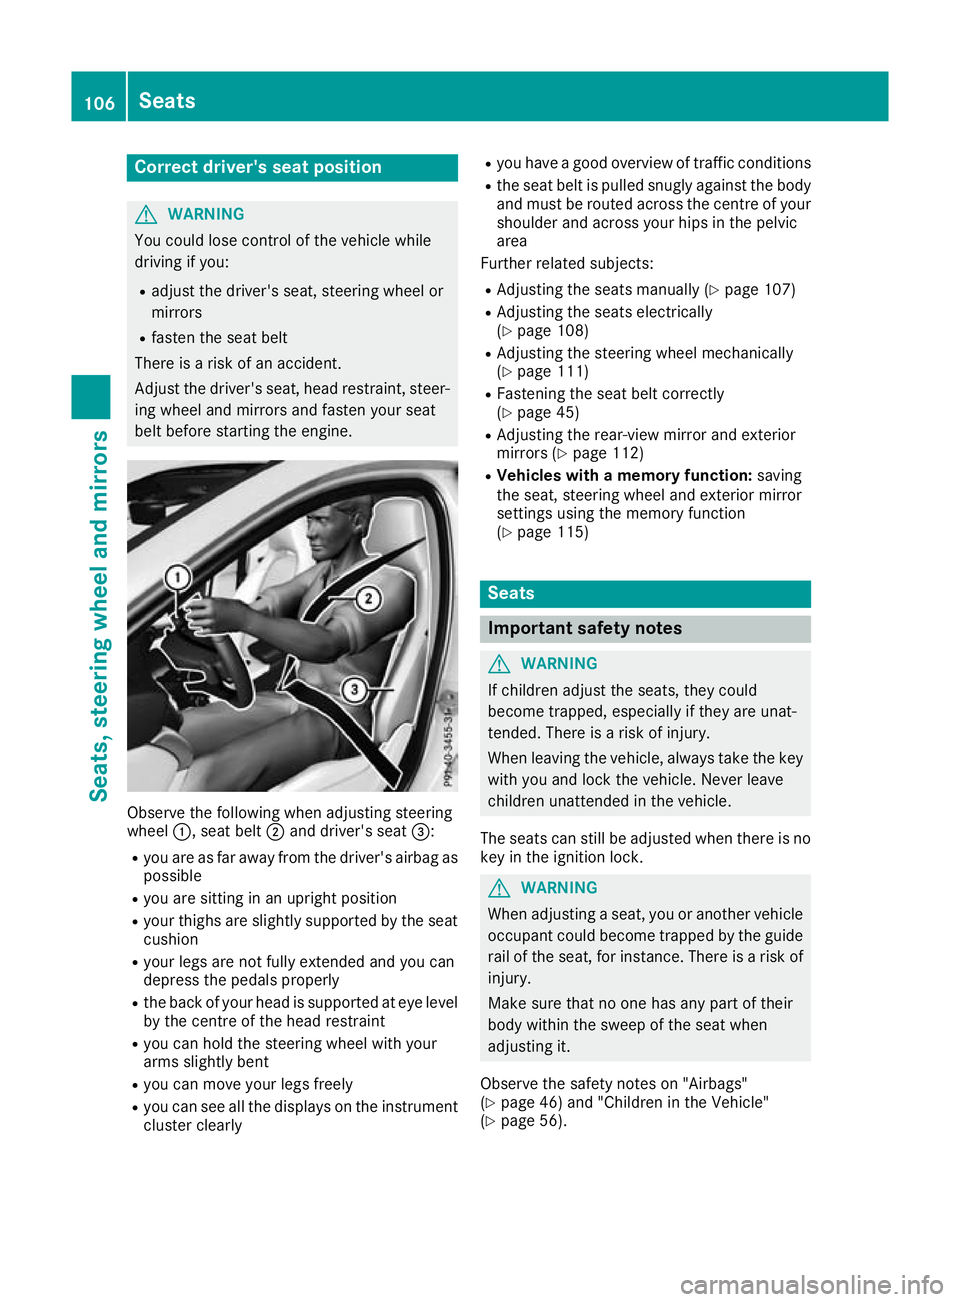
belt before starting the engine. Observe the following when adjusting steering
wheel
:, seat belt ;and driver's seat =:
R you are as far away from the driver's airbag as
possible
R you are sitting in an upright position
R your thighs are slightly supported by the seat
cushion
R your legs are not fully extended and you can
depress the pedals properly
R the back of your head is supported at eye level
by the centre of the head restraint
R you can hold the steering wheel with your
arms slightly bent
R you can move your legs freely
R you can see all the displays on the instrument
cluster clearly R
you have a good overview of traffic conditions
R the seat belt is pulled snugly against the body
and must be routed across the centre of your
shoulder and across your hips in the pelvic
area
Further related subjects:
R Adjusting the seats manually (Y page 107)
R Adjusting the seats electrically
(Y page 108)
R Adjusting the steering wheel mechanically
(Y page 111)
R Fastening the seat belt correctly
(Y page 45)
R Adjusting the rear-view mirror and exterior
mirrors (Y page 112)
R Vehicles with a memory function: saving
the seat, steering wheel and exterior mirror
settings using the memory function
(Y page 115) Seats
Important safety notes
G
WARNING
If children adjust the seats, they could
become trapped, especially if they are unat-
tended. There is a risk of injury.
When leaving the vehicle, always take the key with you and lock the vehicle. Never leave
children unattended in the vehicle.
The seats can still be adjusted when there is no
key in the ignition lock. G
WARNING
When adjusting a seat, you or another vehicle occupant could become trapped by the guiderail of the seat, for instance. There is a risk of
injury.
Make sure that no one has any part of their
body within the sweep of the seat when
adjusting it.
Observe the safety notes on "Airbags"
(Y page 46) and "Children in the Vehicle"
(Y page 56). 106
SeatsSeats, steering wheel and
mirrors
Page 120 of 369
The daytime driving lights improve the visibility
of your vehicle during the day. Here, the daytime
driving lights function must be switched on via
the on-board computer (Y page 229).
If the side lamps and dipped-beam headlamps
are switched on, the green indicator lamps T
(side lamps) and L(dipped-beam head-
lamps) in the instrument cluster light up.
Dipped-beam headlamps
When the ignition is switched on and the light
switch is in the Lposition, the side lamps
and dipped-beam headlamps are switched on
even if the light sensor does not sense dark
ambient light conditions. This is advantageous
when there is fog or rain.
X To switch on the dipped-beam headlamps:
turn the key to position 2in the ignition lock
or start the engine.
X Turn the light switch to L.
The green Lindicator lamp on the instru-
ment cluster lights up.
Foglamps
In conditions where visibility is poor due to fog,
snow or rain, the foglamps improve visibility as
well as making it easier for other road users to
see you. They can be operated together with the side lamps or together with the side lamps and
dipped-beam headlamps.
X To switch on the foglamps: turn the key to
position 2in the ignition lock or start the
engine.
X Turn the light switch to LorÃ.
X Press the Nbutton.
The green Nindicator lamp in the instru-
ment cluster lights up.
X To switch off the foglamps: press theN
button.
The green Nindicator lamp in the instru-
ment cluster goes out.
Rear foglamp
The rear foglamp improves the visibility of your
vehicle for the traffic behind in the event of
heavy fog. Please observe the country-specific
laws on the use of rear fog lamps.
X To switch on the rear fog lamp: turn the key
in the ignition lock to position 2or start the
engine.
X Turn the light switch to LorÃ. X
Press the Rbutton.
The yellow Rindicator lamp in the instru-
ment cluster lights up.
X To switch off the rear foglamp: press the
R button.
The yellow Rindicator lamp in the instru-
ment cluster goes out.
Side lamps
! When the battery is discharged heavily, the
side lamps or parking lamps are automatically
switched off to facilitate an engine start.
Always park your vehicle safely and in a well lit area, in accordance with the relevant legal
stipulations. Avoid using the Tside lamps
for periods lasting several hours. Where pos-
sible, switch on the right Xor left W
parking lamp.
X To switch on: turn the light switch to T.
The green Tindicator lamp in the instru-
ment cluster lights up.
Parking lamps Switching on the parking lamps ensures that the
corresponding side of the vehicle is illuminated.
X To switch on the parking lamps: the key
should not be in the ignition lock or it should
be in key position gin the ignition lock.
X Turn the light switch to W(left-hand side of
the vehicle) or X(right-hand side of the
vehicle).
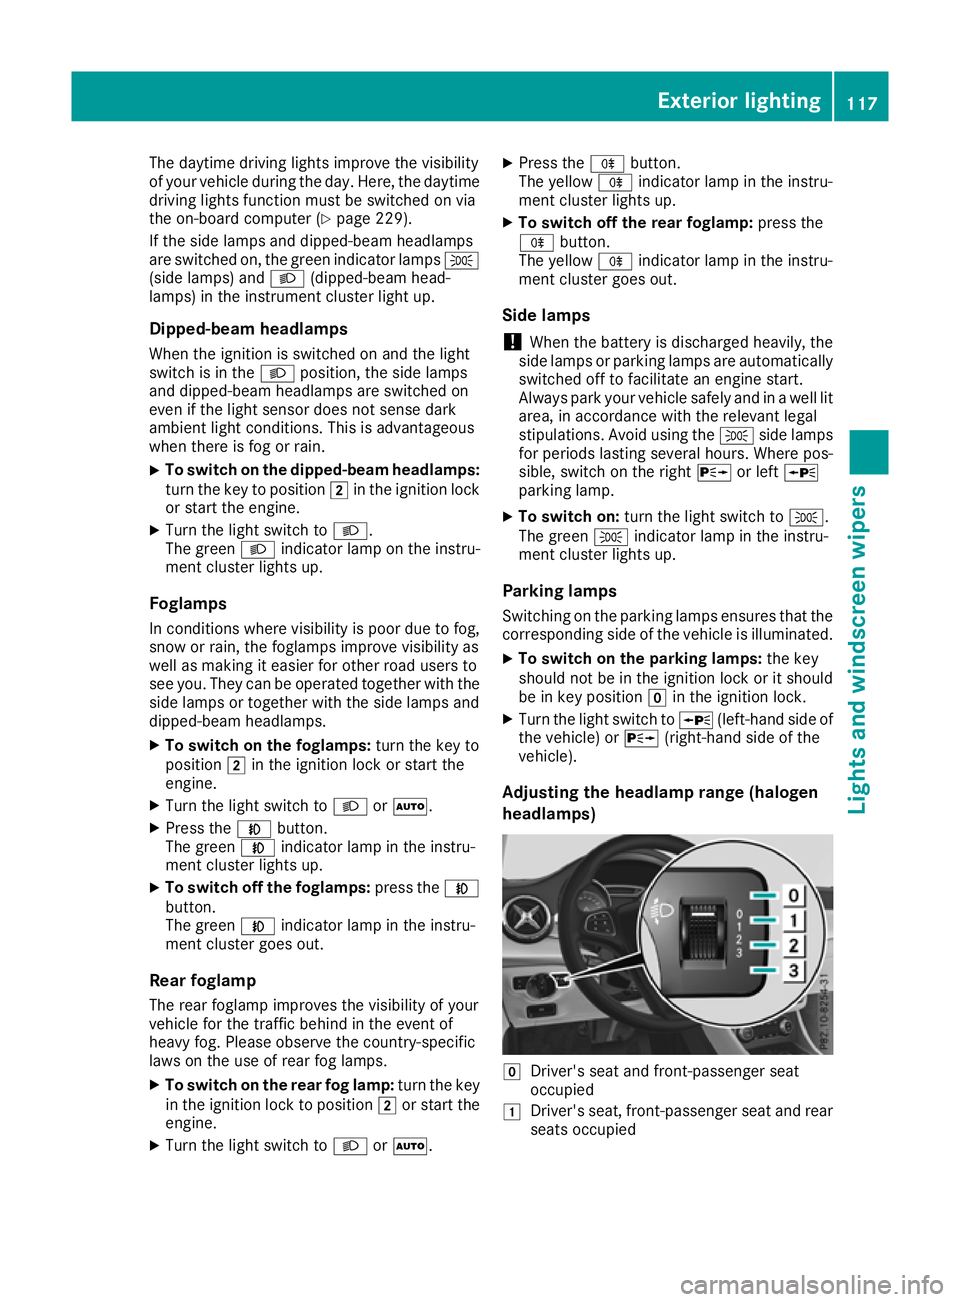
Adjusting the headlamp range (halogen
headlamps) g
Driver's seat and front-passenger seat
occupied
1 Driver's seat, front-passenger seat and rear
seats occupied Exterior lighting
117Lights and windscreen wipers Z
Page 122 of 369
lamps from main beam to dipped beam. Once
the system no longer detects any other vehicles, it switches on the main-beam headlamps again.
The system's optical sensor is located behind
the windscreen near the overhead control
panel.
Important safety notes G
WARNING
Adaptive Highbeam Assist does not recognise road users:
R who have no lights, e.g. pedestrians
R who have poor lighting, e.g. cyclists
R whose lighting is blocked, e.g. by a barrier
On very rare occasions, Adaptive Highbeam
Assist may fail to recognise other road users
that have lights, or may recognise them too
late. In this, or in similar situations, the auto-
matic main-beam headlamps will not be deac-
tivated or will be activated despite the pres-
ence of other road users. There is a risk of an accident.
Always carefully observe the traffic conditionsand switch off the main-beam headlamps in
good time.
Adaptive Highbeam Assist cannot take into
account road, weather or traffic conditions.
Adaptive Highbeam Assist is only an aid. You are
responsible for adjusting the vehicle's lighting
to the prevailing light, visibility and traffic con-
ditions.
In particular, the detection of obstacles can be
restricted if there is:
R poor visibility, e.g. due to fog, heavy rain or
snow
R dirt on the sensors or if the sensors are
obscured
Switching Adaptive Highbeam Assist
on/off X
To activate: turn the light switch to Ã.
X Press the combination switch beyond the
pressure point in the direction of arrow :.
When the _light sensor switches on the
dipped-beam headlamps when it is dark, the indicator lamp in the multifunction display
lights up.
If you are driving at speeds above approx-
imately 30 km/h and no other road users are
recognised:
The main-beam headlamps are switched on
automatically. The Kindicator lamp in the
instrument cluster also lights up.
If you are driving at speeds below 25 km/h or other road users are recognised or the roads
are adequately lit:
The main-beam headlamps are switched off
automatically. The Kindicator lamp in the
instrument cluster goes out. The _indi-
cator lamp in the multifunction display
remains lit.
X To deactivate: move the combination switch
back to its normal position.
The _ indicator lamp in the multifunction
display goes out. Headlamps misted up on the inside
Certain climatic and physical conditions may
cause moisture to form in the headlamp. This
moisture does not affect the functionality of the headlamp. Interior lighting
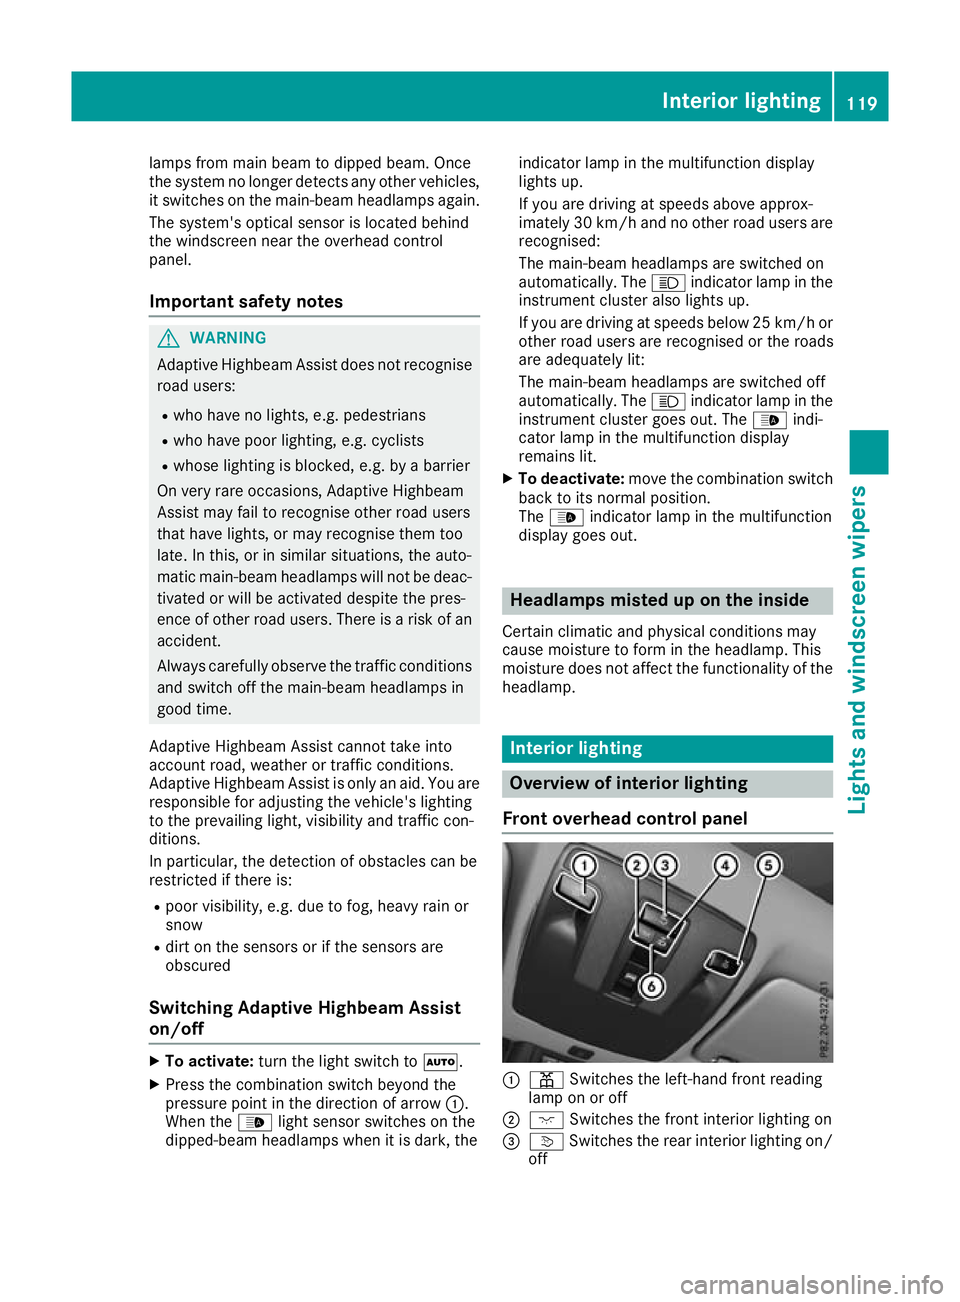
Overview of interior lighting
Front overhead control panel :
p Switches the left-hand front reading
lamp on or off
; c Switches the front interior lighting on
= v Switches the rear interior lighting on/
off Interior lighting
119Lights and windscreen wipers Z
Page 127 of 369
Windscreen wipers
Switching the windscreen wipers on/
off
! Do not operate the windscreen wipers when
the windscreen is dry, as this could damage
the wiper blades. Moreover, dust that has col-
lected on the windscreen can scratch the
glass if wiping takes place when the wind-
screen is dry.
If it is necessary to switch on the windscreen wipers in dry weather conditions, always
operate them using washer fluid.
! If the windscreen wipers leave smears on
the windscreen after the vehicle has been
washed in an automatic car wash, this may be
due to wax or other residue. Clean the wind-
screen with washer fluid after an automatic
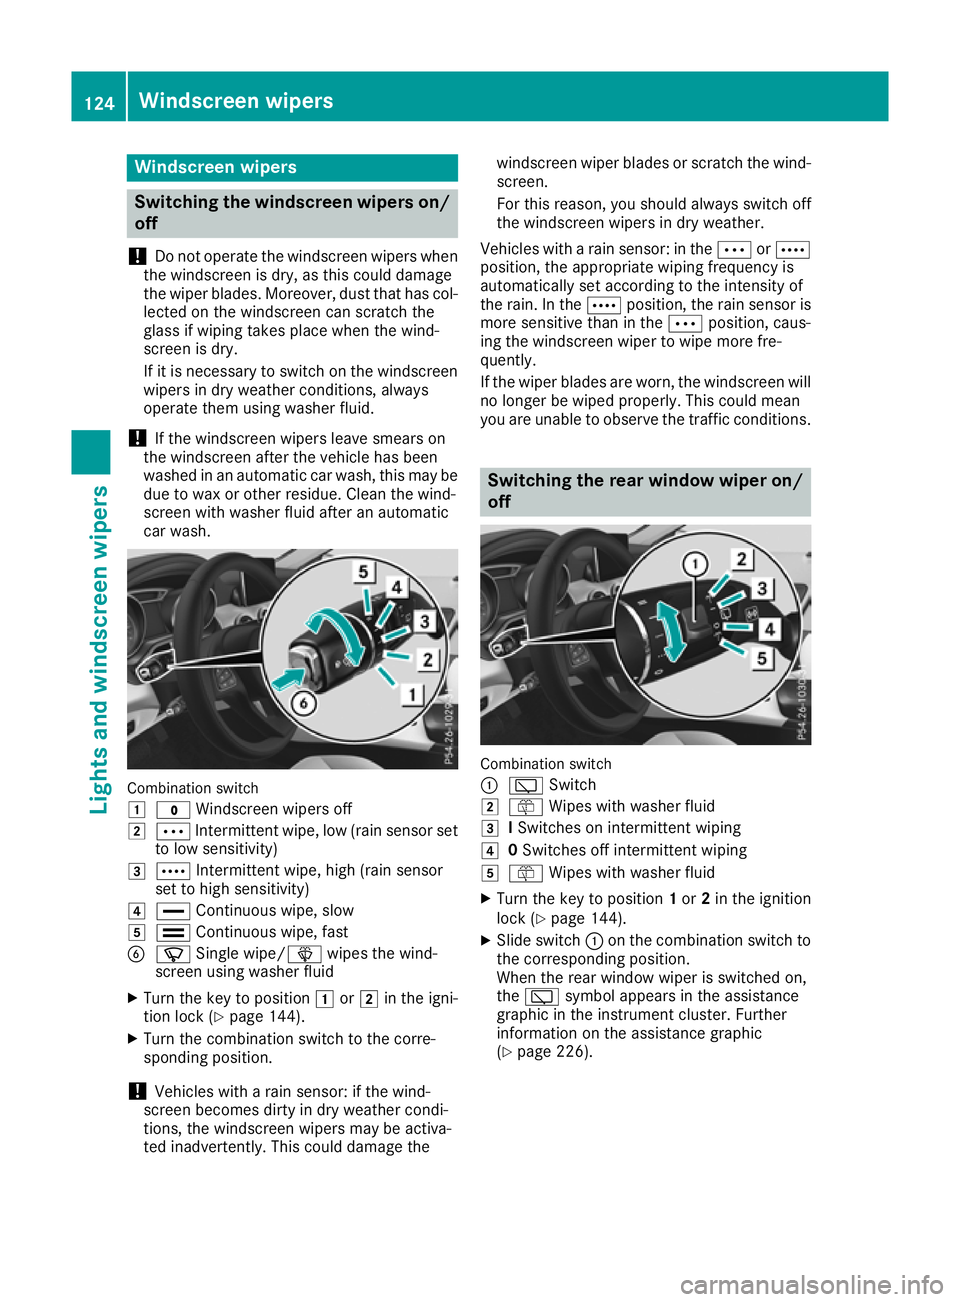
car wash. Combination switch
1
$ Windscreen wipers off
2 Ä Intermittent wipe, low (rain sensor set
to low sensitivity)
3 Å Intermittent wipe, high (rain sensor
set to high sensitivity)
4 ° Continuous wipe, slow
5 ¯ Continuous wipe, fast
B í Single wipe/î wipes the wind-
screen using washer fluid
X Turn the key to position 1or2 in the igni-
tion lock (Y page 144).
X Turn the combination switch to the corre-
sponding position.
! Vehicles with a rain sensor: if the wind-
screen becomes dirty in dry weather condi-
tions, the windscreen wipers may be activa-
ted inadvertently. This could damage the windscreen wiper blades or scratch the wind-
screen.
For this reason, you should always switch off
the windscreen wipers in dry weather.
Vehicles with a rain sensor: in the ÄorÅ
position, the appropriate wiping frequency is
automatically set according to the intensity of
the rain. In the Åposition, the rain sensor is
more sensitive than in the Äposition, caus-
ing the windscreen wiper to wipe more fre-
quently.
If the wiper blades are worn, the windscreen will
no longer be wiped properly. This could mean
you are unable to observe the traffic conditions. Switching the rear window wiper on/
off Combination switch
:
è Switch
2 ô Wipes with washer fluid
3 ISwitches on intermittent wiping
4 0Switches off intermittent wiping
5 ô Wipes with washer fluid
X Turn the key to position 1or 2in the ignition
lock (Y page 144).
X Slide switch :on the combination switch to
the corresponding position.
When the rear window wiper is switched on,
the è symbol appears in the assistance
graphic in the instrument cluster. Further
information on the assistance graphic
(Y page 226). 124
Windscreen wipersLights and windscreen wipers
Page 148 of 369
If you lock the vehicle centrally using the button
on the front door (Y page 87), you can continue
to start the engine with the Start/Stop button.
You can switch off the engine while the vehicle is
in motion by pressing and holding the Start/
Stop button for around three seconds. This func-
tion operates independently of the ECO start/
stop automatic engine switch-off function.
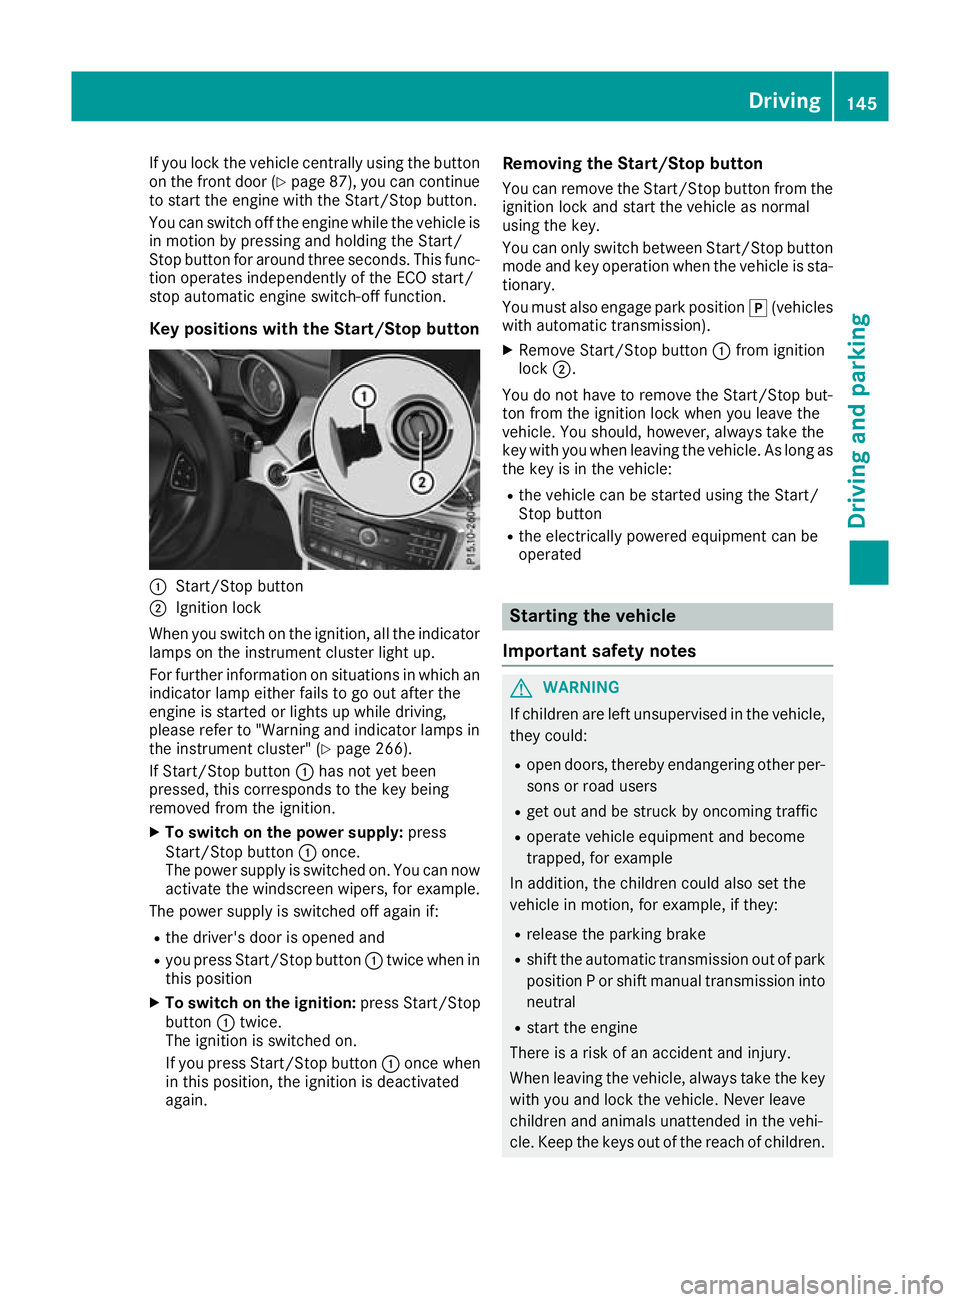
Key positions with the Start/Stop button :
Start/Stop button
; Ignition lock
When you switch on the ignition, all the indicator lamps on the instrument cluster light up.
For further information on situations in which an
indicator lamp either fails to go out after the
engine is started or lights up while driving,
please refer to "Warning and indicator lamps in
the instrument cluster" (Y page 266).
If Start/Stop button :has not yet been
pressed, this corresponds to the key being
removed from the ignition.
X To switch on the power supply: press
Start/Stop button :once.
The power supply is switched on. You can now activate the windscreen wipers, for example.
The power supply is switched off again if:
R the driver's door is opened and
R you press Start/Stop button :twice when in
this position
X To switch on the ignition: press Start/Stop
button :twice.
The ignition is switched on.
If you press Start/Stop button :once when
in this position, the ignition is deactivated
again. Removing the Start/Stop button
You can remove the Start/Stop button from the
ignition lock and start the vehicle as normal
using the key.
You can only switch between Start/Stop button
mode and key operation when the vehicle is sta- tionary.
You must also engage park position j(vehicles
with automatic transmission).
X Remove Start/Stop button :from ignition
lock ;.
You do not have to remove the Start/Stop but-
ton from the ignition lock when you leave the
vehicle. You should, however, always take the
key with you when leaving the vehicle. As long as the key is in the vehicle:
R the vehicle can be started using the Start/
Stop button
R the electrically powered equipment can be
operated Starting the vehicle
Important safety notes G
WARNING
If children are left unsupervised in the vehicle, they could:
R open doors, thereby endangering other per-
sons or road users
R get out and be struck by oncoming traffic
R operate vehicle equipment and become
trapped, for example
In addition, the children could also set the
vehicle in motion, for example, if they:
R release the parking brake
R shift the automatic transmission out of park
position P or shift manual transmission into
neutral
R start the engine
There is a risk of an accident and injury.
When leaving the vehicle, always take the key with you and lock the vehicle. Never leave
children and animals unattended in the vehi-
cle. Keep the keys out of the reach of children. Driving
145Driving and parking Z