2017 MERCEDES-BENZ GLA SUV suspension
[x] Cancel search: suspensionPage 192 of 369
X
To cancel: pull the left steering wheel gear-
shift paddle (Y page 161).
or
X To confirm: pull the right steering wheel
gearshift paddle (Y page 161).
The RACE START available Depress
RACE START available Depress
accelerator
accelerator message appears in the multi-
function display.
i If you do not depress the accelerator pedal
within a few seconds, RACE START is cancel-
led. The multifunction display shows the
RACE START cancelled RACE START cancelled message.
X Fully depress the accelerator pedal.
The engine speed increases.
The RACE
RACE START START Release
Release brake
braketo
tostart
start
message appears in the multifunction display.
i If the brake pedal is not released after a
short while, RACE START is cancelled. The
multifunction display shows the RACE
RACE START START
cancelled
cancelled message.
X Take your foot off the brake, but keep the
accelerator pedal depressed.
The vehicle pulls away at maximum acceler-
ation.
The RACE RACE START
START active
active message appears in
the multifunction display.
RACE START is deactivated when the vehicle
reaches a speed of approximately 50 km/h.
RACE START is deactivated immediately if you
release the accelerator pedal during RACE
START or if any of the activation conditions are
no longer fulfilled. The RACE START not pos‐
RACE START not pos‐
sible See Owner’s Manual sible See Owner’s Manual orRACE START
RACE START
cancelled
cancelled message appears in the multifunc-
tion display.
i After using it several times in short succes-
sion, RACE START will be unavailable until a
certain distance has been driven. AMG RIDE CONTROL
General notes The electronically controlled damping system
works continuously. This improves driving
safety and ride comfort. The damping is adjusted individually to each
wheel and depends on:
R your driving style, e.g. sporty
R the road surface condition, e.g. bumps
R your individual selection of SportorComfort
The suspension setting is adjusted using the
corresponding button on the centre console.
i The mode can also be set using the AMG
DYNAMIC SELECT controller (Y page 152).
If the ignition is switched off for less than four
hours, the previously selected drive program is
activated when the engine is next started. If the
ignition is switched off for more than four hours,
Comfort mode is activated when the engine is
next started.
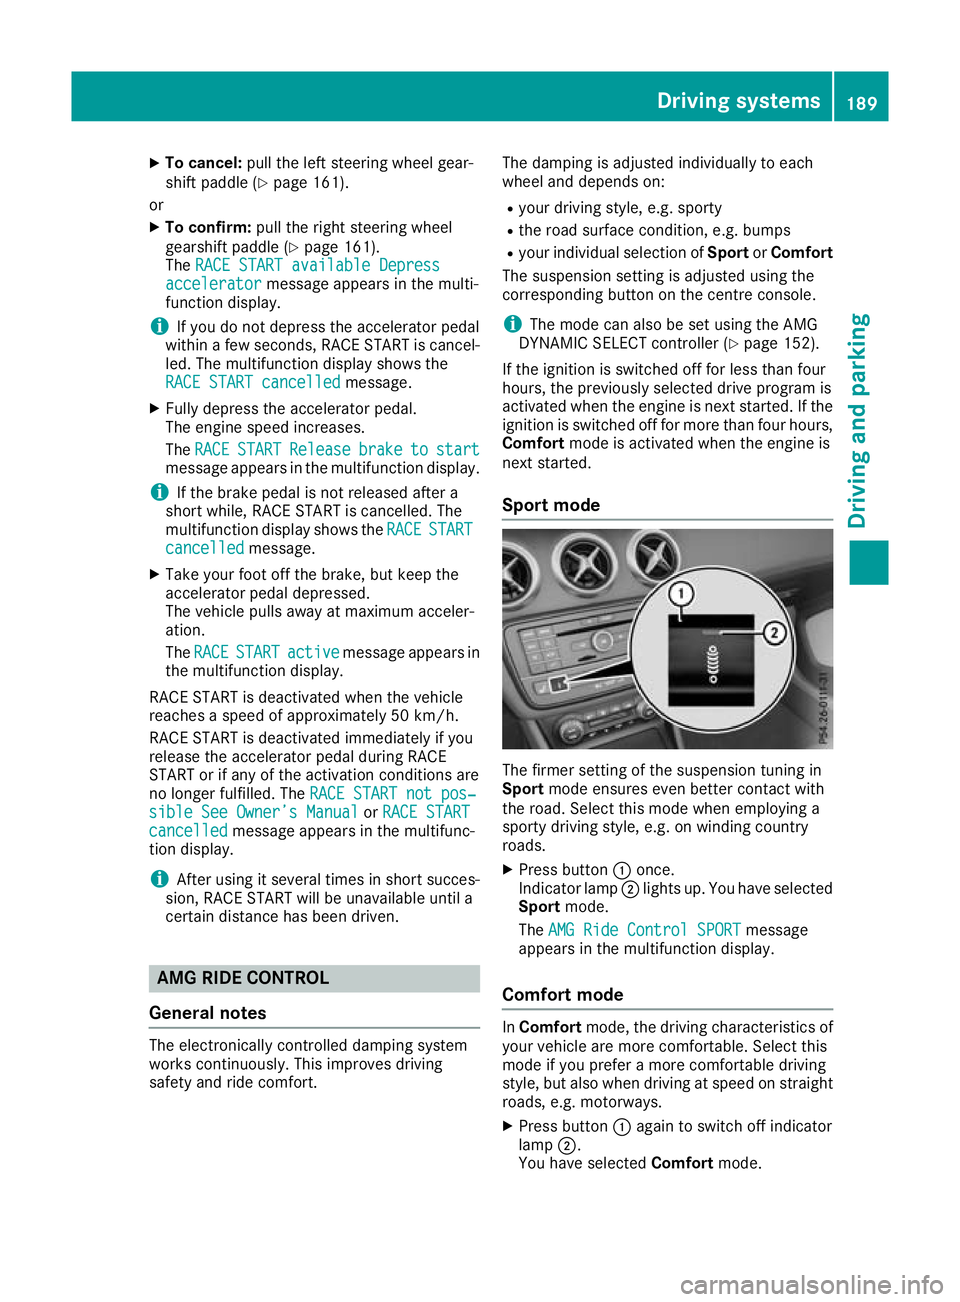
Sport mode The firmer setting of the suspension tuning in
Sport
mode ensures even better contact with
the road. Select this mode when employing a
sporty driving style, e.g. on winding country
roads.
X Press button :once.
Indicator lamp ;lights up. You have selected
Sport mode.
The AMG Ride Control SPORT AMG Ride Control SPORT message
appears in the multifunction display.
Comfort mode In
Comfort mode, the driving characteristics of
your vehicle are more comfortable. Select this
mode if you prefer a more comfortable driving
style, but also when driving at speed on straight
roads, e.g. motorways.
X Press button :again to switch off indicator
lamp ;.
You have selected Comfortmode. Driving systems
189Driving and parking Z
Page 195 of 369
Selecting Comfort mode
In the
Comfort drive program, the driving char-
acteristics of your vehicle are more comforta-
ble. Select this drive program if you prefer a
more comfortable driving style. Also select the
Comfort drive program when driving fast on
straight roads, e.g. on straight stretches of
motorway.
X Press DYNAMIC SELECT button (Y page 151)
as many times as necessary until the Com-
fort drive program is selected.
Selecting Sport mode The firmer suspension setting in the
Sportdrive
program ensures even better contact with the
road. Select this drive program when employing
a sporty driving style, e.g. on winding country
roads.
DSR is not available in the Sportdrive program.
Further information on DSR (Y page 190).
X Press DYNAMIC SELECT button (Y page 151)
as many times as necessary until the Sport
drive program is selected.
Selecting Off-road mode i
The Off-road program is only available on
vehicles with the ON&OFFROAD package.
The engine’s performance characteristics and
the gearshifting characteristics of the automatic
transmission are adapted for the Off-roaddrive
program. ABS, ESP ®
and ETS programs espe-
cially adapted to off-road driving are also acti-
vated. Select this drive program when driving in easily negotiable off-road terrain, e. g. dirt
tracks.
Do not use the Off-road program on roads that
are snow-covered or icy or if you have fitted your
vehicle with snow chains.
X Press DYNAMIC SELECT button (Y page 151)
as many times as necessary until the Off-
road drive program is selected.
Status icon :of the Off-road program is
shown in the multifunction display. Showing the assistance graphic
X Select the Assistance graphic Assistance graphic function
using the on-board computer (Y page 226).
When the Off-road program is activated, sym- bol :appears in the assistance graphic dis-
play. Driving dynamics display (vehicles
with the ON&OFFROAD package)
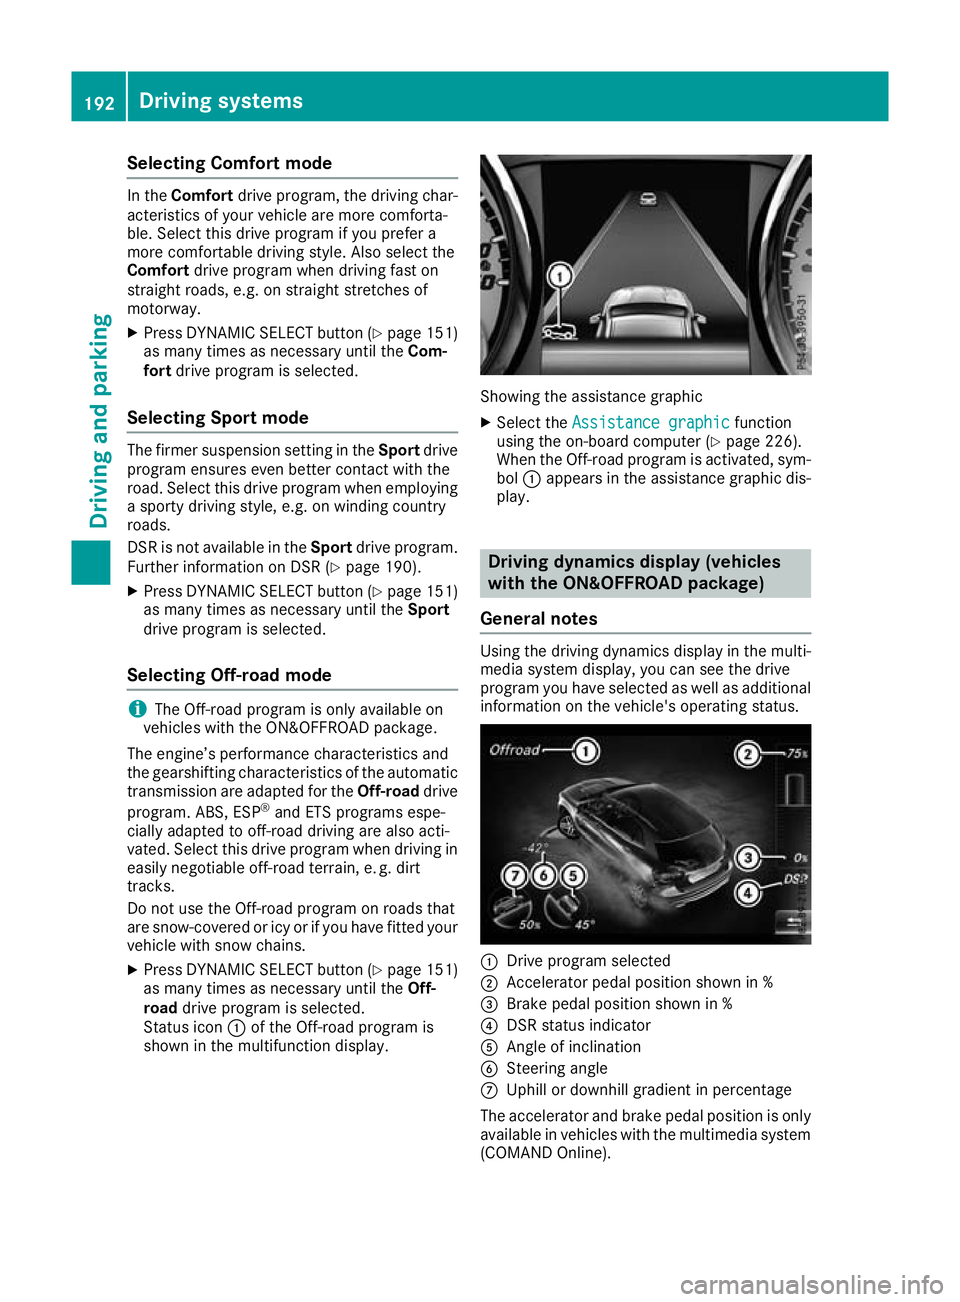
General notes Using the driving dynamics display in the multi-
media system display, you can see the drive
program you have selected as well as additional
information on the vehicle's operating status. :
Drive program selected
; Accelerator pedal position shown in %
= Brake pedal position shown in %
? DSR status indicator
A Angle of inclination
B Steering angle
C Uphill or downhill gradient in percentage
The accelerator and brake pedal position is only available in vehicles with the multimedia system
(COMAND Online). 192
Driving systemsDriving and parking
Page 235 of 369
ture
?and Bare displayed in white in the
multifunction display.
If the multifunction display shows oil temper- ature ?orB in blue, the engine or the
transmission are not yet at normal operating
temperature. Avoid using the full output of the engine during this time.
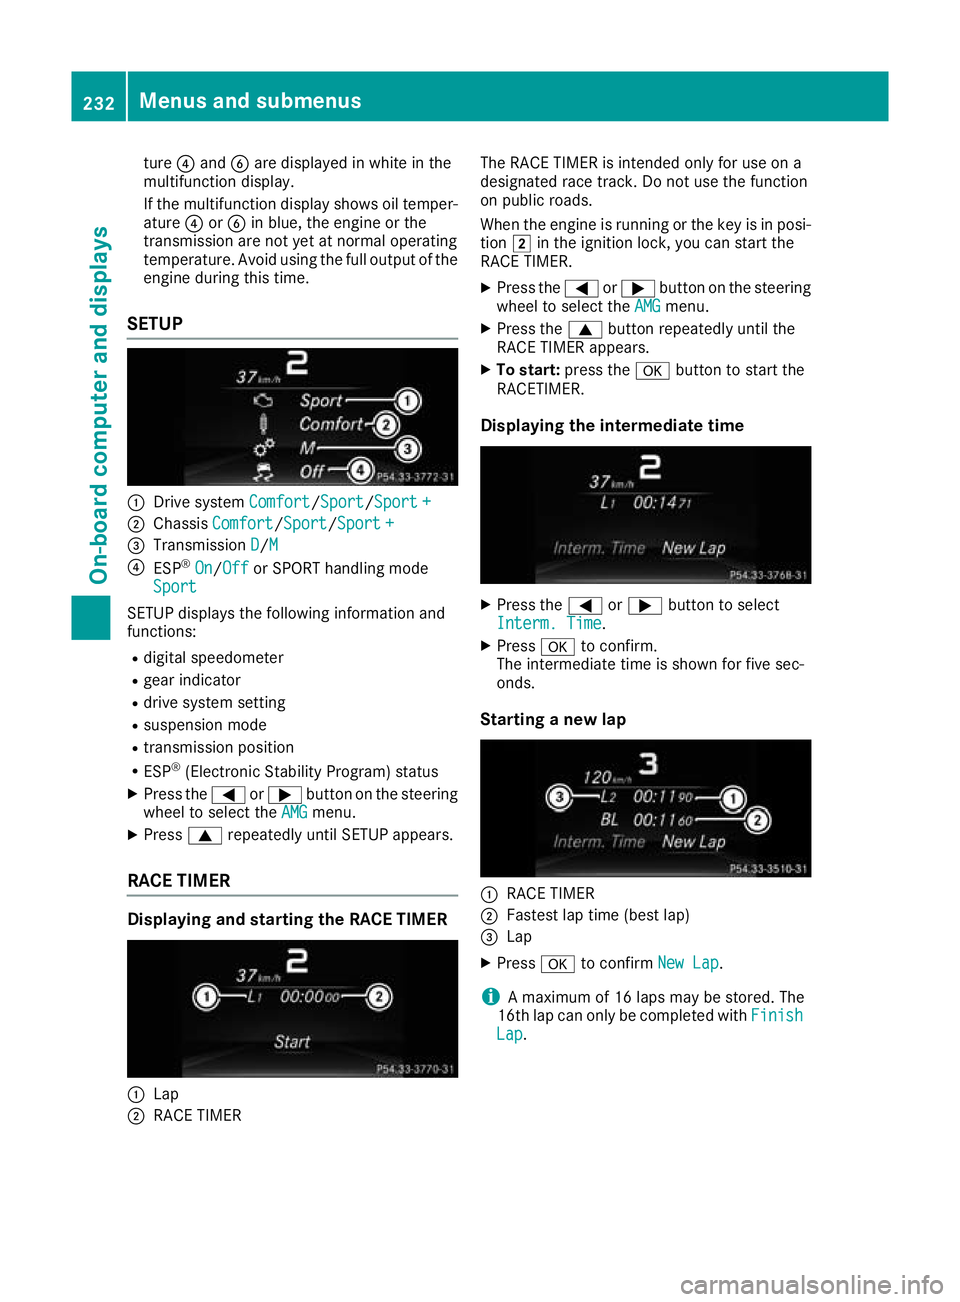
SETUP :
Drive system Comfort Comfort/Sport
Sport/Sport +
Sport +
; Chassis Comfort
Comfort/Sport Sport/Sport +
Sport +
= Transmission D
D/MM
? ESP ®
On
On/ Off
Off or SPORT handling mode
Sport
Sport
SETUP displays the following information and
functions:
R digital speedometer
R gear indicator
R drive system setting
R suspension mode
R transmission position
R ESP ®
(Electronic Stability Program) status
X Press the =or; button on the steering
wheel to select the AMG
AMG menu.
X Press 9repeatedly until SETUP appears.
RACE TIMER Displaying and starting the RACE TIMER
:
Lap
; RACE TIMER The RACE TIMER is intended only for use on a
designated race track. Do not use the function
on public roads.
When the engine is running or the key is in posi- tion 2in the ignition lock, you can start the
RACE TIMER.
X Press the =or; button on the steering
wheel to select the AMG AMGmenu.
X Press the 9button repeatedly until the
RACE TIMER appears.
X To start: press the abutton to start the
RACETIMER.
Displaying the intermediate time X
Press the =or; button to select
Interm. Time Interm. Time.
X Press ato confirm.
The intermediate time is shown for five sec-
onds.
Starting a new lap :
RACE TIMER
; Fastest lap time (best lap)
= Lap
X Press ato confirm New Lap
New Lap.
i A maximum of 16 laps may be stored. The
16th lap can only be completed with Finish
Finish
Lap
Lap . 232
Menus and submenusOn-board computer and displays
Page 337 of 369
Important safety notes
G
WARNING
If wheels and tyres of the wrong size are used, the wheel brakes or suspension components
may be damaged. There is a risk of an acci-
dent.
Always replace wheels and tyres with those
that fulfil the specifications of the original
part.
When replacing wheels, make sure to fit the
correct:
R designation
R type
When replacing tyres, make sure to fit the
correct:
R designation
R manufacturer
R type G
WARNING
A flat tyre severely impairs the driving, steer-
ing and braking characteristics of the vehicle.
There is a risk of accident.
Tyres without run-flat characteristics:
R do not drive with a flat tyre.
R immediately replace the flat tyre with your
emergency spare wheel or spare wheel, or
consult a qualified specialist workshop.
Tyres with run-flat characteristics:
R pay attention to the information and warn-
ing notices on MOExtended tyres (tyres
with run-flat characteristics).
Accessories that are not approved for your vehi-
cle by Mercedes-Benz or are not being used cor- rectly can impair operating safety.
Before purchasing and using non-approved
accessories, visit a qualified specialist work-
shop and enquire about:
R suitability
R legal stipulations
R factory recommendations Further information regarding wheels and tyres
can be found under "Wheel/tyre combinations"
(Y page 347).
You can ask for information regarding permitted
wheel/tyre combinations at a Mercedes-Benz
Service Centre.
Information on tyre pressures can be found:
R on the tyre pressure table in the fuel filler flap
(Y page 164)
R under "Tyre pressure" (Y page 337)
Modification work on the brake system and
wheels is not permitted. The use of spacers or
brake dust shields is not permitted. This inva-
lidates the general operating permit for the vehi-
cle.
i Further information on wheels and tyres can
be obtained at any qualified specialist work-
shop. Operation
Information on driving
Check the tyre pressure when the vehicle is
heavily laden and adjust prior to a trip.
While driving, pay attention to vibrations, noises
and unusual handling characteristics, e.g. pull-
ing to one side. This may indicate that the
wheels or tyres are damaged. If you suspect that
a tyre is defective, reduce your speed immedi-
ately. Stop the vehicle as soon as possible to
check the wheels and tyres for damage. Hidden tyre damage could also be causing the unusual
handling characteristics. If you find no signs of
damage, have the tyres and wheels checked at aqualified specialist workshop.
When parking your vehicle, make sure not to
squash the tyre. If you cannot avoid driving over
obstacles, e.g. kerbs, do so slowly and at an
obtuse angle only. You could otherwise damage
the wheel rims and tyres. Regular checking of wheels and tyres
G
WARNING
Damaged tyres can cause tyre inflation pres-
sure loss. As a result, you could lose control of your vehicle. There is a risk of accident. 334
OperationWheels and ty
res
Page 346 of 369
the wheels or tyres have different dimensions.
The wheel brakes or suspension components may also be damaged. There is a risk of acci-
dent.
Interchange front and rear wheels only if the
wheels and tyres are of the same dimensions.
! On vehicles fitted with a tyre pressure mon-
itor, electronic components are located in the wheel.
Tyre-fitting tools should not be applied in thearea of the valve, as this could damage the
electronic components.
Only have tyres changed at a qualified spe-
cialist workshop.
Interchanging the front and rear wheels of dif-
fering dimensions can render the general oper-
ating permit invalid.
Observe the instructions and safety notes in the "Changing a wheel" section (Y page 342).
The wear patterns on the front and rear tyres
differ depending on the operating conditions.
Interchange the wheels before a clear wear pat-
tern has formed on the tyres. Front tyres typi-
cally wear more on the shoulders, while rear
tyres wear more in the centre.
On vehicles that have front and rear wheels of
the same size, you can interchange the wheels
every 5,000 to 10,000 km depending on the
degree of tyre wear. Ensure the direction of
rotation is maintained.
Clean the contact surfaces of the wheel and the
brake disc thoroughly every time a wheel is
interchanged. Check the tyre pressure and, if
necessary, restart the tyre pressure loss warn-
ing system or the tyre pressure monitor. Direction of rotation
Tyres with a specified direction of rotation have additional benefits, e.g. if there is a risk of aqua-
planing. These advantages can only be gained if the tyres are fitted corresponding to the direc-
tion of rotation.
An arrow on the sidewall of the tyre indicates its correct direction of rotation. Storing wheels
Store wheels in a cool, dry and preferably dark
place if they are not being used. Protect the
tyres against oil, grease, petrol and diesel. Fitting a wheel
Preparing the vehicle X
Stop the vehicle on solid, non-slippery and
level ground.
X Apply the electric parking brake manually.
X Move the front wheels to the straight-ahead
position.
X Vehicles with manual transmission: fully
depress the clutch pedal and engage first or
reverse gear.
X Vehicles with automatic transmission:
shift the transmission to position
j.
X Switch off the engine.
X Vehicles without KEYLESS-GO: remove the
key from the ignition lock.
X Vehicles with KEYLESS-GO start-function
or KEYLESS-GO: open the driver's door.
The vehicle electronics are now in position
u. This is the same as “key removed”.
X Vehicles with KEYLESS-GO start function
or KEYLESS-GO: remove the Start/Stop but-
ton from the ignition lock (Y page 144).
X If included in the vehicle equipment, remove
the tyre-change tool kit from the vehicle.
X Additionally secure the vehicle against rolling
away (Y page 166).
i Apart from some country-specific variants,
vehicles are not equipped with a tyre-change
tool kit. Some tools for changing a wheel are
specific to the vehicle. For more information
on which tools are required to perform a
wheel change on your vehicle, consult a quali-
fied specialist workshop.
Necessary tyre-changing tools may include,
for example:
R Jack
R Wheel chock
R Wheel wrench Changing a
wheel
343Wheels an d tyres Z
Page 350 of 369
X
Tighten the wheel bolts evenly in a crosswise
pattern in the sequence indicated (: toA).
The tightening torque must be 130 Nm.
X Turn the jack back to its initial position.
X Stow the jack and the rest of the vehicle tools
in the vehicle again.
X Mercedes-AMG vehicles and vehicles
with AMG Line:
use the cover of the outer sill.
X Check the tyre pressure of the newly fitted
wheel and adjust if necessary.
Observe the recommended tyre pressures
(Y page 337).
If you are driving with the emergency spare
wheel fitted, the tyre pressure loss warning sys-
tem or the tyre pressure monitor cannot func-
tion reliably. Restart the tyre pressure loss warn- ing system or tyre pressure monitor only once
the defective wheel has been replaced with a
new wheel.
Vehicles with tyre pressure monitor: all fitted
wheels must be equipped with functioning sen-
sors. Wheel and tyre combinations
General notes
You can ask for information regarding permitted
wheel/tyre combinations at a Mercedes-Benz
Service Centre.
You should regularly check the pressure of all
your tyres, including the emergency spare
wheel, particularly prior to long trips, and cor-
rect the pressure as necessary (Y page 337).
The value on the wheel is valid.
! For safety reasons, Mercedes-Benz recom-
mends that you only use tyres and wheels
which have been approved by Mercedes-Benz specifically for your vehicle.
These are specially adapted to the control
systems, such as ABS or ESP ®
and are
marked as follows:
R MO = Mercedes-Benz Original
R MOE = Mercedes-Benz Original Extended
(tyres featuring run-flat characteristics)
R MO1 = Mercedes-Benz Original (only cer-
tain AMG tyres)
Mercedes-Benz Original Extended tyres may
only be used on wheels that have been spe-
cifically approved by Mercedes-Benz. Only use tyres, wheels or accessories tested
and approved by Mercedes-Benz. Certain
characteristics, e.g. handling, vehicle noise
emissions or fuel consumption, may other-
wise be adversely affected. In addition, when
driving with a load, tyre dimension variations
could cause the tyres to come into contact
with the bodywork and axle components. This
could result in damage to the tyres or the
vehicle.
Mercedes-Benz accepts no liability for dam-
age resulting from the use of tyres, wheels or accessories other than those tested and
approved.
Further information about wheels, tyres and
approved combinations can be obtained from
any qualified specialist workshop.
! Retreaded tyres are neither tested nor rec-
ommended by Mercedes-Benz, since previ-
ous damage cannot always be detected on
retreaded tyres. As a result, Mercedes-Benz
cannot guarantee vehicle safety if retreaded
tyres are fitted. Do not fit used tyres if you
have no information about their previous
usage.
! Large wheels: the lower the section width
for a certain wheel size, the lower the ride
comfort is on poor road surfaces. Roll comfort and suspension comfort are reduced and therisk of damage to the wheels and tyres as a
result of driving over obstacles increases.
The recommended tyre pressures for various
operating conditions can be found on the tyre
pressure table on the fuel filler flap. Further
information on tyre pressure (Y page 337).
Check tyre pressures regularly and only when
the tyres are cold.
Notes on the vehicle equipment – always fit the
vehicle:
R with tyres of the same size across an axle
(left/right)
R with the same type of tyre (summer tyres,
MOExtended tyres, winter tyres)
Exception: it is permissible to fit a different
type or make in the event of a flat tyre.
Observe the "MOExtended tyres (tyres with
run-flat characteristics)" section
(Y page 318).
Vehicles with MOExtended tyres are not equip-
ped with a TIREFIT kit at the factory. It is there-
fore recommended that you additionally equip
your vehicle with a TIREFIT kit if you fit tyres that Wheel and tyre combinations
347Wheels and tyres Z
Page 361 of 369
Vehicle data
General notes
Please note that for the specified vehicle data: R the heights specified may vary as a result of:
- tyres
- load
- condition of the suspension
- items of optional equipment
R items of optional equipment reduce the max-
imum payload
R vehicle-specific weight information can be
found on the vehicle identification plate
(Y page 351)
R for certain countries only: you can find vehi-
cle-specific vehicle data in the COC docu-
ments (CERTIFICATE OF CONFORMITY).
These documents are delivered with your
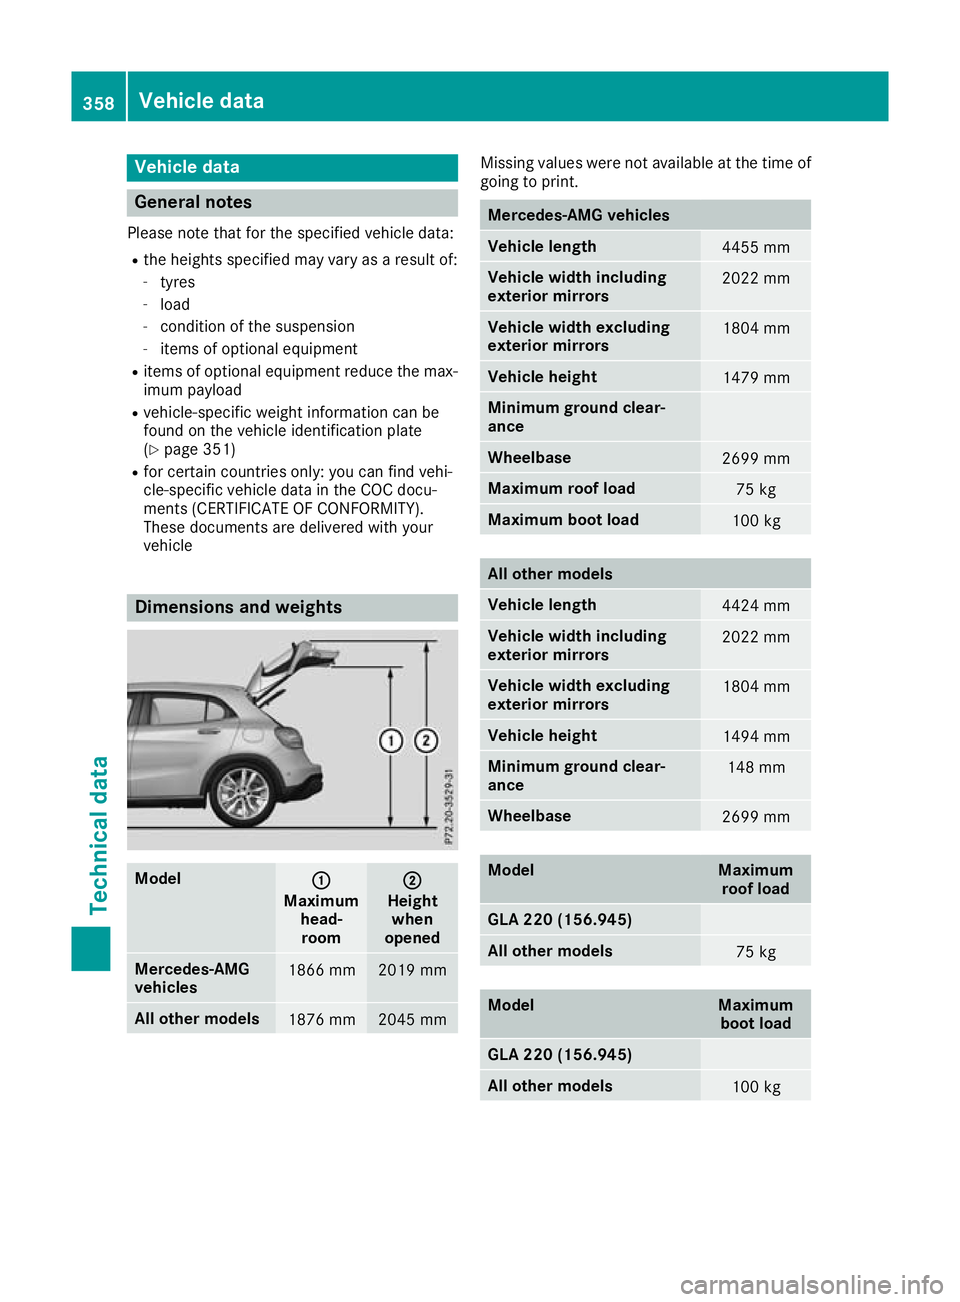
vehicle Dimensions and weights
Model
: :
Maximum head-room ;
;
Height when
opened Mercedes-AMG
vehicles
1866 mm 2019 mm
All other models
1876 mm 2045 mm Missing values were not available at the time of
going to print. Mercedes-AMG vehicles
Vehicle length
4455 mm
Vehicle width including
exterior mirrors
2022 mm
Vehicle width excluding
exterior mirrors
1804 mm
Vehicle height
1479 mm
Minimum ground clear-
ance
Wheelbase
2699 mm
Maximum roof load
75 kg
Maximum boot load
100 kg
All other models
Vehicle length
4424 mm
Vehicle width including
exterior mirrors
2022 mm
Vehicle width excluding
exterior mirrors
1804 mm
Vehicle height
1494 mm
Minimum ground clear-
ance
148 mm
Wheelbase
2699 mm
Model Maximum
roof load GLA 220 (156.945)
All other models
75 kg
Model Maximum
boot load GLA 220 (156.945)
All other models
100 kg358
Vehicle dataTechnical data