2017 MERCEDES-BENZ GLA SUV engine
[x] Cancel search: enginePage 224 of 369
Trip menu
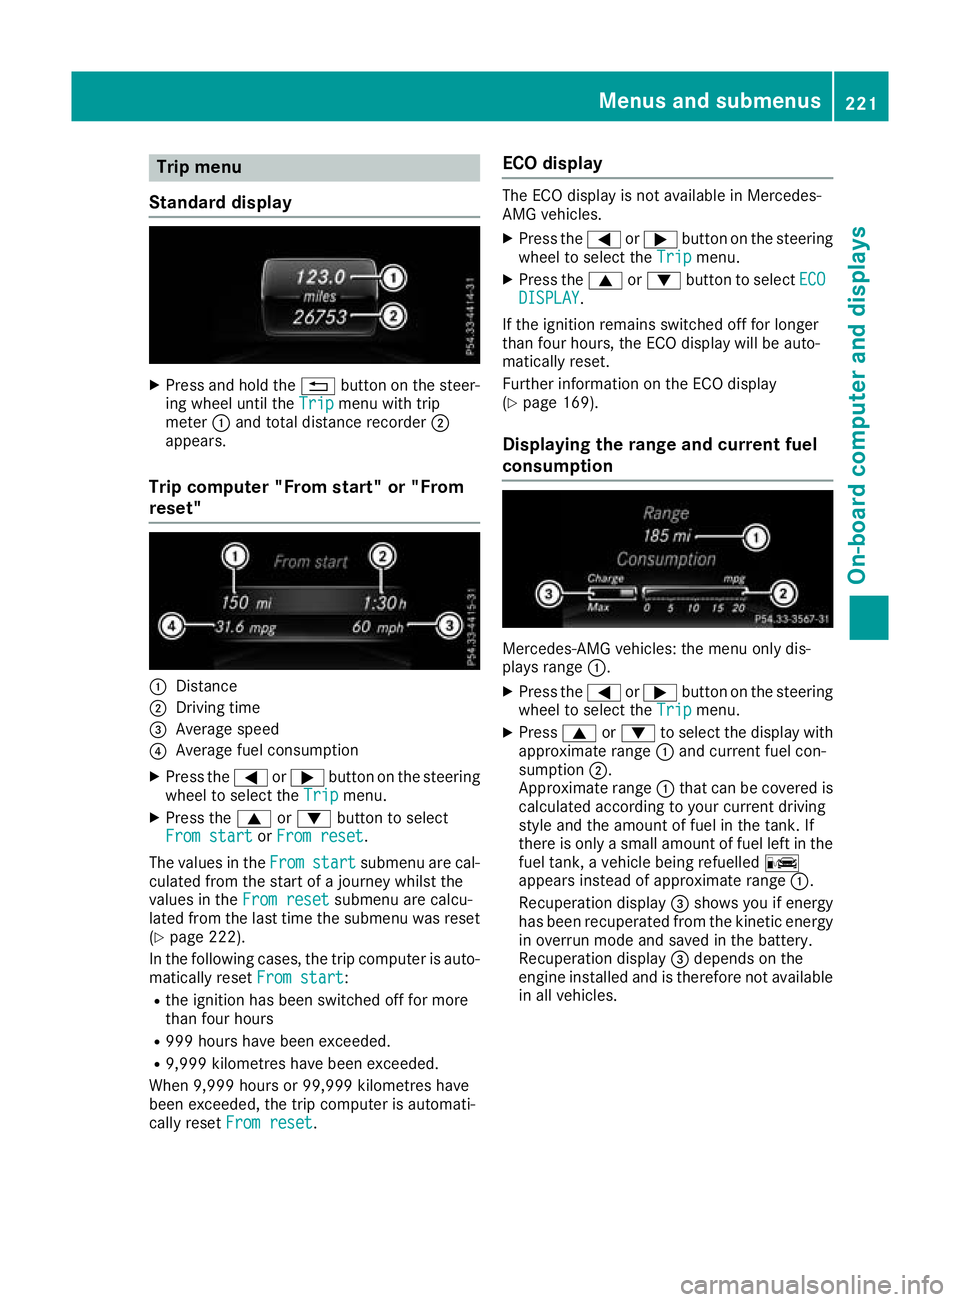
Standard display X
Press and hold the %button on the steer-
ing wheel until the Trip
Tripmenu with trip
meter :and total distance recorder ;
appears.
Trip computer "From start" or "From
reset" :
Distance
; Driving time
= Average speed
? Average fuel consumption
X Press the =or; button on the steering
wheel to select the Trip
Trip menu.
X Press the 9or: button to select
From start From start orFrom reset
From reset.
The values in the From
From start
start submenu are cal-
culated from the start of a journey whilst the
values in the From reset
From reset submenu are calcu-
lated from the last time the submenu was reset
(Y page 222).
In the following cases, the trip computer is auto-
matically reset From start
From start:
R the ignition has been switched off for more
than four hours
R 999 hours have been exceeded.
R 9,999 kilometres have been exceeded.
When 9,999 hours or 99,999 kilometres have
been exceeded, the trip computer is automati-
cally reset From reset
From reset. ECO display The ECO display is not available in Mercedes-
AMG vehicles.
X Press the =or; button on the steering
wheel to select the Trip Tripmenu.
X Press the 9or: button to select ECO
ECO
DISPLAY
DISPLAY.
If the ignition remains switched off for longer
than four hours, the ECO display will be auto-
matically reset.
Further information on the ECO display
(Y page 169).
Displaying the range and current fuel
consumption Mercedes-AMG vehicles: the menu only dis-
plays range :.
X Press the =or; button on the steering
wheel to select the Trip Tripmenu.
X Press 9or: to select the display with
approximate range :and current fuel con-
sumption ;.
Approximate range :that can be covered is
calculated according to your current driving
style and the amount of fuel in the tank. If
there is only a small amount of fuel left in the
fuel tank, a vehicle being refuelled C
appears instead of approximate range :.
Recuperation display =shows you if energy
has been recuperated from the kinetic energy in overrun mode and saved in the battery.
Recuperation display =depends on the
engine installed and is therefore not available in all vehicles. Menus and submenus
221On-board computer and displays Z
Page 230 of 369
X
Press ato confirm.
The current selection appears.
X To activate/deactivate the message func-
tion: press aagain.
Further information about Traffic Sign Assist
(Y page 207).
Deactivating/activating ESP ®Observe the important safety notes on ESP
®
(Y page 72). G
WARNING
If you deactivate ESP ®
, ESP ®
no longer sta-
bilises the vehicle. There is an increased risk
of skidding and an accident.
Only deactivate ESP ®
in the situations descri-
bed in the following.
It may be best to deactivate ESP ®
in the follow-
ing situations:
R when using snow chains
R in deep snow
R on sand or gravel
Deactivating/activating ESP ®
on Mercedes-
AMG vehicles (Y page 73).
For further information about ESP ®
, see
(Y page 72).
X Start the engine.
X Press the =or; button on the steering
wheel to select the Assist. Assist.menu.
X Press 9or: to select ESP ESP.
X Press ato confirm.
The current selection appears.
X To activate/deactivate: pressaagain.
ESP ®
is deactivated if the åwarning lamp
in the instrument cluster lights up continu-
ously when the engine is running.
If the ÷ andå warning lamps light up
continuously, ESP ®
is not available due to a mal-
function.
Observe the information on warning lamps
(Y page 269).
Observe the information on display messages
(Y page 235). Activating/deactivating Active Brake
Assist X
Press the =or; button on the steering
wheel to select the Assist. Assist.menu.
X Press the 9or: button to select
Brake Assist
Brake Assist.
X Press ato confirm.
The current selection appears.
X To activate/deactivate: pressaagain.
When Active Brake Assist is deactivated, the
æ symbol appears in the multifunction dis-
play in the assistance graphic display.
Further information on Active Brake Assist
(Y page 69).
Activating/deactivating ATTENTION
ASSIST X
Press the =or; button on the steering
wheel to select the Assist. Assist.menu.
X Press the 9or: button to select
Attention Assist Attention Assist.
X Press ato confirm.
The current selection appears.
X Press ato confirm.
X Press the :or9 button to set Off
Off,
Standard
Standard orSensitive
Sensitive.
X Press the abutton to save the setting.
When ATTENTION ASSIST is deactivated, the
é symbol appears in the multifunction dis-
play in the assistance graphic display.
For further information about ATTENTION
ASSIST, see (Y page 206).
Activating/deactivating Blind Spot
Assist X
Press the =or; button on the steering
wheel to select the Assist. Assist.menu.
X Press the 9or: button to select
Blind Spot Assist
Blind Spot Assist.
X Press ato confirm.
The current selection appears.
X To activate/deactivate: pressaagain.
Further information about Blind Spot Assist
(Y page 209). Menus and submenus
227On-board computer and displays Z
Page 232 of 369
Selecting permanent display
United Kingdom: this function is unavailable.
The Permanent display:
Permanent display: function allows you
to choose whether the multifunction display
always shows the outside temperature or the
speed.
The speed display is inverse to your speedome- ter.
X Press the =or; button on the steering
wheel to select the Settings
Settings menu.
X Press the :or9 button to select the
Instrument cluster Instrument cluster submenu.
X Press ato confirm.
X Press the :or9 button to select the
Permanent display:
Permanent display: function.
The current setting, outside temperature
outside temperature
or Dig. speedo [mph]:
Dig. speedo [mph]:, appears.
X Press the abutton to save the setting.
Lights Switching the daytime driving lights
on/off
The Daytime driving lights Daytime driving lights function can
only be switched on with the engine turned off.
X Press the =or; button on the steering
wheel to select the Settings
Settingsmenu.
X Press the :or9 button to select the
Lights
Lights submenu.
X Press ato confirm.
X Press the :or9 button to select the
Daytime driving lights
Daytime driving lights function.
If the Daytime
Daytime driving
drivinglights
lightsfunction has
been switched on, the cone of light and the
W symbol in the multifunction display are
shown in orange.
X Press the abutton to save the setting.
Further information on daytime driving lights
(Y page 116).
Vehicle Setting permanent SPEEDTRONIC
You can set the permanent limiter using the
Limit speed (winter tyres):
Limit speed (winter tyres): function.
X Press the =or; button on the steering
wheel to select the Settings Settingsmenu.
X Press the :or9 button to select the
Vehicle
Vehicle submenu. X
Press ato confirm.
X Press :or9 to select the Limit
Limit
speed (winter tyres):
speed (winter tyres): function.
You will see the current setting.
X Press ato confirm.
X Press the :or9 button to adjust the
permanent speed limiter in increments of ten
(160 km/h 160 km/h to240 km/h
240 km/h). The Off
Offsetting
switches the permanent speed limiter off.
X Press the abutton to store the entry.
Further information on the permanent speed
limiter (Y page 180).
Activating/deactivating the automatic
locking feature
X Press the =or; button on the steering
wheel to select the Settings Settingsmenu.
X Press the :or9 button to select the
Vehicle
Vehicle submenu.
X Press ato confirm.
X Press the :or9 button to select the
Automatic door locks
Automatic door locks function.
If the Automatic door locks
Automatic door locks function is
switched on, the multifunction display shows
the vehicle's doors in orange.
X Press ato save the setting.
If you activate the Automatic door locks
Automatic door locks
function, the vehicle is centrally locked above a
speed of around 15 km/h.
For further information on the automatic locking feature; see (Y page 87).
Activating/deactivating the acoustic
locking confirmation
If you switch on the Acoustic AcousticLock
Lockfunction, an
acoustic signal sounds when you lock the vehi-
cle.
X Press the =or; button on the steering
wheel to select the Settings Settingsmenu.
X Press the :or9 button to select the
Vehicle
Vehicle submenu.
X Press ato confirm.
X Press the :or9 button to select the
Acoustic Lock
Acoustic Lock function.
If the Acoustic Lock
Acoustic Lock function is activated,
the & symbol in the multifunction display
lights up orange.
X Press the abutton to save the setting. Menus and submenus
229On-board computer and displays Z
Page 234 of 369
X
Press the :or9 button to set the
selected display.
X Press the abutton to store the entry.
The yellow indicator lamp on the auxiliary
heating button lights up.
Comfort Switching belt adjustment on/off
X Press the =or; button on the steering
wheel to select the Settings Settingsmenu.
X Press the :or9 button to select the
Convenience
Convenience submenu.
X Press ato confirm.
X Press the :or9 button to select the
Belt adjustment
Belt adjustment function.
When the Belt adjustment
Belt adjustment function is acti-
vated, the seat belt is displayed in orange in
the multifunction display.
X Press the abutton to save the setting.
Further information on belt adjustment
(Y page 45).
Switching the fold mirrors in when lock-
ing function on/off This function is only available when the vehicle is
equipped with the electrical fold-in function.
When you activate the Auto. fold-in mir‐
Auto. fold-in mir‐
rors
rors function, the exterior mirrors are folded in
when the vehicle is locked. When you unlock the vehicle and then open the driver's or front-
passenger door, the exterior mirrors fold out
again.
If you have switched on the Auto. fold-in
Auto. fold-in
mirrors
mirrors function and you fold in the exterior
mirrors using the button on the door
(Y page 113), they will not fold out automati-
cally. The exterior mirrors can then only be fol-
ded out using the button on the door.
X Press the =or; button on the steering
wheel to select the Settings
Settings menu.
X Press the :or9 button to select the
Convenience Convenience submenu.
X Press ato confirm.
X Press the :or9 button to select the
Auto. fold-in mirrors
Auto. fold-in mirrors function.
If the Auto. fold-in mirrors
Auto. fold-in mirrors function is
switched on, the multifunction display shows the exterior mirror in orange.
X Press ato save the setting. Resetting to factory settings X
Press the =or; button on the steering
wheel to select the Settings
Settingsmenu.
X Press the :or9 button to select the
Factory setting
Factory setting submenu.
X Press ato confirm.
The Reset all settings?
Reset all settings? function
appears.
X Press the :or9 button to select No
Noor
Yes
Yes.
X Press the abutton to confirm the selec-
tion.
If you have selected Yes Yes, the multifunction
display shows a confirmation message.
For safety reasons, not all functions are reset:
the Limit Limit speed
speed(winter
(winter tyres)
tyres)function of
the permanent speed limiter can only be set in
the Vehicle
Vehicle submenu.
If you want to reset the Daytime driving Daytime driving
lights
lights function in the Lights
Lightssubmenu, you
must turn the key to position 1in the ignition
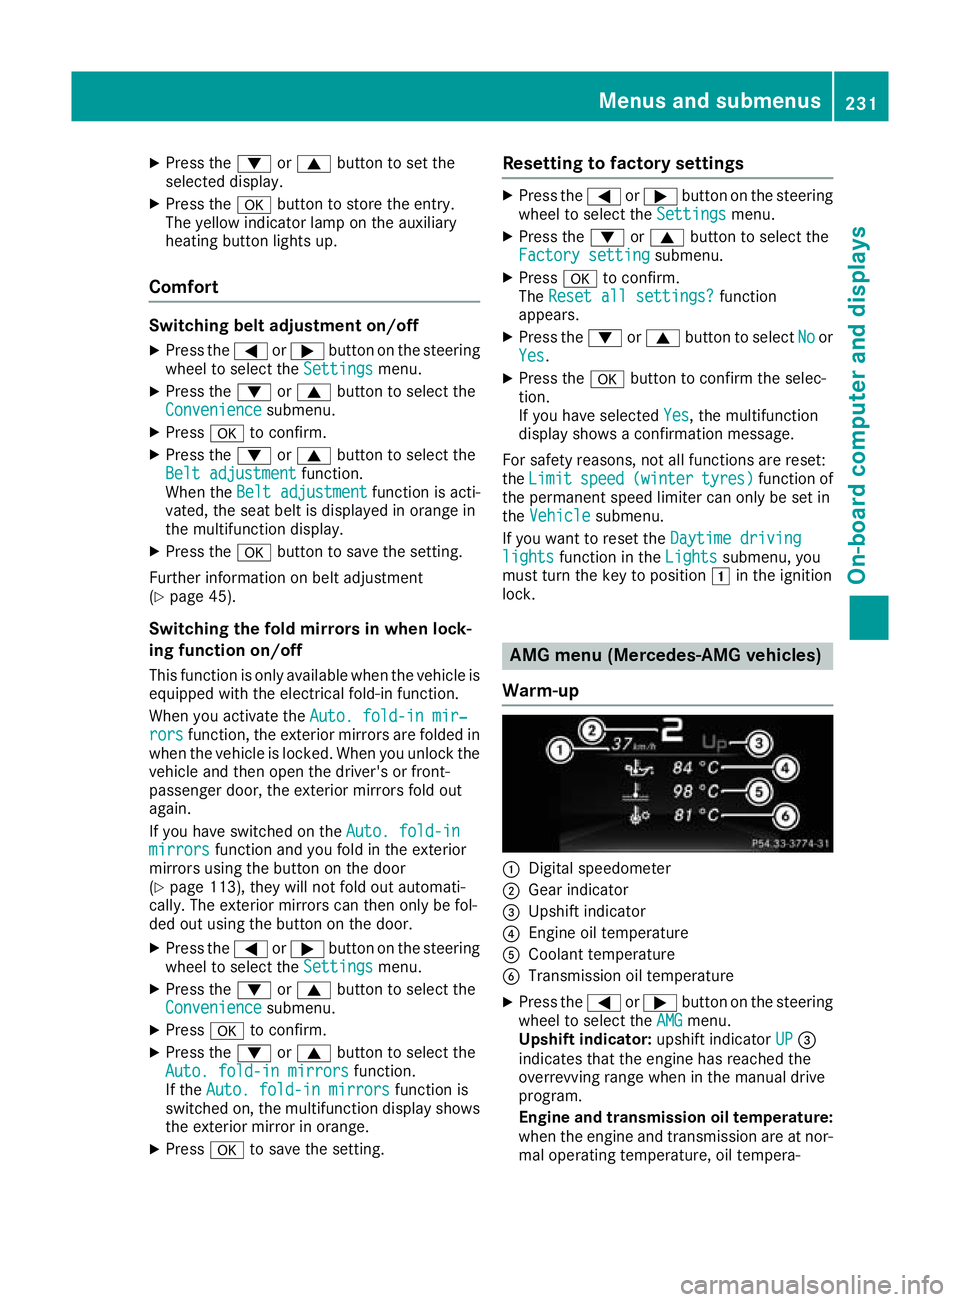
lock. AMG menu (Mercedes-AMG vehicles)
Warm-up :
Digital speedometer
; Gear indicator
= Upshift indicator
? Engine oil temperature
A Coolant temperature
B Transmission oil temperature
X Press the =or; button on the steering
wheel to select the AMG AMGmenu.
Upshift indicator: upshift indicatorUP UP=
indicates that the engine has reached the
overrevving range when in the manual drive
program.
Engine and transmission oil temperature: when the engine and transmission are at nor-
mal operating temperature, oil tempera- Menus and submenus
231On-board computer and displays Z
Page 235 of 369
ture
?and Bare displayed in white in the
multifunction display.
If the multifunction display shows oil temper- ature ?orB in blue, the engine or the
transmission are not yet at normal operating
temperature. Avoid using the full output of the engine during this time.
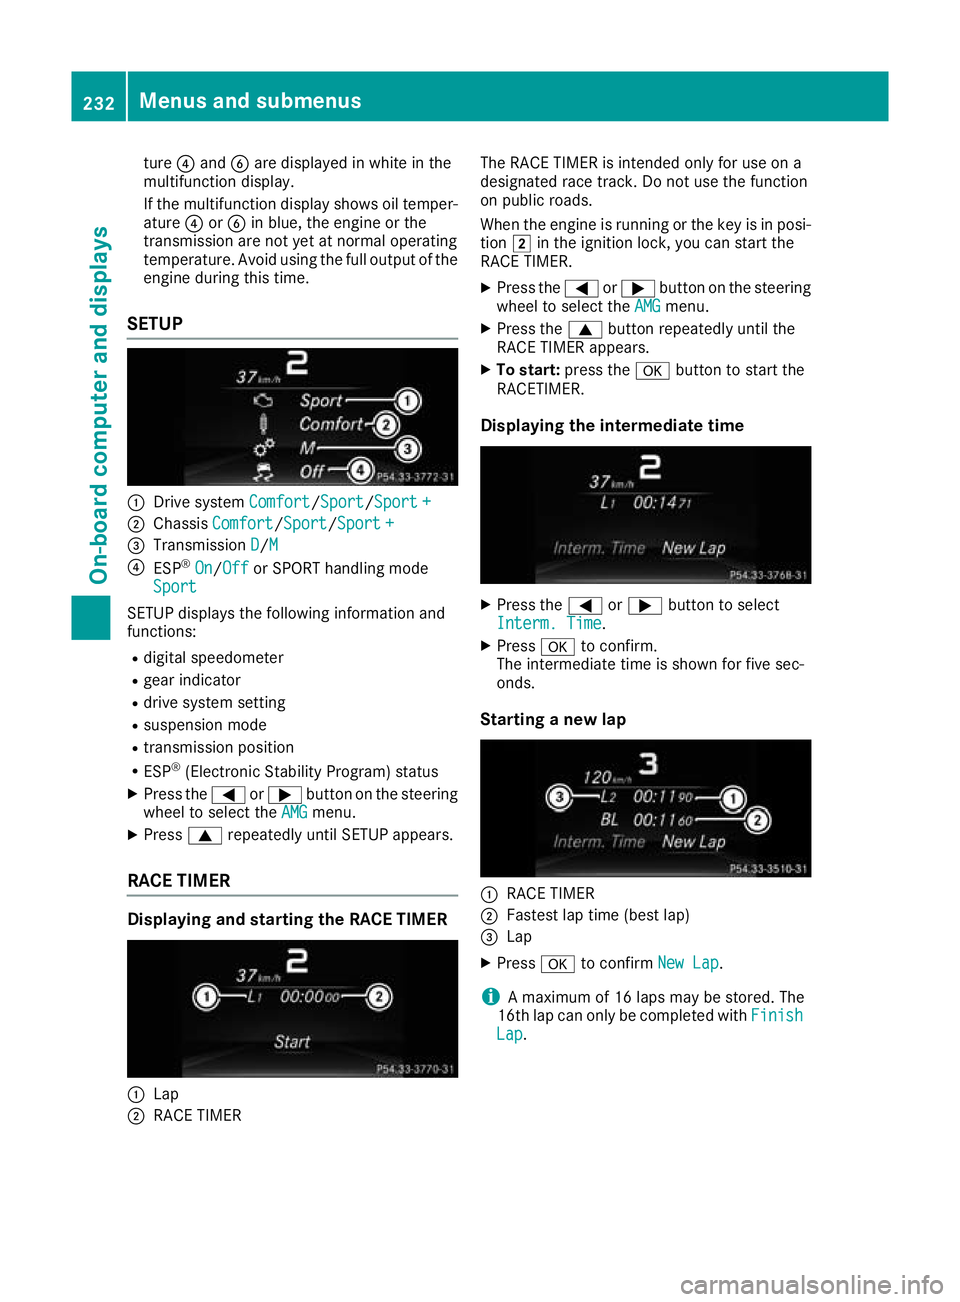
SETUP :
Drive system Comfort Comfort/Sport
Sport/Sport +
Sport +
; Chassis Comfort
Comfort/Sport Sport/Sport +
Sport +
= Transmission D
D/MM
? ESP ®
On
On/ Off
Off or SPORT handling mode
Sport
Sport
SETUP displays the following information and
functions:
R digital speedometer
R gear indicator
R drive system setting
R suspension mode
R transmission position
R ESP ®
(Electronic Stability Program) status
X Press the =or; button on the steering
wheel to select the AMG
AMG menu.
X Press 9repeatedly until SETUP appears.
RACE TIMER Displaying and starting the RACE TIMER
:
Lap
; RACE TIMER The RACE TIMER is intended only for use on a
designated race track. Do not use the function
on public roads.
When the engine is running or the key is in posi- tion 2in the ignition lock, you can start the
RACE TIMER.
X Press the =or; button on the steering
wheel to select the AMG AMGmenu.
X Press the 9button repeatedly until the
RACE TIMER appears.
X To start: press the abutton to start the
RACETIMER.
Displaying the intermediate time X
Press the =or; button to select
Interm. Time Interm. Time.
X Press ato confirm.
The intermediate time is shown for five sec-
onds.
Starting a new lap :
RACE TIMER
; Fastest lap time (best lap)
= Lap
X Press ato confirm New Lap
New Lap.
i A maximum of 16 laps may be stored. The
16th lap can only be completed with Finish
Finish
Lap
Lap . 232
Menus and submenusOn-board computer and displays
Page 236 of 369
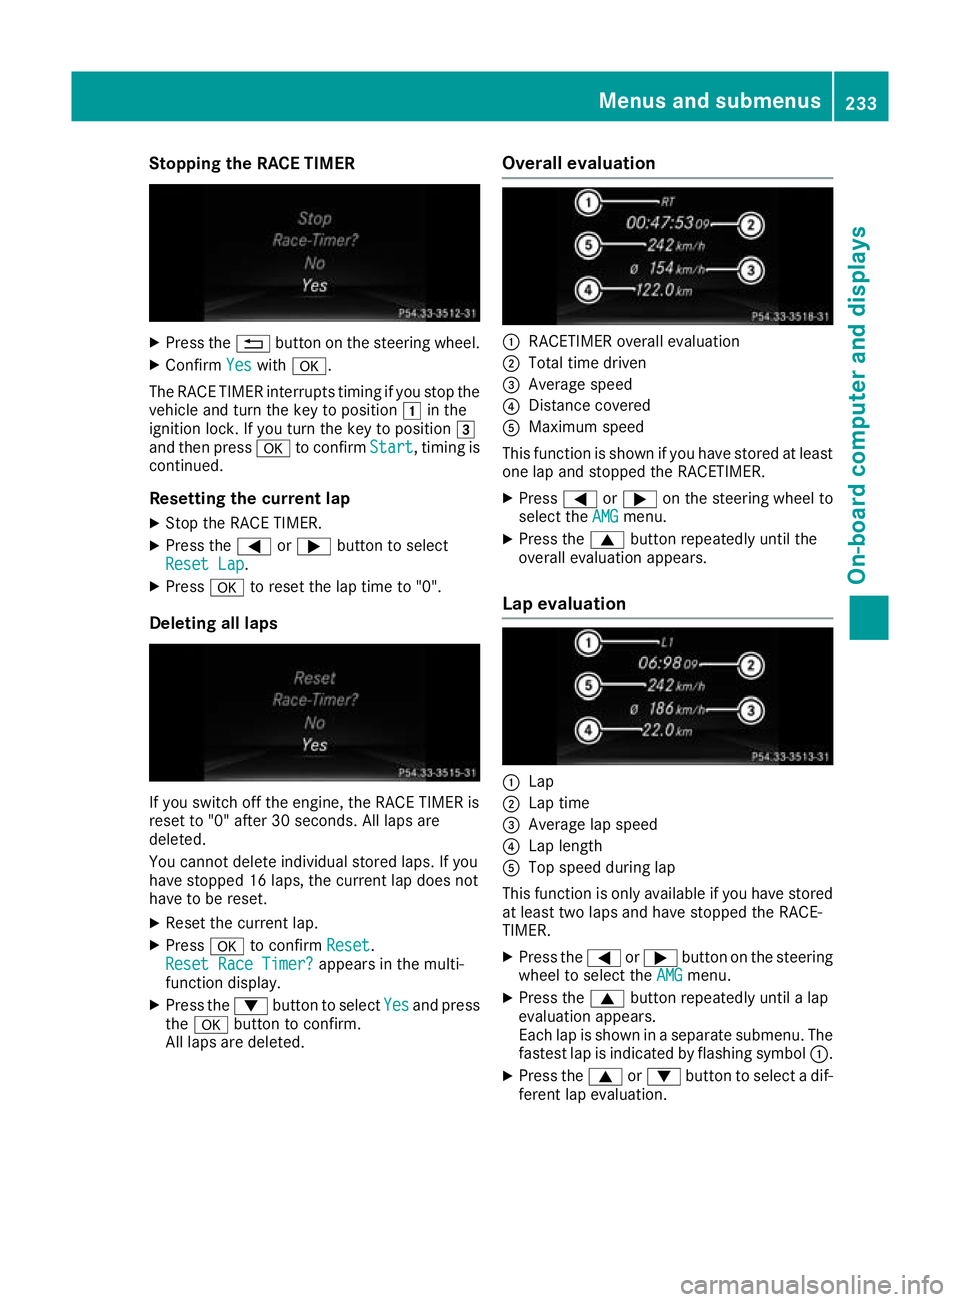
Stopping the RACE TIMER
X
Press the %button on the steering wheel.
X Confirm Yes
Yes with a.
The RACE TIMER interrupts timing if you stop the
vehicle and turn the key to position 1in the
ignition lock. If you turn the key to position 3
and then press ato confirm Start
Start, timing is
continued.
Resetting the current lap
X Stop the RACE TIMER.
X Press the =or; button to select
Reset Lap Reset Lap.
X Press ato reset the lap time to "0".
Deleting all laps If you switch off the engine, the RACE TIMER is
reset to "0" after 30 seconds. All laps are
deleted.
You cannot delete individual stored laps. If you
have stopped 16 laps, the current lap does not
have to be reset.
X Reset the current lap.
X Press ato confirm Reset Reset.
Reset Race Timer?
Reset Race Timer? appears in the multi-
function display.
X Press the :button to select Yes
Yes and press
the a button to confirm.
All laps are deleted. Overall evaluation :
RACETIMER overall evaluation
; Total time driven
= Average speed
? Distance covered
A Maximum speed
This function is shown if you have stored at least one lap and stopped the RACETIMER.
X Press =or; on the steering wheel to
select the AMG
AMGmenu.
X Press the 9button repeatedly until the
overall evaluation appears.
Lap evaluation :
Lap
; Lap time
= Average lap speed
? Lap length
A Top speed during lap
This function is only available if you have stored
at least two laps and have stopped the RACE-
TIMER.
X Press the =or; button on the steering
wheel to select the AMG
AMG menu.
X Press the 9button repeatedly until a lap
evaluation appears.
Each lap is shown in a separate submenu. The fastest lap is indicated by flashing symbol :.
X Press the 9or: button to select a dif-
ferent lap evaluation. Menus and submenus
233On-board computer and displays Z
Page 243 of 369
Display messages
Possible causes/consequences and
M
MSolutions !
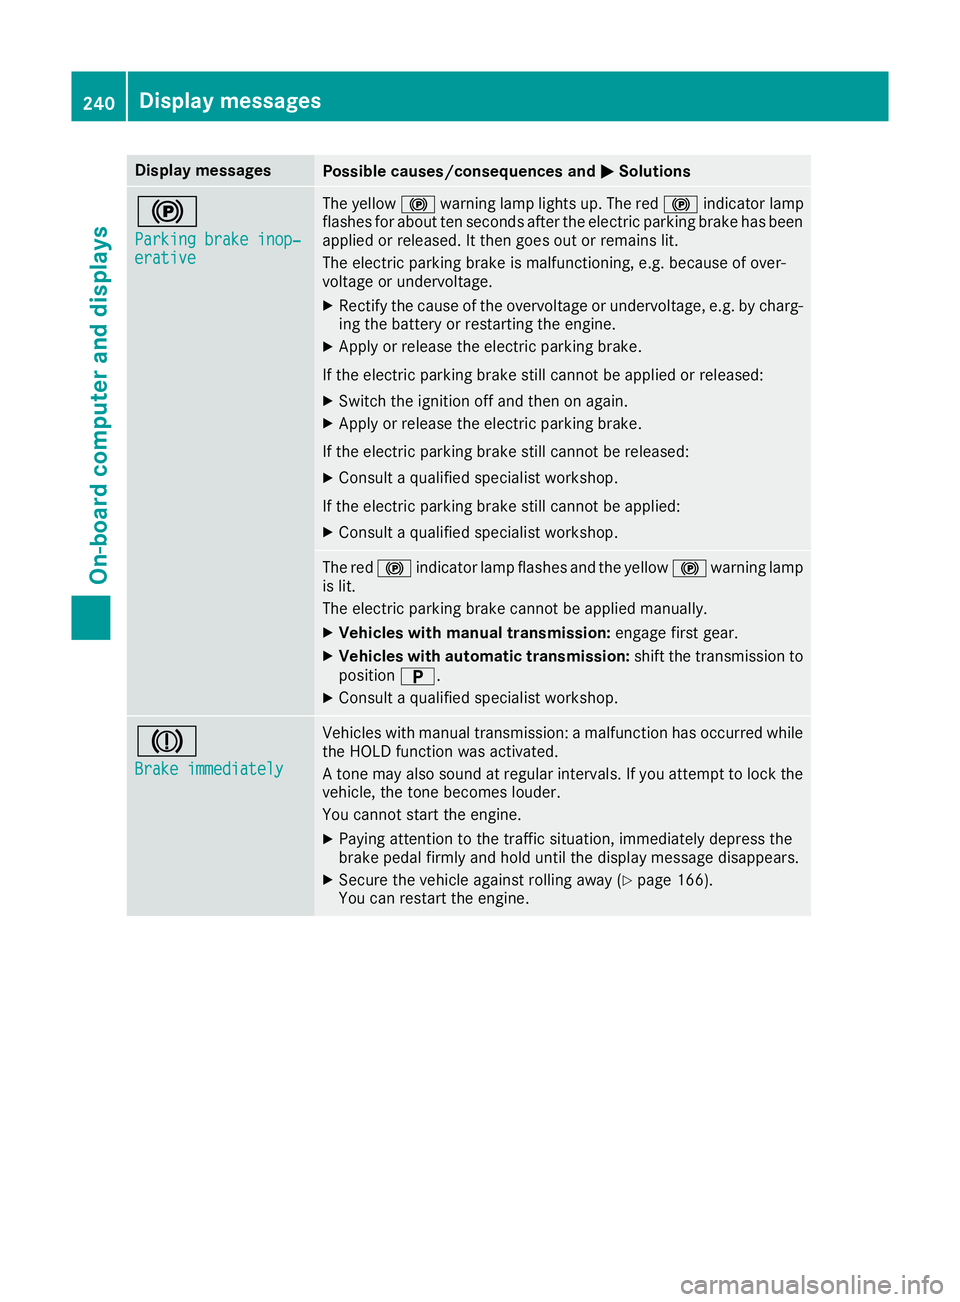
Parking brake inop‐ Parking brake inop‐
erative erative The yellow
!warning lamp lights up. The red !indicator lamp
flashes for about ten seconds after the electric parking brake has been applied or released. It then goes out or remains lit.
The electric parking brake is malfunctioning, e.g. because of over-
voltage or undervoltage.
X Rectify the cause of the overvoltage or undervoltage, e.g. by charg-
ing the battery or restarting the engine.
X Apply or release the electric parking brake.
If the electric parking brake still cannot be applied or released: X Switch the ignition off and then on again.
X Apply or release the electric parking brake.
If the electric parking brake still cannot be released: X Consult a qualified specialist workshop.
If the electric parking brake still cannot be applied:
X Consult a qualified specialist workshop. The red
!indicator lamp flashes and the yellow !warning lamp
is lit.
The electric parking brake cannot be applied manually.
X Vehicles with manual transmission: engage first gear.
X Vehicles with automatic transmission: shift the transmission to
position B.
X Consult a qualified specialist workshop. J
Brake immediately Brake immediately Vehicles with manual transmission: a malfunction has occurred while
the HOLD function was activated.
A tone may also sound at regular intervals. If you attempt to lock the
vehicle, the tone becomes louder.
You cannot start the engine.
X Paying attention to the traffic situation, immediately depress the
brake pedal firmly and hold until the display message disappears.
X Secure the vehicle against rolling away (Y page 166).
You can restart the engine. 240
Display
messagesOn-board computer and displays
Page 244 of 369
Display messages
Possible causes/consequences and
M
MSolutions J
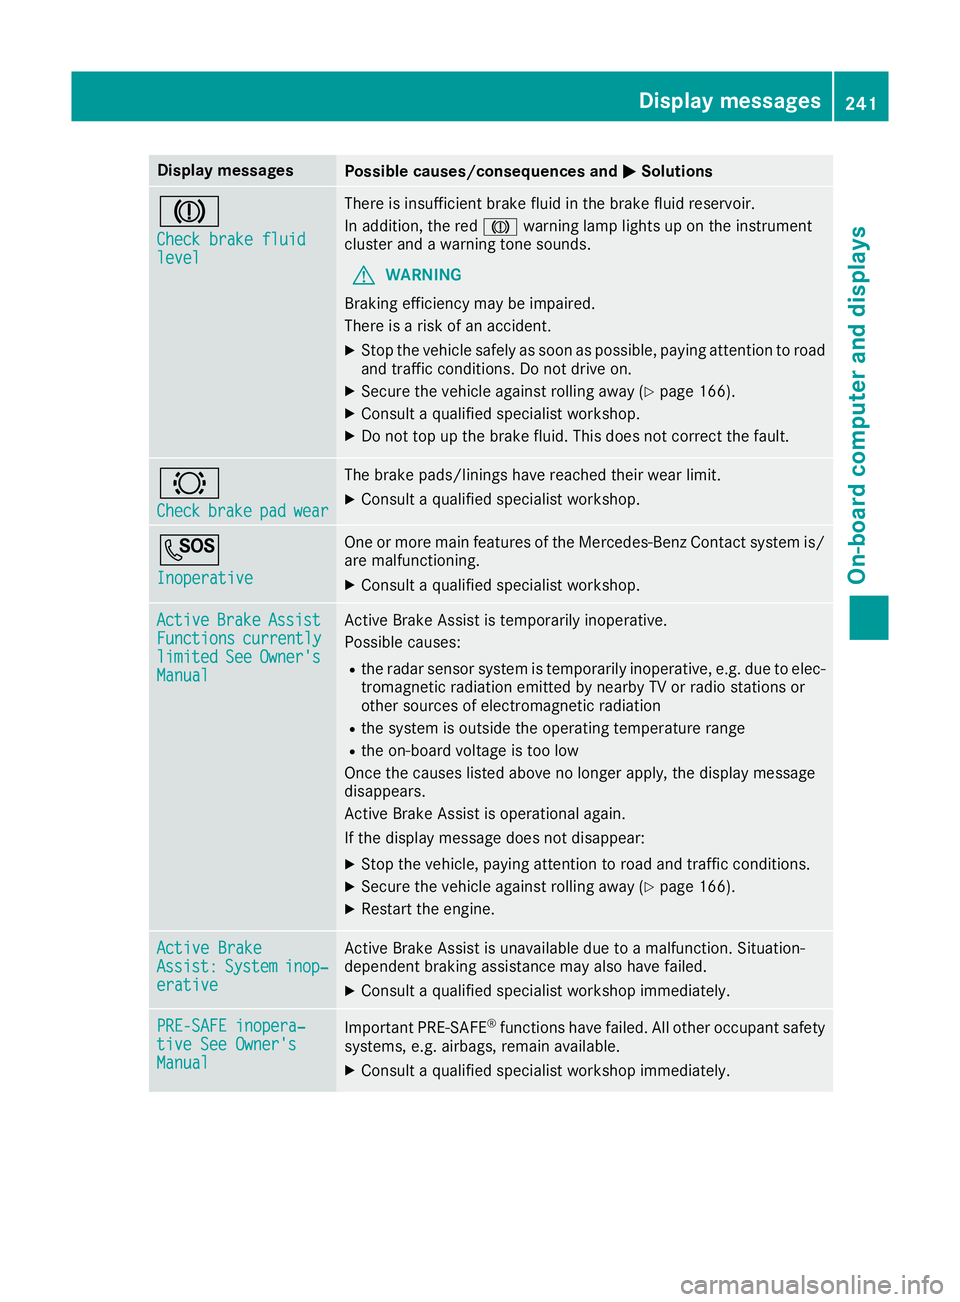
Check brake fluid Check brake fluid
level level There is insufficient brake fluid in the brake fluid reservoir.
In addition, the red Jwarning lamp lights up on the instrument
cluster and a warning tone sounds.
G WARNING
Braking efficiency may be impaired.
There is a risk of an accident.
X Stop the vehicle safely as soon as possible, paying attention to road
and traffic conditions. Do not drive on.
X Secure the vehicle against rolling away (Y page 166).
X Consult a qualified specialist workshop.
X Do not top up the brake fluid. This does not correct the fault. #
Check Check
brake
brakepad
padwear
wear The brake pads/linings have reached their wear limit.
X Consult a qualified specialist workshop. G
Inoperative Inoperative One or more main features of the Mercedes-Benz Contact system is/
are malfunctioning.
X Consult a qualified specialist workshop. Active
Active
Brake
BrakeAssist
Assist
Functions
Functions currently
currently
limited
limited See
SeeOwner's
Owner's
Manual
Manual Active Brake Assist is temporarily inoperative.
Possible causes:
R the radar sensor system is temporarily inoperative, e.g. due to elec-
tromagnetic radiation emitted by nearby TV or radio stations or
other sources of electromagnetic radiation
R the system is outside the operating temperature range
R the on-board voltage is too low
Once the causes listed above no longer apply, the display message
disappears.
Active Brake Assist is operational again.
If the display message does not disappear:
X Stop the vehicle, paying attention to road and traffic conditions.
X Secure the vehicle against rolling away (Y page 166).
X Restart the engine. Active Brake Active Brake
Assist: Assist:
System
Systeminop‐
inop‐
erative
erative Active Brake Assist is unavailable due to a malfunction. Situation-
dependent braking assistance may also have failed.
X Consult a qualified specialist workshop immediately. PRE-SAFE inopera‐
PRE-SAFE inopera‐
tive See Owner's tive See Owner's
Manual Manual
Important PRE-SAFE
®
functions have failed. All other occupant safety
systems, e.g. airbags, remain available.
X Consult a qualified specialist workshop immediately. Display
messages
241On-board computer and displays Z