2017 MERCEDES-BENZ G-Class headlamp
[x] Cancel search: headlampPage 131 of 286

Checklist after driving off-road
!If you detect damagetothevehicle after
driving off-road, have th evehicle checked
immediately at aqualified specialist work-
shop.
Drivin goverroug hterra in places greater
demands on your vehicle than driving on normal
roads. Afte rdriving off-road, check th evehicle.
This allows you to detect damag epromptly and
reduc ethe riskofana ccidenttoy ourself and
other road users.
XShift th etransfer cas etotheon-road position
HIG HRANGE (Ypage 146).
XDisengage th edifferential locks
(Ypage 149).
XClean th eheadlamps and rear lightsa nd
check for damage.
XClean th efront and rear licens eplates.
XClean th ewheelsa nd tires withaw aterjet
and remove any foreign objects.
XClean th ewheels, wheel housing sand the
vehicle underside withaw aterjet;c he ck for
any foreign object sand damage.
XCheckw hether twigs or other part sofplants
have become trapped. Thesei ncreasethe risk
of fir eand can damag efuel pipes,b rake
hoses or th erubbe rbellows of th eaxle joints
and propeller shafts.
XAfte rthe trip, examin ewithout fail th eentire
undercarriage, wheels, tires, brakes, body-
work structure, steering ,cha ssis and exhaust
system for damage.
XAfte rdriving in sand, mud, gravel, wate ror
similar dirt yconditions, have th efollowing
checked and cleaned:
Rbrak ediscs
Rwheels
Rbrak epads
Raxle joints
XIf you notic estron gv ibrations after off-road
driving ,che ck for foreign object sinthe
wheelsa nd drivetrain and ,ifnecessary,
remove them. Foreign object scan disturb the
balance and caus evibrations.
XCarr youtab rak etest.
Driving on sand
Observ ethe followingr ules when driving on
sand:
RShift th etransfer cas etotheoff-road driving
position LOW RANGE (Ypage 146).
RAvoid high engines peeds.
RShift theautomatic transmission to alow
gear.
RDrive quickly to overcome th erolling resist-
ance. Otherwise th evehicle's wheelsc ould
become stuck in looseg round.
RDrive in thetrack sofo ther vehicle sifpossi-
ble. When doings o, makesure that:
-thet irer utsa re no ttoo deep
-thes andiss ufficiently firm
-your vehicle has sufficient ground clear-
ance
Tirer utsa nd grave lroads
!Checkt hatthe rutsa re no ttoo deep and
that your vehicle has sufficient clearance.
Otherwise, your vehicle coul dbedamaged or
botto mout and get stuck.
Observ ethe followingr ules when driving along
rut sino ff-road terrain or on road swithl oose
gravel:
RShift th etransfer cas etotheoff-road driving
position LOW RANGE (Ypage 146).
RAvoid high engines peeds.
RObservethe safety note s(Ypage 127) and
th eg eneral note s(Ypage 127) on off-road
driving.
RShift th eautomatic transmission to alow
gear.
RDrive slowly.
RWherer utsa re to odeep, driv ewitht he
wheelsofo neside on th ecente rgrassy area,
if possible.
Driving over obstacles
!Obstacle scoul dd amag ethe floo roft he
vehicle or components of th echassis.A sk
passengersf or guidance when driving over
large obstacles. The passenger should always
keep asafe distanc efromt hevehicle when
doingsoino rder to avoid injury as aresult of
unexpected vehicle movements. Afte rdriving
off-road or ove robstacles, check th evehicle
Driving tips129
Driving and parking
Z
Page 168 of 286
matic headlamp mode is activated
(Ypage 86).
Rexteriorlighting delayeds witch-off:the
exterior lighting remains lit for 60 seconds
after the engine is switched off. If you close all
the doors and the trunk lid,t he exterior light-
ing goes off after five seconds.
iDepending on you rvehicle's equipment,
when the surround lighting and exterior light-
ing delayed switch-off are on, the following
lightu p:
RParking lamps
RLow-beamh eadlamps
RDaytime running lamps
RSide marker lamps
RSurround lighting in the exterior mirrors
Switching the interiorl ighting delayed
switch-off on/off
If you activate the Interior Lighting Delayfunction, the interior lighting remains on for
20 seconds after you remove the SmartKey from
the ignitionlock.
XPress the=or; button on the steering
wheeltos elect theSett.menu.
XPress the :or9 button to select the
Lightssubmenu.
XPress ato confirm.
XPress the :or9 button to select the
Interior Lighting Delayfunction.
If the Interior Lighting Delayfunction
has been activated ,the vehiclei nterior is dis-
played in red in the multifunction display.
XPress the abutton to save the setting.
Vehicle
Activating/deactivatingt he automatic
door locking mechanism
If you activate the AutomaticDoorLockfunc-
tion, the vehicleisc entrally locked above a
speed of approximately9 mph (15 km/h).
XPress the=or; button on the steering
wheeltos elect theSett.menu.
XPress the :or9 button to select the
Vehiclesubmenu.
XPress ato confirm.
XPress the :or9 button to select the
Automatic Door Lockfunction.
When the Automatic Door Lockfunction is
activated ,the vehicled oors are displayed in
red in the multifunction display.
XPress the abutton to save the setting.
For further informatio nonthe automatic locking
feature ,see (
Ypage 67).
Activating/deactivatingt he acoustic
locking verification signal
If you switch on the AcousticLockfunction, an
acoustic signal sounds when you lock the vehi-
cle.
XPress the =or; button on the steering
wheeltos elect theSett.menu.
XPress the :or9 button to select the
Vehiclesubmenu.
XPress ato confirm.
XPress the :or9 button to select the
Acoustic Lockfunction.
If the Acoustic Lockfunction is activated,
the & symbo linthe multifunction display
lights up red.
XPress the abutton to save the setting.
Comfort
Activating/deactivatin gthe EASY-
ENTRY/EXIT feature
GWARNING
When the EASY-ENTRY/EXIT feature adjusts
the steering wheel, you and other vehicle
occupants –particularl ychildren –could
become trapped. There is arisk of injury.
Whilet he EASY-ENTRY/EXIT feature is mak-
ing adjustments, make sure that no one has
any body parts in the sweepoft he steering
wheel.
If somebody becomes trapped:
Rpress one of the memory function position
buttons, or
Rmove the switch for steering wheela djust-
ment in the opposite directiontot hat in
which the steering wheelism oving.
The adjustment process is stopped.
166Menus and submenus
On-board computer and displays
Page 213 of 286
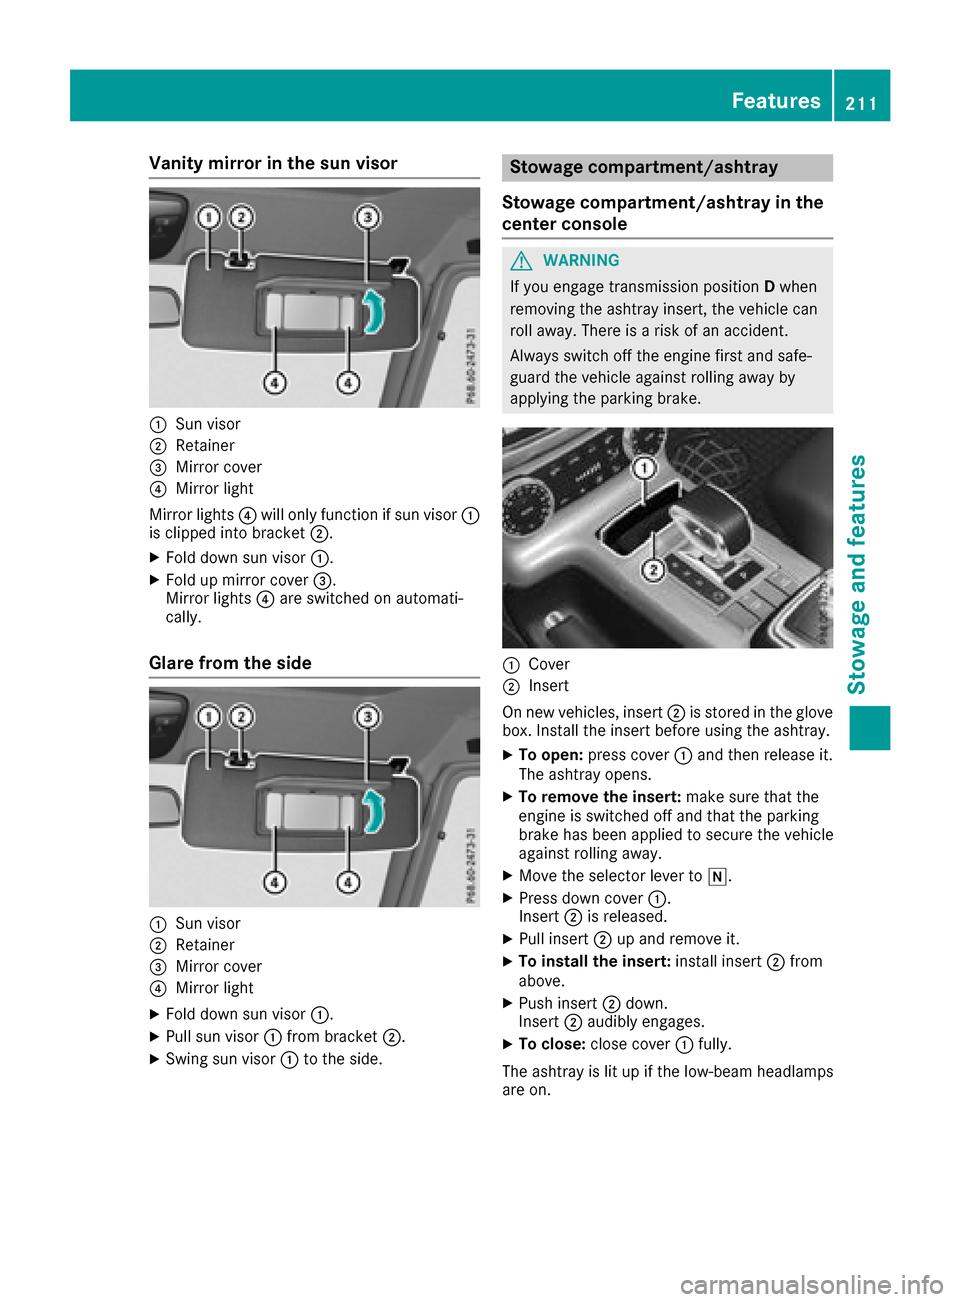
Vanity mirrorinthe sun visor
:Sun visor
;Retainer
=Mirror cover
?Mirror light
Mirror lights ?will onlyf unctionifsunvisor :
is clipped into bracket ;.
XFolddowns un visor :.
XFoldupm irror cover =.
Mirror lights ?are switched on automati-
cally.
Glare from the side
:Sun visor
;Retainer
=Mirror cover
?Mirror light
XFoldd owns un visor :.
XPull sunv isor:from bracket ;.
XSwing sunvisor:to the side.
Stowage compartment/ashtray
Stowage compartment/ashtray in the
centerc onsole
GWARNING
If yo uengage transmission position Dwhen
removing the ashtrayi nsert, the vehiclecan
rolla way. There is ariskofana ccident.
Alway sswitch off the engine first and safe-
guard the vehicl eagain st rolling away by
applying the parking brake.
:Cover
;Insert
On new vehicles, insert ;is stored in the glove
box. Install the insert before using the ashtray.
XTo open: press cover :and then release it.
The ashtrayo pens.
XTo remove the insert: make sure thatthe
engine is switched off and thatt he parking
brake hasb eena pplied to secure the vehicle
against rolling away.
XMov ethe selecto rlev er to i.
XPress down cover :.
Insert ;is released.
XPull insert ;up and remove it.
XTo installt he insert:installinsert ;from
above.
XPush insert ;down.
Insert ;audibl yengages.
XTo close: close cover :fully.
The ashtrayisl itup if the low-bea mheadlamps
are on.
Features211
Stowag eand featur es
Z
Page 231 of 286
If you need to do any work inside the engine
compartment:
Rswitch off the ignition
Rnever reach into the area where there is a
risk of danger from moving components,
such as the fan rotation area
Rremove jewelry and watches
Rkeep items of clothing and hair, for exam-
ple, awayfrom moving parts
GWARNING
The cooling system is pressurized, particularly
when the motor is warm. If you open the cap,
you could be scaldedifh ot coolant spraysout.
There is arisk of injury.
Let the engine cool down before you open the
cap. Wear gloves and eye protection. Slowly
open the cap to relieve pressure.
GWARNING
Opening the hood when the engine is over-
heated or when there is afire in the engine
compartment could expose you to hot gases
or other service products. There is arisk of
injury.
Let an overheated engine cool down before
opening the hood. If there is afire in the
engine compartment, keep the hood closed
and contact the fire department.
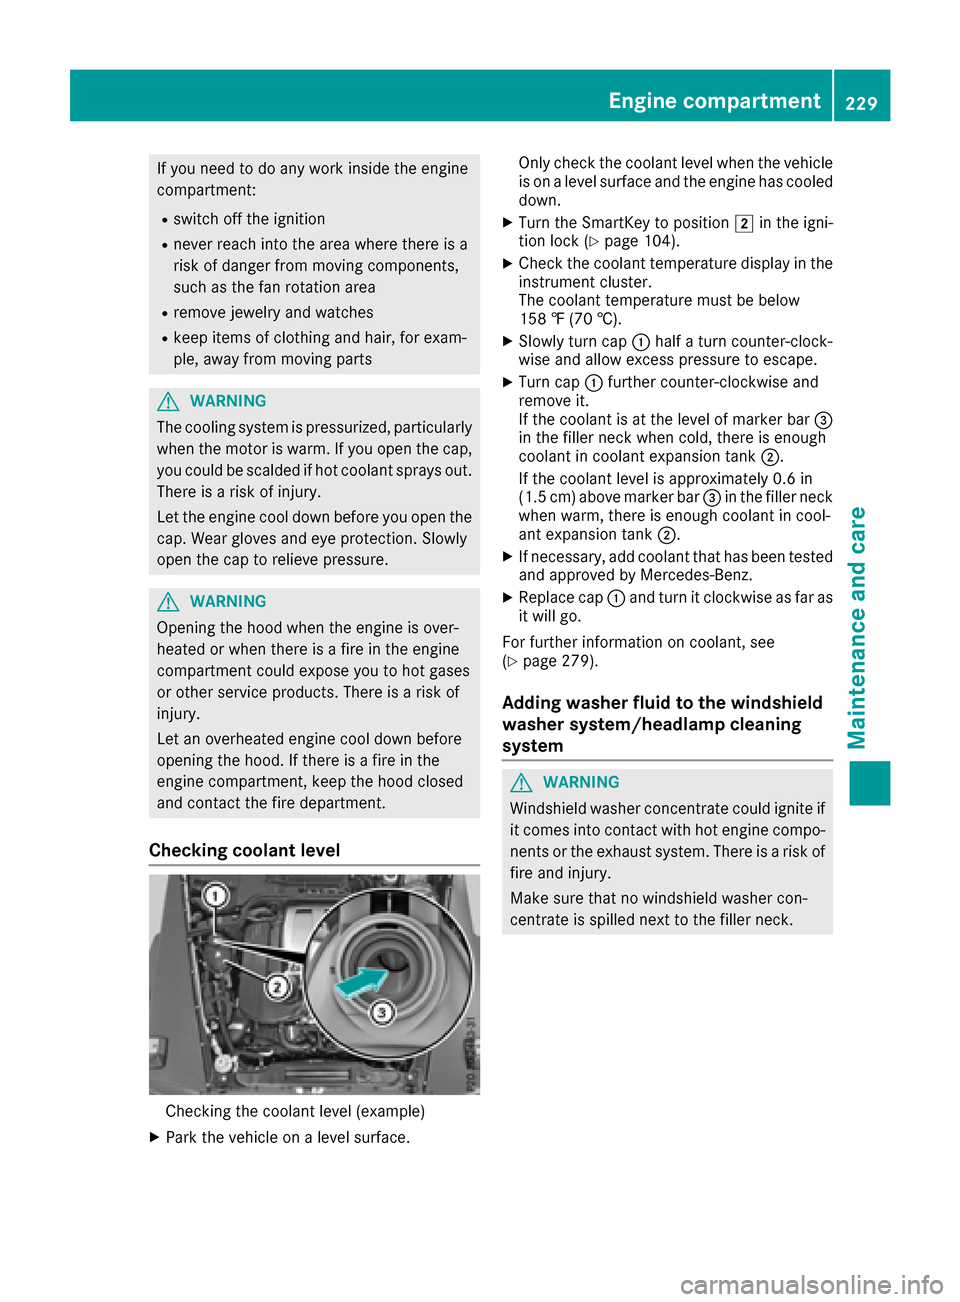
Checking coolant level
Checking the coolant level (example)
XPark the vehicle on alevel surface. Only check the coolant level when the vehicle
is on alevel surface and the engine has cooled
down.
XTurn the SmartKey to position 2in the igni-
tion lock (Ypage 104).
XCheck the coolant temperature display in the
instrument cluster.
The coolant temperature must be below
158 ‡(70 †).
XSlowlyt urn cap :half aturn counter-clock-
wise and allow excess pressure to escape.
XTurn cap :further counter-clockwise and
remove it.
If the coolant is at the level of marker bar =
in the fillern eck when cold, there is enough
coolant in coolant expansion tank ;.
If the coolant level is approximately 0.6 in
(1.5 cm) above marker bar =in the fillern eck
when warm, there is enough coolant in cool-
ant expansion tank ;.
XIf necessary,add coolant that has been tested
and approved by Mercedes-Benz.
XReplace cap :and turn it clockwise as far as
it willg o.
For further information on coolant, see
(
Ypage 279).
Adding washe rfluid to the windshield
washe rsystem/headlamp cleaning
system
GWARNING
Windshield washer concentrate could ignite if it comes into contact with hot engine compo-
nents or the exhaust system. There is arisk of
fire and injury.
Make sure that no windshield washer con-
centrate is spilled next to the fillern eck.
Engine compartment229
Maintenanceand care
Z
Page 232 of 286
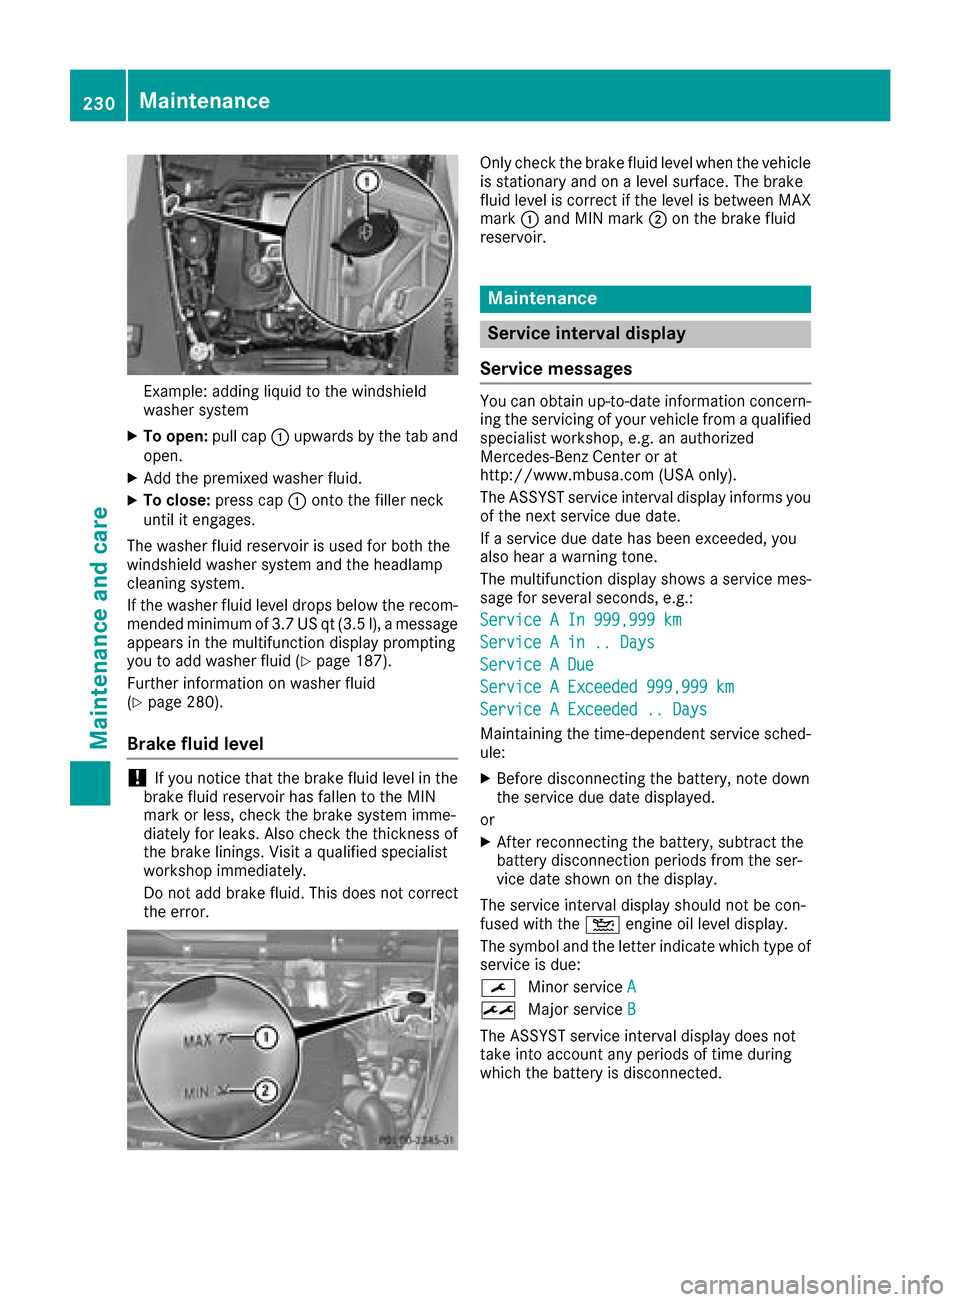
Example: adding liquid to the windshield
washersystem
XTo open: pull cap:upwards by the tab and
open.
XAdd the premixed washe rfluid.
XTo close: press cap :onto the fille rneck
unti lite ngages.
The washe rfluid reservoi risusedf or both the
windshiel dwashers ystem and the headlamp
cleaning system.
If the washe rfluid level drops belo wthe recom-
mended minimu mof3.7 US qt (3.5 l) ,amessage
appear sinthe multifunctio ndisplay prompting
yo utoa ddwashe rfluid (
Ypage 187).
Furtheri nformatio nonwasherf luid
(
Ypage 280).
Brake fluid level
!If yo unotice thatt he brake fluid level in the
brake fluid reservoi rhas fallen to the MIN
mark or less, check the brake system imme-
diately for leaks .Alsoc heck the thicknes sof
the brake linings. Visitaq ualified specialist
workshop immediately.
Do not ad dbrake fluid .Thisd oesn ot correct
the error.
Onlyc heck the brake fluid level when the vehicle
is stationar yand on alevel surface. The brake
fluid level is correct if the level is between MAX
mark :and MIN mark ;on the brake fluid
reservoir.
Maintenance
Service interval display
Service messages
Yo uc an obtai nup-to-date informatio nconcern-
ing the servicing of your vehicl efromaq ualified
specialis tworkshop ,e.g.ana uthorized
Mercedes-Benz Center or at
http://www.mbusa.com (USA only).
The ASSYST servic eintervald isplayinforms you
of the next servic eduedate.
If as ervic eduedate hasb eene xceeded ,you
also hear awarning tone.
The multifunctio ndisplay shows aservic emes-
sage for severa lseconds, e.g.:
ServiceAIn9 99,999km
ServiceAin..D ays
ServiceADue
ServiceAExceeded 999,999k m
ServiceAExceeded .. Days
Maintaining the time-dependent servic esched-
ule:
XBefore disconnecting the battery ,note down
the servic eduedate displayed.
or
XAfter reconnecting the battery ,sub tract the
battery disconnection periods fromt he ser-
vic ed ates hown on the display.
The servic eintervald isplayshouldnot be con-
fused with the 4engine oi llev el display.
The symbo land the letter indicate which typ eof
servic eisdue:
¯ Minor service A
±
Major service B
The ASSYST servic eintervald isplaydoes not
take into account any periods of time during
which the battery is disconnected.
230Maintenance
Maintenance and care
Page 282 of 286
The antifreeze/corrosion inhibitor concentra-
tion in the engine cooling system should:
Rbe at least 50%. This will protectthe engine
cooling system against freezin gdown to
approximately -35 ‡(-37 †).
Rnot exceed 55% (antifreez eprotection down
to -49 ‡[-45 †]). Otherwise, heat will not be
dissipated as effectively.
Mercedes-Benz recommends an antifreeze/
corrosion inhibitor in accordanc ewith MB Spec-
ifications for ServiceP roducts 310.1.
iWhen the vehicle is first delivered, it is filled
with acoolant mixture that ensures adequate
antifreeze and anti-corrosion protection.
iThe coolant is checked at specified intervals
at aq ualified specialist workshop.
The engine cooling system is filled with coolant
at the factor ywhich contains antifreeze/corro-
sion inhibitor that ensures protection down to
approximately -35 ‡(-37 †).
Capacity
Missing values were not availableatt ime of
going to print.
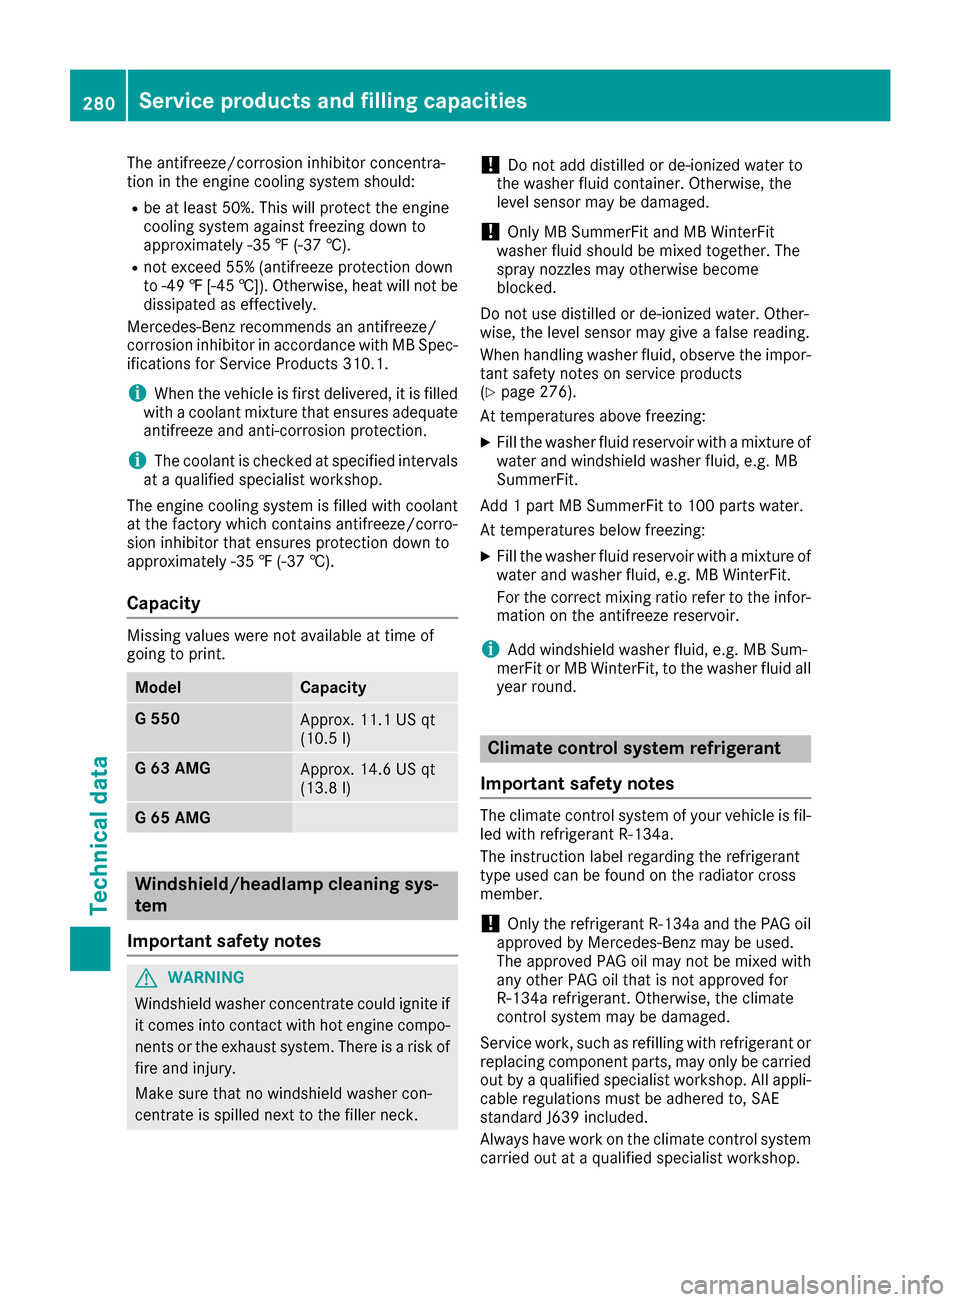
ModelCapacity
G5 50Approx.1 1.1 US qt
(10.5 l)
G63A MGApprox.1 4.6 US qt
(13.8 l)
G65A MG
Windshield/headlamp cleaning sys-
tem
Important safety notes
GWARNING
Windshield washer concentrate could ignite if it comes into contact with hot engine compo-
nentsort he exhaust system. There is arisk of
fire and injury.
Make sure that no windshield washer con-
centrate is spilled next to the filler neck.
!Do not add distilled or de-ionized water to
the washer fluid container. Otherwise, the
level sensor may be damaged.
!Only MB SummerFit and MB WinterFit
washer fluid should be mixed together. The
spray nozzles may otherwise become
blocked.
Do not use distilled or de-ionized water. Other-
wise, the level sensor may give afalse reading.
When handling washer fluid, observe the impor-
tant safety notes on service products
(
Ypage 276).
At temperatures above freezing:
XFill the washer fluid reservoir with amixture of
water and windshield washer fluid, e.g. MB
SummerFit.
Add 1part MB SummerFit to 100 parts water.
At temperatures below freezing:
XFill the washer fluid reservoir with amixture of
water and washer fluid, e.g. MB WinterFit.
For the correctm ixing ratio refer to the infor-
mation on the antifreeze reservoir.
iAdd windshield washer fluid, e.g. MB Sum-
merFit or MB WinterFit, to the washer fluid all
year round.
Climate control system refrigerant
Important safety notes
The climate control system of your vehicle is fil-
led with refrigerant R‑ 134a.
The instruction label regarding the refrigerant
type used can be found on the radiator cross
member.
!Only the refrigerant R‑134a and the PAG oil
approved by Mercedes-Benz may be used.
The approved PAG oil may not be mixed with
any other PAG oil that is not approved for
R-134a refrigerant.O therwise, the climate
control system may be damaged.
Servicew ork, such as refilling with refrigerant or
replacing component parts, may only be carried
out by aqualified specialist workshop. All appli-
cable regulations must be adhered to, SAE
standard J639 included.
Always have work on the climate control system carried out at aqualified specialist workshop.
280Service products and filling capacities
Technical data