2017 MERCEDES-BENZ E43AMG change time
[x] Cancel search: change timePage 321 of 482

#Changetheflat tire immediately with
th e emer gency spa rewheel or spare
wheel. Alternativel y,consult a qualified
specialist workshop.
Ti re s with run-flat characteristics:
#Observ eth e information and warning
no tes on MOExtended tires (run-flat
tires).
In theeve nt of a flat tire, thefo llowing options
are available depending on your vehicle's equip‐
ment:
RVe hicles with MOExtended tires: it is pos‐
sible tocontinue the journey for a short
period of time. Make sure you observ eth e
no tes on MOExtended tires (run-flat tires)
(
→page 319).
RVe hicles with a TIREFIT kit: you can repair
th e tire so that it is possible tocontinue the
journ ey for a short period of time. Todo this,
use the TIREFIT kit (
→page 320).
RVe hicles with a Mercedes-Benz emer‐
ge ncy call sy stem: intheeve nt of a break‐ down, consult
the Mercedes-Benz emer gency
call sy stem Cus tomer Assis tance Center.
RChange the wheel (→page 362).
MOExtended tires (run-flat tires)
Wi th MOExtended tires (run-flat tires), you can
continue todrive your vehicle even if there is a
to ta l loss of pressure in one or more tires. How‐
eve r,th e tire af fected must not show any clear ly
visible dama ge.
Yo u can recognize MOExtended tires bythe
MOExtended marking which appears on the side
wa ll of the tire.
Ve hicles with a tire pressure monitoring sys‐
te m: MOExtended tires may only be used in con‐
junction wi than activated tire pressure monitor‐
ing sy stem.
If a pressure loss warning message appears in
th e multifunction display:
RCheck the tire for dama ge
RIf driving on, obser vethefo llowing no tes
&
WARNING Risk of accident when driving
in li mp-home mode
When driving in li mp-home mode, the han‐
dling characteristics are impaired. e.g. when
cornering, when accelerating stronglyand
when braking.
#Do not exceed the maximum permissi‐
ble speed.
#Av oid any abrupt steering and driving
maneuvers as well as driving over
obs tacles (curbs, pot holes, cross-coun‐
try). This applies, in part icular,toa loa‐
ded vehicle.
#Stop driving in limp-home mode if you
notice:
Rbanging noise
Rve hicle vibration
Rsmoke which smells like rubber
Rcontinuous ESP®inter vention
Rcrac ksin tire side walls
#After driving in limp-home mode, ha ve
th erims checkedby aqu alified special‐
Breakdown assis tance 31
9
Page 346 of 482

The system checks the tire pressure of the tires
ins talled on theve hicle bymeans of a tire pres‐
sure sensor.
New tire pressure sensor, e.g. in winter tires, are
automatically taught-in thefirs t time they are
driven.
The tire pressure appears in the multifunction
display (
→page 202).
If th ere is a subs tantial pressure loss or if the
tire temp erature is excessive, a warning will be
given:
RVi a display messages (→page 409).
RViath eh warning lamp in the instrument
clus ter (→page 440).
It is the driver's responsibility toset the tire
pressure tothere commended cold tire pressure
suitable forth e operating situation. Set the tire
pressure for cold tires using a tire pressure
ga uge. Notethat the cor rect tire pressure forth e
cur rent operating situation must firs t be taught-
in to the tire pressure monitor.
In most cases, the tire pressure monitoring sys‐
te m will auto matically update the new refere nce va
lues af teryo u ha vechanged the tire pressure.
Yo u can, ho wever,also update there fere nce val‐
ues byrestarting the tire pressure monitoring
sy stem manually (
→page 345).
Sy stem limitations
The t
ire pressure monitoring sy stem does not
issue a warning:
RIfth e tire pressure is set incor rectly.
RIfth ere is a sudden pressure loss caused, for
ex ample, byafo re ign object penetrating the
tire.
RIf th ere is a malfunction caused byano ther
ra dio signal source.
Be sure toalso observ eth efo llowing fur ther
re lated subjects:
RNo tes on tire pressure (→page 339)
Checking the tire pressure with the tire pres‐
sure moni toring sy stem
Requ irements
RThe ignition is switched on. On-board computer:
,�6�H�U�Y�L�F�H.�7�L�U�H �3�U�H�V�V�X�U�H
One of thefo llowing displa ysappears:
RCur rent tire pressure of ea chwheel:
R�7�L�U�H �S�U�H�V�V�X�U�H �Z�L�O�O �E�H �G�L�V�S�O�D�\�H�G �D�I�W�H�U �G�U�L�Y�L�Q�J �D
�I�H�Z �P�L�Q�X�W�H�V
R�7�L�U�H �3�U�H�V�V�X�U�H �0�R�Q�L�W�R�U �$�F�W�L�Y�H: thete ach-in
process of the sy stem is not yet comple te.
The tire pressures are already being moni‐
to re d.
#Compare the tire pressure with there com‐
mended tire pressure forth e cur rent operat‐
34 4
Wheels and tires
Page 365 of 482

Aluminum hub cap
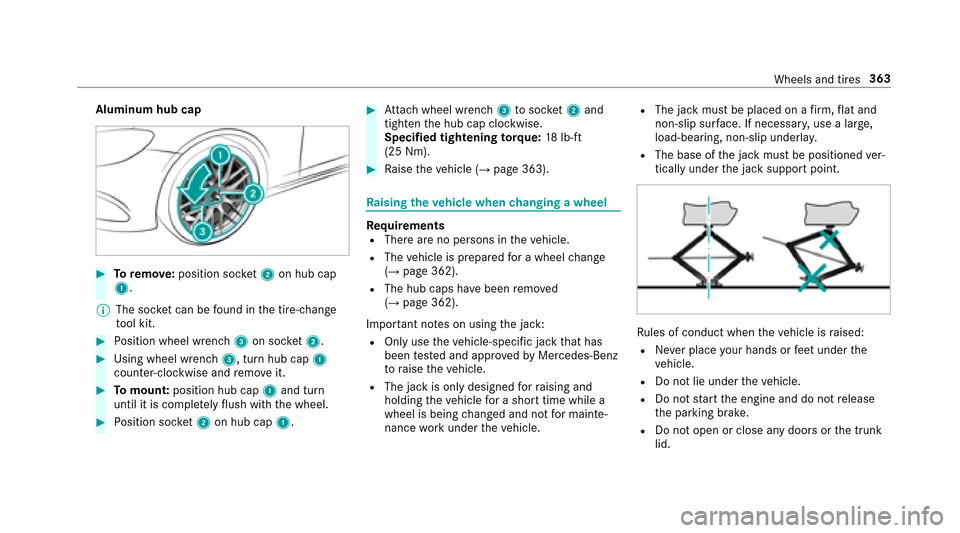
#Toremo ve:position soc ket2 on hub cap
1.
% The soc ket can be found inthe tire-change
to ol kit.
#Po sition wheel wrench 3on soc ket2.
#Using wheel wrench 3, turn hub cap1
counter-clo ckwise and remo veit.
#To mount: position hub cap 1and turn
until it is compl etely flush withth e wheel.
#Po sition soc ket2 on hub cap 1.
#Attach wheel wrench 3tosoc ket2 and
tighten the hub cap clockwise.
Specified tightening torq ue: 18lb-ft
(25 Nm).
#Ra ise theve hicle (→page 363).
Ra ising theve hicle when changing a wheel
Re quirementsRThere are no persons in theve hicle.
RThe vehicle is prepared for a wheel change
(→page 362).
RThe hub caps ha vebeen remo ved
(→page 362).
Impor tant no tes on using the jack:
ROnly use theve hicle-specific jack that has
been tested and appr ovedby Mercedes-Benz
to raise theve hicle.
RThe jack is only designed forra ising and
holding theve hicle for a short time while a
wheel is being changed and not for mainte‐
nance workunder theve hicle.
RThe jack must be placed on a firm ,fl at and
non-slip sur face. If necessar y,use a lar ge,
load-bearing, non-slip underla y.
RThe base ofthe jack must be positioned ver‐
tically under the jack support point.
Ru les of conduct when theve hicle is raised:
RNe ver place your hands or feet under the
ve hicle.
RDo not lie under theve hicle.
RDo not start the engine and do not release
th e parking brake.
RDo not open or close any doors or the trunk
lid.
Wheels and tires 363
Page 473 of 482

Tie-d owney es .......................................... 100
Time Manual time setting ............................. 232
Setting Da ylight Saving Time (Sum‐
mer) .................................................... 232
Setting the time and date automati‐
cally ..................................................... 232
Setting the time zone .......................... 232
Setting the time/date form at .............. 232
TIN (Tire Identification Number) ............3 51
Ti re and Loading Information placard ... 345
Ti re ch aracteristics ................................. 353
Ti re inflation compressor
see TIREFIT kit
Ti re information table .............................345
Ti re labeling ............................................ .350
Cha racteristics .................................... 353
DO T,Tire Identification Number (TIN) .. 351
Load index ........................................... 353
Load rating .......................................... 353
Maximum tire load .............................. 352
Maximum tire pressure ....................... 352
Overview ............................................. 350 Speed
rating ........................................ 353
Te mp erature grade .............................. 350
Ti re Quality Grading ............................. 350
Ti re size designation ............................3 53
Tr action grade .................................... .350
Tr ead wear grade ...... ...
.......................
.350
Ti re load (maximum) .............................. .352
Ti re pressure ........................................... 320
Checking (manually) ............................ 342
Checking (tire pressure monito ring
sy stem) ............................................... 344
Maximum ............................................ 352
No tes .................................................. 339
Re starting the tire pressure monitor‐
ing sy stem .......................................... .345
Ti re pressure monitoring sy stem
(function) ............................................. 343
Ti re pressure table ...............................3 41
Ti re pressure moni toring sy stem
Checking the tire pressure .................. 344
Fu nction .............................................. 343
Re starting ............................................ 345
Te ch nical da ta..................................... 345
Tire pressure table .................................. 341 Tire Quality Grading
................................ 350
Tire tread ................................................. 338
Tire-change tool kit
Overview .............................................. 361
TIREFIT kit ................................................ 320
St orage location ..................................3 20
Using ....... ............................................ 320
TI
REFIT kit see Tire pressure
Ti re s
Changing ............................................ .362
Changing hub caps .............................. 362
Cha racteristics .................................... 353
Checking ............................................. 338
Checking the tire pressure (man‐
ually) ................................................... 342
Checking the tire pressure (tire pres‐
sure monitoring sy stem) ..................... .344
Definitions ........................................... 355
DO T,Tire Identification Number (TIN) .. 351
Flat tire ................................................ 318
Load index ........................................... 353
Load rating .......................................... 353
Maximum tire load .............................. 352
Index 47
1