Page 313 of 482
RThe blowerfo rth eve ntilation/heating is
switched off.
RThe windshield wiper switch is in position 0.
RIn car washes with a towing mechanism: neu‐
tral iis engaged.
RThe SmartK eyis at a dis tance of at least
10 ft(3 m) away from theve hicle, otherwise
th e trunk lid could open unintentionall y.
% Remo vethewa x from the windshield and
wiper rubber af terth e car wash; this will pre‐
ve nt smearing and reduce wiper noise.
Information on using a po werwa sher
&
WARNING Risk of accident when using
high-pressure cleaning equipment wi th
ro und-s pray nozzles
The wate r jet from a round-s pray nozzle (dirt
grinder) may cause damage totires and sus‐
pension components that is not visible.
Components damaged in this wa yma yfa il
unexpec tedly.
#Do not use high-pressure cleaning
equipment wi thround-spr aynozzles to
clean your vehicle.
#Damaged tires or suspension compo‐
nents must be replaced immediatel y.
Toavo id damage to yourvehicle, obser vethefo l‐
lowing when using a po werwa sher:
RKeep the SmartK eyat least 10ft(3 m) away
from theve hicle. Otherwise the trunk lid
could open unintentionall y.
RMaintain a distance of at least 11.8 in
(30 cm) totheve hicle.
RVe hicles with deco rative foil: parts of your
ve hicle are co vered with a decorative foil.
Maintain a dis tance of at least 27.6 in
(70 cm) between thefo il-c ove red parts of the
ve hicle and the nozzle of the high pressure
cleaner. Mo vethe po werwa sher nozzle
around whilst cleaning.
RObser vethe information on the cor rect dis‐
ta nce in the equipment manufacturer's oper‐
ating instructions.
RDo not point the nozzle of the po werwa sher
directly at sensitive parts such as tires, slits,
electrical component parts, batteries, light
sources and ventilation slot s.
Washing the vehicle byhand
Obser velegal requ irements, forex ample in
some countries washing byhand is only allo wed
at specially equipped washing ba ys.
#Use a mild cleaning agent such as car sham‐
poo.
#Wa shtheve hicle with luk ewarmwate r and a
soft car sponge. While doing so, do not
ex pose theve hicle todirect sunlight.
#Hose down theve hicle carefully with water
and dry it with a leather clo th. Make sure
th at thewate r jet is not pointed directly into
th e air inlet grille.
Maintenance and care 31
1
Page 319 of 482
Information on cleaning and careAvoiding vehicle damage
Clo thseat co vers
Cleanwith a damp clo thand 1% soap solution and allow to
dr y.
EAS Y-PA CK trunk
box Clean wi
tha damp clo th.D o not use any alcohol-basedthinners, gasoline or abrasive
cleaning agents.
Maintenance and care 317
Page 322 of 482
istworkshop with rega rd totheir fur ther
use.
#The defective tire must be replaced in
eve rycase.
Driving distance possible in li mp-home mode
af te r the pressure loss warning
Load condition Driving distance pos‐
sible in limp-homemode
Pa rtially laden 50 miles (80 km)
Fu lly laden 19miles (30 km)
RThe driving dis tance possible in li mp-home
mode may vary depending on the driving
st yle.
RMaximum permissible speed 50 mph
(80 km/h).
If a tire has gone flat and cannot be replaced
with an MOEx tended tire, a standard tire may be
used as a temp orary measure.
TIREFIT kit storage location
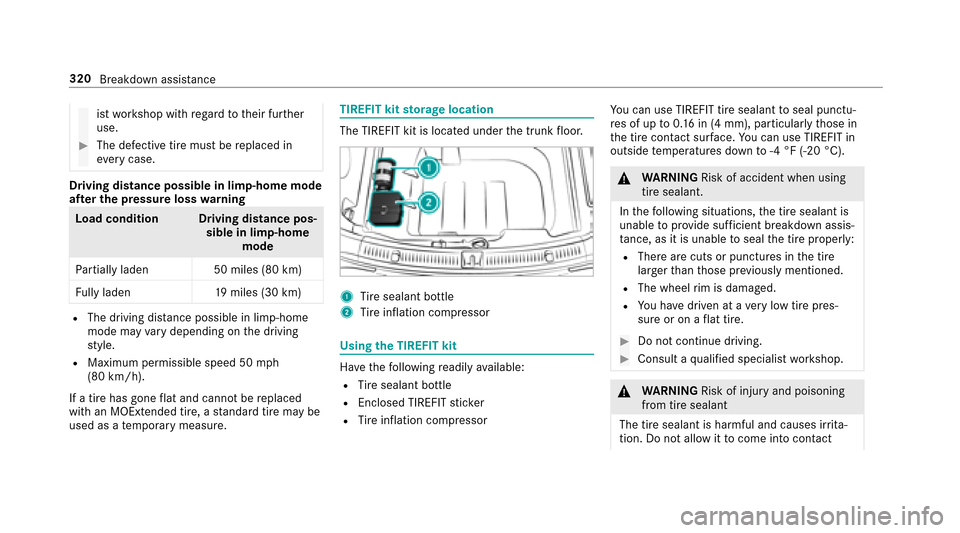
The TIREFIT kit is located under the trunk floor.
1Ti re sealant bottle
2Tire inflation compressor
Using the TIREFIT kit
Ha ve thefo llowing readily available:
RTire sealant bottle
REnclosed TIREFIT sticke r
RTire inflation compressor Yo
u can use TIREFIT tire sealant toseal punctu‐
re s of up to0.16 in (4 mm), particular lythose in
th e tire conta ct surface.You can use TIREFIT in
outside temp eratures down to-4 °F (-20 °C).
&
WARNING Risk of accident when using
tire sealant.
In thefo llowing situations, the tire sealant is
unable toprov ide suf ficient breakdown assis‐
ta nce, as it is unable toseal the tire properly:
RThere are cuts or punctures in the tire
larger than those pr eviously mentioned.
RThe wheel rim is dama ged.
RYo u ha vedriven at a very low tire pres‐
sure or on a flat tire.
#Do not continue driving.
#Consult a qualified specialist workshop.
&
WARNING Risk of injury and poisoning
from tire sealant
The tire sealant is harmful and causes ir rita ‐
tion. Do not allow it tocome into contact
320
Breakdown assis tance
Page 335 of 482
#Loadtheve hicle cor rectly onto the
transpo rter.
#Secure theve hicle on all four wheels
wit h suit abletensioning stra ps.
#Do not exceed the maximum permissi‐
ble speed of 35 mph(6 0 km/h) when
transpo rting.
* NO
TEDama getotheve hicle from secur‐
ing it incor rectly
#Af ter loading, theve hicle must be
secured at all four wheels. Otherwise,
th eve hicle could be damaged.
#A minimum dis tance of 8 in (20 cm) up
and 4 in (10 cm) down must bekept to
th e transport platform.
#Secure theve hicle on all four wheels af ter
loading. 4MATIC
vehicles/ve hicles with automatic
transmission
#Make sure that the front and rear axles come
to rest on the same transport vehicle.
* NO
TEDama getothe driv etra in due to
incor rect positioning
#Do not position theve hicle abo vethe
connection point of the transport vehi‐
cle.
To wing eye
Towing eye1 is attached tothe edge of the
trunk under the trunk floor.
Breakdown assis tance 333
Page 337 of 482
color and fuserating. The fuse ratings are li sted
in the fuse assignment diagram.
Fu se assignment diag ram: onthe fuse box in
th e trunk (
→page 337).
* NO
TEDama geor malfunctions caused
by moisture
Moisture may cause dama getothe electrical
sy stem or cause it tomalfunction.
#When the fuse box is open, make sure
th at no moisture can enter the fuse
box.
#When closing the fuse box, make sure
th at the seal of the lid is positioned cor‐
re ctly on the fuse box.
If a newly inser ted fuse also blo ws, ha vethe
cause traced and rectified at a qualified special‐
ist workshop.
Ensure thefo llowing before replacing a fuse:
RThe vehicle is secured against rolling away.
RAll electrical consumers are switched off.
RThe ignition is switched off. The electrical fuses are located in
various fuse
bo xes:
RFu se box in the engine compartment on the
driver's side (→page 335)
RFu se box on the driver's side of the cockpit
(→page 336)
RFu se box in the front-passen gerfo ot we ll
(→page 336)
RFu se box in the trunk on theright-hand side
of theve hicle, when vie wed in the direction
of tr avel (
→page 337)
Fuse box in the engine compa rtment
Prerequisites
Observ eth e no tes on electrical fuses
(
→page 334).
Ha ve thefo llowing readily available:
RA dry clo th
RA screwdriver Opening
&
WARNING Risk of injury from usingthe
windshield wipers while the engine hood
is open
When the engine hood is open and the wind‐
shield wipers are set in motion, you can be
trapped bythe wiper linkage.
#Alw ays switch off the windshield wipers
and ignition before opening the engine
hood.
Breakdown assis tance 335
Page 339 of 482
#Open cover1 inthe direction of the ar row
and remo veit.
Fuse box in the trunk
Re quirements
Obser vethe no tes on electrical fuses
(
→page 334).
#Fo ld co ver1 down in the direction of the
ar row .
The fuse assignment diagram is in a recess on
th e side of the fuse box.
Breakdown assis tance 337
Page 363 of 482
Thewear patte rns on the front and rear wheels
dif fer:
RFr ont wheels wear more on the shoulder of
th e tire
RRe ar wheels wear more in the center of the
tire
On vehicles that ha vethe same size front and
re ar wheels, inter change the wheels according
to the inter vals in the tire manufacturer's war‐
ra nty book in your vehicle documents. If this is
not available, inter change the tires every
3,000 to6,000 miles (5,000to10,000 km),
depending on thewe ar. Ensure that the direction
of rotation is maintained.
It is impe rative toobser vethe instructions and
saf etyno tes on "Wheel change" when doing so.
Note s onstoring wheels
RAf terre moving wheels, store them in a cool,
dry and preferably dark place.
RPr otect the tires from conta ct withoil, grease
or fuel.
Overview of the tire-chan getool kit
Apart from some countr y-specific variants, vehi‐
cles are not equipped with a tire-change tool kit.
Fo r more information on which tire-changing
to ols are required and appr oved for per form ing a
tire change on your vehicle, consult a qualified
specialist workshop.
Necessary tire-changing tools may include, for
ex ample:
RJack
Rch ock
RWheel wrench
RCentering pin
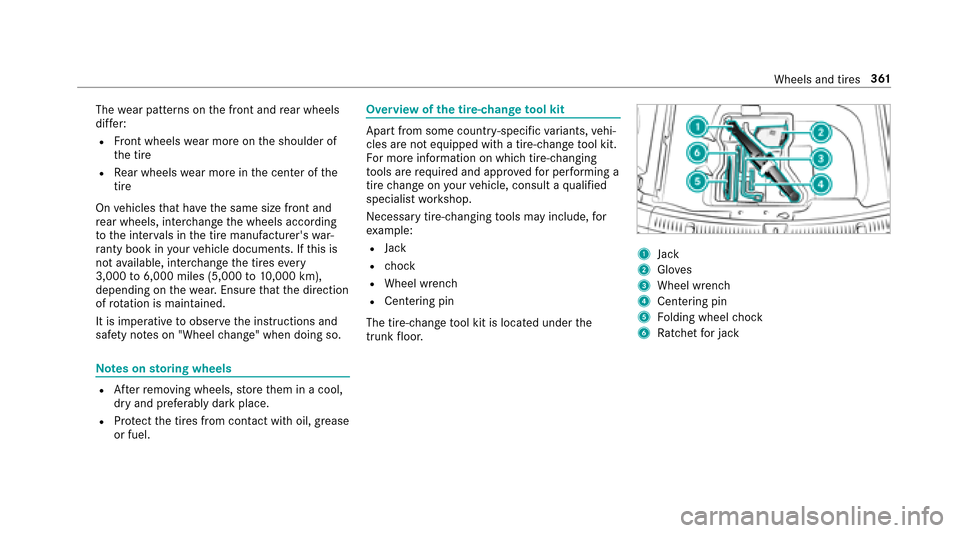
The tire-change tool kit is located under the
trunk floor.
1Jack
2Glo ves
3Wheel wrench
4Centering pin
5Fo lding wheel chock
6Ra tchet for jack
Wheels and tires 361
Page 365 of 482
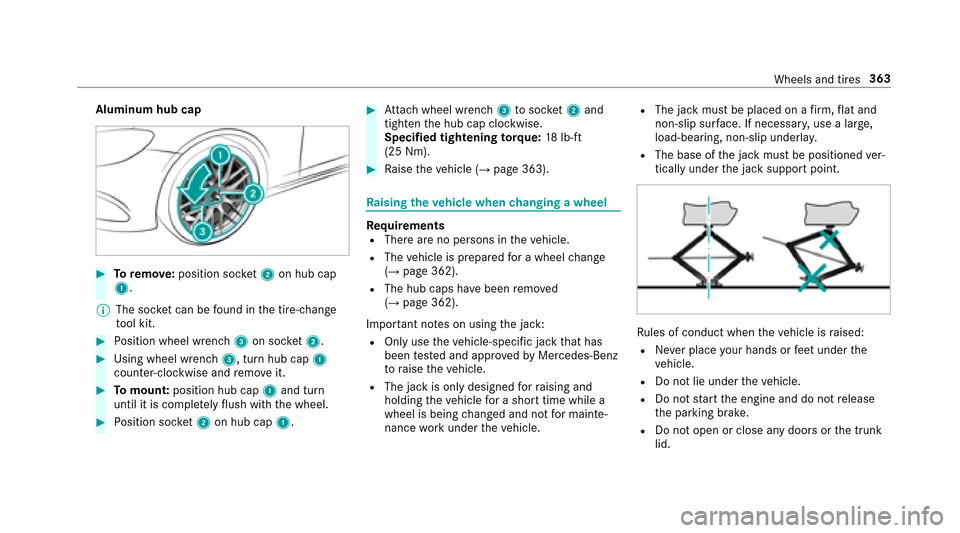
Aluminum hub cap
#Toremo ve:position soc ket2 on hub cap
1.
% The soc ket can be found inthe tire-change
to ol kit.
#Po sition wheel wrench 3on soc ket2.
#Using wheel wrench 3, turn hub cap1
counter-clo ckwise and remo veit.
#To mount: position hub cap 1and turn
until it is compl etely flush withth e wheel.
#Po sition soc ket2 on hub cap 1.
#Attach wheel wrench 3tosoc ket2 and
tighten the hub cap clockwise.
Specified tightening torq ue: 18lb-ft
(25 Nm).
#Ra ise theve hicle (→page 363).
Ra ising theve hicle when changing a wheel
Re quirementsRThere are no persons in theve hicle.
RThe vehicle is prepared for a wheel change
(→page 362).
RThe hub caps ha vebeen remo ved
(→page 362).
Impor tant no tes on using the jack:
ROnly use theve hicle-specific jack that has
been tested and appr ovedby Mercedes-Benz
to raise theve hicle.
RThe jack is only designed forra ising and
holding theve hicle for a short time while a
wheel is being changed and not for mainte‐
nance workunder theve hicle.
RThe jack must be placed on a firm ,fl at and
non-slip sur face. If necessar y,use a lar ge,
load-bearing, non-slip underla y.
RThe base ofthe jack must be positioned ver‐
tically under the jack support point.
Ru les of conduct when theve hicle is raised:
RNe ver place your hands or feet under the
ve hicle.
RDo not lie under theve hicle.
RDo not start the engine and do not release
th e parking brake.
RDo not open or close any doors or the trunk
lid.
Wheels and tires 363