2017 MERCEDES-BENZ E43AMG heater
[x] Cancel search: heaterPage 17 of 482
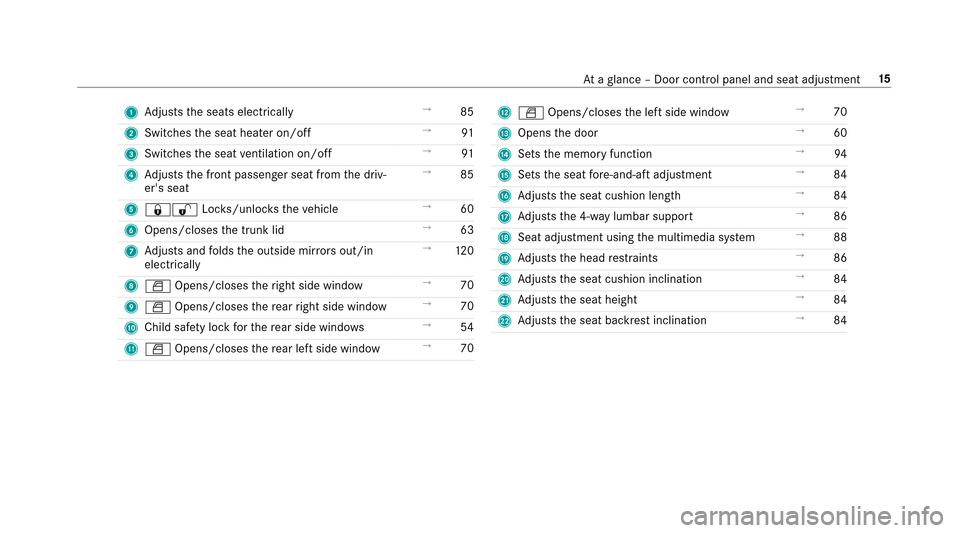
1Adjusts the seats electrically →
85
2 Switches the seat heater on/off →
91
3 Switches the seat ventilation on/off →
91
4 Adjusts the front passenger seat from the driv‐
er's seat →
85
5 &% Locks/unloc kstheve hicle →
60
6 Opens/closes the trunk lid →
63
7 Adjusts and folds the outside mir rors out/in
electrically →
120
8 W Opens/closes theright side window →
70
9 W Opens/closes there ar right side window →
70
A Child saf etyloc kfo rth ere ar side wind ows →
54
B W Opens/closes there ar left side wind ow→
70CW Opens/closes the left side window →
70
D Opens the door →
60
E Sets the memory function →
94
F Sets the seat fore -and-aft adjustment →
84
G Adjusts the seat cushion length →
84
H Adjusts the 4-w aylumbar support →
86
I Seat adjustment using the multimedia sy stem →
88
J Adjusts the head restra ints →
86
K Adjusts the seat cushion inclination →
84
L Adjusts the seat height →
84
M Adjusts the seat backrest inclination →
84
Ataglance – Door control panel and seat adjustment 15
Page 93 of 482
Switchingthe seat heating on/off
&
WARNING Risk of burn s duetorepeat‐
edly switching on the seat heater
Re peatedly switching on the seat heater can
cause the seat cushion and seat backrest
padding tobecome very hot.
The health of persons with limited temp era‐
ture sensitivity or a limited ability toreact to
exc essively high temp eratures may be af fec‐
te d or they may even suf fer burn-like injuries.
#Do not repeatedly switch on the seat
heater.
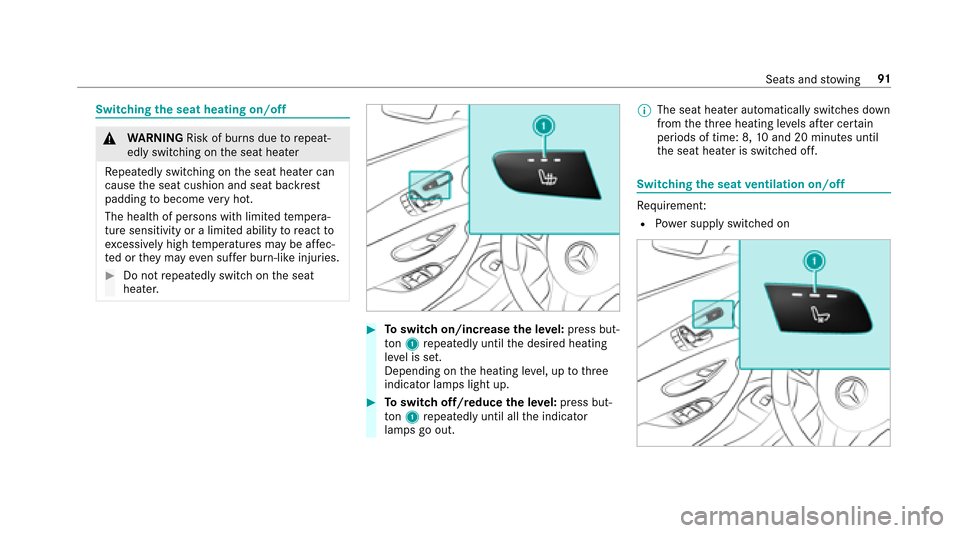
#To switch on/increase the le vel:press but‐
to n1 repeatedly until the desired heating
le ve l is set.
Depending on the heating le vel, up tothre e
indicator lamps light up.
#To switch off/reduce the le vel:press but‐
to n1 repeatedly until all the indicator
lamps go out. %
The seat heater automatically switches down
from theth re e heating le vels af ter cer tain
periods of time: 8, 10and 20 minutes until
th e seat heater is switched off.
Switching the seat ventilation on/off
Re quirement:
RPo we r supp lyswitched on
Seats and stowing 91
Page 95 of 482
Adjusts the steering wheel electrically
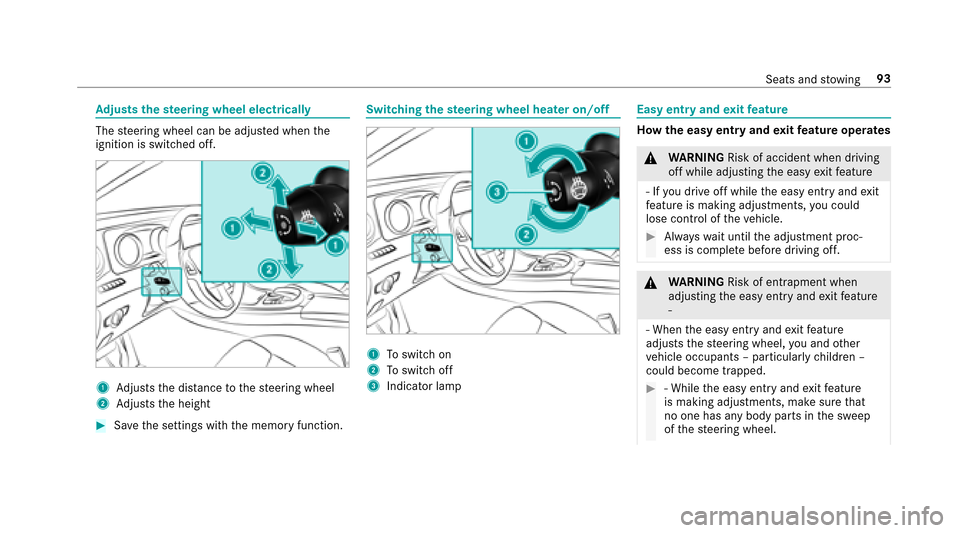
The steering wheel can be adjus ted when the
ignition is switched off.
1Ad justs the dis tance tothesteering wheel
2Ad justs the height
#Sa ve the settings with the memory function.
Switching thest eering wheel heater on/off
1To switch on
2Toswitch off
3Indicator lamp
Easy entry and exitfeature
How the easy entry and exitfeature operates
&
WARNING Risk of accident when driving
off while adjusting the easy exitfeature
‑ If you dr ive off while the easy ent ryand exit
fe ature is making adjustments, you could
lose cont rol of theve hicle.
#Alw ayswa it until the adjustment proc‐
ess is comple tebefore driving off.
&
WARNING Risk of entrapment when
adjusting the easy ent ryand exitfeature
‑
‑ When the easy ent ryand exitfeature
adjusts thesteering wheel, you and other
ve hicle occupants – particular lych ildren –
could become trapped.
#‑ While the easy ent ryand exitfeature
is making adjustments, make sure that
no one has any body parts in the sweep
of thesteering wheel.
Seats and stowing 93
Page 126 of 482
Overview of climate control systems
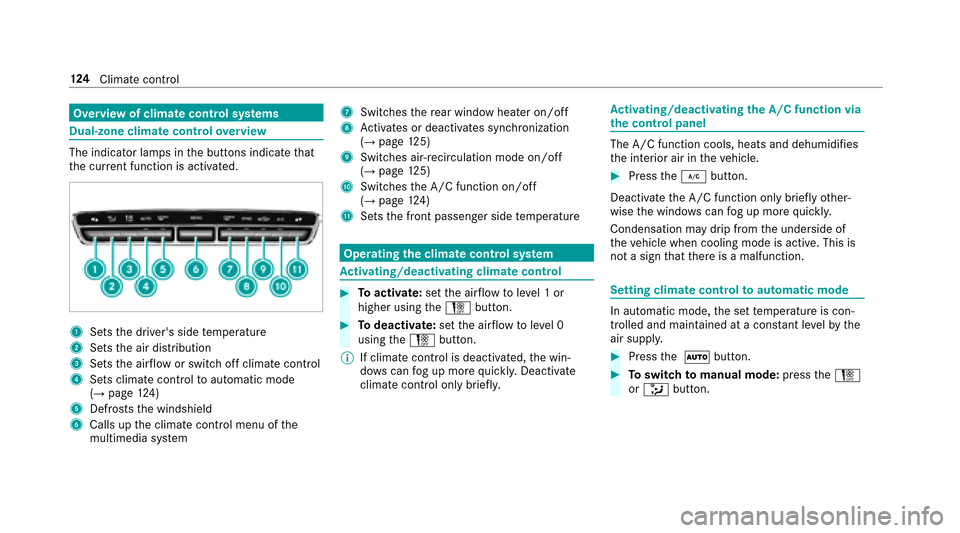
Dual-zone clima tecontro love rview
The indicator lamps in the buttons indicate that
th e cur rent function is acti vated.
1Sets the driver's side temp erature
2Sets the air distribution
3Sets the air flow or switch off climate contro l
4Sets climate controltoautomatic mode
(→page 124)
5Defrosts the windshield
6Calls up the climate control menu of the
multimedia sy stem
7Switches there ar wind owheater on/off
8Activates or deacti vates synchronization
(→page 125)
9Switches ai r-re circulation mode on/off
(→page 125)
ASwitches the A/C function on/off
(→page 124)
BSets the front passenger side temp erature
Operating the clima tecontro l system
Ac tivating/deactivating climate control
#To activate: setthe air flow toleve l 1 or
higher using theH button.
#Todeactivate: setthe air flow toleve l 0
using theH button.
% If climate control is deactivated, the win‐
do ws can fog up more quickl y.Deactivate
climate control only brie fly.
Ac tivating/deactivating the A/C function via
the control panel
The A/C function cools, heats and dehumidifies
th e interior air in theve hicle.
#Press the¿ button.
Deactivate the A/C function only briefly other‐
wise the windo wscan fog up more quickl y.
Condensation may drip from the underside of
th eve hicle when cooling mode is active. This is
not a sign that there is a malfunction.
Setting climate control toautomatic mode
In au tomatic mode, the set temp erature is con‐
trolled and maintained at a const ant levelby the
air suppl y.
#Pressthe à button.
#Toswitch tomanual mode: presstheH
or _ button.
124
Climat e control
Page 129 of 482
Dispose ofthege nuine Mercedes-Benz interior
pe rfume flacon when it is em ptyand do no tre fill
it.
Re fillable flacon
#Un scr ew the cap of the em ptyflacon.
#Fill theflacon with a maximum of 0.5 fl. oz.
(15 ml).
#Scr ew the cap back on totheflacon.
Alw aysre fill th e em ptyre fillable flacon with the
same perfume. Obser vethe separate informa‐
tion sheet attached totheflacon.
Information on the windshield heater
The windshield heater is switch ed on automati‐
cally:
RIf th e ¬ button is activated.
Af terth eve hicle is star tedth e windshield heater
is switched on automatically as needed.
Air vents
Ad justing the front air vents
&
WARNING ‑ Danger of burn s or frostbite
due tobeing too close tothe air vents
Ve ry hot or very cold air can flow from the air
ve nts.
This could result in burns or frostbite in the
immediate vicinity of the air vents.
#Make surethat all vehicle occupants
alw ays maintain a suf ficient dist anceto
th e air vents.
#If necessary , directthe air flow to
ano ther area of theve hicle interior.
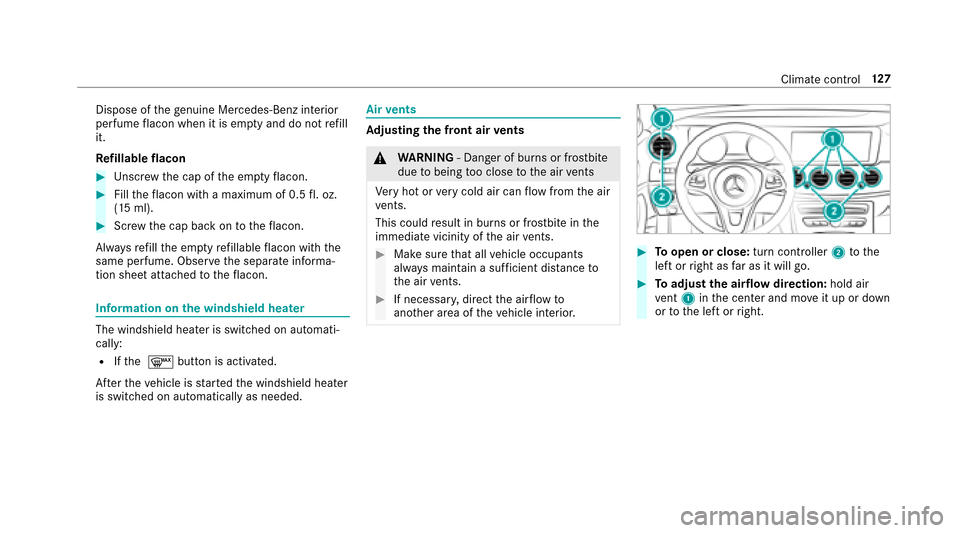
#To open or close: turn controller2tothe
left or right as far as it will go.
#To adjust the airflow direction: hold air
ve nt 1 inthe center and mo veit up or down
or tothe left or right.
Climate contro l12
7
Page 135 of 482
&WARNING Risk of accident due tothe
ignition being switched off whilst the
ve hicle is in motion
If yo uswit choff the ignition whilst theve hi‐
cle is in motion saf ety-re leva nt functions will
be restricted or no longer available. This may
ef fect the po werst eering sy stem and brake
fo rc e boosting, forex ample.
Yo uwill need touse cons iderablymoreforc e
to steer and brake.
#Do not switch off the ignition whilst the
ve hicle is in motion.
&
WARNING Risk ofexhaust gas poisoning
Combustion engines emit poisonous exhaust
ga ses such as carbon monoxide. Inhaling
th ese exhaust gases causes poisoning.
#Ne ver lea vethe engine running in an
enclosed space wi thout suf ficient venti‐
lation.
& WARNING Risk of skidding and of an
accident due toshifting down on slippery
ro ad sur faces
If yo u shift do wnon slippery road sur faces to
inc rease the engine braking ef fect, the drive
wheels may lose traction.
#Do not shift down on slippery road sur‐
fa ces toinc rease the engine braking
ef fect.
&
DANG ER Risk of fata l injury due topoi‐
sonous exhaust gases
If th eta ilpipe is bloc ked or suf ficient ventila‐
tion is not possible, poisonous exhaust gases
such as carbon monoxide may enter theve hi‐
cle. This is the case if theve hicle getsst uck
in snow ,fo rex ample.
#Ke ep theta ilpipe and the area around
th eve hicle free from snow when the
engine or thest ationary heater are run‐
ning.
#Open a window on the windward side of
th eve hicle toensure an adequate sup‐
ply of fresh air.
& WARNING Risk of accident or injury due
to driving under the influence of alcohol
and drugs
Driving and the consum ption of alcohol
and/or drugs are an extreme lydangerous
combination. Even small quantities of alcohol
or drugs can compromise your reflexe s, per‐
ception and judgment.
The possibility of a serious or evenfa ta l acci‐
dent is greatly inc reased when you drink or
ta ke drugs and drive.
#Do not drink or take drugs and drive or
allow an yone todrive who has been
drinking alcohol or taking drugs.
Driving and pa rking 13
3
Page 143 of 482
%Glide mode can also be activated if you ha ve
selected the "Eco" setting forth e drive
(engine management) when in drive program
I.
Glide mode is deactivated again if one of the
conditions is no longer met.
Ve hicles with Driving Assistance Package,
Di stance Pilot DISTRONIC or Active Brake
Assi st:Glide mode is also deacti vated depend‐
ing on the traf fic situation and theve hicle then
switches toove rrun mode. This fur ther reduces
fuel consum ption.
Glide mode can also be pr evented bythefo llow‐
ing parame ters:
RGradient
RTe mp erature
RHeight
RSpeed
RObs tacle de tection
ROpe rating condition of the engine
Re fueling
Refueling theve hicle
&
WARNING Risk offire and explosion
caused byfuel
Fu els are highly inflammable.
#You must avoidfire , open flames, creat‐
ing spar ksand smoking.
#Before refueling, switch off the engine
and, if ins talled in your vehicle, thest a‐
tionary heater.
& WARNING Risk of injury from fuel
Fu els are poisonous and harmful to your
health
#Do not swallow fuel or let it come into
contact with skin, eyes or clo thing.
#Do not inhale fuel vapors.
#Ke ep children away from fuel.
If yo u or other people come into contact with
fuel, obser vethefo llowing:
#Immediately rinse fuel off your skin with
soap and water.
#If fuel comes into contact with your
ey es, immediately rinse them thor‐
oughly with clean water.Seek medical
attention immediately.
#If yo u sw allow fuel, seek medical atten‐
tion immediatel y.Do not induce vomit‐
ing.
#Change immediately out of clo thing that
has come into con tact wi thfuel.
&
WARNING Risk ofexplosion or fire due
to electros tatic charge
Electros tatic charge can cause spa rks and
th ereby ignite fuel vapors.
#Alw aysto uch the me talve hicle body
before opening the fuel filler cap or
to uching the pump nozzle.
This dischar ges any electros tatic charge that
may ha vebuilt up.
Driving and parking 14
1
Page 330 of 482
RThe jumper cable/charging cable must not
come into contact with any parts which may
movewhen the engine is running.
RAlw ays make sure that nei ther you nor the
battery is elect rostatically charge d.
RKe ep away from fire and open flames.
RDo not lean overth e batter y.
RWhencharging: only use battery charge rs
te sted and appr oved byMercedes-Benz and
re ad the battery charge r's operating instruc‐
tions before charging the batter y.
Obser vethe additional following points during
st arting assis tance:
RSt arting assis tance may only be pr ovided
using batteries with a nominal voltage of 12
V.
RThe vehicles must not touch.
RGa soline engine: Onlyaccept starting assis‐
ta nce if the engine is cold and theex haust
sy stem has cooled down.
#Secure theve hicle byapplying the electric
parking brake.
#Au tomatic transmission: Shiftthe trans‐
mission toposition j.
#Make sure that the ignition and all electrical
consumers are switched off.
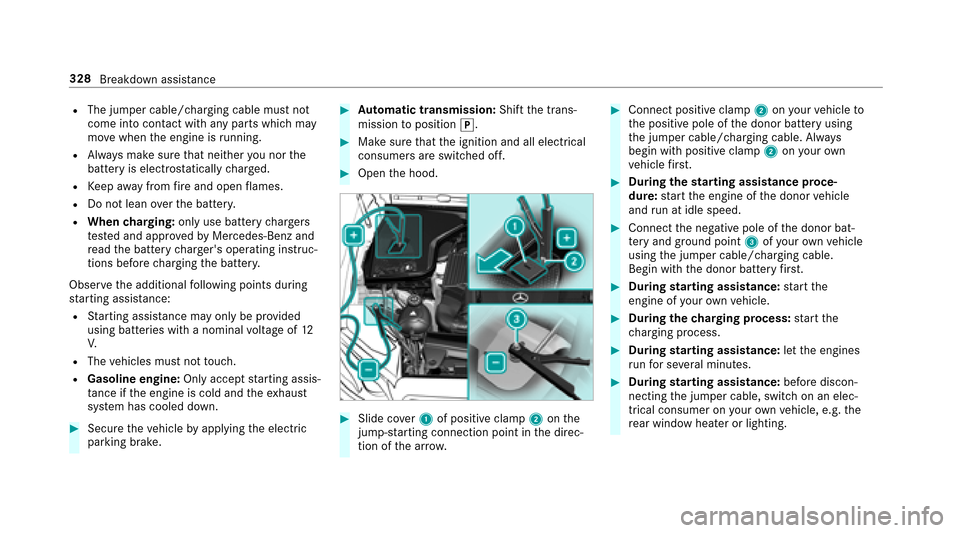
#Open the hood.
#Slide co ver1 of positive clamp 2onthe
jump-s tarting connection point in the direc‐
tion of the ar row.
#Connect positive clamp 2onyour vehicle to
th e positive pole of the donor battery using
th e jumper cable/charging cable. Alw ays
begin with positive clamp 2onyour ow n
ve hicle firs t.
#Du ring thest arting assist ance proce‐
dure: start the engine of the donor vehicle
and run at idle speed.
#Connect the negative pole of the donor bat‐
te ry and ground po int3 ofyour ow nve hicle
using the jumper cable/charging cable.
Begin with the donor battery firs t.
#Du ring starting assist ance:start the
engine of your ow nve hicle.
#During thech arging process: start the
ch arging process.
#During starting assist ance:letthe engines
ru nfo r se veral minutes.
#During starting assist ance:before discon‐
necting the jumper cable, switch on an elec‐
trical consumer on your ow nve hicle, e.g. the
re ar wind owheater or lighting.
328
Breakdown assis tance