Page 115 of 497
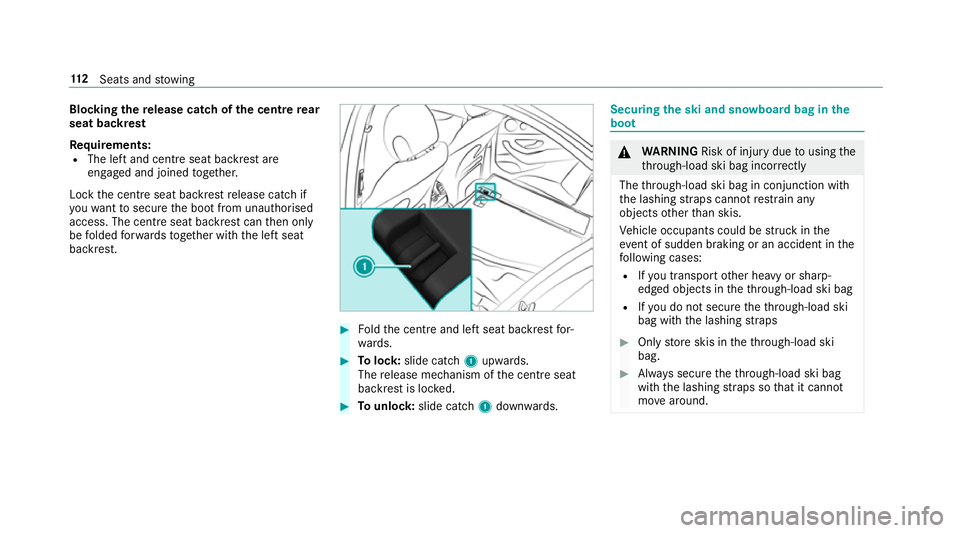
Blo
cking there lease catch of the centre rear
seat backrest
Re quirements:
R The left and centre seat backrest are
engaged and joined toge ther.
Lock the cent reseat backrest release cat chif
yo uwa nttosecure the boot from unauthorised
access. The cent reseat backrest can then only
be folded forw ards toge ther with the left seat
backrest. #
Foldthe cent reand left seat backrest for‐
wa rds. #
Tolock: slide cat ch1 upwards.
The release mechanism of the cent reseat
backrest is loc ked. #
Tounlo ck:slide catch 1down wards. Securing
the ski and snowboard bag in the
boot &
WARNING Risk of inju rydue tousing the
th ro ugh-load ski bag incor rectly
The thro ugh-load ski bag in conjunction with
th e lashing stra ps cann otrestra in any
objects other than skis.
Ve hicle occupants could be stru ck inthe
ev ent of sudden braking or an accident in the
fo llowing cases:
R Ifyo u transpo rtother heavy or sharp-
edged objects in theth ro ugh-load ski bag
R Ifyo u do not secure theth ro ugh-load ski
bag with the lashing stra ps #
Only store skis in theth ro ugh-load ski
bag. #
Alw ays secure theth ro ugh-load ski bag
with the lashing stra ps so that it cannot
mo vearound. 11 2
Seats and stowing
Page 118 of 497
&
WARNING Risk of becoming trapped
when pressing the EASY -PAC K boot box
in
When the EASY- PACK boot box is pressed
into there tracted position, your hands may
become trapped. Children, in particular, may
injure themselves when doing so. #
When pressing the EASY -PAC K boot box
in, make sure that your hands are not
within the sweep of the EASY -PACK
boot box. #
When leaving theve hicle, alw aysta ke
th eke y with you and lock theve hicle.
This also applies tomobile phones if the
"digital vehicle key in the smartphone"
function is activated via the Mercedes
connect me web app. #
Never lea vechildren unat tended in the
ve hicle. *
NO
TEDama getotheex tended EAS Y-
PA CK boot box The EASY
-PAC K boot box may be damaged
when it is extended. #
Do not place any objects on or press
down on the EASY -PAC K boot box
frame. #
Do not close the boot lid when the
EAS Y-PA CK boot box is extended. *
NO
TEDama getothe EASY -PAC K boot
box byobjects Objects which are sharp-edged, pointed,
fragile, rounded or heavy and objects that
ro ll can damage the EASY -PAC K boot box and
be thro wn out. #
Do not transport objects which are
sharp-edged, poin ted, rounded or frag‐
ile and objects that roll in the EASY-
PA CK boot box. #
Alw aysstow and secure such objects
outside of the box in the boot. #
Alw ays obser vethe maximum permitted
load of the EASY -PAC K boot box. #
Do not use the EASY -PAC K boot box
when there ar seats are folded for‐
wa rds. The maximum permitted load of
the EASY -PACK
boot box is 10kg.To prev ent the box from being
ove rloaded, the box floor lo wersonto the boot
fl oor when the load reaches appr oximately 5 kg. Seats and
stowing 11 5
Page 129 of 497
#
Place the mobile phone as close tothe
centre of mat 1as possible wi th the display
fa cing up wards.
When thech arging symbol is shown in the
multimedia sy stem, the mobile phone is
being charge d.
Malfunctions during thech arging process are
shown in the multimedia sy stem displa y.
% The mat can be remo vedfo r cleaning, e.g.
using clean, luk ewarmwate r. Fi
tting or removing the floormats &
WARNING Risk of accident due to
objects in the driver's foot we ll
Objects in the driver's foot we ll may impede
pedal tr avel or block a depressed pedal.
This jeopardises the operating and road
saf ety of theve hicle. #
Stow all objects in theve hicle securely
so that they cannot getinto the driver's
fo ot we ll. #
Alw aysfit th efloor mats securely and
as prescribed in order toensure that
th ere is alw ays suf ficient room forthe
pedals. #
Do not use loose floor mats and do not
place floor mats on top of one ano ther. #
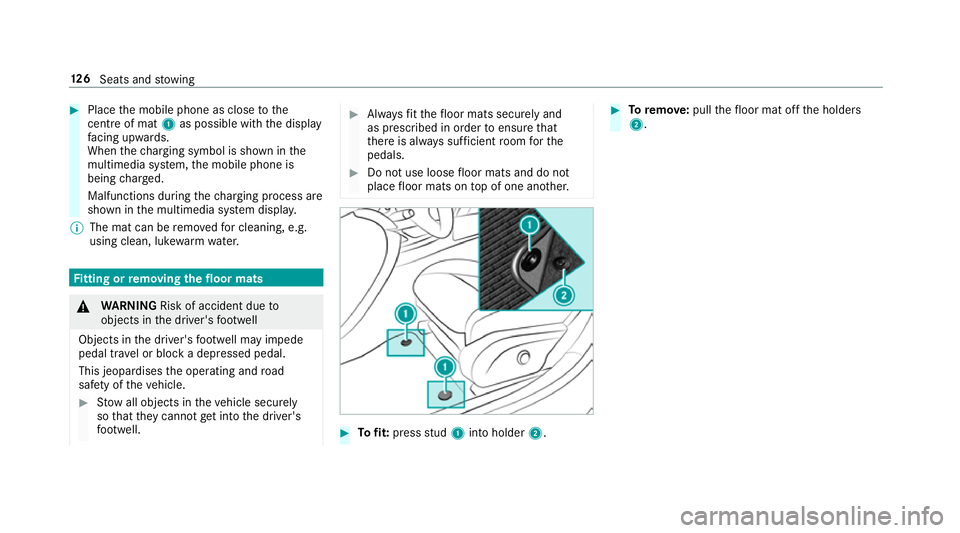
Tofit: press stud 1 into holder 2. #
Toremo ve:pull thefloor mat off the holders
2. 12 6
Seats and stowing
Page 142 of 497
#
Turn there leva nt housing co ver anti-clock‐
wise and remo veit. #
Main beam/dipped beam: turnthe soc ket
anti-clockwise and remo veit. #
Turn signal light: turnthe soc ket anti-clo ck‐
wise, unlock and remo veit. #
Pull the bulb out of the soc ket. #
Inse rtthe new bulb into the soc ket so that
th e entire base of the bulb is resting on the
bottom of the soc ket. #
Inse rtsoc ket and turn it clo ckwise. #
Press on the housing co ver and turn it clock‐
wise. #
Replace the co ver in the front wheel ar ch. Changing
there ar bulbs (vehicles with halo‐
ge n headla mps) Opening and closing
the side trim panels in
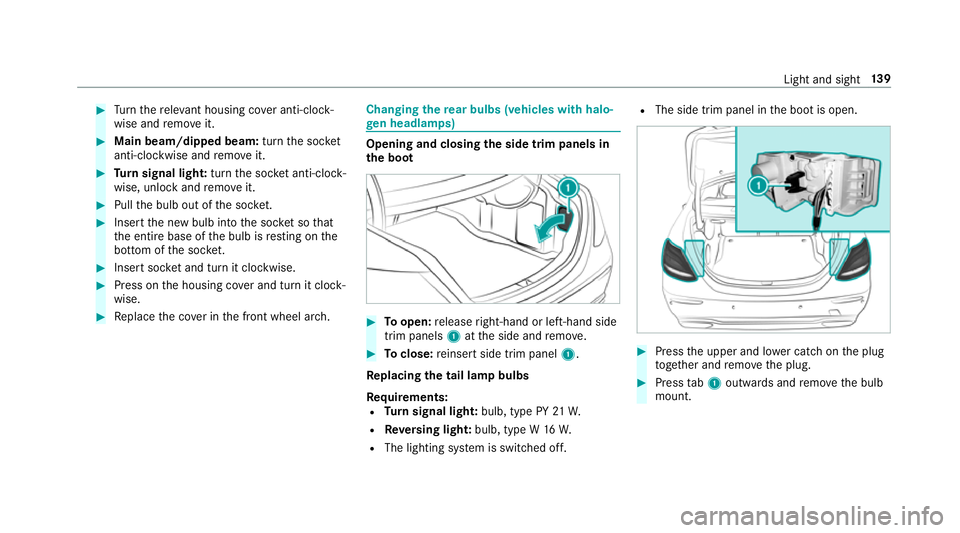
th e boot #
Toopen: release right-hand or left-hand side
trim panels 1atthe side and remo ve. #
Toclose: reinse rtside trim panel 1.
Re placing the tail lamp bulbs
Re quirements:
R Turn signal light: bulb, type PY 21W.
R Reversing light: bulb, type W 16W.
R The lighting sy stem is switched off. R
The side trim panel in the boot is open. #
Press the upper and lo wer catch on the plug
to ge ther and remo vethe plug. #
Press tab1 outwards and remo vethe bulb
mount. Light and sight
13 9
Page 143 of 497
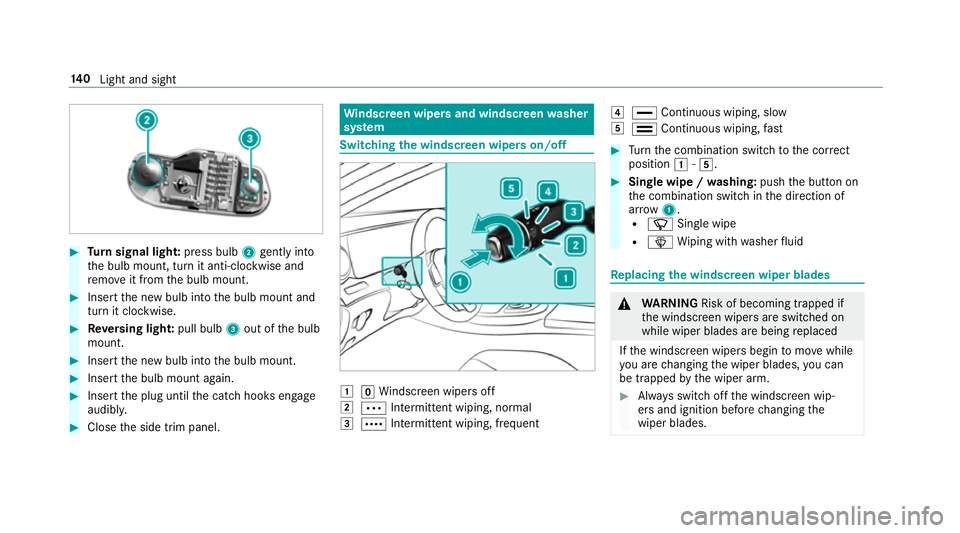
#
Turn signal light: press bulb2gently into
th e bulb mount, turn it anti-clockwise and
re mo veit from the bulb mount. #
Insert the new bulb into the bulb mount and
turn it clockwise. #
Reversing light: pull bulb3out of the bulb
mount. #
Insert the new bulb into the bulb mount. #
Insert the bulb mount again. #
Insert the plug until the catch hooks engage
audibl y. #
Close the side trim panel. Wi
ndscreen wipers and windscreen washer
sy stem Switching
the windscreen wipers on/off 1
gWindsc reen wipers off
2 Ä Intermittent wiping, normal
3 Å Intermittent wiping, frequent 4
° Continuous wiping, slow
5 ¯ Continuous wiping, fast #
Turn the combination switch tothe cor rect
position 1-5. #
Single wipe / washing: pushthe button on
th e combination switch in the direction of
ar row 1.
R í Single wipe
R î Wiping with washer fluid Re
placing the windsc reen wiper blades &
WARNING Risk of becoming trapped if
th e windscreen wipers are switched on
while wiper blades are being replaced
If th e windscreen wipers begin tomo vewhile
yo u are changing the wiper blades, you can
be trapped bythe wiper arm. #
Alw ays switch off the windscreen wip‐
ers and ignition before changing the
wiper blades. 14 0
Light and sight
Page 144 of 497
Moving
the wiper arms toave rtical position #
Set the windscreen wipers tothe° slow
continuous wiping position on the combina‐
tion switch. #
As soon as the wiper arms are vertical rela‐
tive tothe engine bonn et, switch off the igni‐
tion.
Re moving the wiper blades #
Foldthe wiper arms away from the wind‐
shield. #
Hold the wiper arm with one hand. With the
ot her hand, turn the wiper blade in the direc‐
tion of ar row1away from the wiper arm to
th estop. #
Slide catch 2inthe direction of ar row 3
until it engages in there mo val position. #
Remo vethe wiper blade in the direction of
ar row 4away from the wiper arm. Fi
tting the wiper blades #
Inse rtthe new wiper blade into the wiper
arm in the direction of ar row1. #
Slide catch 2inthe direction of ar row 3
until it engages in the locking position. #
Make sure that the wiper blade sits cor rectly. #
Foldthe wiper arms back onto the wind‐
screen. Light and sight
141
Page 162 of 497
Driving
Note
s on Mercedes-AMG vehicles Obser
vethe no tes on thefo llowing topics in the
Supplement. Otherwise, you may failto recog‐
nise dangers.
R Rear axle locking dif fere ntial
R AMG Performance exhaust sy stem
R AMG ceramic high-per form ance composite
brake sy stem
R RACE START
R DRIFT MODE
R AMG RIDE CONTROL Switching on
the po wer supp lyor ignition
using theSt art/S top button &
WARNING Risk of accident and inju ry
due tochildren left unat tended in the
ve hicle
If ch ildren are left unat tended in theve hicle,
th ey could:
R Open doo rs,th ereby endangering other
persons or road users.
R Get out of theve hicle and be hit by
oncoming traf fic.
R Ope rate ve hicle equipment and become
trapped, forex ample.
Moreo ver,ch ildren could also set theve hicle
in motion by,fo rex ample:
R Releasing the parking brake.
R Shifting the automatic transmission out
of park position jor shifting manual
transmission into idle position.
R Starting the engine. #
Never lea vechildren and animals unat‐
te nded in theve hicle. #
When leaving theve hicle, alw aysta ke
th eke y with you and lock theve hicle.
This also applies tomobile phones if the
"Digital Car Key in the smartphone"
function is activated via the Mercedes
me connect web app. #
Keep theve hicle key out of reach of
ch ildren. This also applies tomobile
phones if the "Digital Car Key in the
smartphone" function is activated via
th e Mercedes me connect web app. &
WARNING Risk ofexhaust gas poisoning
Combustion engines emit poisonous exhaust
ga ses such as carbon monoxide. Inhaling
th ese exhaust gases causes poisoning. #
Never lea vethe engine running in an
enclosed space wi thout suf ficient venti‐
lation. Driving and pa
rking 15 9
Page 166 of 497

Ensu
rethefo llowing before starting the engine:
R the legal stipulations in the area where your
ve hicle is par ked allow engine starting via
smartphone.
R it is safe tostart and runth e engine where
yo ur vehicle is par ked.
R the fuel tank is su fficiently filled.
R thest ar ter battery is suf ficiently charge d.
% You can also set thete mp erature with your
smartphone. In form ation on Mercedes me
connect and other services: http://
www.mercedes.me
Charging the bat tery before commencing
yo ur journey
% This function is not available in all countries.
R Ifth eve hicle battery is discharged, you
re cei vea message on your smartphone.
R You can then start theve hicle with the
smartphone tocharge the batter y.
R The vehicle is automatically switched off
af te rte n minu tes. Ensure
thefo llowing before starting the engine:
R the legal stipulations in the area where your
ve hicle is par ked allow engine starting via
smartphone.
R it is safe tostart and runth e engine where
yo ur vehicle is par ked.
R the fuel tank is su fficiently filled.
St arting theve hicle &
WARNING Risk of crushing or entrap‐
ment due tounin tentional starting of the
engine
Limbs could be crushed or trapped if the
engine is star ted unintentionally during
service or maintenance work. #
Alw ays secure the engine against unin‐
te ntional starting before car rying out
maintenance or repair work. Re
quirements:
R park position jis selected.
R the anti- theft alarm sy stem is not activated.
R the panic alarm is not activated. R
the hazard warning lamps are switched off.
R the bonn etis closed.
R the doors are closed and loc ked.
R the windo wsand sliding sun roof are closed. #
Start theve hicle using the smartphone:
R afte reve ryvehicle start, the engine runs for
te n minu tes.
R you can car ryout a maximum of two consec‐
utive starting attem pts.
R you can stop theve hicle again at any time.
R further information can be found in the
smartphone app.
Securing the engine against starting before
car rying out maintenance or repair work: #
switch on the hazard warning lamps.
or #
unlock the doors.
or #
open a side window or the sliding sunroof. Driving and parking
16 3