2017 MERCEDES-BENZ CLS-Class start stop button
[x] Cancel search: start stop buttonPage 6 of 206

Selecting a playback option ........... 163
Starting playback if the Blue-
tooth
®audio device has been
stopped ......................................... 163
Telephony ........................................ 94
Telephony notes .............................. 93
Buttons and controller ........................ 20
C
Call lists
Displaying details ........................... 113
Opening and selecting an entry ..... 113
Saving an entry in the address
book .............................................. 114
Camera
360° camera (COMAND) ................. 47
Rear view camera ............................ 48
Car pool lanes ...................................... 56
Category list (music search) ............ 157
CD
Fast forward/fast rewind ............... 155
Inserting ........................................ 152
Inserting/loading (DVD changer) ... 152
Inserting/loading (Rear Seat
Entertainment System) .................. 194
Notes on discs ............................... 152
Removing/ejecting (Rear Seat
Entertainment System) .................. 194
Selecting a track ............................ 155
Sound settings (balance, bass,
fader, treble) .................................. 172
CD mode
Playback options ........................... 154
Character entry
Phone book ...................................... 28
Characters
Entering (navigation) ........................ 29
Clear button ......................................... 20
Climate control
Ionization (COMAND) ....................... 45
COMAND
Active multicontour seat .................. 46
Basic functions ................................ 26
Components .................................... 17
Control panel ................................... 19
Controller ......................................... 20
Display ............................................. 18 Functions ......................................... 17
Multicontour seat ............................ 46
Seat functions .................................. 46
Switching on/off .............................. 26
COMAND display
Cleaning instructions ....................... 18
Setting ............................................. 33
Contacts
Deleting ......................................... 111
Importing ....................................... 111
Controller ............................................. 20
Cordless headphones
Changing batteries ........................ 191
Indicator lamp ................................ 189
Rear Seat Entertainment System ... 189
Selecting the screen ...................... 190
D
Date format, setting ............................ 35
Day design, setting ............................. 33
Delayed switch-off
Interior lighting ................................ 45
Delayed switch-off time
Setting (COMAND) ........................... 45
Destination
Saving to SD memory card .............. 82
Storing in the address book ............. 81
Destination (navigation)
Entering a destination using the
map ................................................. 64
Entering a point of interest .............. 61
Entering using geo-coordinates ....... 67
Entering using Mercedes-Benz
Apps ................................................ 67
Keyword search ............................... 59
Saving .............................................. 81
Selecting an address book con-
tact as a destination ........................ 61
Selecting from the list of last des-
tinations ........................................... 60
Destination/route download
Deleting a destination from the
server ............................................ 133
Displaying destinations in the
vehicle ........................................... 132
Displaying the vehicle identifica-
tion number (VIN) .......................... 133
4Index
Page 57 of 206
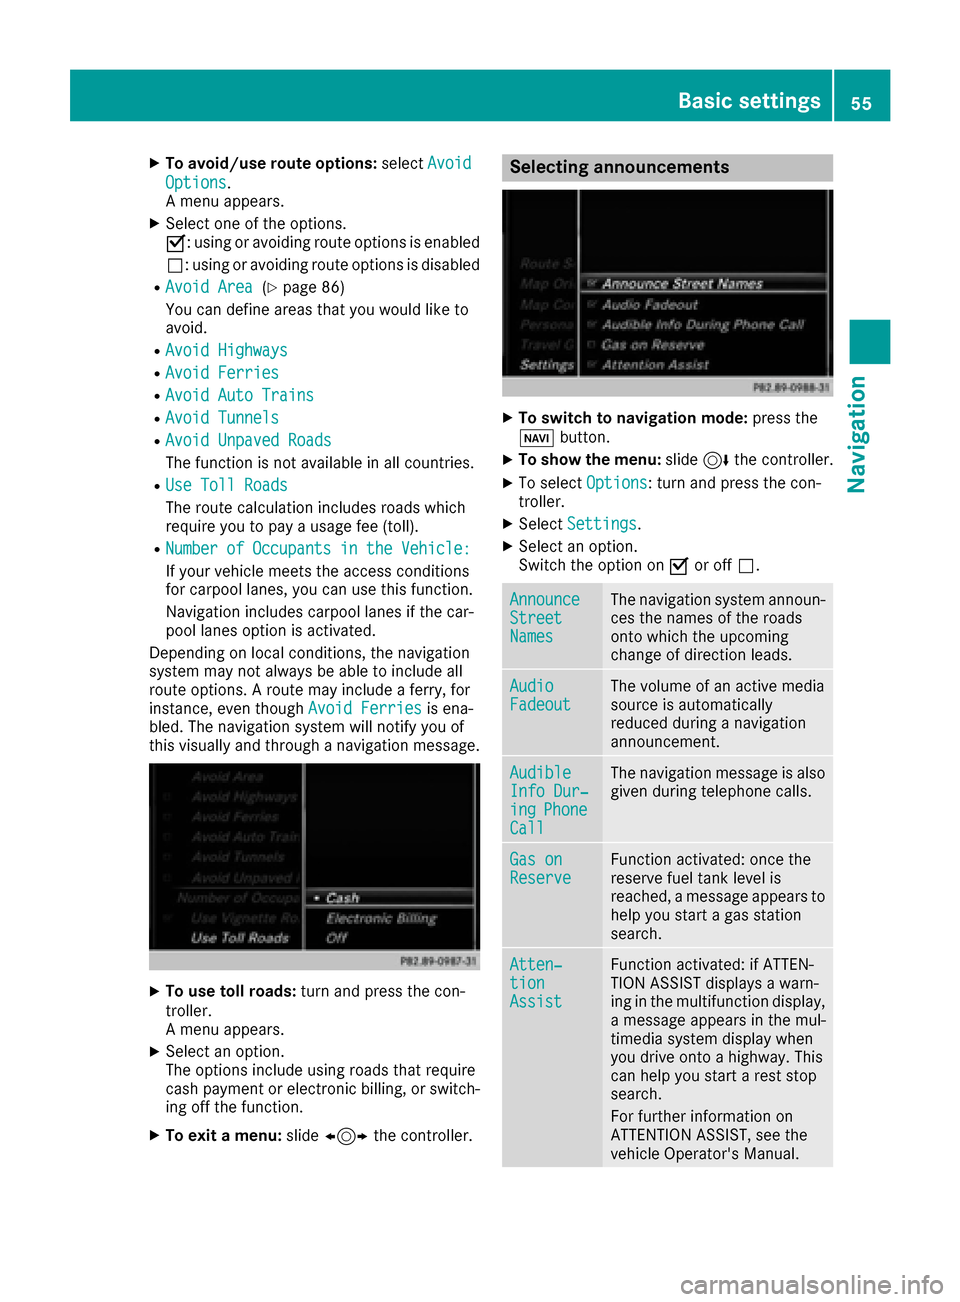
XTo avoid/use route options:selectAvoid
Options.
A menu appears.
XSelect one of the options.
O: using or avoiding route options is enabled
ª: using or avoiding route options is disabled
RAvoid Area(Ypage 86)
You can define areas that you would like to
avoid.
RAvoid Highways
RAvoid Ferries
RAvoid Auto Trains
RAvoid Tunnels
RAvoid Unpaved Roads
The function is not available in all countries.
RUse Toll Roads
The route calculation includes roads which
require you to pay a usage fee (toll).
RNumberofOccupantsintheVehicle:
If your vehicle meets the access conditions
for carpool lanes, you can use this function.
Navigation includes carpool lanes if the car-
pool lanes option is activated.
Depending on local conditions, the navigation
system may not always be able to include all
route options. A route may include a ferry, for
instance, even though Avoid Ferries
is ena-
bled. The navigation system will notify you of
this visually and through a navigation message.
XTo use toll roads: turn and press the con-
troller.
A menu appears.
XSelect an option.
The options include using roads that require
cash payment or electronic billing, or switch-
ing off the function.
XTo exit a menu: slide1 the controller.
Selecting announcements
XTo switch to navigation mode: press the
Ø button.
XTo show the menu: slide6the controller.
XTo select Options: turn and press the con-
troller.
XSelect Settings.
XSelect an option.
Switch the option on Oor off ª.
AnnounceStreetNames
The navigation system announ-
ces the names of the roads
onto which the upcoming
change of direction leads.
AudioFadeoutThe volume of an active media
source is automatically
reduced during a navigation
announcement.
AudibleInfo Dur‐ingPhoneCall
The navigation message is also
given during telephone calls.
Gas onReserveFunction activated: once the
reserve fuel tank level is
reached, a message appears to
help you start a gas station
search.
Atten‐tionAssist
Function activated: if ATTEN-
TION ASSIST displays a warn-
ing in the multifunction display,
a message appears in the mul-
timedia system display when
you drive onto a highway. This
can help you start a rest stop
search.
For further information on
ATTENTION ASSIST, see the
vehicle Operator's Manual.
Basic settings55
Navigation
Z
Page 72 of 206

XSelect personal POI or personal route
(Ypage 69).
XTo explore a personal POI or route:turn and
press the controller to select Map
.
The map with the crosshair appears and
shows the destination.
XScroll the map (Ypage 53).
XSet the map scale (Ypage 83).
XTo return to the menu: press the %button.
XTo call the personal POI: turn and press the
controller to select Call
.
If a mobile phone is connected to the multi-
media system and the telephone number is
available, the call is connected (
Ypage 100).
XTo edit the name and category: to select
Edit
: turn and press the controller.
XSelect Change NameorEdit Icon.
XTo change name: enter character (Ypage 29).
XTo change the category: select a category.
The personal POI is saved in the selected cat-
egory.
XTo delete a personal POI or route: turn and
press the controller to select Delete
.
A prompt will appear.
XSelect YesorNo.
If you select Yes, the personal destination or
personal route is deleted.
XTo select the outward and return routes:
turn and press the controller to select Swap
.
The starting and destination positions of your
personal route, and thus the direction for
route guidance, are switched round. One-way
streets or restricted intersections are taken
into consideration. Therefore, the outward
and return routes may differ from each other.
XTo save a personal POI: turn and press the
controller to select Save
.
XTo continue saving (Ypage 81).
XTo start route guidance: selectStartby
turning and pressing the controller.
Recording the route
General notes
When recording the route, bear in mind the fol-
lowing:
RIf the SD memory card is inserted, it must not
be removed during recording
RIf route recording is started manually, it must
be finished manually before the multimedia
system is switched off
RThe multimedia system minimizes the num-
ber of route points recorded. Therefore when
the recorded route is subsequently com-
menced, it may differ from the route that was
originally recorded.
Starting/finishing route recording
XInsert the SD memory card (Ypage 154).
XTo switch to navigation mode: press the
ß button.
XTo show the menu: slide6the controller.
XTo select Destination: turn and press the
controller.
XSelect From Memory Card.
XSelectStart Route Recording.
The route is recorded and RECappears at the
bottom edge of the screen.
XTo stop recording, select End RouteRecordingfrom the menu.
The route is stored under Personal Routes.
Displaying/editing the recorded route
XInsert the SD memory card (Ypage 154).
XTo switch to navigation mode: press the
ß button.
XTo show the menu: slide6the controller.
70Personal POIs and routes
Navigation
Page 104 of 206
several parties to hear one another and speak
with one another.
XAdd a call (Ypage 100).
or
XAnswer an incoming call (Ypage 102).
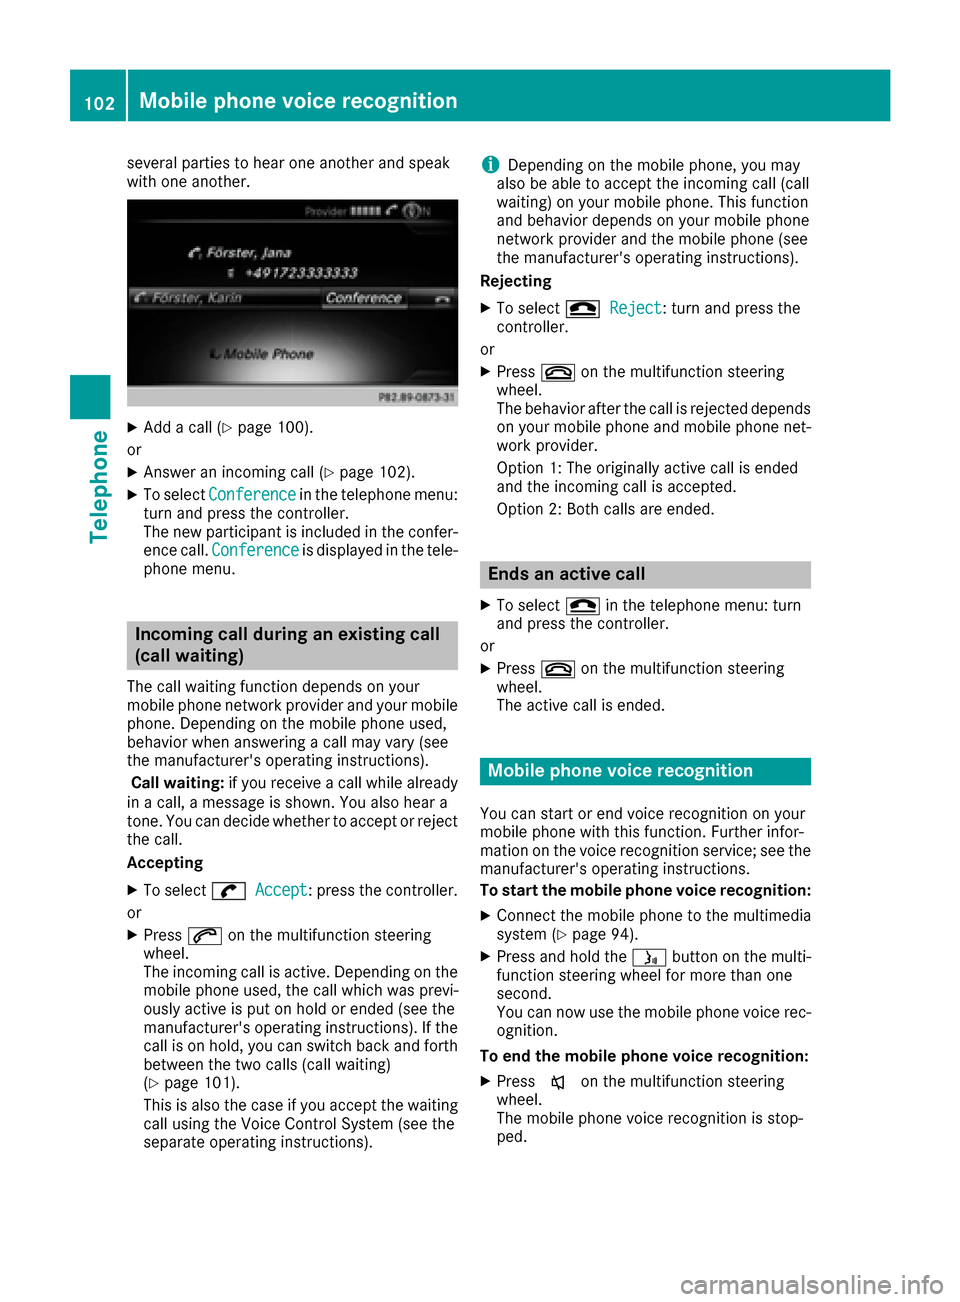
XTo select Conferencein the telephone menu:
turn and press the controller.
The new participant is included in the confer-
ence call. Conference
is displayed in the tele-
phone menu.
Incoming call during an existing call
(call waiting)
The call waiting function depends on your
mobile phone network provider and your mobile
phone. Depending on the mobile phone used,
behavior when answering a call may vary (see
the manufacturer's operating instructions).
Call waiting: if you receive a call while already
in a call, a message is shown. You also hear a
tone. You can decide whether to accept or reject
the call.
Accepting
XTo select wAccept: press the controller.
or
XPress 6on the multifunction steering
wheel.
The incoming call is active. Depending on the
mobile phone used, the call which was previ-
ously active is put on hold or ended (see the
manufacturer's operating instructions). If the
call is on hold, you can switch back and forth
between the two calls (call waiting)
(
Ypage 101).
This is also the case if you accept the waiting
call using the Voice Control System (see the
separate operating instructions).
iDepending on the mobile phone, you may
also be able to accept the incoming call (call
waiting) on your mobile phone. This function
and behavior depends on your mobile phone
network provider and the mobile phone (see
the manufacturer's operating instructions).
Rejecting
XTo select =Reject: turn and press the
controller.
or
XPress ~on the multifunction steering
wheel.
The behavior after the call is rejected depends
on your mobile phone and mobile phone net-
work provider.
Option 1: The originally active call is ended
and the incoming call is accepted.
Option 2: Both calls are ended.
Ends an active call
XTo select =in the telephone menu: turn
and press the controller.
or
XPress ~on the multifunction steering
wheel.
The active call is ended.
Mobile phone voice recognition
You can start or end voice recognition on your
mobile phone with this function. Further infor-
mation on the voice recognition service; see the
manufacturer's operating instructions.
To start the mobile phone voice recognition:
XConnect the mobile phone to the multimedia
system (Ypage 94).
XPress and hold the óbutton on the multi-
function steering wheel for more than one
second.
You can now use the mobile phone voice rec-
ognition.
To end the mobile phone voice recognition:
XPress xon the multifunction steering
wheel.
The mobile phone voice recognition is stop-
ped.
102Mobile phone voice recognition
Telephone
Page 162 of 206
iIf you authorize a mobile phone that sup-
ports Bluetooth®audio, the A2DP and AVRCP
Bluetooth®audio profiles are connected
automatically.
The mobile phone is then entered:
Rin the Bluetooth®telephone list
(Ypage 95)
Rin the Bluetooth®audio device list
(Ypage 160)
Mercedes-Benz recommends authorizing a
mobile phone in Bluetooth
®telephony
(Ypage 96).
iIf the mobile phone that is connected only
supports two Bluetooth®profiles at the same
time, the multimedia system may behave as
follows:
Rwhen connecting to the Internet, playback
is stopped on the Bluetooth®audio device.
Rwhen starting playback on the Bluetooth®
audio device, the Internet connection is
ended.
Searching for and authorizing a Blue-
tooth®audio device
Switching to Bluetooth®audio mode
XPress the Õbutton.
XTo select BluetoothAudioin the menu: turn
and press the controller.
A menu appears.
If you see the No
BluetoothAudioDeviceAuthorizedmessage, you will need to
authorize the Bluetooth®audio device first.
XTo select Optionsin the Bluetooth audio
menu: slide 6and press the controller.
XTo select BluetoothAudioDevices: press
the controller.
A new menu appears.
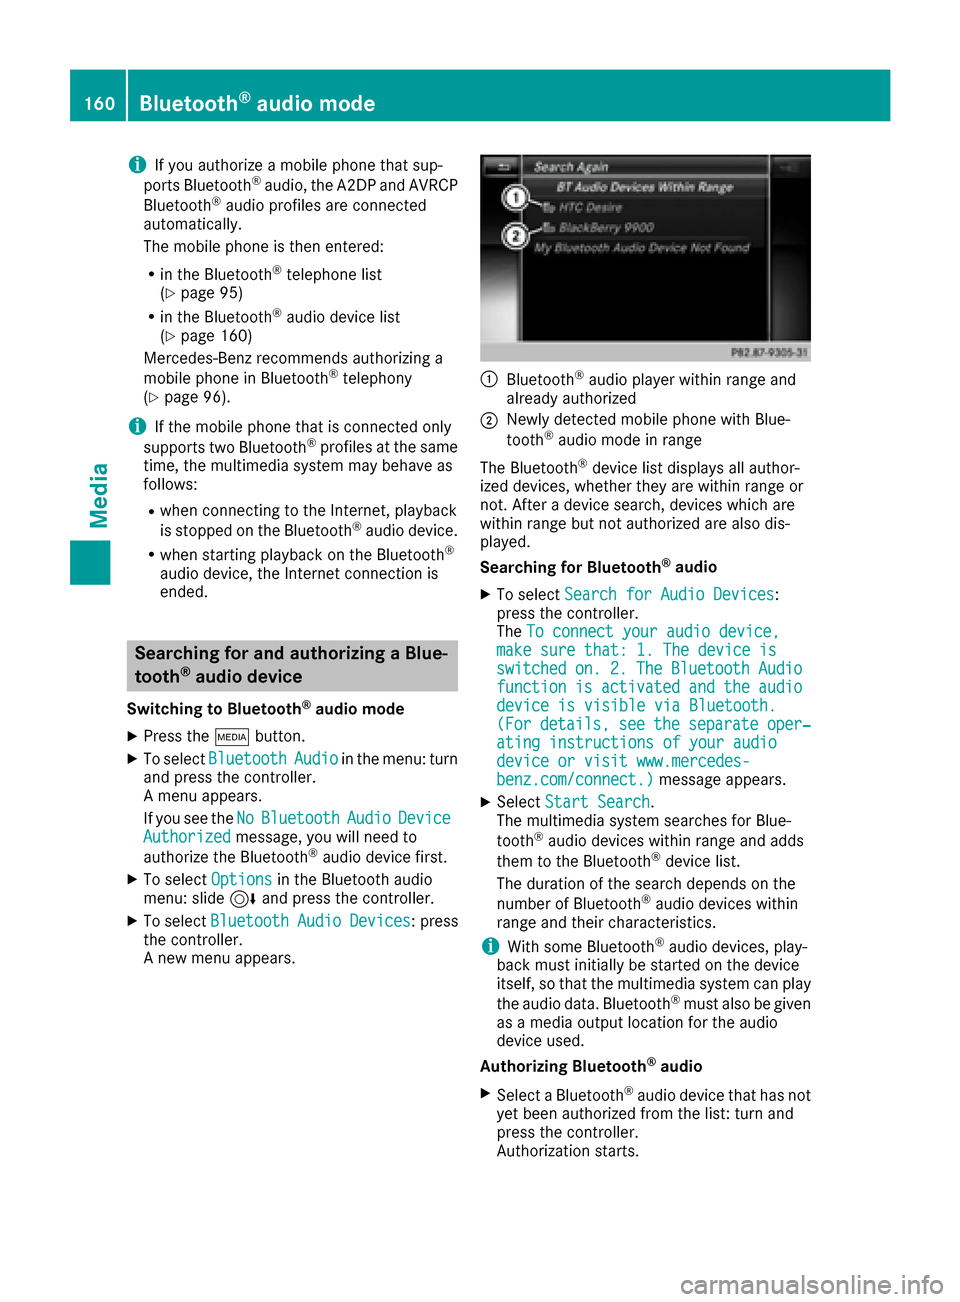
:Bluetooth®audio player within range and
already authorized
;Newly detected mobile phone with Blue-
tooth®audio mode in range
The Bluetooth
®device list displays all author-
ized devices, whether they are within range or
not. After a device search, devices which are
within range but not authorized are also dis-
played.
Searching for Bluetooth
®audio
XTo select Search for Audio Devices:
press the controller.
The To connect your audio device,
make sure that: 1. The device isswitchedon.2.TheBluetoothAudiofunctionisactivatedandtheaudiodevice is visible via Bluetooth.(Fordetails,seetheseparateoper‐ating instructions of your audiodevice or visit www.mercedes-benz.com/connect.)message appears.
XSelect Start Search.
The multimedia system searches for Blue-
tooth
®audio devices within range and adds
them to the Bluetooth®device list.
The duration of the search depends on the
number of Bluetooth
®audio devices within
range and their characteristics.
iWith some Bluetooth®audio devices, play-
back must initially be started on the device
itself, so that the multimedia system can play
the audio data. Bluetooth
®must also be given
as a media output location for the audio
device used.
Authorizing Bluetooth
®audio
XSelect a Bluetooth®audio device that has not
yet been authorized from the list: turn and
press the controller.
Authorization starts.
160Bluetooth®audio mode
Media
Page 164 of 206
Option 2:
XTo selectOptions: slide6and press the
controller.
XTo select BluetoothAudioDevices: press
the controller.
XTo select a Bluetooth®audio device: turn and
press the controller.
If the Bluetooth
®audio device has been
authorized, playback starts.
Bluetooth®audio device and simulta-
neous search for mobile phones
i
When searching for a mobile phone or a new
Bluetooth®audio device, the connection to an
already activated Bluetooth®audio device is
separated (Ypage 95).
In the Bluetooth
®audio basic display, you will
see the No Bluetooth Audio Device Con‐
nectedmessage, and the Connect Devicemenu item cannot be selected.
Displaying details
XTo select a Bluetooth®audio device from the
Bluetooth®device list: turn the controller.
XTo select the symbol to the right of the Blue-
tooth®audio device: slide 9the controller.
XTo select Details: turn and press the con-
troller.
The following information concerning the
selected mobile phone is shown:
RBluetooth®name
RBluetooth®address
RAvailability status (shown after an update)
RAuthorization status
XTo close the detailed display: press the
% button.
De-authorizing (deregistering) a Blue-
tooth®audio device
XTo select a Bluetooth®audio device from the
Bluetooth®device list: turn the controller.
XTo select the symbol to the right of the Blue-
tooth®audio device: slide 9and press the
controller.
XTo select Deauthorize: press the controller.
A prompt appears asking whether you really
wish to deauthorize this device.
XTo select YesorNo: turn and press the con-
troller.
If you select Yes
, the device will be deleted
from the Bluetooth®device list.
If you select No
the process is canceled.
iBefore re-authorizing the Bluetooth®audio
device, you should also delete the device
name MB Bluetooth
from your Bluetooth®
audio device's Bluetooth®list (see the Blue-
tooth®audio device's operating instructions).
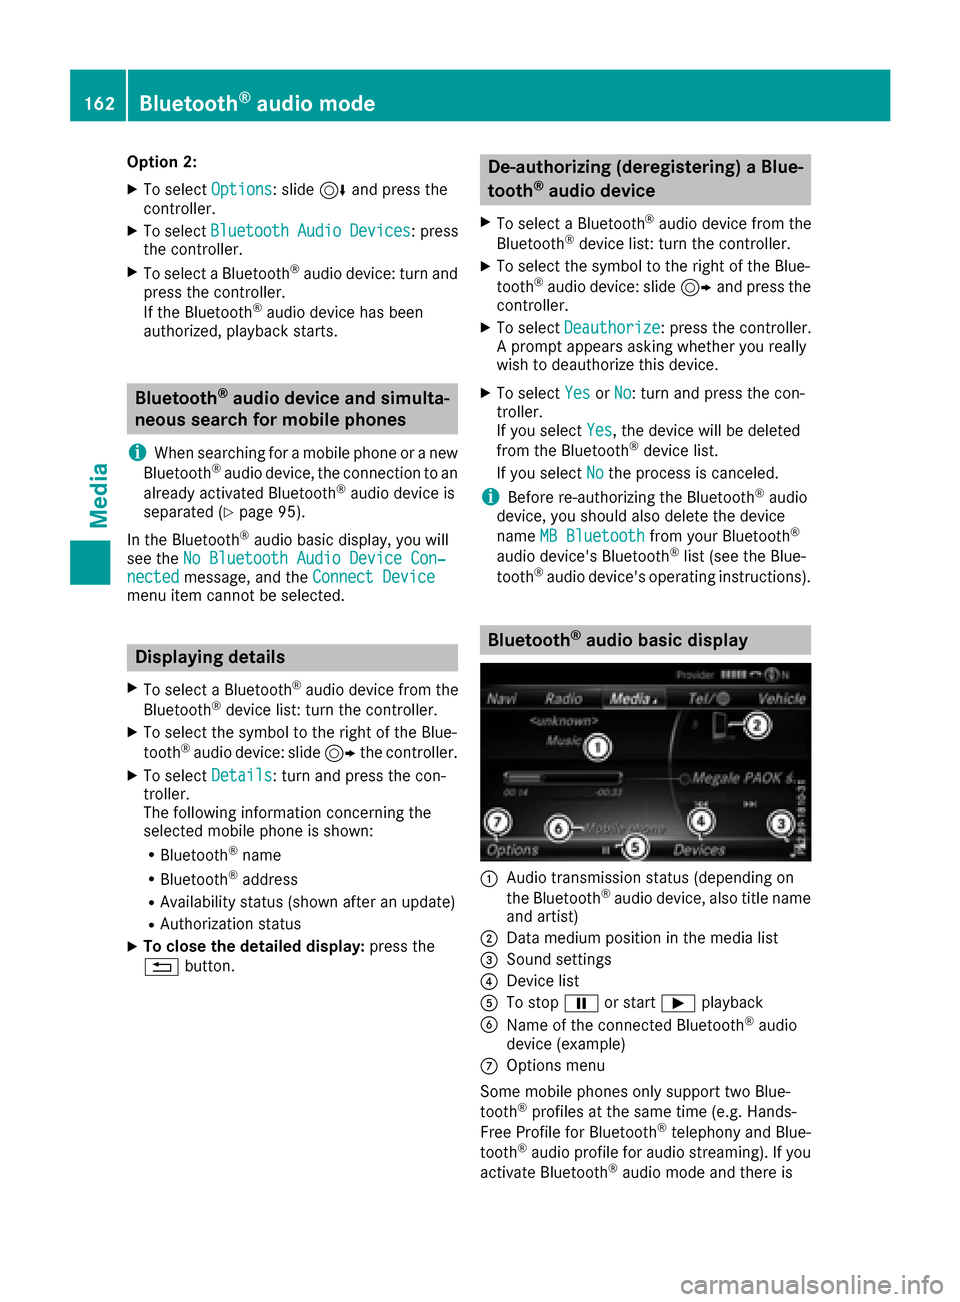
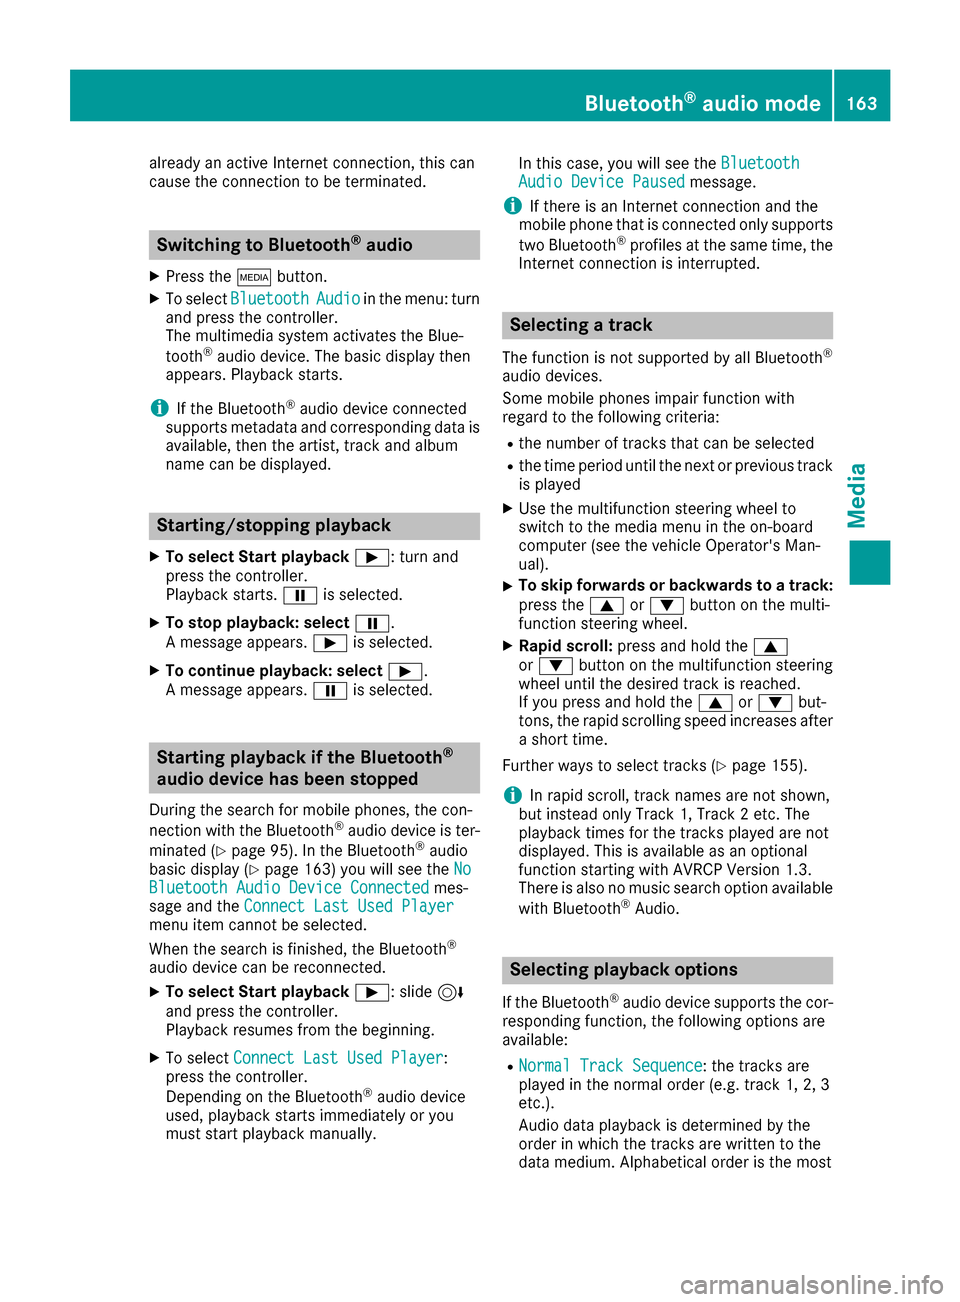
Bluetooth®audio basic display
:Audio transmission status (depending on
the Bluetooth®audio device, also title name
and artist)
;Data medium position in the media list
=Sound settings
?Device list
ATo stop Ëor start Ìplayback
BName of the connected Bluetooth®audio
device (example)
COptions menu
Some mobile phones only support two Blue-
tooth
®profiles at the same time (e.g. Hands-
Free Profile for Bluetooth®telephony and Blue-
tooth®audio profile for audio streaming). If you
activate Bluetooth®audio mode and there is
162Bluetooth®audio mode
Media
Page 165 of 206
already an active Internet connection, this can
cause the connection to be terminated.
Switching to Bluetooth®audio
XPress theÕbutton.
XTo select BluetoothAudioin the menu: turn
and press the controller.
The multimedia system activates the Blue-
tooth
®audio device. The basic display then
appears. Playback starts.
iIf the Bluetooth®audio device connected
supports metadata and corresponding data is
available, then the artist, track and album
name can be displayed.
Starting/stopping playback
XTo select Start playback Ì: turn and
press the controller.
Playback starts. Ëis selected.
XTo stop playback: select Ë.
A message appears. Ìis selected.
XTo continue playback: select Ì.
A message appears. Ëis selected.
Starting playback if the Bluetooth®
audio device has been stopped
During the search for mobile phones, the con-
nection with the Bluetooth®audio device is ter-
minated (
Ypage 95). In the Bluetooth®audio
basic display (Ypage 163) you will see the NoBluetooth Audio Device Connectedmes-
sage and the Connect Last Used Player
menu item cannot be selected.
When the search is finished, the Bluetooth®
audio device can be reconnected.
XTo select Start playback Ì: slide6
and press the controller.
Playback resumes from the beginning.
XTo select Connect Last Used Player:
press the controller.
Depending on the Bluetooth
®audio device
used, playback starts immediately or you
must start playback manually. In this case, you will see the
Bluetooth
Audio Device Pausedmessage.
iIf there is an Internet connection and the
mobile phone that is connected only supports
two Bluetooth
®profiles at the same time, the
Internet connection is interrupted.
Selecting a track
The function is not supported by all Bluetooth®
audio devices.
Some mobile phones impair function with
regard to the following criteria:
Rthe number of tracks that can be selected
Rthe time period until the next or previous track
is played
XUse the multifunction steering wheel to
switch to the media menu in the on-board
computer (see the vehicle Operator's Man-
ual).
XTo skip forwards or backwards to a track:
press the 9or: button on the multi-
function steering wheel.
XRapid scroll: press and hold the 9
or : button on the multifunction steering
wheel until the desired track is reached.
If you press and hold the 9or: but-
tons, the rapid scrolling speed increases after a short time.
Further ways to select tracks (
Ypage 155).
iIn rapid scroll, track names are not shown,
but instead only Track 1, Track 2 etc. The
playback times for the tracks played are not
displayed. This is available as an optional
function starting with AVRCP Version 1.3.
There is also no music search option available
with Bluetooth
®Audio.
Selecting playback options
If the Bluetooth®audio device supports the cor-
responding function, the following options are
available:
RNormal Track Sequence: the tracks are
played in the normal order (e.g. track 1, 2, 3
etc.).
Audio data playback is determined by the
order in which the tracks are written to the
data medium. Alphabetical order is the most
Bluetooth®audio mode163
Media
Z
Page 172 of 206
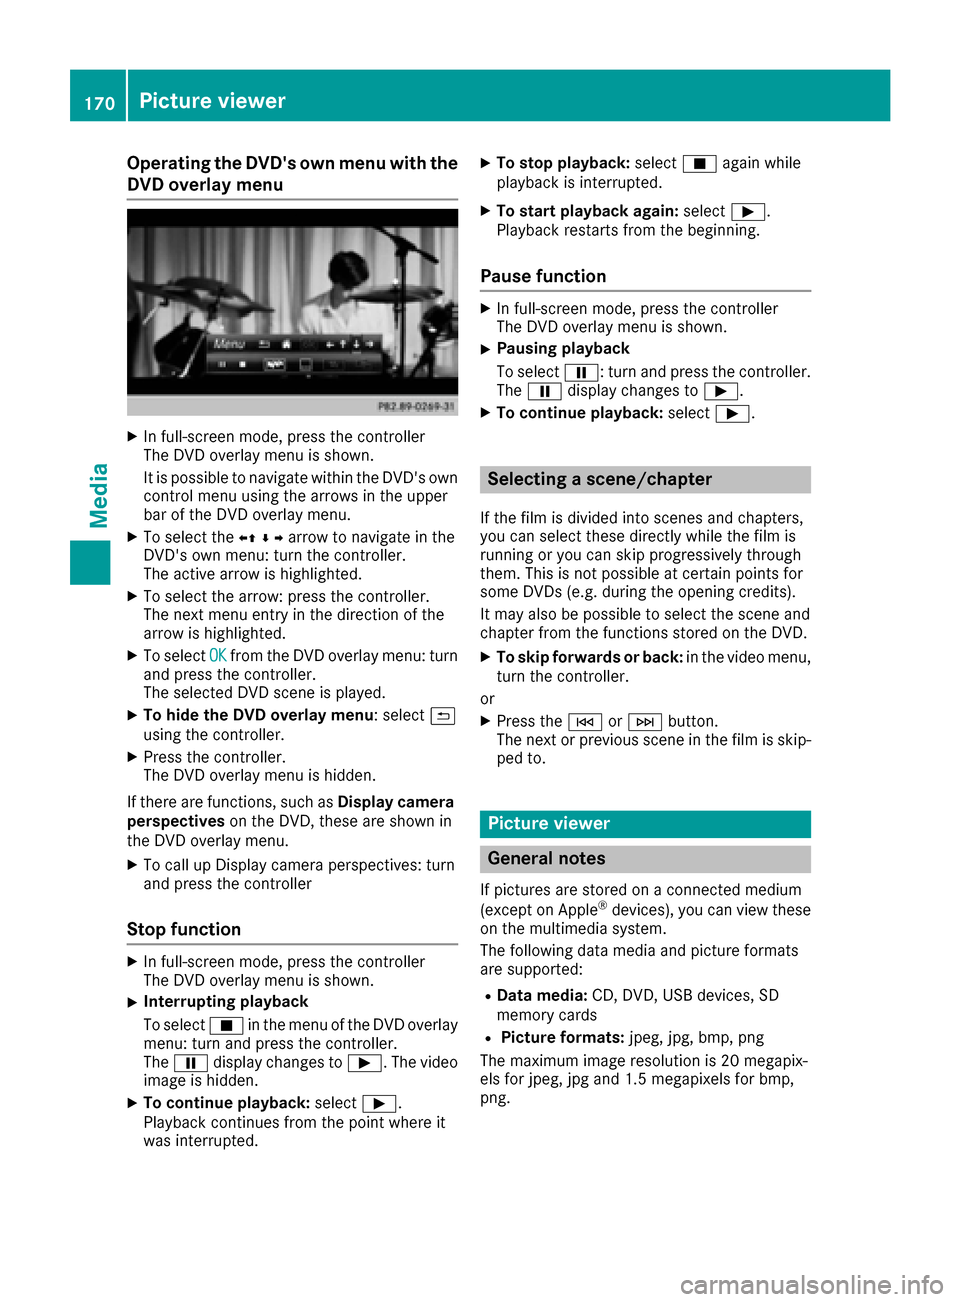
Operating the DVD's own menu with the
DVD overlay menu
XIn full-screen mode, press the controller
The DVD overlay menu is shown.
It is possible to navigate within the DVD's owncontrol menu using the arrows in the upper
bar of the DVD overlay menu.
XTo select the XZ¬Yarrow to navigate in the
DVD's own menu: turn the controller.
The active arrow is highlighted.
XTo select the arrow: press the controller.
The next menu entry in the direction of the
arrow is highlighted.
XTo select OKfrom the DVD overlay menu: turn
and press the controller.
The selected DVD scene is played.
XTo hide the DVD overlay menu : select&
using the controller.
XPress the controller.
The DVD overlay menu is hidden.
If there are functions, such as Display camera
perspectives on the DVD, these are shown in
the DVD overlay menu.
XTo call up Display camera perspectives: turn
and press the controller
Stop function
XIn full-screen mode, press the controller
The DVD overlay menu is shown.
XInterrupting playback
To select Éin the menu of the DVD overlay
menu: turn and press the controller.
The Ë display changes to Ì. The video
image is hidden.
XTo continue playback: selectÌ.
Playback continues from the point where it
was interrupted.
XTo stop playback: selectÉagain while
playback is interrupted.
XTo start playback again: selectÌ.
Playback restarts from the beginning.
Pause function
XIn full-screen mode, press the controller
The DVD overlay menu is shown.
XPausing playback
To select Ë: turn and press the controller.
The Ë display changes to Ì.
XTo continue playback: selectÌ.
Selecting a scene/chapter
If the film is divided into scenes and chapters,
you can select these directly while the film is
running or you can skip progressively through
them. This is not possible at certain points for
some DVDs (e.g. during the opening credits).
It may also be possible to select the scene and
chapter from the functions stored on the DVD.
XTo skip forwards or back: in the video menu,
turn the controller.
or
XPress the EorF button.
The next or previous scene in the film is skip-
ped to.
Picture viewer
General notes
If pictures are stored on a connected medium
(except on Apple®devices), you can view these
on the multimedia system.
The following data media and picture formats
are supported:
RData media: CD, DVD, USB devices, SD
memory cards
RPicture formats: jpeg, jpg, bmp, png
The maximum image resolution is 20 megapix-
els for jpeg, jpg and 1.5 megapixels for bmp,
png.
170Picture viewer
Media