2017 MERCEDES-BENZ CLS-Class navigation
[x] Cancel search: navigationPage 19 of 206

Overview
Components
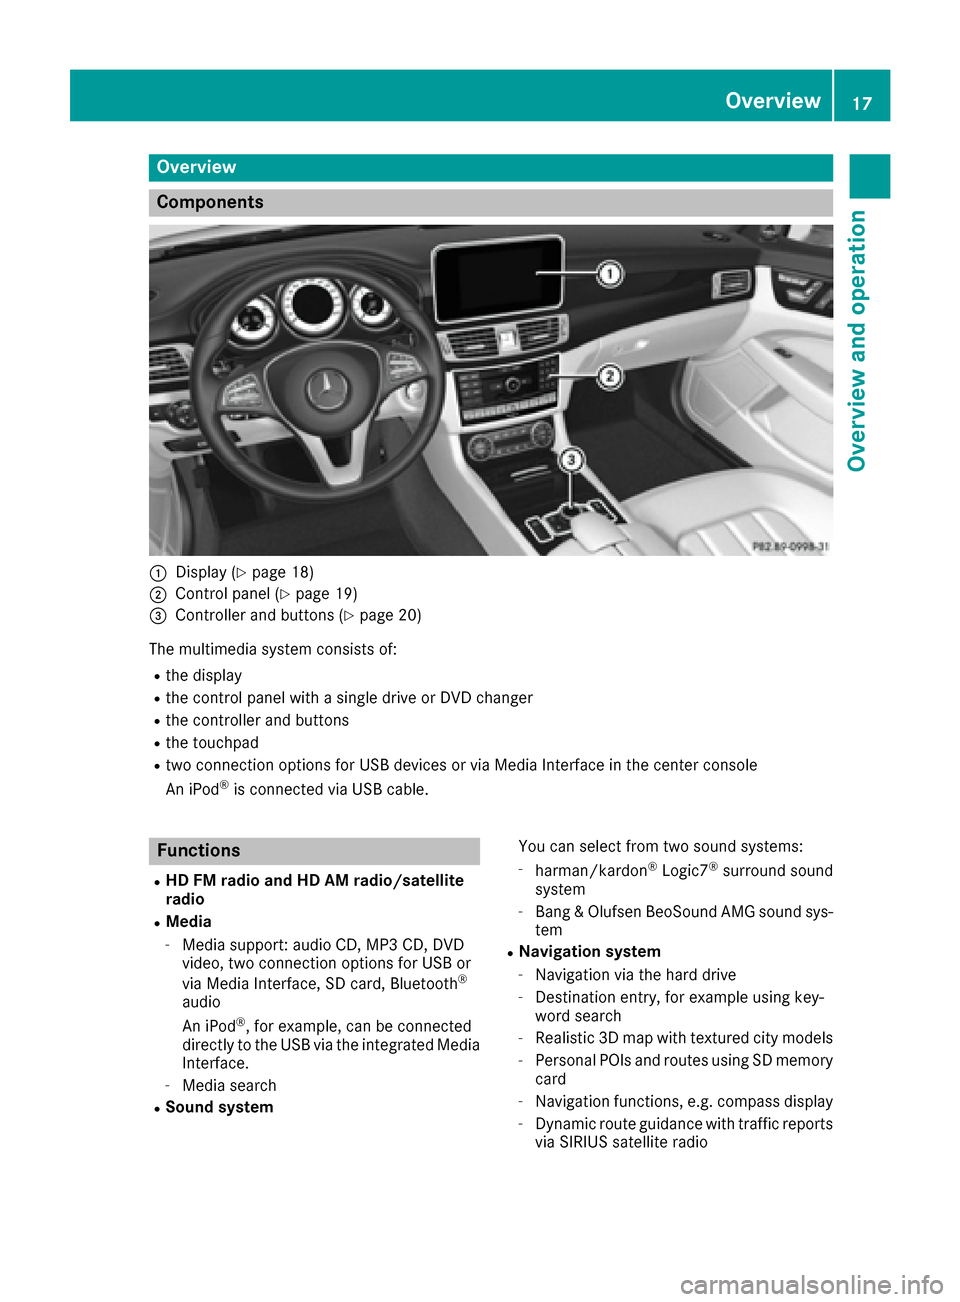
:Display (Ypage 18)
;Control panel (Ypage 19)
=Controller and buttons (Ypage 20)
The multimedia system consists of:
Rthe display
Rthe control panel with a single drive or DVD changer
Rthe controller and buttons
Rthe touchpad
Rtwo connection options for USB devices or via Media Interface in the center console
An iPod®is connected via USB cable.
Functions
RHD FM radio and HD AM radio/satellite
radio
RMedia
-Media support: audio CD, MP3 CD, DVD
video, two connection options for USB or
via Media Interface, SD card, Bluetooth
®
audio
An iPod®, for example, can be connected
directly to the USB via the integrated Media
Interface.
-Media search
RSound system You can select from two sound systems:
-harman/kardon®Logic7®surround sound
system
-Bang & Olufsen BeoSound AMG sound sys-
tem
RNavigation system
-Navigation via the hard drive
-Destination entry, for example using key-
word search
-Realistic 3D map with textured city models
-Personal POIs and routes using SD memory
card
-Navigation functions, e.g. compass display
-Dynamic route guidance with traffic reports
via SIRIUS satellite radio
Overview17
Overview and operation
Page 22 of 206

FunctionPage
HRejects a call99
Ends an active call102
ISwitches the mute function
on/off27
Switches off navigation
announcements27
FunctionPage
JSwitches to navigation mode53
Calls up the navigation sys-
tem menu89
KCalls up the telephone menu94
LCalls up vehicle settings44
Buttons and controller
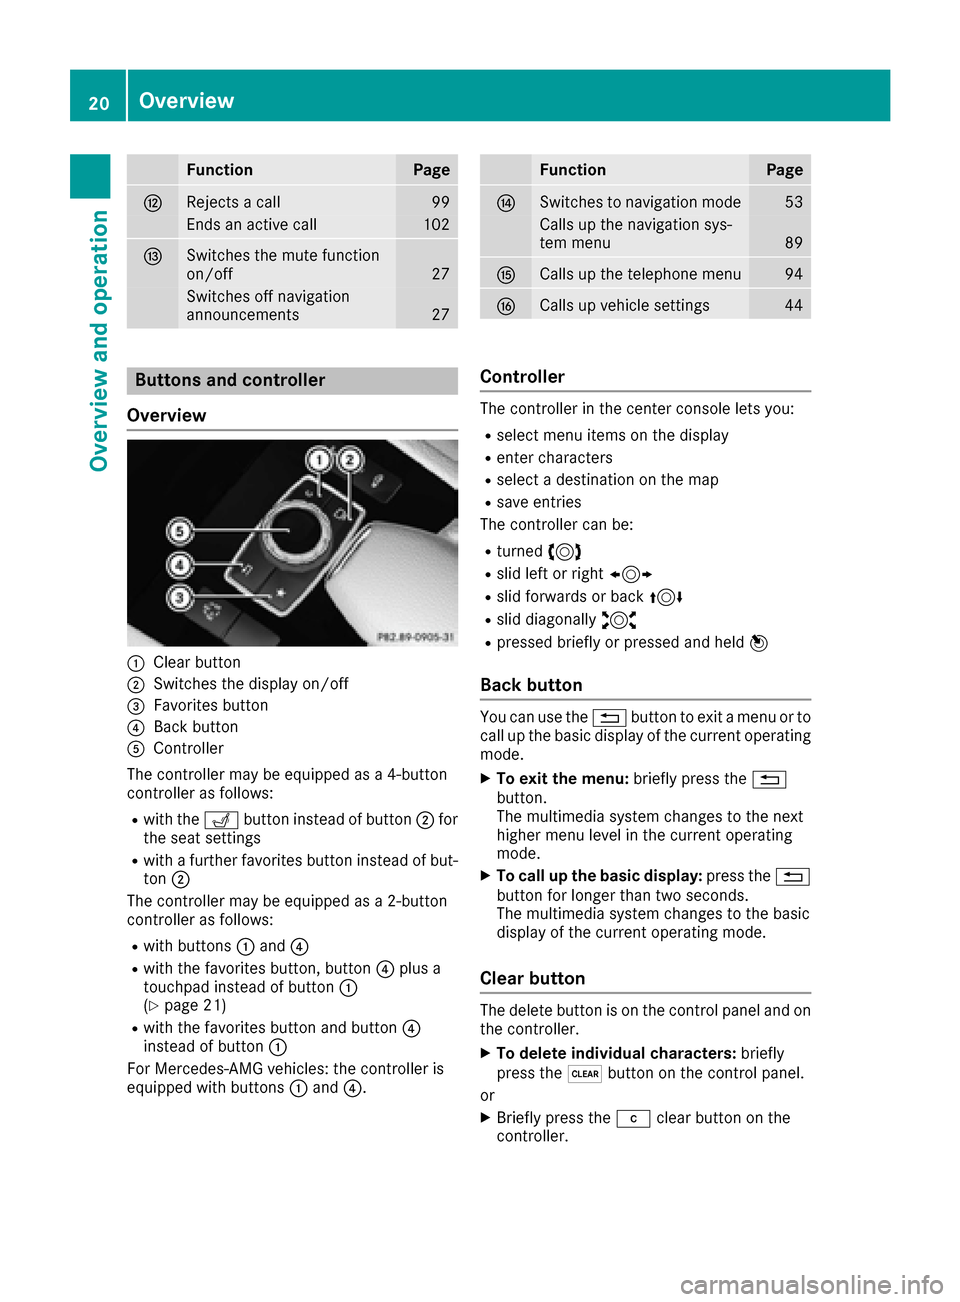
Overview
:Clear button
;Switches the display on/off
=Favorites button
?Back button
AController
The controller may be equipped as a 4-button
controller as follows:
Rwith the Tbutton instead of button ;for
the seat settings
Rwith a further favorites button instead of but-
ton ;
The controller may be equipped as a 2-button
controller as follows:
Rwith buttons :and ?
Rwith the favorites button, button ?plus a
touchpad instead of button :
(
Ypage 21)
Rwith the favorites button and button ?
instead of button :
For Mercedes-AMG vehicles: the controller is
equipped with buttons :and ?.
Controller
The controller in the center console lets you:
Rselect menu items on the display
Renter characters
Rselect a destination on the map
Rsave entries
The controller can be:
Rturned 3
Rslid left or right 1
Rslid forwards or back 4
Rslid diagonally2
Rpressed briefly or pressed and held 7
Back button
You can use the%button to exit a menu or to
call up the basic display of the current operating
mode.
XTo exit the menu: briefly press the%
button.
The multimedia system changes to the next
higher menu level in the current operating
mode.
XTo call up the basic display: press the%
button for longer than two seconds.
The multimedia system changes to the basic
display of the current operating mode.
Clear button
The delete button is on the control panel and on
the controller.
XTo delete individual characters: briefly
press the $button on the control panel.
or
XBriefly press the jclear button on the
controller.
20Overview
Overview and operation
Page 23 of 206

XTo delete an entire entry:press and hold the
$ button on the control panel.
or
XPress and hold the jclear button on the
controller.
Favorites button
You can assign predefined functions using the
g favorites button and call them up by press-
ing the button (
Ypage 41).
Display off button
You can switch the display off/on using the
_ button (Ypage 34).
Seat button
If the controller is equipped with the Tbut-
ton, you can call up the menu for the seat set-
tings (
Ypage 46).
Touchpad
Touchpad overview
!
Do not use any sharp objects on the touch-
pad. This could damage the touchpad.
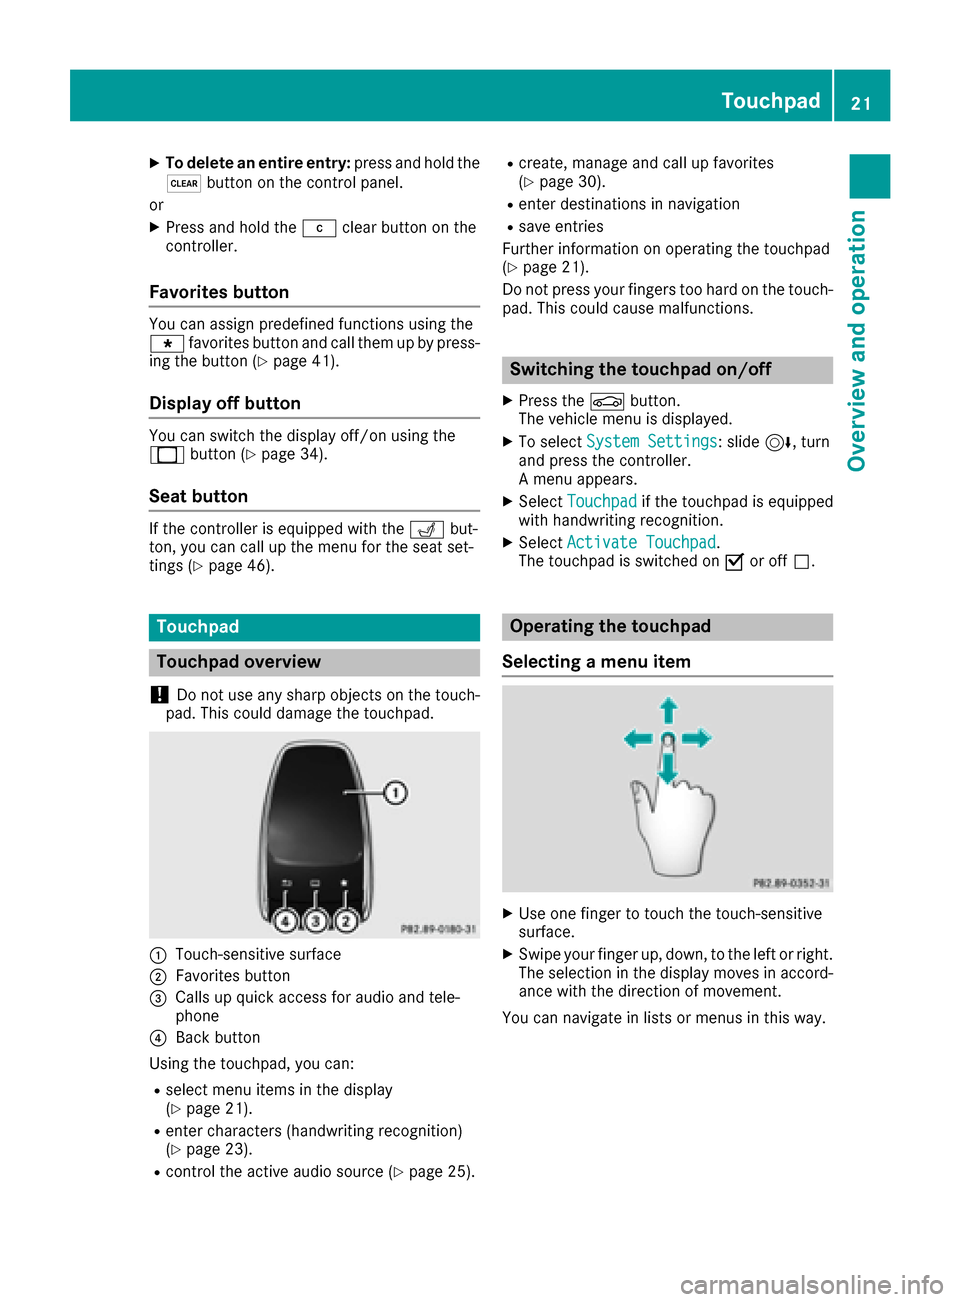
:Touch-sensitive surface
;Favorites button
=Calls up quick access for audio and tele-
phone
?Back button
Using the touchpad, you can:
Rselect menu items in the display
(Ypage 21).
Renter characters (handwriting recognition)
(Ypage 23).
Rcontrol the active audio source (Ypage 25).
Rcreate, manage and call up favorites
(Ypage 30).
Renter destinations in navigation
Rsave entries
Further information on operating the touchpad
(
Ypage 21).
Do not press your fingers too hard on the touch-
pad. This could cause malfunctions.
Switching the touchpad on/off
XPress the Øbutton.
The vehicle menu is displayed.
XTo select System Settings: slide6, turn
and press the controller.
A menu appears.
XSelect Touchpadif the touchpad is equipped
with handwriting recognition.
XSelect Activate Touchpad.
The touchpad is switched on Oor off ª.
Operating the touchpad
Selecting a menu item
XUse one finger to touch the touch-sensitive
surface.
XSwipe your finger up, down, to the left or right.
The selection in the display moves in accord- ance with the direction of movement.
You can navigate in lists or menus in this way.
Touchpad21
Overview and operation
Page 28 of 206

Changing the audio source
XCall up quick access (Ypage 22).
The current audio source is displayed.
XTo display the available audio sources:
glide down with one finger.
XTo select an audio source: glide your finger
to the left or right and press.
The selected audio source is played.
Sending DTMF tones
The function is not supported by all mobile
phones (see the manufacturer's operating
instructions).
XCall up quick access during a call (Ypage 22).
XTo select characters: glide your finger to the
left or right and press.
Every character selected will be transmitted
immediately.
Basic functions
Switching the multimedia system on/
off
XPress the qcontrol knob.
When you switch the multimedia system on, a
warning message will appear. The multimedia
system calls up the previously selected menu.
If you switch the multimedia system off, play- back of the current media source will also be
switched off.
Adjusting the volume
Adjusting the volume for media sources
XTurn the qcontrol knob.
or
XPress the WorX button on the multi-
function steering wheel.
The volume of the media source currently
selected changes.
Adjusting the volume for traffic
announcements and navigation
announcements
During traffic or navigation announcements:
XTurn the qcontrol knob.
or
XPress the WorX button on the multi-
function steering wheel.
iYou can set the volume for navigation
announcements to be different from the vol-
ume of the respective media source.
Adjusting the volume for phone calls
You can adjust the volume for hands-free mode
during a telephone call.
XTurn the qcontrol knob.
or
XPress the WorX button on the multi-
function steering wheel.
iSetting the volume for the Voice Control
System voice output; see the separate oper-
ating instructions.
26Basic functions
Overview and operation
Page 29 of 206

Switching the sound on/off
Media source sound
XPress the 8button on the control panel or
on the multifunction steering wheel.
The sound is switched off. If the audio output
is switched off, the status line will show the
8 symbol. If you switch the media source
or change the volume, the sound is automat-
ically switched on.
iEven if the sound is switched off, you will still
hear navigation system announcements.
Switching navigation announcements
off and on again
XTo switch navigation announcements off:
press the 8button during an announce-
ment.
The Spoken driving recommendations
have been deactivated.message
appears.
XTo switch navigation announcements on
again: switch the multimedia system off and
then on again (
Ypage 26).
or
XStart a new route calculation (Ypage 58).
or
XSelect +: while route guidance is active,
show the menu and press the controller
(
Ypage 74).
Function menu
XPress the Õbutton or the ß,$,
%, or Øbutton.
Navigation: the map displays the current
vehicle position. Radio:
the basic menu of the last radio mode
set appears.
Media: the basic display for the last media
source set appears. In the example, Media
Interface mode is set.
Communication: the basic menu of the last
communication function set appears (tele-
phone, address book, Internet).
Vehicle functions: the basic display
appears.
XTo show the menu: slide4 the controller.
The menu for the selected functions appears.
Depending on the operation, the marking is
shown:
Rin the main function bar at the top or
Rin the menu bar at the bottom
XTo select a menu item: turn and press the
controller.
If you have selected a menu item from the
main function bar, switch to the last menu set
for the selected function.
The menu bar features options within the cur-
rently set function.
Selecting the operating mode for a
main function
For the main functions, e.g. communication or
media, you can choose from the available oper-
ating modes.
In the communication menu, you can:
Rswitch to telephone mode.
Rcall up the address book.
Raccess the Internet.
Rcall up the digital operating instructions for
Tel/®.
Basic functions27
Overview and operation
Page 31 of 206

SymbolFunction
%Cancels input
SInserts a paragraph
Entering characters using the number
keypad
If an input line for text or numbers is selected,
the number keypad is used for the character
entry.
XFor example, to enter the letterc: press the
l number key briefly three times in suc-
cession.
An additional display area is shown with all
the available characters. Press the key
repeatedly to go through the characters until
c
is highlighted.
XWait until the character display goes out.
The letter cis entered in the input line.
Character entry (navigation)
Entering characters using the charac-
ter bar
:Characters NEW(orange color) entered by
the user
;Characters automatically added by the mul-
timedia system YORK
=Characters not currently available
?Currently selected character
ACharacters currently available
BCharacter bar
The example shows the address entry
(
Ypage 57).
XTo enter a character: turn, slide6or5
and press the controller.
Selected character :is entered in the upper
line. The multimedia system adds the missing
characters and shows the entry that best
matches the current input.
The characters are available Aor not =,
depending on the characters already entered
and the data stored in the digital map.
The Gsymbol indicates that an entry exists
more than once.
XTo delete a character: slide6and turn the
controller, then press it after selecting F.
XTo delete an entire entry:slide6and turn
the controller; then after selecting Fpress
and hold down the controller until the entire
entry is deleted.
XTo confirm an entry: slide6and turn the
controller, then press it after selecting ¬.
or
XSlide 5the controller repeatedly until the
character bar disappears.
The location selection list appears. The selec-
ted entry is highlighted.
The example shows the character entry when
you save a destination as a navigable contact in
the address book (
Ypage 58). The cursor is
located in the input line.
XTo select an input line: slide6and turn
the controller, then press it after selecting 4
or 5.
or
XSlide 5the controller repeatedly until the
character bar disappears.
XTurn and press the controller.
XTo move the cursor: select the input line.
XSlide6and turn the controller, then press it
after selecting 2or3.
Character entry (navigation)29
Overview and operation
Page 33 of 206

Adding favorites
Adding predefined favorites
XPress th efavorite sbutto non th econtroller .
The favorite sare displayed.
XTo sho wthemen ubar :slid e6 thecon-
troller .
XTo select Reassign:tur nand press th econ-
troller .
The categorie sfor th eavailable favorite sare
displayed.
XTo select acategory: turnth econtroller and
press to confirm .
The corresponding favorite sare displayed.
XTo select afavorite: turnand press th econ-
troller .
XTo add afavorit eat th edesired position:
tur nand press th econtroller .
If there is already afavorite at this position ,
then this will be deleted.
Adding your own favorites
You can creat eyour own favorite sto help you to
use these functions, for example:
RCallin gup telephon enumber sfrom th etele-
phone book
RSelecting aradi ostation
RSkippin gto aspecific plac ein atrack or an
audio book
RCallin gup preferred media
RSelecting navigation destination sfor rout e
calculation
The exampl eshows how to store atelephon e
number from th etelephon ebook as afavorite .
XCall up th ephone book .
XSearchfor th econtact and display th ephone
number .
XTo add atelephone number as afavorit e
at th edesired position: press and hold the
favorite sbutto non th econtroller until th e
favorite sare displayed.
XTurn and press th econtroller .
If there is already afavorite at this position ,
then this will be deleted.
Renaming favorites
XPress th efavorite sbutto non th econtroller .
The favorite sare displayed.
XTo select afavorit eto be renamed: turnth e
controller .
XTo showthemen ubar :slid e6 thecon-
troller .
XTo select Rename:tur nand press th econtrol -
ler .
XEnte rcharacters usin gth econtroller .
XTo finish th eentry :select OK.
The favorite is renamed .
Moving favorites
XPress thefavorite sbutto non th econtroller .
The favorite sare displayed.
XTo select afavorit eto be moved: turnth e
controller .
XTo showthemen ubar :slid e6 thecon-
troller .
XTo select Move:tur nand press th econtroller .
XTo storeafavorit ein th edesired order:
tur nand press th econtroller .
The favorite is moved.
If on efavorite is store dove ranother one, this
is then is deleted.
Deleting favorites
XPress th efavorite sbutto non th econtroller .
The favorite sare displayed.
XTo select afavorit eto be deleted: turnth e
controller .
XTo showthemen ubar :slid e6 thecon-
troller .
Favorites31
Overview and operation
Page 36 of 206

DesignExplanation
Day ModeThe display is set perma-
nently to day design .
Night ModeThe display is set perma-
nently to night design .
AutoIn th eAut osetting ,th e
multimedia system evalu-
ate sth ereading sfrom th e
automatic vehicl eligh t
sensor and automatically
switches th edisplay
design .
Switching the display on/off
XPress th eØ button.
XTo select DisplayOff:slid e6, turnand
press th econtroller .
The display goe sout .
or
XPress th e_ buttonon th econtroller .
The display goe sout .
XTo switch th edispla yon again: press the
controller .
Time settings
Gene ral inform ation
The multimedia system can automatically set
thetime and date.
The followin gnavigation system function s
require th etime, time zone and summer/stand-
ard time to be set correctl yin order to wor k
properly:
Rrout eguidance on routes wit htime-depend -
en ttraffic guidance
Rcalculation of expecte dtime of arrival
Switching automatic ti me onand off
TheAutomatic Tim eSettingsfunction is
used to activat eor deactivat eth eautomatic
setting of th etime and date. This function is
activated when th evehicl eleaves th efactory.
XPress th eØ button.
or
XPress Vehicl ein themain function bar.
The vehicl emen uis displayed.
XTo select Time:slid e6, turnand press th e
controller .
A men uappears.
XTo select AutomaticTimeSettings:press
th econtroller .
XTo switch th efunction on Oor off ª:press
th econtroller .
Setting the ti mezone
To set th etime zone ,th eAutomatic Tim eSettingsfunction mustbe activated.
XPress th eØ button.
or
XPress Vehicl ein themain function bar.
The vehicl emen uis displayed.
XTo select Time:slid e6, turnand press th e
controller .
A men uappears.
XTo select TimeZone::tur nand press th e
controller .
A list of countrie sappears. The #dot indi-
cates th ecurren tsetting .
XSelectth ecountry you are currentl yin by
turnin gand pressing th econtroller .
The country is accepted.
A time zone list may also be displayed,
depending on th ecountry selected.
XTo select th edesired time zone: turnand
press th econtroller .
The time zone is accepted.
A list of available option sfor setting summer
time appear s (
Ypage 34).
Setting sum mer and standard ti me
TheDaylightSavingTimemen uis no tavail -
able in all countries.
You can use th eDaylight
SavingTim emen u
to set automatic summer time changeover or
switch th esummer time setting on or off .The
changeover to summer time advance sth etime
by on ehour .
34Time settings
System settings