2017 MERCEDES-BENZ CLA parking brake
[x] Cancel search: parking brakePage 280 of 318
X
When the vehicle is stationary, depress the
brake pedal and keep it depressed. X
Shift the automatic transmission to posi-
tion P .X
Release the brake pedal. X
Release the electric parking brake. X
Switch off the automatic locking
( Y
page 184).X
Switch on the hazard warning lamps
( Y
page 101).X
Turn the SmartKey in the ignition lock to posi-
tion 0 and leave the SmartKey in the ignition
lock.
Towing a vehicle with both axles on
the ground It is important that you observe the safety
instructions when towing away your vehicle
( Y
page 276). X
On vehicles with KEYLESS-GO or the KEY-
LESS-GO start function: you must use the
SmartKey instead of the Start/Stop button
( Y
page 122).
The automatic transmission automatically shifts
to position P when you open the driver's or front-
passenger door or when you remove the Smart-
Key from the ignition lock. In order to ensure
that the automatic transmission stays in posi-
tion N when towing the vehicle, you must
observe the following points: X
Make sure that the vehicle is stationary. X
Turn the SmartKey to position 2 in the ignition
lock. X
Depress and hold the brake pedal. X
Shift the automatic transmission to position
N . X
Leave the SmartKey in position 2 in the igni-
tion lock. X
Release the brake pedal. X
Release the electric parking brake. X
Switch on the hazard warning lamps
( Y
page 101).
i In order to signal a change of direction when
towing the vehicle with the hazard warning
lamps switched on, use the combination
switch as usual. In this case, only the indicator
lamps for the direction of travel flash. After resetting the combination switch, the hazard
warning lamp starts flashing again.
Transporting the vehicle
4MATIC vehicles or vehicles with auto-
matic transmission
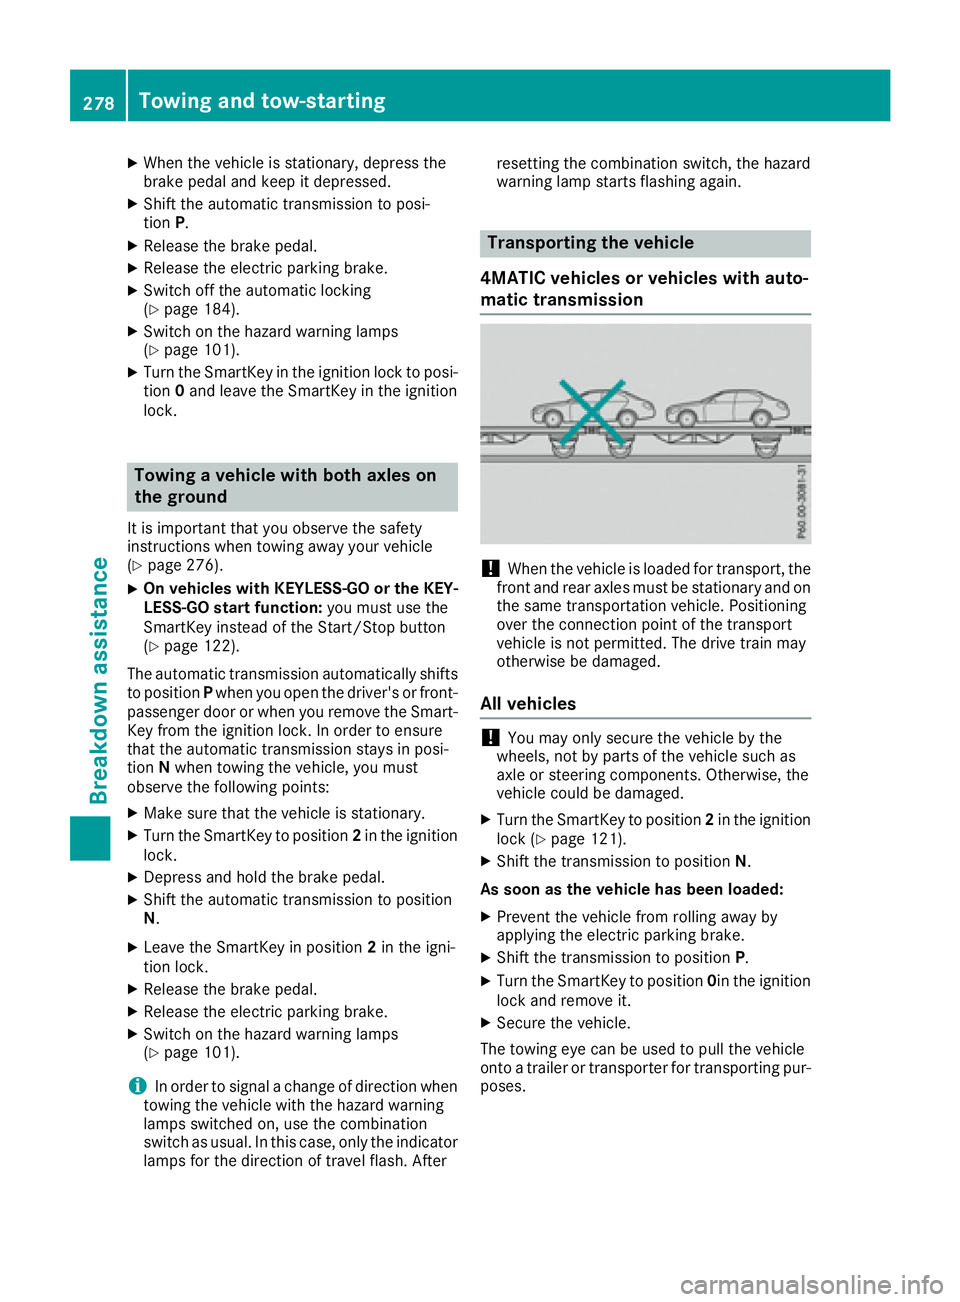
! When the vehicle is loaded for transport, the
front and rear axles must be stationary and on
the same transportation vehicle. Positioning
over the connection point of the transport
vehicle is not permitted. The drive train may
otherwise be damaged.
All vehicles
! You may only secure the vehicle by the
wheels, not by parts of the vehicle such as
axle or steering components. Otherwise, the
vehicle could be damaged. X
Turn the SmartKey to position 2 in the ignition
lock ( Y
page 121). X
Shift the transmission to position N .
As soon as the vehicle has been loaded: X
Prevent the vehicle from rolling away by
applying the electric parking brake. X
Shift the transmission to position P .X
Turn the SmartKey to position 0 in the ignition
lock and remove it. X
Secure the vehicle.
The towing eye can be used to pull the vehicle
onto a trailer or transporter for transporting pur-
poses.278
Towing and tow-starting
Breakdown assistance
Page 284 of 318

Important safety notes
G WARNIN G
If wheels and tires of th e wrong siz e are used,
th e whee l brakes or suspension component s
may be damaged. Ther e is a ris k of an acci-
dent.
Always replace wheels and tires wit h those
that fulfill th e specification s of th e original
part .
When replacing wheels, mak e sur e to use th e
correct: R
designation R
model
When replacing tires , mak e sur e to use th e
correct: R
designation R
manufacturer R
model
G WARNIN G
A flat tire severely impairs th e driving , steer -
ing and braking characteristics of th e vehicle.
Ther e is a ris k of accident.
Tires without run-flat characteristics :R
do no t driv e wit h a flat tire.R
immediately replace th e flat tire wit h your
emergenc y spar e whee l or spar e wheel, or
consult a qualified specialist workshop.
Tires wit h run-flat characteristics :R
pay attention to th e information and warn -
ing notice s on MOExtended tires (tire s wit h
run-flat characteristics).
Accessories that are no t approve d for your vehi-
cle by Mercedes-Ben z or are no t bein g used cor-
rectl y can impair th e operating safety.
Before purchasing and usin g non-approve d
accessories, visit a qualified specialist work-
sho p and inquire about :R
suitabilit yR
legal stipulation sR
factory recommendation s Further information regarding wheels and tires
can be foun d under "Wheel/tire combinations"
( Y
page 306).
You can ask for information regarding permitte d
wheel-tire combination s at an authorize d
Mercedes-Ben z Center.
Information on tire pressur e can be found:R
on th e Tir e and Loading Information placard
on th e B-pillar on th e driver' s side
( Y
page 292) R
in th e tire pressur e table in th e fuel filler flap
( Y
page 138) R
under "Tir e pressure" ( Y
page 285)
Operation
Information on driving Chec k th e tire pressur e when th e vehicl e is
heavily laden and adjust prio r to a trip.
While driving , pay attention to vibrations, noises
and unusual handlin g characteristics , e.g. pull-
ing to on e side . This may indicat e that th e
wheels or tires are damaged. If you suspec t that
a tire is defective, reduce your spee d immedi-
ately. Stop th e vehicl e as soo n as possible to
chec k th e wheels and tires for damage. Hidden
tire damag e could also be causing th e unusual
handlin g characteristics . If you fin d no sign s of
damage, hav e th e tires and wheels checke d at a
qualified specialist workshop.
When parking your vehicle, mak e sur e that th e
tires do no t get deformed by th e cur b or other
obstacles. If they canno t be avoided, driv e ove r
obstacles suc h as curbs slowly and at an obtuse
angle. Otherwise, you may damag e th e wheels
or tires .
Regular checking of wheels and tires
G WARNIN G
Damaged tires can caus e tire inflation pres-
sur e loss . As a result , you could lose control of
your vehicle. Ther e is a ris k of accident.
Chec k th e tires regularly for sign s of damag e
and replace any damaged tires immediately.282
Operation
Wheels and tires
Page 304 of 318
Tire-mounting tools should not be used near
the valve. This could damage the electronic
components.
Only have tires changed at a qualified spe-
cialist workshop.
Observe the instructions and safety notes in the
"Changing a wheel" section ( Y
page 301).
The wear patterns on the front and rear tires
differ, depending on the operating conditions.
Rotate the wheels before a clear wear pattern
has formed on the tires. Front tires typically
wear more on the shoulders and the rear tires in
the center.
On vehicles that have the same size front and
rear wheels, you can rotate the wheels accord-
ing to the intervals in the tire manufacturer's
warranty book in your vehicle documents. If no
warranty book is available, the tires should be
rotated every 3,000 to 6,000 miles (5,000 to
10,000 km). Depending on tire wear, this may
be required earlier. Do not change the direction
of wheel rotation.
Clean the contact surfaces of the wheel and the
brake disc thoroughly every time a wheel is rota-
ted. Check the tire pressure and, if necessary,
restart the tire pressure loss warning system
(Canada only) or the tire pressure monitor (USA
only).
Direction of rotation Tires with a specified direction of rotation have
additional benefits, e.g. if there is a risk of hydro-
planing. These advantages can only be gained if
the tires are installed corresponding to the
direction of rotation.
An arrow on the sidewall of the tire indicates its
correct direction of rotation.
Storing wheels Store wheels that are not being used in a cool,
dry and preferably dark place. Protect the tires
from oil, grease, gasoline and diesel. Mounting a wheel
Preparing the vehicle X
Stop the vehicle on solid, non-slippery and
level ground. X
Apply the electric parking brake manually. X
Bring the front wheels into the straight-ahead
position. X
Shift the transmission to position P .X
Switch off the engine. X
Vehicles without KEYLESS-GO: remove the
SmartKey from the ignition lock. X
Vehicles with KEYLESS-GO start-function
or KEYLESS-GO: open the driver's door.
The vehicle electronics now have status 0 .
This is the same as the SmartKey having been
removed. X
Vehicles with KEYLESS-GO start-function
or KEYLESS-GO: remove the Start/Stop but-
ton from the ignition lock ( Y
page 121).X
Make sure that the engine cannot be started
via your smartphone ( Y
page 122).X
If included in the vehicle equipment, remove
the tire-change tool kit from the vehicle. X
Safeguard the vehicle against rolling away
( Y
page 140).
Securing the vehicle to prevent it from
rolling away
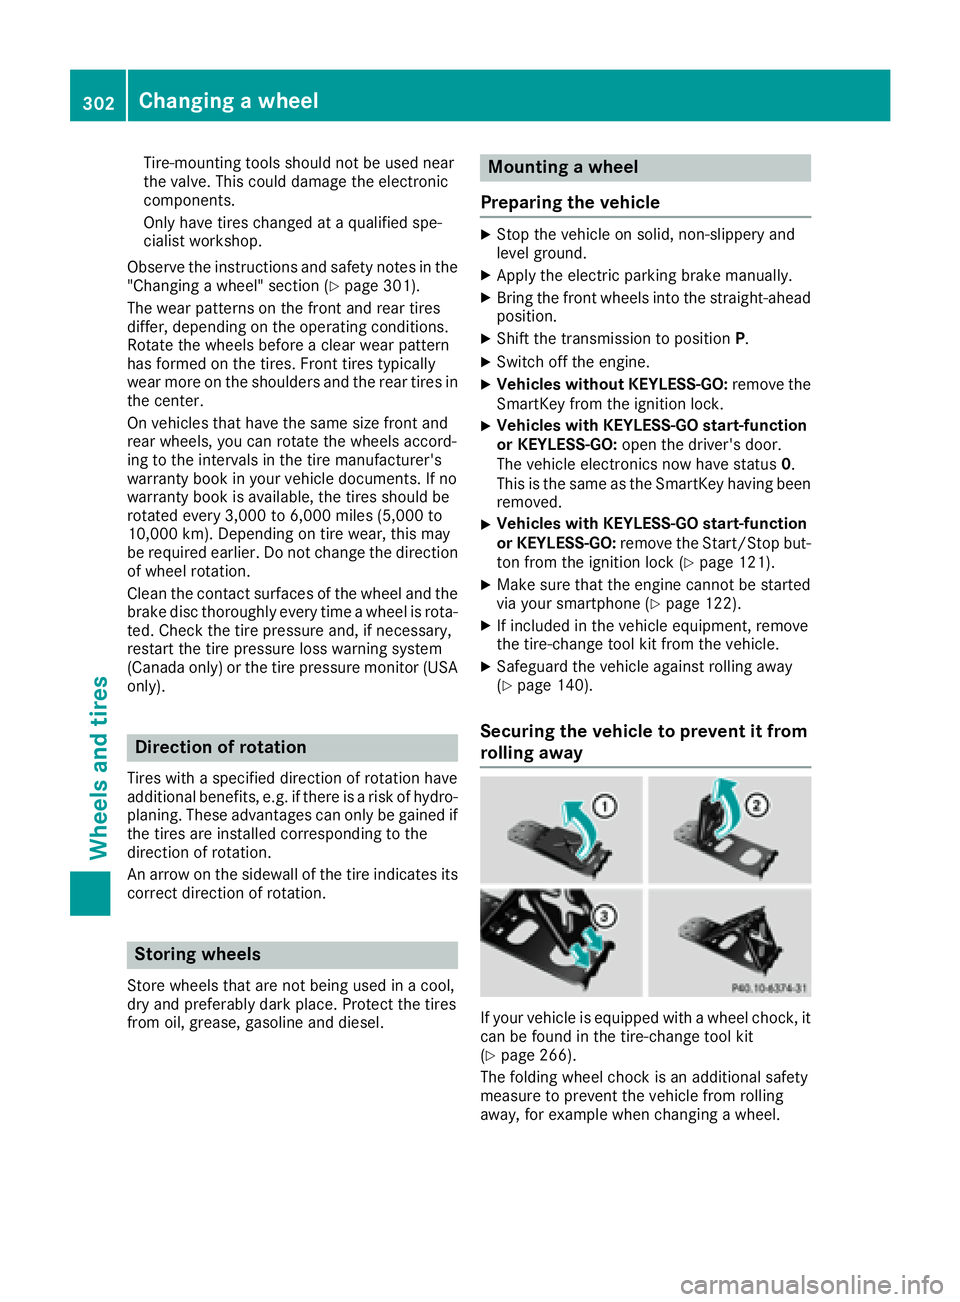
If your vehicle is equipped with a wheel chock, it
can be found in the tire-change tool kit
( Y
page 266).
The folding wheel chock is an additional safety
measure to prevent the vehicle from rolling
away, for example when changing a wheel.302
Changing a wheel
Wheels and tires