2017 MERCEDES-BENZ CLA door lock
[x] Cancel search: door lockPage 241 of 318

G WARNING
If objects in the passenger compartment are
stowed incorrectly, they can slide or be
thrown around and hit vehicle occupants. In
addition, cupholders, open stowage spaces
and mobile phone brackets cannot always
retain all objects they contain. There is a risk
of injury, particularly in the event of sudden
braking or a sudden change in direction. R
Always stow objects so that they cannot be
thrown around in such situations. R
Always make sure that objects do not pro-
trude from stowage spaces, parcel nets or
stowage nets. R
Close the lockable stowage spaces before
starting a journey. R
Always stow and secure heavy, hard, poin-
ted, sharp-edged, fragile or bulky objects in
the trunk.
! Only use the cup holders for containers of
the right size and which have lids. The drinks
could otherwise spill.
Observe the loading guidelines ( Y
page 233).
The stowage compartments in the doors provide
space for bottles: R
front: capacity up to 34 fl. oz. (1.0 l)R
rear: capacity up to 17 fl. oz. (0.5 l)
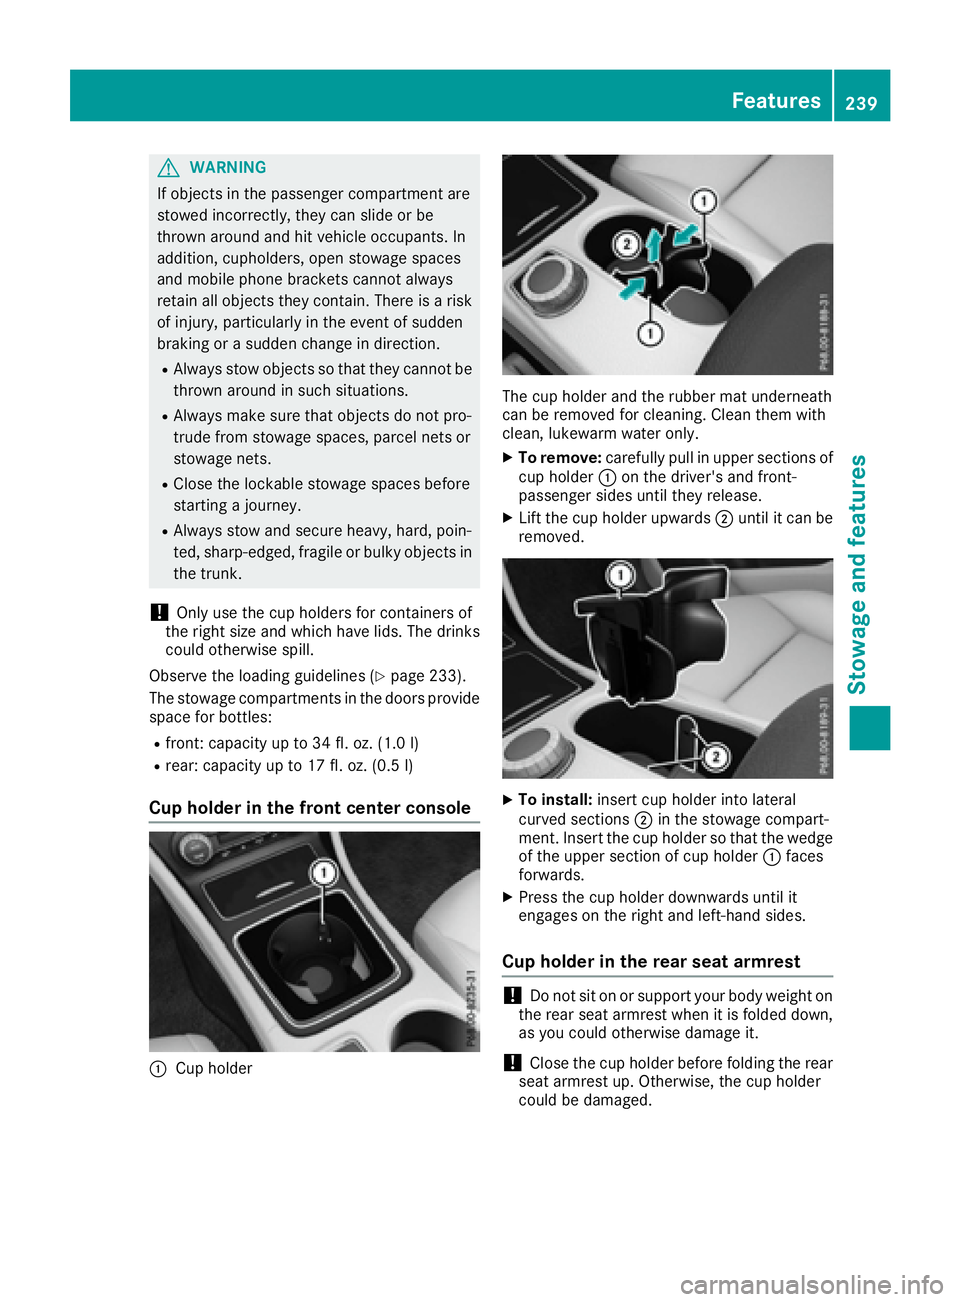
Cup holder in the front center console
�C
Cup holder The cup holder and the rubber mat underneath
can be removed for cleaning. Clean them with
clean, lukewarm water only. X
To remove: carefully pull in upper sections of
cup holder �C on the driver's and front-
passenger sides until they release. X
Lift the cup holder upwards �D until it can be
removed.
X
To install: insert cup holder into lateral
curved sections �D in the stowage compart-
ment. Insert the cup holder so that the wedge
of the upper section of cup holder �C faces
forwards. X
Press the cup holder downwards until it
engages on the right and left-hand sides.
Cup holder in the rear seat armrest
! Do not sit on or support your body weight on
the rear seat armrest when it is folded down,
as you could otherwise damage it.
! Close the cup holder before folding the rear
seat armrest up. Otherwise, the cup holder
could be damaged. Features 239
Stowage and features Z
Page 249 of 318

Mercedes-Benz Customer Assistance Center
at 1-800-FOR-MERCedes (1-800-367-6372)
or 1-866-990-9007
You will be asked for your password. X
Return to your vehicle at the time agreed upon
with the Mercedes-Benz Customer Assis-
tance Center.
Alternatively, the vehicle can be opened via: R
the Internet, under the "Owners Online" sec-
tion R
telephone applications (e.g. for iPhone ®
,
Android™)
To do this, you will need your identification num-
ber and password.
Vehicle remote closing The vehicle remote-closing feature can be used
when you have forgotten to lock the vehicle and
you are no longer nearby.
The vehicle can then be locked by the Mercedes-
Benz Customer Assistance Center.
The vehicle can be immediately remotely locked
within four days of the ignition being turned off.
After this time, remote closing may be delayed
by 15 to 60 minutes. After 30 days the vehicle
can no longer be valet locked remotely.
The vehicle remote closing feature is available if
the relevant mobile phone network is available
and a data connection is possible. X
Contact the following service hotlines:
Mercedes-Benz Customer Assistance Center
at 1-800-FOR-MERCedes (1-800-367-6372)
or 1-866-990-9007
You will be asked for your password.
The next time you are inside the vehicle and you
switch on the ignition, the Doors Locked
Remotely message appears in the multifunction
display.
Alternatively, the vehicle can be locked via: R
the Internet, under the "Owners Online" sec-
tion R
telephone applications (e.g. for iPhone ®
,
Android™)
To do this, you will need your identification num-
ber and password. Stolen vehicle recovery service If your vehicle has been stolen: X
Notify the police.
The police will issue a numbered incident
report. X
This number will be forwarded to the
Mercedes-Benz Customer Assistance Center
together with your PIN.
The Mercedes-Benz Customer Assistance
Center then tries to locate the system. The
Mercedes-Benz Customer Assistance Center
contacts you and the local law enforcement
agency if the vehicle is located.
However, only the law enforcement agency is
informed of the location of the vehicle.
If the anti-theft alarm system is activated for
longer than 30 seconds, the Mercedes-Benz
Customer Assistance Center is automatically
notified.
Vehicle Health Check With the Vehicle Health Check, the Customer
Assistance Center can provide improved sup-
port for problems with your vehicle. During an
existing call, vehicle data is transferred to the
Customer Assistance Center.
The customer service representative can use
the received data to decide what kind of assis-
tance is required. You are then, for example,
guided to the nearest Mercedes-Benz Service
Center or a recovery vehicle is called.
If vehicle data needs to be transferred during an
MB Info call or a Roadside Assistance call, this is
initiated by the Customer Assistance Center.
The Roadside Assistance Connected mes-
sage appears in the display. If the Vehicle Health
Check can be started, the Request for Vehi‐
cle Diagnostics Received Start vehi‐
cle diagnostics? message appears in the
display. X
Press the Yes button to confirm the message. X
When the Vehicle Diagnostics Please
Start Ignition message appears: turn the
SmartKey to position 2 in the ignition lock
( Y
page 121). X
If the Please follow the instructions
received by phone and move your vehi‐
cle to a safe position. message
appears: please follow the instructions Features 247
Stowage and features Z
Page 278 of 318

i Jumper cables and further information regarding jump-starting can be obtained at any qualified
specialist workshop.
Towing and tow-starting
Important safety notes
G WARNING
Functions relevant to safety are restricted or
no longer available if: R
the engine is not running. R
the brake system or the power steering is
malfunctioning. R
there is a malfunction in the voltage supply
or the vehicle's electrical system.
If your vehicle is being towed, much more
force may be necessary to steer or brake.
There is a risk of an accident.
In such cases, use a tow bar. Before towing,
make sure that the steering moves freely.
G WARNING
You can no longer steer the vehicle if the
steering wheel lock has been engaged. There
is a risk of an accident.
Always switch off the ignition when towing the
vehicle with a tow cable or a tow bar.
G WARNING
When towing or tow-starting another vehicle
and its weight is greater than the permissible
gross weight of your vehicle, the: R
the towing eye could detach itself R
the vehicle/trailer combination could roll-
over.
There is a risk of an accident.
When towing or tow-starting another vehicle,
its weight should not be greater than the per-
missible gross weight of your vehicle.
Details on the permissible gross vehicle weight
of your vehicle can be found on the vehicle iden-
tification plate ( Y
page 308).
! When Active Brake Assist, Distance Pilot
DISTRONIC or the HOLD function is activated, the vehicle brakes automatically in certain
situations.
To avoid damage to the vehicle, deactivate
these systems in the following or similar sit-
uations: R
when towing the vehicle R
in the car wash
! Make sure that the electric parking brake is
released. If the electric parking brake is faulty,
visit a qualified specialist workshop.
! Only secure the tow rope or tow bar at the
towing eyes. Otherwise, the vehicle could be
damaged.
! Do not use the towing eyes for recovery pur-
poses as this could damage the vehicle. If in
doubt, recover the vehicle with a crane.
! When towing, pull away slowly and
smoothly. If the tractive power is too high, the
vehicles could be damaged.
! The vehicle can be towed a maximum of
30 miles (50km). The towing speed of 30 mph
(50km/h) must not be exceeded.
If the vehicle has to be towed more than
30 miles (50km), the front axle must be raised
or the entire vehicle raised and transported.
! Do not tow with sling-type equipment. This
could damage the vehicle.
! When towing vehicles with KEYLESS-GO,
use the key instead of the Start/Stop button.
Otherwise, the automatic transmission may
shift to position P when the driver's or front-
passenger door are opened, which could lead
to damage to the transmission.
! Vehicles with automatic transmission must
not be started by tow-starting. This could oth-
erwise damage the transmission.
It is better to have the vehicle transported than
to have it towed away.
If the vehicle can no longer be driven because of
an accident or breakdown, you have the follow-
ing options: R
transporting the vehicle276
Towing and tow-starting
Breakdown assistance
Page 280 of 318

X
When the vehicle is stationary, depress the
brake pedal and keep it depressed. X
Shift the automatic transmission to posi-
tion P .X
Release the brake pedal. X
Release the electric parking brake. X
Switch off the automatic locking
( Y
page 184).X
Switch on the hazard warning lamps
( Y
page 101).X
Turn the SmartKey in the ignition lock to posi-
tion 0 and leave the SmartKey in the ignition
lock.
Towing a vehicle with both axles on
the ground It is important that you observe the safety
instructions when towing away your vehicle
( Y
page 276). X
On vehicles with KEYLESS-GO or the KEY-
LESS-GO start function: you must use the
SmartKey instead of the Start/Stop button
( Y
page 122).
The automatic transmission automatically shifts
to position P when you open the driver's or front-
passenger door or when you remove the Smart-
Key from the ignition lock. In order to ensure
that the automatic transmission stays in posi-
tion N when towing the vehicle, you must
observe the following points: X
Make sure that the vehicle is stationary. X
Turn the SmartKey to position 2 in the ignition
lock. X
Depress and hold the brake pedal. X
Shift the automatic transmission to position
N . X
Leave the SmartKey in position 2 in the igni-
tion lock. X
Release the brake pedal. X
Release the electric parking brake. X
Switch on the hazard warning lamps
( Y
page 101).
i In order to signal a change of direction when
towing the vehicle with the hazard warning
lamps switched on, use the combination
switch as usual. In this case, only the indicator
lamps for the direction of travel flash. After resetting the combination switch, the hazard
warning lamp starts flashing again.
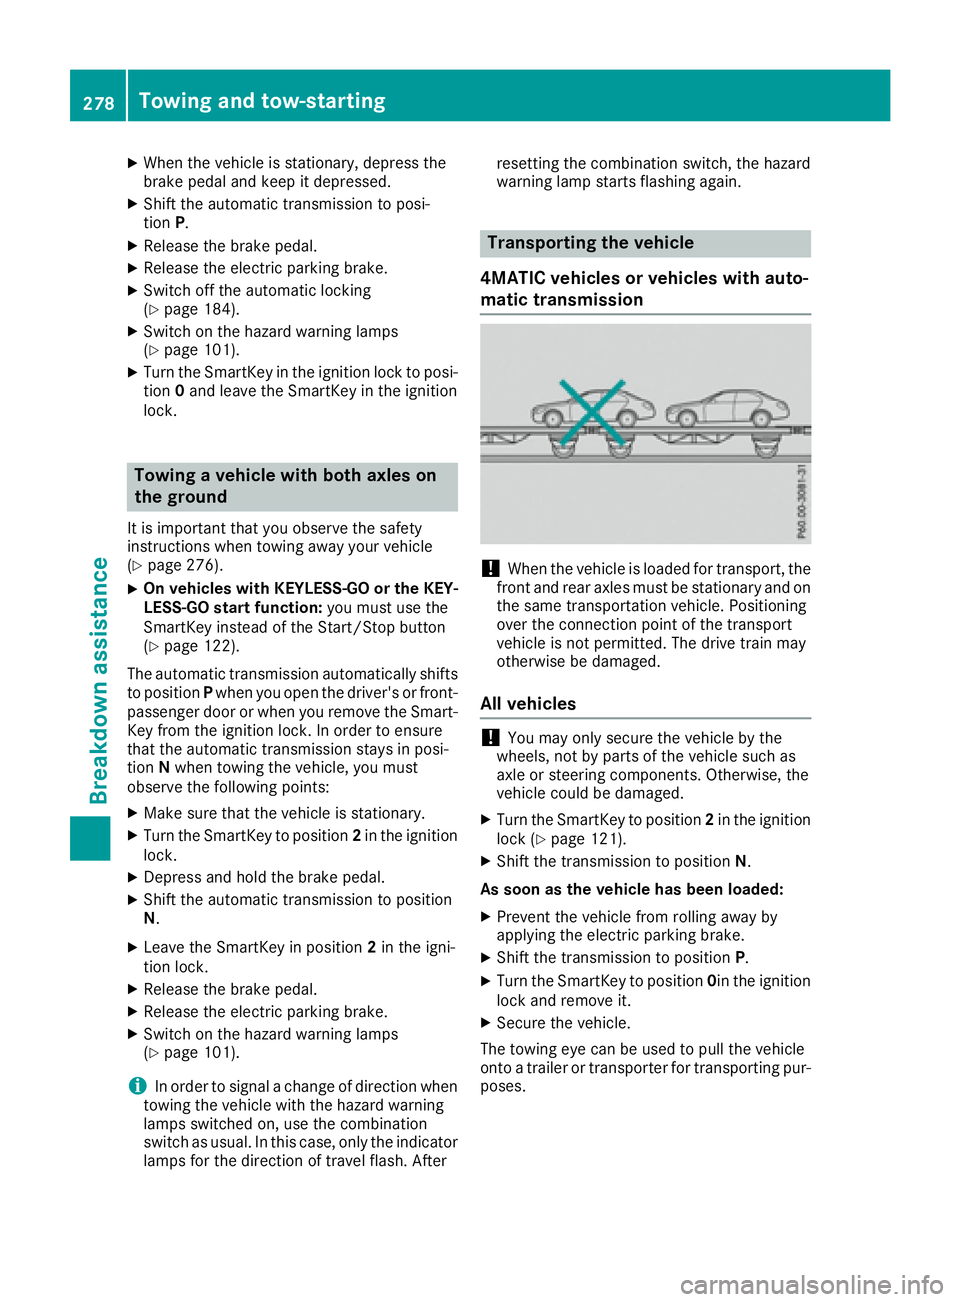
Transporting the vehicle
4MATIC vehicles or vehicles with auto-
matic transmission
! When the vehicle is loaded for transport, the
front and rear axles must be stationary and on
the same transportation vehicle. Positioning
over the connection point of the transport
vehicle is not permitted. The drive train may
otherwise be damaged.
All vehicles
! You may only secure the vehicle by the
wheels, not by parts of the vehicle such as
axle or steering components. Otherwise, the
vehicle could be damaged. X
Turn the SmartKey to position 2 in the ignition
lock ( Y
page 121). X
Shift the transmission to position N .
As soon as the vehicle has been loaded: X
Prevent the vehicle from rolling away by
applying the electric parking brake. X
Shift the transmission to position P .X
Turn the SmartKey to position 0 in the ignition
lock and remove it. X
Secure the vehicle.
The towing eye can be used to pull the vehicle
onto a trailer or transporter for transporting pur-
poses.278
Towing and tow-starting
Breakdown assistance
Page 281 of 318

Notes on 4MATIC vehicles
! Vehicles with 4MATIC must not be towed
with either the front or the rear axle raised, as
doing so will damage the transmission.
Vehicles with 4MATIC may only either be towed
away with both axles on the ground or be loaded
up and transported.
If the vehicle's transmission, front, or rear axle is
damaged, have the vehicle transported on a
truck or trailer.
In the event of damage to the electrical sys-
tem:
If the battery is defective, the automatic trans-
mission will be locked in position P . To shift the
automatic transmission to position N , you must
provide power to the vehicle's electrical system
in the same way as when jump-starting
( Y
page 273).
Have the vehicle transported on a transporter or
trailer.
Tow-starting (emergency engine
starting)
! Vehicles with automatic transmission must
not be tow-started. You could otherwise dam-
age the automatic transmission.
i You can find information on "Jump-starting"
under ( Y
page 273).
Fuses
Important safety notes
G WARNING
If you manipulate or bridge a faulty fuse or if
you replace it with a fuse with a higher amper-
age, the electric cables could be overloaded.
This could result in a fire. There is a risk of an
accident and injury.
Always replace faulty fuses with the specified
new fuses having the correct amperage.
! Only use fuses that have been approved for
Mercedes-Benz vehicles and which have the
correct fuse rating for the system concerned.
Only use fuses marked with an "S". Other- wise, components or systems could be dam-
aged.
! Make sure that no moisture can enter the
fuse box when the cover is open.
! When closing the cover, make sure that it is
lying correctly on the fuse box. Moisture seep-
ing in or dirt could otherwise impair the oper-
ation of the fuses.
The fuses in your vehicle serve to close down
faulty circuits. If a fuse blows, all the compo-
nents on the circuit and their functions stop
operating.
Blown fuses must be replaced with fuses of the
same rating, which you can recognize by the
color and value. The fuse ratings are listed in the
fuse al loca tion chart.
T he fuse allocation chart is in the fuse box in the
front-passenger footwell ( Y
page 280).
If a newly inserted fuse also blows, have the
cause traced and rectified at a qualified special-
ist workshop, e.g. an authorized Mercedes-Benz
Center.
Before changing a fuse X
Secure the vehicle against rolling away
( Y
page 140). X
Switch off all electrical consumers. X
Vehicles without KEYLESS-GO: remove the
SmartKey from the ignition lock. X
Vehicles with KEYLESS-GO start-function
or KEYLESS-GO: open the driver's door.
The vehicle electronics now have status 0 .
This is the same as the SmartKey having been
removed.
The fuses are located in various fuse boxes: R
Fuse box in the engine compartment on the
left-hand side of the vehicle, when viewed in
the direction of travel R
Fuse box in the front-passenger footwell
The fuse allocation chart is on the fuse box in the
front-passenger footwell ( Y
page 280).Fuses 279
Breakdown assistance Z
Page 304 of 318

Tire-mounting tools should not be used near
the valve. This could damage the electronic
components.
Only have tires changed at a qualified spe-
cialist workshop.
Observe the instructions and safety notes in the
"Changing a wheel" section ( Y
page 301).
The wear patterns on the front and rear tires
differ, depending on the operating conditions.
Rotate the wheels before a clear wear pattern
has formed on the tires. Front tires typically
wear more on the shoulders and the rear tires in
the center.
On vehicles that have the same size front and
rear wheels, you can rotate the wheels accord-
ing to the intervals in the tire manufacturer's
warranty book in your vehicle documents. If no
warranty book is available, the tires should be
rotated every 3,000 to 6,000 miles (5,000 to
10,000 km). Depending on tire wear, this may
be required earlier. Do not change the direction
of wheel rotation.
Clean the contact surfaces of the wheel and the
brake disc thoroughly every time a wheel is rota-
ted. Check the tire pressure and, if necessary,
restart the tire pressure loss warning system
(Canada only) or the tire pressure monitor (USA
only).
Direction of rotation Tires with a specified direction of rotation have
additional benefits, e.g. if there is a risk of hydro-
planing. These advantages can only be gained if
the tires are installed corresponding to the
direction of rotation.
An arrow on the sidewall of the tire indicates its
correct direction of rotation.
Storing wheels Store wheels that are not being used in a cool,
dry and preferably dark place. Protect the tires
from oil, grease, gasoline and diesel. Mounting a wheel
Preparing the vehicle X
Stop the vehicle on solid, non-slippery and
level ground. X
Apply the electric parking brake manually. X
Bring the front wheels into the straight-ahead
position. X
Shift the transmission to position P .X
Switch off the engine. X
Vehicles without KEYLESS-GO: remove the
SmartKey from the ignition lock. X
Vehicles with KEYLESS-GO start-function
or KEYLESS-GO: open the driver's door.
The vehicle electronics now have status 0 .
This is the same as the SmartKey having been
removed. X
Vehicles with KEYLESS-GO start-function
or KEYLESS-GO: remove the Start/Stop but-
ton from the ignition lock ( Y
page 121).X
Make sure that the engine cannot be started
via your smartphone ( Y
page 122).X
If included in the vehicle equipment, remove
the tire-change tool kit from the vehicle. X
Safeguard the vehicle against rolling away
( Y
page 140).
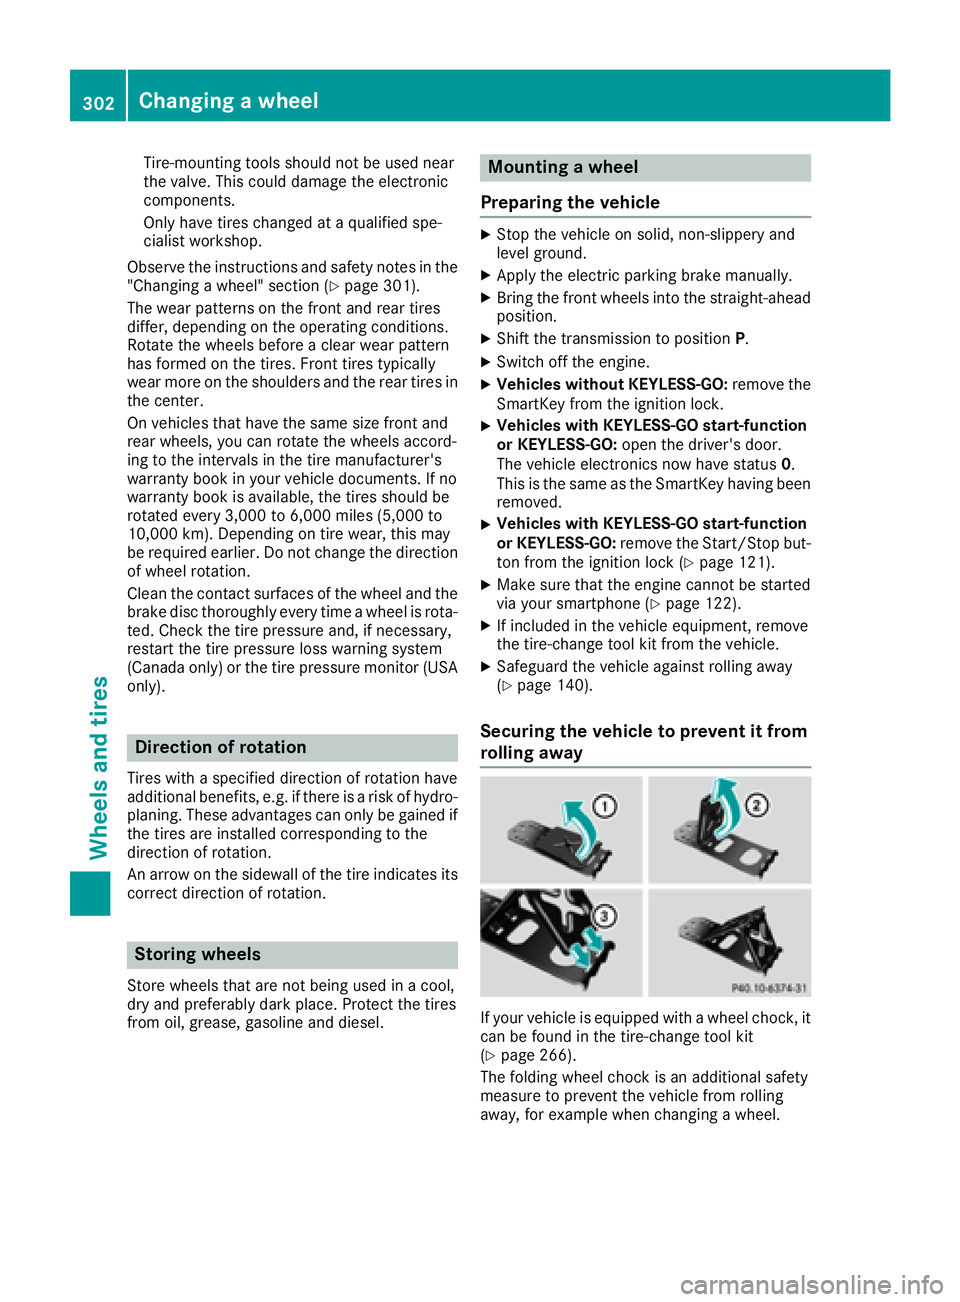
Securing the vehicle to prevent it from
rolling away
If your vehicle is equipped with a wheel chock, it
can be found in the tire-change tool kit
( Y
page 266).
The folding wheel chock is an additional safety
measure to prevent the vehicle from rolling
away, for example when changing a wheel.302
Changing a wheel
Wheels and tires