2017 LINCOLN MKZ warning
[x] Cancel search: warningPage 166 of 564

ENGINE BLOCK HEATER (If Equipped)
WARNINGS
Failure to follow engine block heater
instructions could result in property
damage or serious personal injury. Do not use your heater with
ungrounded electrical systems or
two-pronged adapters. There is a risk of
electrical shock. Do not fully close the hood, or allow it
to drop under its own weight when
using the engine block heater. This could
damage the power cable and may cause an
electrical short resulting in fire, injury and
property damage. Note:
The heater is most effective when
outdoor temperatures are below 0°F (-18°C).
The heater acts as a starting aid by warming
the engine coolant. This allows the climate
control system to respond quickly. The
equipment includes a heater element
(installed in the engine block) and a wire
harness. You can connect the system to a
grounded 120-volt AC electrical source. We recommend that you do the following for
a safe and correct operation:
•
Use a 16-gauge outdoor extension cord
that is product certified by Underwriter’ s
Laboratory (UL) or Canadian Standards
Association (CSA). This extension cord
must be suitable for use outdoors, in cold
temperatures, and be clearly marked
Suitable for Use with Outdoor
Appliances. Do not use an indoor
extension cord outdoors. This could
result in an electric shock or become a
fire hazard.
• Use as short an extension cord as
possible.
• Do not use multiple extension cords.
• Make sure that when in operation, the
extension cord plug and heater cord plug
connections are free and clear of water.
This could cause an electric shock or fire.
• Make sure your vehicle is parked in a
clean area, clear of combustibles.
• Make sure the heater, heater cord and
extension cord are firmly connected. •
Check for heat anywhere in the electrical
hookup once the system has been
operating for approximately 30 minutes.
• Make sure the system is unplugged and
properly stowed before starting and
driving your vehicle. Make sure the
protective cover seals the prongs of the
block heater cord plug when not in use.
• Make sure the heater system is checked
for proper operation before winter.
Using the Engine Block Heater
Make sure the receptacle terminals are clean
and dry prior to use. Clean them with a dry
cloth if necessary.
The heater uses 0.4 to 1.0 kilowatt-hours of
energy per hour of use. The system does not
have a thermostat. It achieves maximum
temperature after approximately three hours
of operation. Using the heater longer than
three hours does not improve system
performance and unnecessarily uses
electricity.
163
MKZ (CC9) Canada/United States of America, enUSA, First Printing Starting and Stopping the Engine
Page 167 of 564

SAFETY PRECAUTIONS
WARNINGS
Do not overfill the fuel tank. The
pressure in an overfilled tank may
cause leakage and lead to fuel spray and
fire. The fuel system may be under
pressure. If you hear a hissing sound
near the fuel filler inlet, do not refuel until the
sound stops. Otherwise, fuel may spray out,
which could cause serious personal injury. Fuels can cause serious injury or death
if misused or mishandled.
Flow of fuel through a fuel pump nozzle
can produce static electricity. This can
cause a fire if you are filling an ungrounded
fuel container. Fuel may contain benzene, which is a
cancer-causing agent. WARNINGS
When refueling always shut the engine
off and never allow sparks or open
flames near the fuel tank filler valve. Never
smoke or use a cell phone while refueling.
Fuel vapor is extremely hazardous under
certain conditions. Avoid inhaling excess
fumes. Observe the following guidelines when
handling automotive fuel:
•
Extinguish all smoking materials and any
open flames before refueling your
vehicle.
• Always turn off the vehicle before
refueling.
• Automotive fuels can be harmful or fatal
if swallowed. Fuel such as gasoline is
highly toxic and if swallowed can cause
death or permanent injury. If fuel is
swallowed, call a physician immediately,
even if no symptoms are immediately
apparent. The toxic effects of fuel may
not be visible for hours. •
Avoid inhaling fuel vapors. Inhaling too
much fuel vapor of any kind can lead to
eye and respiratory tract irritation. In
severe cases, excessive or prolonged
breathing of fuel vapor can cause serious
illness and permanent injury.
• Avoid getting fuel liquid in your eyes. If
fuel is splashed in the eyes, remove
contact lenses (if worn), flush with water
for 15 minutes and seek medical
attention. Failure to seek proper medical
attention could lead to permanent injury.
164
MKZ (CC9) Canada/United States of America, enUSA, First Printing Fuel and Refueling
Page 169 of 564

Do not be concerned if the engine
sometimes knocks lightly. However, if the
engine knocks heavily while using fuel with
the recommended octane rating, contact an
authorized dealer to prevent any engine
damage.
RUNNING OUT OF FUEL
Avoid running out of fuel because this
situation may have an adverse effect on
powertrain components.
If you have run out of fuel:
•
You may need to cycle the ignition from
off to on several times after refueling to
allow the fuel system to pump the fuel
from the tank to the engine. On
restarting, cranking time will take a few
seconds longer than normal. With keyless
ignition, just start the engine. Crank time
will be longer than usual.
• Normally, adding 1 gallon (3.8 liters) of
fuel is enough to restart the engine. If the
vehicle is out of fuel and on a steep
grade, more than 1 gallon (3.8 liters) may
be required.
• The service engine soon indicator may
come on. For more information on the
service engine soon indicator, See
Warning Lamps and Indicators (page
103). Refilling With a Portable Fuel Container WARNINGS
Do not insert the nozzle of portable
fuel containers or aftermarket funnels
into the capless fuel system. This could
damage the fuel system and its seal, and
may cause fuel to run onto the ground
instead of filling the tank, which could result
in serious personal injury. Do not try to pry open or push open
the capless fuel system with foreign
objects. This could damage the fuel system
and its seal and cause injury to you or others. Note:
Do not use aftermarket funnels; they
will not work with the capless fuel system
and can damage it. The included fuel funnel
has been specially designed to work safely
with your vehicle.
When filling the vehicle ’s fuel tank from a
portable fuel container, use the funnel
included with the vehicle.
166
MKZ (CC9) Canada/United States of America, enUSA, First Printing Fuel and Refueling
Page 170 of 564

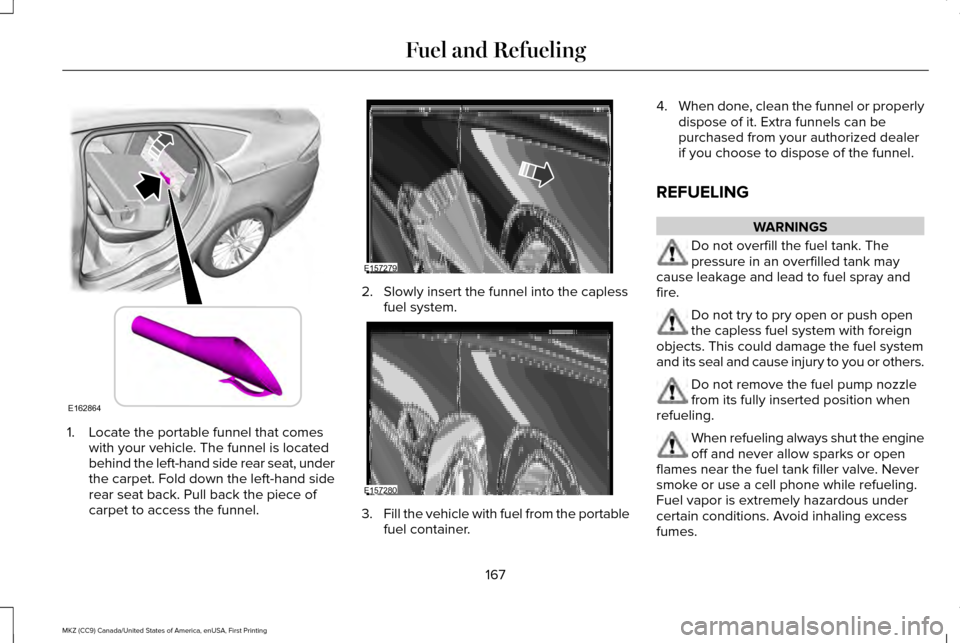
1. Locate the portable funnel that comes
with your vehicle. The funnel is located
behind the left-hand side rear seat, under
the carpet. Fold down the left-hand side
rear seat back. Pull back the piece of
carpet to access the funnel. 2. Slowly insert the funnel into the capless
fuel system. 3.
Fill the vehicle with fuel from the portable
fuel container. 4.
When done, clean the funnel or properly
dispose of it. Extra funnels can be
purchased from your authorized dealer
if you choose to dispose of the funnel.
REFUELING WARNINGS
Do not overfill the fuel tank. The
pressure in an overfilled tank may
cause leakage and lead to fuel spray and
fire. Do not try to pry open or push open
the capless fuel system with foreign
objects. This could damage the fuel system
and its seal and cause injury to you or others. Do not remove the fuel pump nozzle
from its fully inserted position when
refueling. When refueling always shut the engine
off and never allow sparks or open
flames near the fuel tank filler valve. Never
smoke or use a cell phone while refueling.
Fuel vapor is extremely hazardous under
certain conditions. Avoid inhaling excess
fumes.
167
MKZ (CC9) Canada/United States of America, enUSA, First Printing Fuel and RefuelingE162864 E157279 E157280
Page 171 of 564

WARNINGS
Wait at least 10 seconds before
removing the fuel pump nozzle to allow
any residual fuel to drain into the fuel tank. Stop refueling when the fuel pump
nozzle automatically shuts off for the
first time. Failure to follow this will fill the
expansion space in the fuel tank and could
lead to fuel overflowing. Note:
Your vehicle does not have a fuel filler
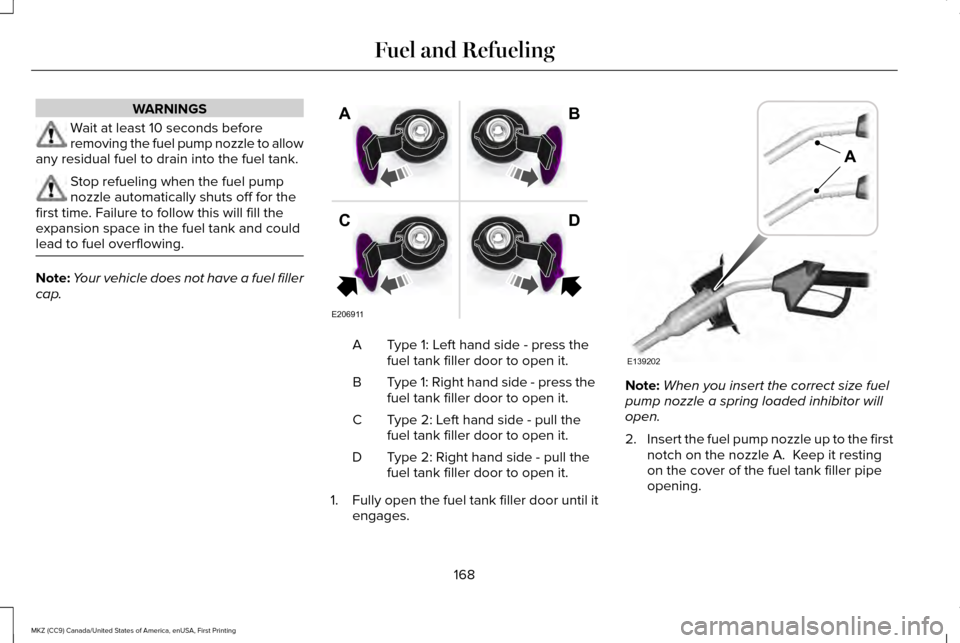
cap. Type 1: Left hand side - press the
fuel tank filler door to open it.
A
Type 1: Right hand side - press the
fuel tank filler door to open it.
B
Type 2: Left hand side - pull the
fuel tank filler door to open it.
C
Type 2: Right hand side - pull the
fuel tank filler door to open it.
D
1. Fully open the fuel tank filler door until it
engages. Note:
When you insert the correct size fuel
pump nozzle a spring loaded inhibitor will
open.
2. Insert the fuel pump nozzle up to the first
notch on the nozzle A. Keep it resting
on the cover of the fuel tank filler pipe
opening.
168
MKZ (CC9) Canada/United States of America, enUSA, First Printing Fuel and RefuelingE206911
AB
CD E139202
A
Page 173 of 564

•
Turn the ignition off before fueling; an
inaccurate reading results if the engine
is left running.
• Use the same fill rate (low-medium-high)
each time the tank is filled.
• Allow no more than two automatic
click-offs when filling.
Results are most accurate when the filling
method is consistent.
Calculating Fuel Economy
Do not measure fuel economy during the
first 1000 miles (1600 kilometers) of driving
(this is your engine ’s break-in period); a more
accurate measurement is obtained after
2000 miles - 3000 miles (3200 kilometers -
4800 kilometers). Also, fuel expense,
frequency of fill ups or fuel gauge readings
are not accurate ways to measure fuel
economy.
1. Fill the fuel tank completely and record the initial odometer reading.
2. Each time you fill the tank, record the amount of fuel added. 3.
After at least three to five tank fill ups, fill
the fuel tank and record the current
odometer reading.
4. Subtract your initial odometer reading from the current odometer reading.
5. Calculate fuel economy by dividing miles
traveled by gallons used (For Metric:
Multiply liters used by 100, then divide
by kilometers traveled).
Keep a record for at least one month and
record the type of driving (city or highway).
This provides an accurate estimate of the
vehicle ’s fuel economy under current driving
conditions. Additionally, keeping records
during summer and winter show how
temperature impacts fuel economy. In
general, lower temperatures mean lower fuel
economy. EMISSION CONTROL SYSTEM WARNINGS
Do not park, idle, or drive your vehicle
in dry grass or other dry ground cover.
The emission system heats up the engine
compartment and exhaust system, which can
start a fire. Exhaust leaks may result in entry of
harmful and potentially lethal fumes
into the passenger compartment. If you smell
exhaust fumes inside your vehicle, have your
dealer inspect your vehicle immediately. Do
not drive if you smell exhaust fumes. Your vehicle is equipped with various
emission control components and a catalytic
converter that will enable your vehicle to
comply with applicable exhaust emission
standards. To make sure that the catalytic
converter and other emission control
components continue to work properly:
•
Use only the specified fuel listed.
• Avoid running out of fuel.
170
MKZ (CC9) Canada/United States of America, enUSA, First Printing Fuel and Refueling
Page 174 of 564

•
Do not turn off the ignition while your
vehicle is moving, especially at high
speeds.
• Have the items listed in scheduled
maintenance information performed
according to the specified schedule.
The scheduled maintenance items listed in
scheduled maintenance information are
essential to the life and performance of your
vehicle and to its emissions system. See
Scheduled Maintenance (page 495).
If you use parts other than Ford, Motorcraft
or Ford-authorized parts for maintenance
replacements, or for service of components
affecting emission control, such non-Ford
parts should be the equivalent to genuine
Ford Motor Company parts in performance
and durability.
Illumination of the service engine soon
indicator, charging system warning light or
the temperature warning light, fluid leaks,
strange odors, smoke or loss of engine
power could indicate that the emission
control system is not working properly. An improperly operating or damaged exhaust
system may allow exhaust to enter the
vehicle. Have a damaged or improperly
operating exhaust system inspected and
repaired immediately.
Do not make any unauthorized changes to
your vehicle or engine. By law, vehicle
owners and anyone who manufactures,
repairs, services, sells, leases, trades
vehicles, or supervises a fleet of vehicles are
not permitted to intentionally remove an
emission control device or prevent it from
working. Information about your vehicle
’s
emission system is on the Vehicle Emission
Control Information Decal located on or near
the engine. This decal also lists engine
displacement
Please consult your warranty information for
complete details. On-Board Diagnostics (OBD-II)
Your vehicle has a computer known as the
on-board diagnostics system (OBD-II) that
monitors the engine
’s emission control
system. The system protects the environment
by making sure that your vehicle continues
to meet government emission standards. The
OBD-II system also assists a service
technician in properly servicing your vehicle. When the service engine soon
indicator illuminates, the OBD-II
system has detected a malfunction.
Temporary malfunctions may cause the
service engine soon indicator to illuminate.
Examples of temporary malfunctions are:
• the vehicle has run out of fuel—the
engine may misfire or run poorly
• poor fuel quality or water in the fuel—the
engine may misfire or run poorly
• the fuel fill inlet may not have closed
properly.
See Refueling (page 167).
• driving through deep water—the
electrical system may be wet.
171
MKZ (CC9) Canada/United States of America, enUSA, First Printing Fuel and Refueling
Page 176 of 564

AUTOMATIC TRANSMISSION
WARNINGS
Always set the parking brake fully and
make sure you shift the gearshift lever
to park (P). Switch the ignition off and remove
the key whenever you leave your vehicle. Do not apply the brake pedal and
accelerator pedal simultaneously.
Applying both pedals simultaneously for
more than a few seconds will limit engine
rpm, which may result in difficulty maintaining
speed in traffic and could lead to serious
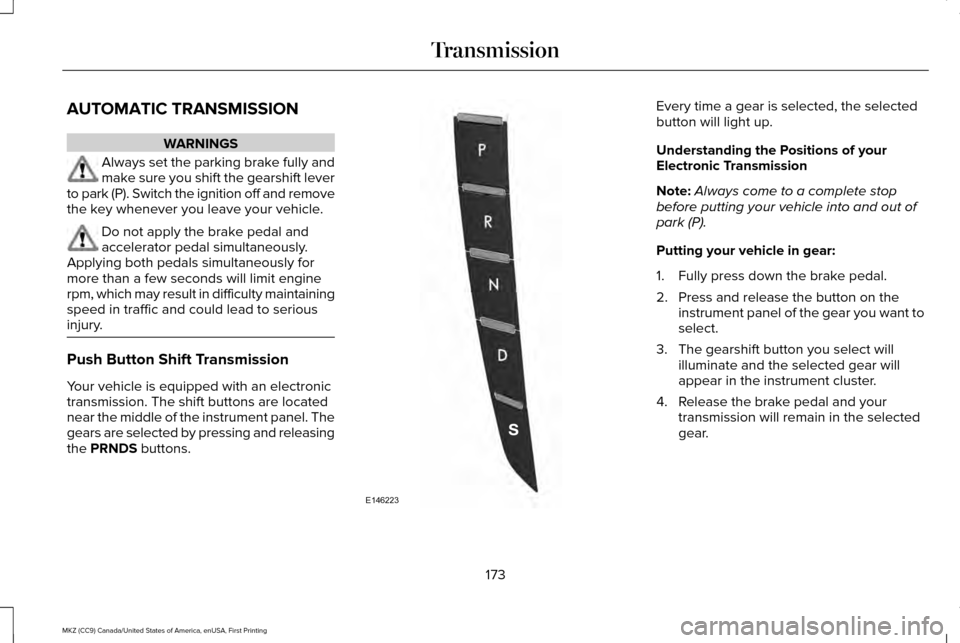
injury. Push Button Shift Transmission
Your vehicle is equipped with an electronic
transmission. The shift buttons are located
near the middle of the instrument panel. The
gears are selected by pressing and releasing
the PRNDS buttons. Every time a gear is selected, the selected
button will light up.
Understanding the Positions of your
Electronic Transmission
Note:
Always come to a complete stop
before putting your vehicle into and out of
park (P).
Putting your vehicle in gear:
1. Fully press down the brake pedal.
2. Press and release the button on the instrument panel of the gear you want to
select.
3. The gearshift button you select will illuminate and the selected gear will
appear in the instrument cluster.
4. Release the brake pedal and your transmission will remain in the selected
gear.
173
MKZ (CC9) Canada/United States of America, enUSA, First Printing TransmissionE146223