2017 LINCOLN CONTINENTAL lock
[x] Cancel search: lockPage 143 of 584

Maintaining Your Head Up Display
•
Do not place objects onto the transparent
cover, as they may block you from seeing
portions of the image. These objects
could also damage the cover and affect
the quality of the projected image.
• The system uses a special windshield
designed to provide the optimum image
quality. You must replace the windshield
in a vehicle with this system with a
certified original equipment
manufactured (OEM) head up display
windshield. Replacing this system's
windshield with a non-head up display
windshield causes a double image or
distorted image. Have an authorized
dealer or authorized repair facility replace
the windshield.
• Direct light from oncoming headlamps or
a sunrise or sunset can affect the driver's
ability to see the HUD image.
• Clean the windshield often for optimal
HUD performance. See Cleaning the
Instrument Panel and Instrument
Cluster Lens
(page 336).
140
Continental (CPL) Canada/United States of America, enUSA, First Printing Information Displays
Page 149 of 584

Temperature control: Controls the temperature of the air circulated in the rear of your vehi\
cle. Turn to increase or decrease the
temperature.
E
Ventilated seats:
Press to switch the ventilated seats on and off. See Seats (page 148).
F
Power:
Press to switch the rear system on and off.
G
Note:
The rear climate system turns off automatically whenever max defrost is\
switched on, and turns back on when max defrost
is switched off. You can manually switch on the rear system with max defrost on.
Rear control lock:
When illuminated, you can only operate the rear passenger settings thro\
ugh the front controls.
H
Note:
The indicator briefly illuminates if you try to use the rear climate sy\
stem when the controls are locked.
HEATED WINDOWS AND MIRRORS
Note: Make sure the engine is running
before operating the heated windows.
Note: Depending on your remote start
settings, the heated windows, mirrors and
wipers may remain on after remote starting
the vehicle. Heated Rear Window Press the button to clear the
heated rear window of thin ice and
fog. The heated rear window will
automatically turn off after a short period of
time. Press the button again to switch it off.
Note: An indicator on the button illuminates
when active.
Note: Do not use razor blades or other
sharp objects to clean or remove decals from
the inside of the heated rear window. The
vehicle warranty does not cover damage
caused to the heated rear window grid lines. Heated Exterior Mirrors
(If Equipped)
When you switch the heated rear window
on, the heated exterior mirrors will
automatically turn on.
Note: Do not remove ice from the mirrors
with a scraper or adjust the mirror glass
when it is frozen in place.
Note: Do not clean the mirror housing or
glass with harsh abrasives, fuel or other
petroleum-based cleaning products.
146
Continental (CPL) Canada/United States of America, enUSA, First Printing Climate ControlE184884
Page 152 of 584

WARNINGS
The head restraint is a safety device.
Whenever possible it should be
installed and properly adjusted when the
seat is occupied. Failure to adjust the head
restraint properly could reduce its
effectiveness during certain impacts. Install the head restraint properly to
help minimize the risk of neck injury in
the event of a crash. Note:
Adjust the seatback to an upright
driving position before adjusting the head
restraint. Adjust the head restraint so that
the top of it is level with the top of your head
and as far forward as possible. Make sure
that you remain comfortable. If you are
extremely tall, adjust the head restraint to
its highest position. Front seat manual head restraints (If
Equipped) The front head restraints consist of:
An energy absorbing head
restraint.
A
Two steel stems.
B
Guide sleeve adjust and unlock
button.
C
Guide sleeve unlock and remove
button.
D Raising the Head Restraint
Pull the head restraint up.
Lowering the Head Restraint
1. Press and hold button C.
2. Push the head restraint down.
Removing the Head Restraint
1.
Pull the head restraint up until it reaches
its highest position.
2. Press and hold buttons C and D.
3. Pull the head restraint up.
Installing the Head Restraint
Align the steel stems into the guide sleeves
and push the head restraint down until it
locks.
149
Continental (CPL) Canada/United States of America, enUSA, First Printing SeatsE138642
Page 153 of 584

Rear seat outboard head restraints
The rear outboard head restraints consist of:
An energy absorbing head
restraint.
A
Two steel stems.
B
Guide sleeve unlock and remove
button.
C
Fold button (If equipped).
D
Removing the Head Restraint
1. Press and hold both C buttons.
2. Pull the head restraint up. Installing the Head Restraint
Align the steel stems into the guide sleeves
and push the head restraint down until it
locks.
Folding the Head Restraint
1. Press and hold button D.
2. Pull it back up to reset.
Rear seat center head restraint The rear center head restraint consists of:
An energy absorbing head
restraint.
A
Two steel stems.
B
Guide sleeve adjust and unlock
button.
C
Guide sleeve unlock and remove
button.
D
Raising the Head Restraint
Pull the head restraint up.
Lowering the Head Restraint
1. Press and hold button C.
2. Push the head restraint down.
Removing the Head Restraint
1. Pull the head restraint up until it reaches
its highest position.
2. Press and hold buttons C and D.
3. Pull the head restraint up.
150
Continental (CPL) Canada/United States of America, enUSA, First Printing SeatsE162605 E138645
Page 154 of 584

Installing the Head Restraint
Align the steel stems into the guide sleeves
and push the head restraint down until it
locks.
Tilting Manual Head Restraints
The front seat head restraints tilt for extra
comfort. To tilt the head restraint, do the
following:
1.
Adjust the seatback to an upright driving
or riding position. 2. Pivot the head restraint forward toward
your head to the desired position.
After the head restraint reaches the
forward-most tilt position, pivot it forward
again to release it to the rearward, un-tilted
position.
Power Front Head Restraints (If equipped) Power Rear Head Restraints (If Equipped)
Press the button on the overhead console
to fold the rear outboard head restraints.
151
Continental (CPL) Canada/United States of America, enUSA, First Printing SeatsE144727 E222280 E229803
Page 160 of 584

You can save up to three preset memory
positions. You can save a memory preset at
any time.
Recalling a PreSet Position
Press and release the preset button
associated with your desired driving position.
The memory features move to the position
stored for that preset.
Note:
You can only recall a preset memory
position when the ignition is off, or when the
transmission is in park (P) or neutral (N) (and
your vehicle is not moving) if the ignition is
on.
You can also recall a preset memory position
by:
• Pressing the unlock button on your
intelligent access key fob if it is linked to
a preset position.
• Unlocking the intelligent driver door
handle if a linked key fob is present.
• Entering a personal entry code on the
Securicode keypad. See Doors and
Locks (page 65). Note:
Using a linked key fob to recall your
memory position when the ignition is off
moves the seat to the Easy Entry position.
Note: Pressing any active memory feature
adjustment control (or any memory button)
during a memory recall cancels the
operation.
Linking a PreSet Position to your
Remote Control or Intelligent Access
Key Fob
You can save preset memory positions for
up to three remote controls or intelligent
access (IA) keys.
1. With the ignition on, move the memory positions to the desired positions.
2. Press and hold the preset button you desire for about five seconds. A tone
sounds after a few seconds. Continue
holding until you hear a second tone.
3. Within three seconds, press the lock button on the remote control you are
linking. To unlink a remote control, follow the same
procedure – except in step 3, press the
unlock button on the remote control.
Note:
If more than one linked remote control
or intelligent access key is in range, the
memory function moves to the settings of
the first key to initiate a memory recall.
Easy Entry and Exit Feature
If you enable the easy entry and exit feature,
it automatically moves the driver seat
position rearward up to two inches (five
centimeters) when you switch the ignition
off.
The driver seat will return to its previous
position when you switch the ignition on.
You can enable or disable this feature in the
information display.
See Information
Displays (page 110).
157
Continental (CPL) Canada/United States of America, enUSA, First Printing Seats
Page 161 of 584

REAR SEATS
Adjusting the Rear Seats
WARNING
To prevent possible damage to the
seat or seatbelts, make sure that the
seatbelts are not fastened before folding the
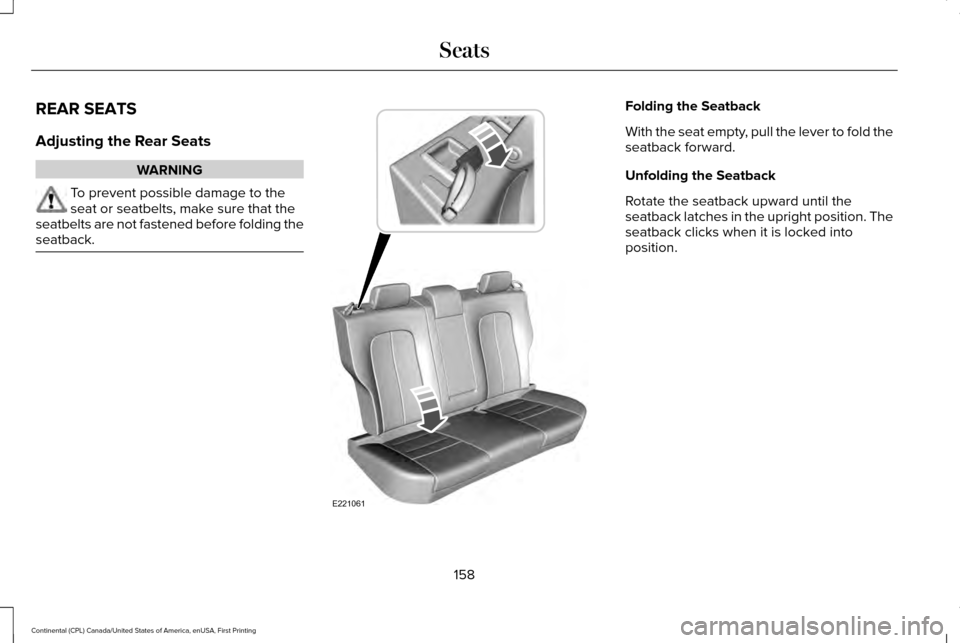
seatback. Folding the Seatback
With the seat empty, pull the lever to fold the
seatback forward.
Unfolding the Seatback
Rotate the seatback upward until the
seatback latches in the upright position. The
seatback clicks when it is locked into
position.
158
Continental (CPL) Canada/United States of America, enUSA, First Printing SeatsE221061
Page 167 of 584

HomeLink Wireless Control System
WARNINGS
Make sure that the garage door and
security device are free from
obstruction when you are programming. Do
not program the system with the vehicle in
the garage. Do not use the system with any garage
door opener that does not have the
safety stop and reverse feature as required
by U.S. Federal Safety Standards (this
includes any garage door opener
manufactured before April 1, 1982). A garage
door opener which cannot detect an object,
signaling the door to stop and reverse, does
not meet current federal safety standards.
Using a garage door opener without these
features increases the risk of serious injury
or death. Note:
Make sure you keep the original
remote control transmitter for use in other
vehicles as well as for future system
programming. Note:
We recommend that upon the sale or
lease termination of your vehicle, you erase
the programmed function buttons for security
reasons. See Erasing the Function Button
Codes later in this section.
Note: You can program a maximum of three
devices. To change or replace any of the
three devices after it has been initially
programmed, you must first erase the current
settings. See
Erasing the Function Button
Codes. The universal garage door opener replaces
the common hand-held garage door opener
with a three-button transmitter integrated
into the driver’
s sun visor. The system includes two primary features, a
garage door opener and a platform for
remote activation of devices within the home.
You can program garage doors as well as
entry gate operators, security systems, entry
door locks and home or office lighting.
Additional system information can be found
online at www.homelink.com,
www.youtube.com/user/HomeLinkGentex
or by calling the toll-free help line at
1-800-355-3515.
In-Vehicle Programming
This process is to program your in-vehicle
HomeLink function button with your
hand-held transmitter.
Note:
The programming steps below assume
you will be programming HomeLink that was
not previously programmed. If your
HomeLink was previously programmed, you
may need to erase your HomeLink buttons.
See
Erasing the Function Button Codes.
Note: Put a new battery in the hand-held
transmitter. This helps ensure quicker
training and accurate transmission of the
radio-frequency signal.
164
Continental (CPL) Canada/United States of America, enUSA, First Printing Universal Garage Door OpenerE188211