2017 LINCOLN CONTINENTAL reset
[x] Cancel search: resetPage 317 of 584

3. Add engine oil that meets Ford
specifications. See Capacities and
Specifications (page 378). You may have
to use a funnel to pour the engine oil into
the opening.
4. Recheck the oil level.
5. If the oil level is correct, replace the dipstick and make sure it is fully seated.
6. Replace the engine oil filler cap. Turn it clockwise until you feel a strong
resistance.
Note: Do not add oil further than the
maximum mark. Oil levels above the
maximum mark may cause engine damage.
Note: Make sure you install the oil filler cap
correctly.
Note: Soak up any spillage with an
absorbent cloth immediately.
OIL CHANGE INDICATOR RESET
Use the information display controls on the
steering wheel to reset the oil change
indicator. From the main menu scroll to: Action and description
Message
Press the right arrow button,
then from this menu scroll to
the following message.
Settings
Press the right arrow button,
then from this menu scroll to
the following message.
Vehicle
Press the right arrow button,
then from this menu scroll to
the following message.
Oil Life
Press and hold the OK button
until the instrument cluster
displays the following
message.
Hold OK to
Reset
Reset Successful
When the oil change indicator
resets the instrument cluster
displays 100%.
Remaining Life
{00}% Action and description
Message
If the instrument cluster
displays one of the following
messages, repeat the
process.
Not Reset
Reset Cancelled
ENGINE COOLANT CHECK WARNINGS
Do not add engine coolant when the
engine is hot. Steam and scalding
liquids released from a hot cooling system
can burn you badly. Also, spilling coolant on
hot engine parts can burn you. Do not put engine coolant in the
windshield washer fluid container. If
sprayed on the windshield, engine coolant
could make it difficult to see through the
windshield.
314
Continental (CPL) Canada/United States of America, enUSA, First Printing Maintenance
Page 320 of 584

Severe Climates
If you drive in extremely cold climates:
•
It may be necessary to increase the
coolant concentration above 50%.
• A coolant concentration of 60% provides
improved freeze point protection.
Coolant concentrations above 60%
decrease the overheat protection
characteristics of the coolant and may
cause engine damage.
If you drive in extremely hot climates:
• You can decrease the coolant
concentration to 40%.
• Coolant concentrations below 40%
decrease the freeze and corrosion
protection characteristics of the coolant
and may cause engine damage.
Vehicles driven year-round in non-extreme
climates should use prediluted coolant for
optimum cooling system and engine
protection. Coolant Change
At specific mileage intervals, as listed in the
scheduled maintenance information, the
coolant should be changed. Add prediluted
coolant approved to the correct specification.
See Capacities and Specifications (page
368).
Fail-Safe Cooling
Fail-safe cooling allows you to temporarily
drive your vehicle before any incremental
component damage occurs. The fail-safe
distance depends on ambient temperature,
vehicle load and terrain.
How Fail-Safe Cooling Works
If the engine begins to overheat, the coolant
temperature gauge moves toward the red
zone: A warning lamp illuminates and a
message may appear in the
information display.If the engine reaches a preset
over-temperature condition, the engine
automatically switches to alternating cylinder
operation. Each disabled cylinder acts as an
air pump and cools the engine.
When this occurs, your vehicle still operates,
however:
•
Engine power is limited.
• The air conditioning system turns off.
Continued operation increases the engine
temperature, causing the engine to
completely shut down. Your steering and
braking effort increases in this situation.
When the engine temperature cools, you can
re-start the engine. Have your vehicle
checked as soon as possible to minimize
engine damage.
317
Continental (CPL) Canada/United States of America, enUSA, First Printing Maintenance
Page 328 of 584

performance of the engine. The clock and
radio station presets are also maintained in
memory by power from the low-voltage
battery. These settings are erased when a
technician disconnects and connects the
low-voltage battery.
To restore the settings, do the following:
Note:
Until you switch the ignition to the on
position, you will receive a message in your
information display stating that your vehicle
is not in park.
1. Apply the parking brake.
2. Shift into park (P) or neutral (N).
3. Switch off all accessories.
4. Press the brake pedal and start your vehicle.
5. Run the engine until it reaches normal operating temperature. While the engine
is warming up, complete the following:
Reset the clock. See Audio System
(page 396). Reset the power windows
bounce-back feature. See Windows and
Mirrors
(page 96). Reset the radio station
presets. See Audio System (page 396). 6. Allow the engine to idle for at least one
minute.
7. Drive the vehicle at least 10 mi (16 km) to
completely relearn the idle trim and fuel
trim strategy.
Note: If you do not allow the engine to
relearn the idle and fuel trim strategy, the
idle quality of your vehicle may be adversely
affected until the engine computer
eventually relearns the idle trim and fuel trim
strategy.
Note: Certain features may not operate if
the battery monitor system is not reset with
a scan tool following a jump start or battery
replacement. Normal electrical accessory
operation should resume after your vehicle
is left undisturbed for 8 hours.
Make sure that you dispose of old batteries
in an environmentally friendly way. Seek
advice from your local authority about
recycling old batteries.
If storing your vehicle for more than 30 days
without recharging the battery, we
recommend that you disconnect the battery
cables to maintain battery charge for quick
starting. CHECKING THE WIPER BLADES
Run the tip of your fingers over the edge of
the blade to check for roughness.
Clean the wiper blades with washer fluid or
water applied with a soft sponge or cloth.
CHANGING THE WIPER BLADES
Replace the wiper blades at least annually
for optimum performance.
You can improve poor wiper quality by
cleaning the wiper blades and the
windshield. See Cleaning the Windows and
Wiper Blades (page 336).
325
Continental (CPL) Canada/United States of America, enUSA, First Printing MaintenanceE142463
Page 343 of 584

Cooling system
•
Protect against freezing temperatures.
• When removing your vehicle from
storage, check coolant fluid level.
Confirm that there are no cooling system
leaks and that fluid is at the
recommended level.
Battery
• Check and recharge as necessary. Keep
connections clean.
• If storing your vehicle for more than 30
days without recharging the battery, we
recommend that you disconnect the
battery cables to maintain battery charge
for quick starting.
Note: It is necessary to reset memory
features if battery cables are disconnected.
Brakes
• Make sure the brakes and parking brake
release fully.
Tires
• Maintain recommended air pressure. Miscellaneous
•
Make sure all linkages, cables, levers and
pins under your vehicle are covered with
grease to prevent rust.
• Move vehicles at least 25 ft (7.5 m) every
15 days to lubricate working parts and
prevent corrosion.
Removing Vehicle From Storage
When your vehicle is ready to come out of
storage, do the following:
• Wash your vehicle to remove any dirt or
grease film build-up on window surfaces.
• Check windshield wipers for any
deterioration.
• Check under the hood for any foreign
material that may have collected during
storage such as mice or squirrel nests.
• Check the exhaust for any foreign
material that may have collected during
storage.
• Check tire pressures and set tire inflation
per the Tire Label. •
Check brake pedal operation. Drive your
vehicle 15 ft (4.5 m) back and forth to
remove rust build-up.
• Check fluid levels (including coolant, oil
and gas) to make sure there are no leaks,
and fluids are at recommended levels.
• If you remove the battery, clean the
battery cable ends and check for
damage.
Contact an authorized dealer if you have any
concerns or issues.
340
Continental (CPL) Canada/United States of America, enUSA, First Printing Vehicle Care
Page 404 of 584

DISPLAY: Press to switch the display on and off.
A
Seek, Fast Forward and Reverse:
In radio mode, press either button to scroll through the presets from the front radio\
. To select a
radio station, press and hold to move quickly forward or backward throug\
h the radio stations. In CD or USB mode, press to select
the next or previous track. Press and hold to move quickly forward or ba\
ckward through the selected media source.
B
Volume:
Turn to adjust the volume.
C
SOURCE:
Press to access different media modes, for example AM, FM, CD, and USB.
D
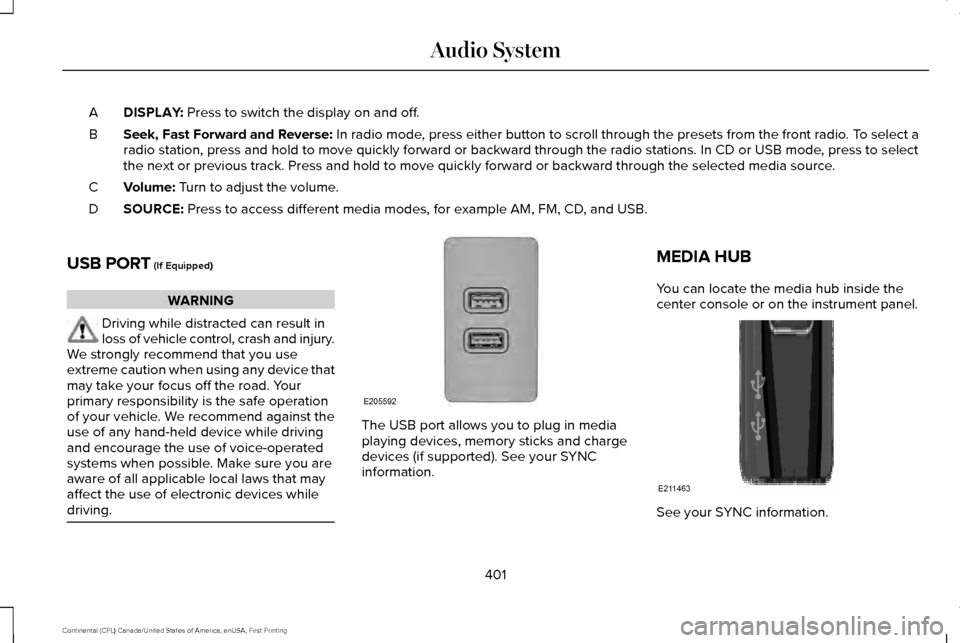
USB PORT
(If Equipped) WARNING
Driving while distracted can result in
loss of vehicle control, crash and injury.
We strongly recommend that you use
extreme caution when using any device that
may take your focus off the road. Your
primary responsibility is the safe operation
of your vehicle. We recommend against the
use of any hand-held device while driving
and encourage the use of voice-operated
systems when possible. Make sure you are
aware of all applicable local laws that may
affect the use of electronic devices while
driving. The USB port allows you to plug in media
playing devices, memory sticks and charge
devices (if supported). See your SYNC
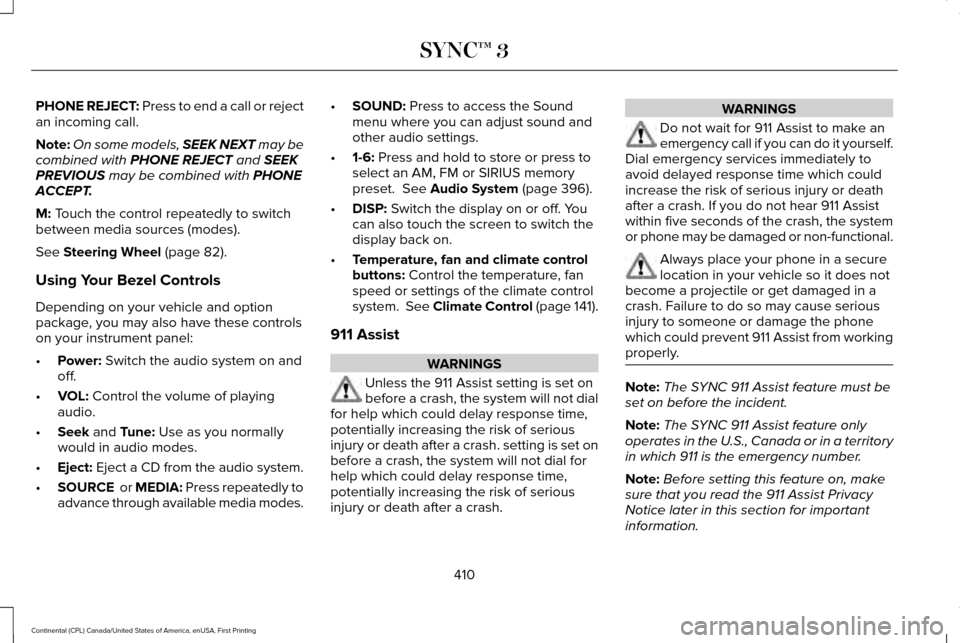
information.MEDIA HUB
You can locate the media hub inside the
center console or on the instrument panel.
See your SYNC information.
401
Continental (CPL) Canada/United States of America, enUSA, First Printing Audio SystemE205592 E211463
Page 412 of 584

Information
Option
If you are on a call, the call information is displayed on the informati\
on display.
If you are receiving a call, you can accept it by selecting OK on the ri\
ght-hand steering wheel controls.
* Depending on your vehicle options, all of these choices may not displa\
y.
Use the OK and arrow buttons on the right
side of your steering wheel to scroll through
the available modes. The available options
depend on the cluster screen.
The selection menu expands and different
options appear.
• Press the up and down arrows to scroll
through the modes.
• Press the right arrow to enter the mode,
use the left arrow to exit the mode.
• Press the up and down arrows to make
adjustments within the chosen mode.
• Press
OK to confirm your selection. Note:
If your vehicle is not equipped with
navigation, compass appears in the display
instead of navigation. If you press the right
arrow to go into the compass menu, you can
see the compass graphic. The compass
displays the direction in which the vehicle is
traveling, not true direction (for example, if
the vehicle is traveling west, the middle of
the compass graphic displays west; north
displays to the left of west though its true
direction is to the right of west).
Using the Steering Wheel Controls
Depending on your vehicle and option
package, you can use different controls on
your steering wheel to interact with the
touchscreen system in different ways.
VOL:
Control the volume of audio output.
Mute:
Mute the audio output. Voice:
Press to start a voice session. Press
again to stop the voice prompt and
immediately begin speaking. Press and hold
to end a voice session.
SEEK NEXT:
• While in radio mode, press to seek
between memory presets.
• While in USB, Bluetooth Audio or CD
mode, press to seek between songs or
press and hold to fast seek.
SEEK PREVIOUS:
• While in radio mode, press to seek
between memory presets.
• While in USB, Bluetooth Audio or CD
mode, press to seek between songs or
press and hold to fast seek.
PHONE ACCEPT:
Press to answer a call or
switch between calls.
409
Continental (CPL) Canada/United States of America, enUSA, First Printing SYNC™ 3
Page 413 of 584

PHONE REJECT: Press to end a call or reject
an incoming call.
Note:
On some models, SEEK NEXT may be
combined with PHONE REJECT and SEEK
PREVIOUS may be combined with PHONE
ACCEPT.
M:
Touch the control repeatedly to switch
between media sources (modes).
See
Steering Wheel (page 82).
Using Your Bezel Controls
Depending on your vehicle and option
package, you may also have these controls
on your instrument panel:
• Power:
Switch the audio system on and
off.
• VOL:
Control the volume of playing
audio.
• Seek
and Tune: Use as you normally
would in audio modes.
• Eject:
Eject a CD from the audio system.
• SOURCE
or MEDIA: Press repeatedly to
advance through available media modes. •
SOUND:
Press to access the Sound
menu where you can adjust sound and
other audio settings.
• 1-6:
Press and hold to store or press to
select an AM, FM or SIRIUS memory
preset.
See Audio System (page 396).
• DISP:
Switch the display on or off. You
can also touch the screen to switch the
display back on.
• Temperature, fan and climate control
buttons:
Control the temperature, fan
speed or settings of the climate control
system. See Climate Control (page 141).
911 Assist WARNINGS
Unless the 911 Assist setting is set on
before a crash, the system will not dial
for help which could delay response time,
potentially increasing the risk of serious
injury or death after a crash. setting is set on
before a crash, the system will not dial for
help which could delay response time,
potentially increasing the risk of serious
injury or death after a crash. WARNINGS
Do not wait for 911 Assist to make an
emergency call if you can do it yourself.
Dial emergency services immediately to
avoid delayed response time which could
increase the risk of serious injury or death
after a crash. If you do not hear 911 Assist
within five seconds of the crash, the system
or phone may be damaged or non-functional. Always place your phone in a secure
location in your vehicle so it does not
become a projectile or get damaged in a
crash. Failure to do so may cause serious
injury to someone or damage the phone
which could prevent 911 Assist from working
properly. Note:
The SYNC 911 Assist feature must be
set on before the incident.
Note: The SYNC 911 Assist feature only
operates in the U.S., Canada or in a territory
in which 911 is the emergency number.
Note: Before setting this feature on, make
sure that you read the 911 Assist Privacy
Notice later in this section for important
information.
410
Continental (CPL) Canada/United States of America, enUSA, First Printing SYNC™ 3
Page 418 of 584

You will need an empty USB drive. Please
check the website for minimum
requirements. Once you have inserted the
USB drive into your computer, choose to start
the download. Follow the instructions
provided to download the files to the USB
drive.
The installation of most files occurs in the
background, and does not interrupt your use
of the system. Navigation updates cannot be
installed in the background, because the files
are too large.
To install the update in your vehicle, remove
anything that is plugged in the USB ports on
the media hub and plug in the USB drive
containing the update. When the USB drive
is plugged in, the installation should begin
immediately. After a successful installation,
the update is available the next time the
vehicle is started.
Please reference the website for any further
actions.
Updating Over Wi-Fi
To update your System over Wi-Fi your
vehicle must be within the range of a Wi-Fi
access point. Data rates may apply.
To connect your system to Wi-Fi, select: Menu Item
Settings
Wi-Fi You can then select your Wi-
Fi network. You may have
to enter the security code if
the network is secured. The
system confirms when it has
connected to the network.
Available Wi-
Fi Networks You must also give the system permission
to update automatically. Upon vehicle
delivery, the System asks you if you would
like to use the automatic update feature. If
you agree to automatic updates, you can
press OK to confirm. If this selection does
not appear upon vehicle delivery you can
access it through the General Settings. See
Settings (page 469). You can also perform a
master reset. See SYNC™ 3 Troubleshooting
(page 486).
If you would like to switch this feature on
later, select: Menu Item
Settings
General From this menu, you can
enable automatic updates.
If you have not done so
already, the system prompts
you to set up a Wi-Fi
connection when you
enable this feature.
Automatic
System
Updates
415
Continental (CPL) Canada/United States of America, enUSA, First Printing SYNC™ 3