2017 LINCOLN CONTINENTAL ECU
[x] Cancel search: ECUPage 284 of 584

vehicle and reimburse the buyer in an
amount equal to the actual price paid or
payable by the consumer (less a reasonable
allowance for consumer use). The consumer
has the right to choose whether to receive
a refund or replacement vehicle.
California Civil Code Section 1793.22(b)
presumes that the manufacturer has had a
reasonable number of attempts to conform
the vehicle to its applicable express
warranties if, within the first 18 months of
ownership of a new vehicle or the first 18000
miles (29 000 km), whichever occurs first:
1. Two or more repair attempts are made
on the same non-conformity likely to
cause death or serious bodily injury OR
2. Four or more repair attempts are made on the same nonconformity (a defect or
condition that substantially impairs the
use, value or safety of the vehicle) OR
3. The vehicle is out of service for repair of
nonconformities for a total of more than
30 calendar days (not necessarily all at
one time). In the case of 1 or 2 above, the consumer
must also notify the manufacturer of the need
for the repair of the nonconformity at the
following address:
Ford Motor Company
16800 Executive Plaza Drive
Mail Drop 3NE-B
Dearborn, MI 48126
You are required to submit your warranty
dispute to BBB AUTO LINE before asserting
in court any rights or remedies conferred by
California Civil Code Section 1793.22(b). You
are also required to use BBB AUTO LINE
before exercising rights or seeking remedies
created by the Federal Magnuson-Moss
Warranty Act, 15 U.S.C. sec. 2301 et seq. If
you choose to seek redress by pursuing
rights and remedies not created by California
Civil Code Section 1793.22(b) or the
Magnuson-Moss Warranty Act, resort to BBB
AUTO LINE is not required by those statutes.
THE BETTER BUSINESS BUREAU
(BBB) AUTO LINE PROGRAM (U.S.
ONLY)
Your satisfaction is important to Ford Motor
Company and to your dealer. If a warranty
concern has not been resolved using the
three-step procedure outlined earlier in this
chapter in the Getting the Services you need
section, you may be eligible to participate in
the BBB AUTO LINE program.
The BBB AUTO LINE program consists of
two parts – mediation and arbitration. During
mediation, a representative of the BBB will
contact both you and Ford Motor Company
to explore options for settlement of the claim.
If an agreement is not reached during
mediation or you do not want to participate
in mediation, and if your claim is eligible, you
may participate in the arbitration process. An
arbitration hearing will be scheduled so that
you can present your case in an informal
setting before an impartial person. The
arbitrator will consider the testimony
provided and make a decision after the
hearing.
281
Continental (CPL) Canada/United States of America, enUSA, First Printing Customer Assistance
Page 288 of 584

REPORTING SAFETY DEFECTS
(U.S. ONLY)
If you believe that your vehicle has a
defect which could cause a crash or
could cause injury or death, you should
immediately inform the National
Highway Traffic Safety Administration
(NHTSA) in addition to notifying Ford
Motor Company.
If NHTSA receives similar complaints, it
may open an investigation, and if it finds
that a safety defect exists in a group of
vehicles, it may order a recall and
remedy campaign. However, NHTSA
cannot become involved in individual
problems between you, your dealer, or
Ford Motor Company.
To contact NHTSA, you may call the
Vehicle Safety Hotline toll-free at
1-888-327-4236 (TTY: 1-800-424-9153);
go to www.safercar.gov; or write to:
Administrator
1200 New Jersey Avenue, SoutheastWashington, D.C. 20590
You can also obtain other information
about motor vehicle safety from
www.safercar.gov.
REPORTING SAFETY DEFECTS
(CANADA ONLY)
If you believe that your vehicle has a defect
which could cause a crash or could cause
injury or death, you should immediately
inform Transport Canada and Ford of
Canada. Transport Canada Contact Information
www.tc.gc.ca/eng/motorvehiclesafety/safevehicles-defectinvestigations-index-76.htm\
(English)
Website
www.tc.gc.ca/fra/securiteautomobile/VehiculesSecuritaires-Enquetes-index-76.htm (French)
Website
1–800–333–0510
Phone
285
Continental (CPL) Canada/United States of America, enUSA, First Printing Customer AssistanceE142557
Page 302 of 584

Protected components
Fuse amp rating
Fuse or relay number
Not used (spare).
5A 1
4
Subwoofer amplifier.
20A 1
5
Revel digital signal processing amplifier.
Not used.
—
6
Not used.
—
7
Security horn.
10A 1
8
Rear seat entertainment module.
10A 1
9
Telematics module.
5A 2
10
Power decklid module.
Keypad.
5A 2
11
Outside lock switch.
Combined security sensor module.
Front control interface module (climate control).
7.5A 2
12
Gear shift module.
Rear climate control module.
Instrument cluster.
7.5A 2
13
Smart data link.
Steering column control module.
299
Continental (CPL) Canada/United States of America, enUSA, First Printing Fuses
Page 333 of 584

CHANGING THE ENGINE AIR
FILTER - 3.7L
WARNING
To reduce the risk of vehicle damage
and/or personal burn injuries do not
start your engine with the air cleaner
removed and do not remove it while the
engine is running. When changing the air filter element, use
only the air filter element listed. See
Capacities and Specifications (page 368).
For EcoBoost equipped vehicles: When
servicing the air cleaner, it is important that
no foreign material enter the air induction
system. The engine and turbocharger are
susceptible to damage from even small
particles.
Change the air filter element at the proper
interval. See Scheduled Maintenance (page
508
). Note:
Failure to use the correct air filter
element may result in severe engine
damage. The customer warranty may be
void for any damage to the engine if the
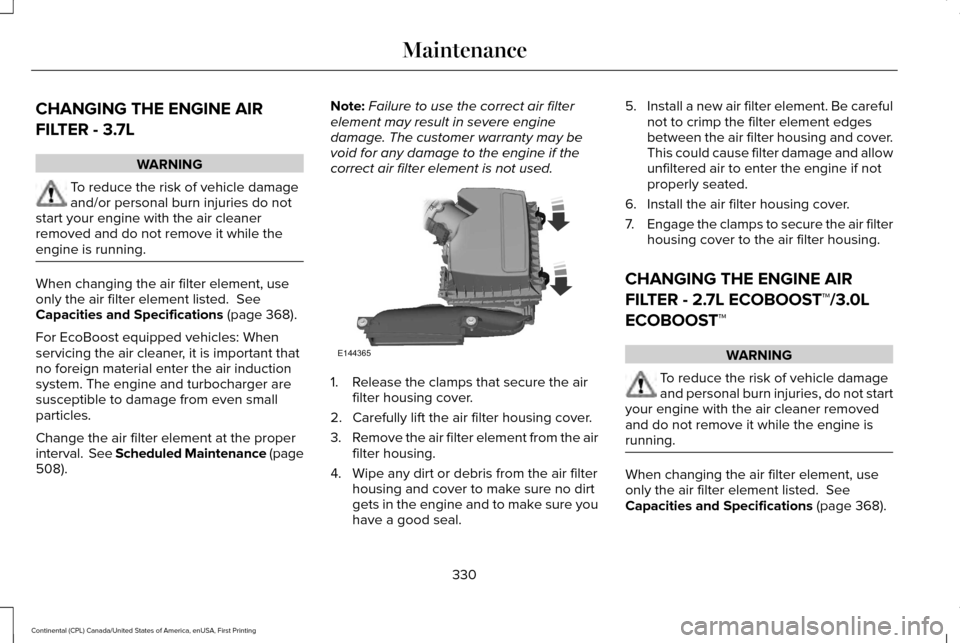
correct air filter element is not used. 1. Release the clamps that secure the air
filter housing cover.
2. Carefully lift the air filter housing cover.
3. Remove the air filter element from the air
filter housing.
4. Wipe any dirt or debris from the air filter housing and cover to make sure no dirt
gets in the engine and to make sure you
have a good seal. 5.
Install a new air filter element. Be careful
not to crimp the filter element edges
between the air filter housing and cover.
This could cause filter damage and allow
unfiltered air to enter the engine if not
properly seated.
6. Install the air filter housing cover.
7. Engage the clamps to secure the air filter
housing cover to the air filter housing.
CHANGING THE ENGINE AIR
FILTER - 2.7L ECOBOOST™/3.0L
ECOBOOST™ WARNING
To reduce the risk of vehicle damage
and personal burn injuries, do not start
your engine with the air cleaner removed
and do not remove it while the engine is
running. When changing the air filter element, use
only the air filter element listed.
See
Capacities and Specifications (page 368).
330
Continental (CPL) Canada/United States of America, enUSA, First Printing MaintenanceE144365
Page 334 of 584

For EcoBoost equipped vehicles: When
servicing the air cleaner, it is important that
no foreign material enter the air induction
system. The engine and turbocharger are
susceptible to damage from even small
particles.
Change the air filter element at the proper
interval. See Scheduled Maintenance (page
508).
Note: Failure to use the correct air filter
element may result in severe engine
damage. The customer warranty may be
void for any damage to the engine if the
correct air filter element is not used. 1. Release the clamps that secure the air
filter housing cover.
2. Carefully lift the air filter housing cover.
3. Remove the air filter element from the air
filter housing.
4. Wipe any dirt or debris from the air filter housing and cover to make sure no dirt
gets in the engine and to make sure you
have a good seal. 5.
Install a new air filter element. Be careful
not to crimp the filter element edges
between the air filter housing and cover.
This could cause filter damage and allow
unfiltered air to enter the engine if not
properly seated.
6. Install the air filter housing cover.
7. Engage the clamps to secure the air filter
housing cover to the air filter housing.
331
Continental (CPL) Canada/United States of America, enUSA, First Printing MaintenanceE225562
Page 365 of 584

When driving with the full-size dissimilar
spare wheel and tire assembly additional
caution should be given to:
•
Towing a trailer.
• Driving vehicles equipped with a camper
body.
• Driving vehicles with a load on the cargo
rack.
Drive cautiously when using a full-size
dissimilar spare wheel and tire assembly and
seek service as soon as possible.
Tire Change Procedure (If Equipped) WARNINGS
When one of the front wheels is off the
ground, the transmission alone will not
prevent the vehicle from moving or slipping
off the jack, even if the transmission is in park
(P). WARNINGS
To help prevent your vehicle from
moving when changing a wheel, shift
the transmission into park (P), set the parking
brake and use an appropriate block or wheel
chock to secure the wheel diagonally
opposite to the wheel being changed. For
example, when changing the front left wheel,
place an appropriate block or wheel chock
on the right rear wheel. No person should place any portion of
their body under a vehicle that is
supported by a jack. Do not attempt to change a tire on the
side of the vehicle close to moving
traffic. Pull far enough off the road to avoid
the danger of being hit when operating the
jack or changing the wheel. Always use the jack provided as
original equipment with your vehicle.
If using a jack other than the one provided,
make sure the jack capacity is adequate for
the vehicle weight, including any vehicle
cargo or modifications. If you are unsure if
the jack capacity is adequate, contact the
authorized dealer. Note:
Passengers should not remain in your
vehicle when the vehicle is being jacked.
1. Park on a level surface, set the parking brake and activate the hazard flashers.
2. Place the transmission in park (P) and turn the engine off. 3.
Block both the front and rear of the wheel
diagonally opposite the flat tire. For
example, if the left front tire is flat, block
the right rear wheel.
4. Lift the carpeted load floor panel and secure in the up position with the hanger
clip.
362
Continental (CPL) Canada/United States of America, enUSA, First Printing Wheels and TiresE175447
Page 366 of 584

5. Remove the steel winged washer nut
securing the spare tire by turning it
counterclockwise.
6. Remove the spare tire from the spare tire
compartment.
7. Remove plastic wing nut and jack and lug wrench assembly. Detach lug wrench
from jack by turning the jack hex nut
drive screw counterclockwise. 8. If your vehicle has a wheel trim, use the
tool supplied to remove it and access the
lug nuts. 9.
Loosen each wheel lug nut one-half turn
counterclockwise, but do not remove
them until the wheel is raised off the
ground. 10. The vehicle jacking points are shown
above, and are depicted on the yellow
warning label on the jack. 11. Position the jack so that the vehicle
downward flange rests in the jack
saddle flange as shown above. Raise
the vehicle by using the lug wrench to
turn the jack nut clockwise. Once the
flat tire is raised above the ground,
remove the lug nuts with the lug
wrench.
12. Replace the flat tire with the spare tire,
making sure the valve stem is facing
outward. Reinstall the lug nuts until the
wheel is snug against the hub. Do not
fully tighten the lug nuts until the wheel
has been lowered.
13. Lower the wheel by turning the jack handle counterclockwise.
363
Continental (CPL) Canada/United States of America, enUSA, First Printing Wheels and TiresE224481 E145908 E201100
Page 367 of 584

14. Remove the jack and fully tighten the
lug nuts in the order shown. See
Technical Specifications (page 366). 15. Fold up the wrench/jack handle and
re-attach to the jack. Re-position
jack/wrench assembly into the original
vehicle position and secure with the
plastic wing nut. Make sure the jack is
fastened securely before you drive.
16. Unblock the wheel.
Stowing the flat tire
You cannot store the full-sized road wheel
in the temporary spare tire well.
1. Find the flat tire retainer strap tucked inside the jack channel. Lower the
carpeted load floor.
2. Stow the flat tire in the cargo area on the
load floor with the wheel facing up.
Secure the flat tire with the retainer strap
by following the next steps. 3. Locate the rear left side and right side
cargo tie-down rings. Push the loop end
of the retainer strap through one cargo
tie-down ring. Thread the non-loop end
through the loop.
4. Weave the retainer strap through the wheel openings.
5. Locate the cargo tie-down in the opposite
rear corner of the cargo area. Thread the
retainer strap though the tie-down and
pull tight.
364
Continental (CPL) Canada/United States of America, enUSA, First Printing Wheels and Tires12
3
4
5
E75442 E142906