2017 LINCOLN CONTINENTAL change time
[x] Cancel search: change timePage 245 of 584

If Adaptive Cruise Control is enabled and a
vehicle is being followed, additional graphics
appear in the display.
When you switch off the system, the lane
marking graphics will not display.
While the system is on, the color of the lane
markings will change to indicate the system
status.
Gray: Indicates that the system is temporarily
unable to provide a warning or intervention
on the indicated side(s). This may be
because:
•
Your vehicle is under the activation
speed.
• The turn indicator is active.
• Your vehicle is in a dynamic maneuver.
• The road has no or poor lane markings
in the camera field-of-view.
• The camera is obscured or unable to
detect the lane markings due to
environmental conditions (significant sun
angles, shadows, snow, heavy rain or
fog), traffic conditions (following a large
vehicle that is blocking or shadowing the
lane), or vehicle conditions (poor
headlamp illumination). See Troubleshooting for additional
information.
Green: Indicates that the system is available
or ready to provide a warning or intervention,
on the indicated side(s).
Yellow: Indicates that the system is providing
or has just provided a lane keeping aid
intervention.
Red: Indicates that the system is providing
or has just provided a lane keeping alert
warning.
The system can be temporarily suppressed
at any time by the following:
• Quick braking.
• Fast acceleration.
• Using the turn signal indicator.
• Evasive steering maneuver.
242
Continental (CPL) Canada/United States of America, enUSA, First Printing Driving AidsE222903
Page 246 of 584

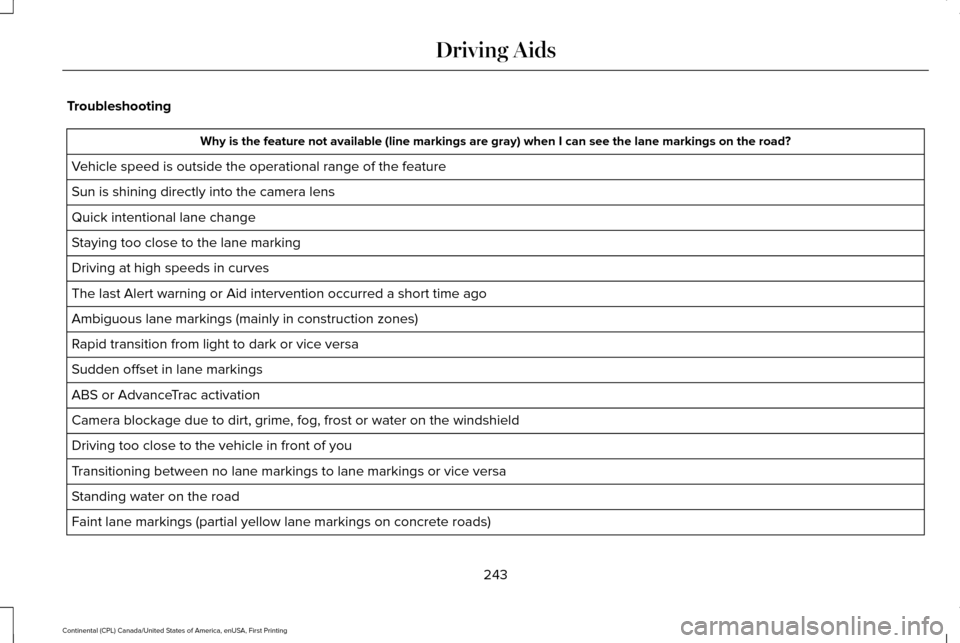
Troubleshooting
Why is the feature not available (line markings are gray) when I can s\
ee the lane markings on the road?
Vehicle speed is outside the operational range of the feature
Sun is shining directly into the camera lens
Quick intentional lane change
Staying too close to the lane marking
Driving at high speeds in curves
The last Alert warning or Aid intervention occurred a short time ago
Ambiguous lane markings (mainly in construction zones)
Rapid transition from light to dark or vice versa
Sudden offset in lane markings
ABS or AdvanceTrac activation
Camera blockage due to dirt, grime, fog, frost or water on the windshield
Driving too close to the vehicle in front of you
Transitioning between no lane markings to lane markings or vice versa
Standing water on the road
Faint lane markings (partial yellow lane markings on concrete roads)
243
Continental (CPL) Canada/United States of America, enUSA, First Printing Driving Aids
Page 259 of 584

Note:
Proper system operation requires a
clear view of the road by the camera. Have
any windshield damage in the area of the
camera's field of view repaired.
Note: If something hits the front end of your
vehicle or damage occurs, the radar sensing
zone may change. This could cause missed
or false vehicle detections. Contact an
authorized dealer to have the radar checked
for proper coverage and operation.
Note: If your vehicle detects excessive heat
at the camera or a potential misalignment
condition, a message may display in the
information display indicating temporary
sensor unavailability. This message
deactivates automatically when operational
conditions are corrected (for example, when
the ambient temperature around the sensor
decreases or the sensor automatically
recalibrates successfully). DRIVE CONTROL (If Equipped)
LINCOLN DRIVE CONTROL
Lincoln Drive Control delivers the Lincoln
driving experience through a suite of
sophisticated electronic vehicle systems.
These systems continuously monitor your
driving inputs and the road conditions to
optimize ride comfort, steering, handling,
powertrain response and sound. You can
preset your preferences for these systems
within the information display. Lincoln Drive
Control will respond to your preferences
based on what gear position you select. This
provides a single location to control multiple
systems performance settings. Lincoln Drive Control consists of the
following systems:
•
Continuously controlled damping
dynamically adjusts the shock absorbers
stiffness in real time to match the road
surface and driver inputs. This system
continuously monitors your vehicle ’s
motion (roll, pitch, bounce), suspension
position, load, speed, road conditions,
and steering to adjust the suspension
damping for optimal vehicle control.
• Electronically power-assisted steering
adjusts steering effort and feel based on
your vehicle speed and your inputs.
• Adaptive steering optimizes your
vehicle's steering response based on
your steering wheel input, changes in
vehicle speed and other conditions.
• Active noise control utilizes your vehicle
electronics to enhance the acoustic
experience.
256
Continental (CPL) Canada/United States of America, enUSA, First Printing Driving Aids
Page 272 of 584

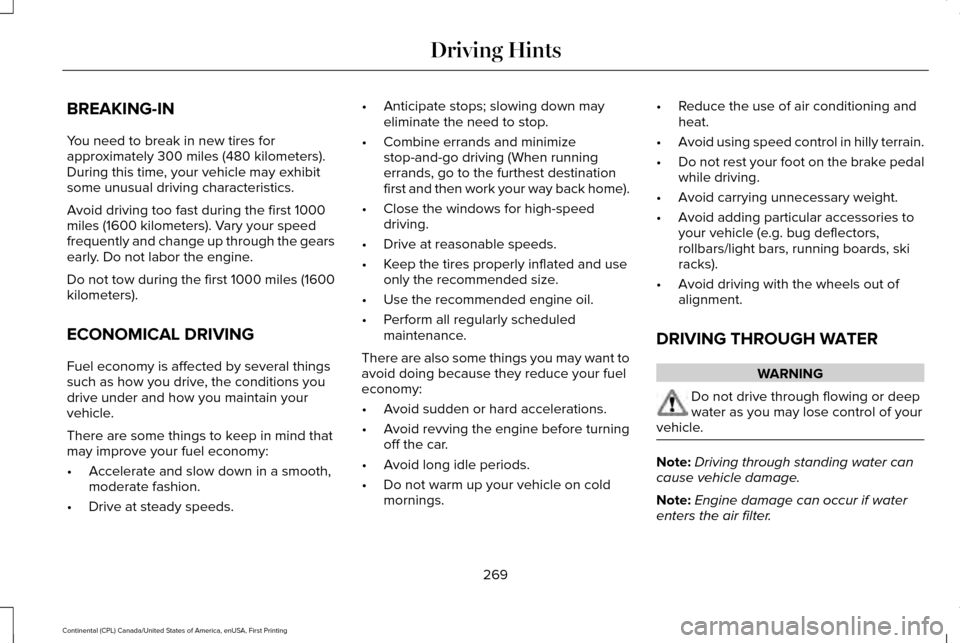
BREAKING-IN
You need to break in new tires for
approximately 300 miles (480 kilometers).
During this time, your vehicle may exhibit
some unusual driving characteristics.
Avoid driving too fast during the first 1000
miles (1600 kilometers). Vary your speed
frequently and change up through the gears
early. Do not labor the engine.
Do not tow during the first 1000 miles (1600
kilometers).
ECONOMICAL DRIVING
Fuel economy is affected by several things
such as how you drive, the conditions you
drive under and how you maintain your
vehicle.
There are some things to keep in mind that
may improve your fuel economy:
•
Accelerate and slow down in a smooth,
moderate fashion.
• Drive at steady speeds. •
Anticipate stops; slowing down may
eliminate the need to stop.
• Combine errands and minimize
stop-and-go driving (When running
errands, go to the furthest destination
first and then work your way back home).
• Close the windows for high-speed
driving.
• Drive at reasonable speeds.
• Keep the tires properly inflated and use
only the recommended size.
• Use the recommended engine oil.
• Perform all regularly scheduled
maintenance.
There are also some things you may want to
avoid doing because they reduce your fuel
economy:
• Avoid sudden or hard accelerations.
• Avoid revving the engine before turning
off the car.
• Avoid long idle periods.
• Do not warm up your vehicle on cold
mornings. •
Reduce the use of air conditioning and
heat.
• Avoid using speed control in hilly terrain.
• Do not rest your foot on the brake pedal
while driving.
• Avoid carrying unnecessary weight.
• Avoid adding particular accessories to
your vehicle (e.g. bug deflectors,
rollbars/light bars, running boards, ski
racks).
• Avoid driving with the wheels out of
alignment.
DRIVING THROUGH WATER WARNING
Do not drive through flowing or deep
water as you may lose control of your
vehicle. Note:
Driving through standing water can
cause vehicle damage.
Note: Engine damage can occur if water
enters the air filter.
269
Continental (CPL) Canada/United States of America, enUSA, First Printing Driving Hints
Page 285 of 584

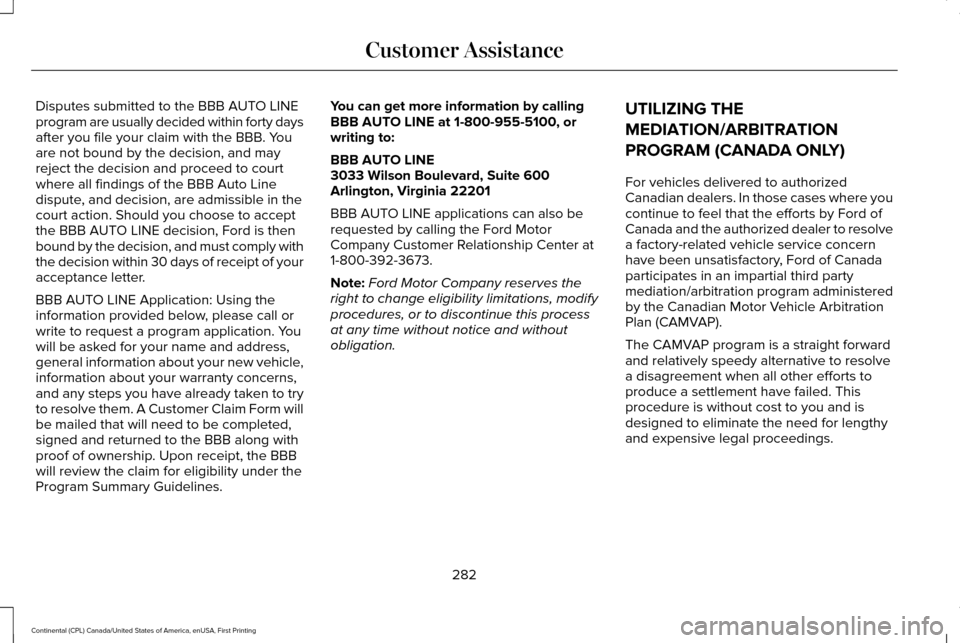
Disputes submitted to the BBB AUTO LINE
program are usually decided within forty days
after you file your claim with the BBB. You
are not bound by the decision, and may
reject the decision and proceed to court
where all findings of the BBB Auto Line
dispute, and decision, are admissible in the
court action. Should you choose to accept
the BBB AUTO LINE decision, Ford is then
bound by the decision, and must comply with
the decision within 30 days of receipt of your
acceptance letter.
BBB AUTO LINE Application: Using the
information provided below, please call or
write to request a program application. You
will be asked for your name and address,
general information about your new vehicle,
information about your warranty concerns,
and any steps you have already taken to try
to resolve them. A Customer Claim Form will
be mailed that will need to be completed,
signed and returned to the BBB along with
proof of ownership. Upon receipt, the BBB
will review the claim for eligibility under the
Program Summary Guidelines.
You can get more information by calling
BBB AUTO LINE at 1-800-955-5100, or
writing to:
BBB AUTO LINE
3033 Wilson Boulevard, Suite 600
Arlington, Virginia 22201
BBB AUTO LINE applications can also be
requested by calling the Ford Motor
Company Customer Relationship Center at
1-800-392-3673.
Note:
Ford Motor Company reserves the
right to change eligibility limitations, modify
procedures, or to discontinue this process
at any time without notice and without
obligation. UTILIZING THE
MEDIATION/ARBITRATION
PROGRAM (CANADA ONLY)
For vehicles delivered to authorized
Canadian dealers. In those cases where you
continue to feel that the efforts by Ford of
Canada and the authorized dealer to resolve
a factory-related vehicle service concern
have been unsatisfactory, Ford of Canada
participates in an impartial third party
mediation/arbitration program administered
by the Canadian Motor Vehicle Arbitration
Plan (CAMVAP).
The CAMVAP program is a straight forward
and relatively speedy alternative to resolve
a disagreement when all other efforts to
produce a settlement have failed. This
procedure is without cost to you and is
designed to eliminate the need for lengthy
and expensive legal proceedings.
282
Continental (CPL) Canada/United States of America, enUSA, First Printing Customer Assistance
Page 319 of 584

If the coolant level is at or below the
minimum mark, add prediluted coolant
immediately.
To top up the coolant level do the following:
1. Unscrew the cap slowly. Any pressure
escapes as you unscrew the cap.
2. Add prediluted coolant approved to the correct specification. See Capacities and
Specifications (page 368).
3. Add enough prediluted coolant to reach
the correct level.
4. Replace the coolant reservoir cap, turn it clockwise until you feel a strong
resistance.
5. Check the coolant level in the coolant reservoir the next few times you drive
your vehicle. If necessary, add enough
prediluted engine coolant to bring the
coolant level to the correct level.
If you have to add more than
1.1 qt (1 L) of
engine coolant per month, have your vehicle
checked as soon as possible. Operating an
engine with a low level of coolant can result
in engine overheating and possible engine
damage. Note:
During normal vehicle operation, the
coolant may change color from orange to
pink or light red. As long as the coolant is
clear and uncontaminated, this color change
does not indicate the coolant has degraded
nor does it require the coolant to be drained,
the system to be flushed, or the coolant to
be replaced.
Note: In case of emergency, you can add a
large amount of water without coolant in
order to reach a vehicle service location.
Water alone, without coolant, can cause
engine damage from corrosion, overheating
or freezing. When you reach a service
location, you must have the cooling system
drained and refilled with prediluted coolant
approved to the correct specification.
See
Capacities and Specifications (page 368).
Do not use the following as a coolant
substitute:
• Alcohol.
• Methanol.
• Brine.
• Any coolant mixed with alcohol or
methanol antifreeze. Alcohol and other liquids can cause engine
damage from overheating or freezing.
Do not add extra inhibitors or additives to
the coolant. These can be harmful and
compromise the corrosion protection of the
coolant.
Recycled Coolant
We do not recommend the use of recycled
coolant as an approved recycling process is
not yet available.
Dispose of used engine coolant in an
appropriate manner. Follow your
community's regulations and standards for
recycling and disposing of automotive fluids.
316
Continental (CPL) Canada/United States of America, enUSA, First Printing Maintenance
Page 322 of 584

You may notice a reduction in vehicle speed
caused by reduced engine power. In order
to manage the engine coolant temperature.
Your vehicle may enter this mode if certain
high-temperature and high-load conditions
take place. The amount of speed reduction
depends on vehicle loading, grade and
ambient temperature. If this occurs, there is
no need to pull off the road. You can
continue to drive your vehicle.
The air conditioning may automatically turn
on and off during severe operating
conditions to protect the engine from
overheating. When the coolant temperature
decreases to the normal operating
temperature, the air conditioning turns on.
If the coolant temperature gauge moves fully
into the red zone, or if the coolant
temperature warning or service engine soon
messages appear in your information display,
do the following:
1. Pull off the road as soon as safely
possible and shift the transmission into
park (P). 2. Leave the engine running until the
coolant temperature gauge needle
returns to the normal position. After
several minutes, if the temperature does
not drop, follow the remaining steps.
3. Switch the engine off and wait for it to cool. Check the coolant level.
4. If the coolant level is at or below the minimum mark, add prediluted coolant
immediately.
5. If the coolant level is normal, restart the engine and continue.
AUTOMATIC TRANSMISSION
FLUID CHECK
6F50/6F55 Transmission
(If Equipped) WARNINGS
The dipstick cap and surrounding
components may be hot, use gloves.
Use gloves when moving the air filter
assembly. Components will be hot. Note:
Automatic transmission fluid expands
when warmed. To obtain an accurate fluid
check, drive your vehicle until you warm it
up, approximately
20 mi (30 km). If you
operate your vehicle for an extended period
at high speeds, in city traffic during hot
weather or pulling a trailer, switch your
vehicle off until it reaches normal operating
temperatures to allow the fluid to cool before
checking. Depending on vehicle use, cooling
times could take up to 30 minutes or longer.
Refer to your scheduled maintenance
information for scheduled intervals for fluid
checks and changes. Your transmission does
not consume fluid. However, you should
check the fluid level if the transmission is not
working properly. For example, if the
transmission slips or shifts slowly or if you
notice some sign of a fluid leak.
1. Drive your vehicle 20 mi (30 km) or until it reaches normal operating temperature.
2. Park your vehicle on a level surface and engage the parking brake.
319
Continental (CPL) Canada/United States of America, enUSA, First Printing Maintenance
Page 330 of 584

4. There is a distinct cut-off (change from
light to dark) in the left portion of the
beam pattern. Position the top edge of
this cut-off 2 inches (5 centimeters) below
the horizontal reference line. 5. Locate the vertical adjuster on each
headlamp. Use a Phillips #2 screwdriver
to turn the adjuster either clockwise or
counterclockwise to adjust the vertical
aim of the headlamp. The horizontal edge
of the brighter light should touch the
horizontal reference line.
6. Repeat Steps 3 through 7 to adjust the other headlamp.
7. Close the hood and turn off the lamps.
Horizontal Aim Adjustment
Horizontal aim is not required for this vehicle
and is not adjustable. CHANGING A BULB WARNINGS
Bulbs can become hot. Let the bulb
cool down before removing it. Failure
to do so could result in personal injury. Switch the lamps and the ignition off.
Failure to follow this warning could
result in serious personal injury. Use the correct specification bulb. See Bulb
Specification Chart (page 328).
Install in the reverse order unless otherwise
stated.
High-Intensity Discharge Headlamps
These lamps operate at a high voltage. See
an authorized dealer if they fail.
327
Continental (CPL) Canada/United States of America, enUSA, First Printing MaintenanceE142465 E167359