2017 LINCOLN CONTINENTAL change time
[x] Cancel search: change timePage 141 of 584

Navigation Display Area.
D
Status Bar.
E
Speedometer Display Area.
F
Signaling and Traffic Indication
Displays direction indicators, blind spot
information (if direction indicators are active)
and cross traffic alert.
Left Information Group
Displays incoming call information.
ADAS Display Area
Displays ACC and lane keeping system
status and warnings. Navigation Display Area
Displays navigation next turn instructions.
Status Bar
Displays distance to empty (DTE), time and
outside air temperature. Next to DTE, the
fuel gauge fill color changes to yellow in low
fuel conditions. You can switch off the status
bar in the HUD settings menu.
Speedometer Display Area
Displays current vehicle speed, speed limit
(if available in the map database) and
PRNDS.
Configuring The Head Up Display
You can control the system's options through
the information display by using the HUD,
OK and arrow buttons on the right-hand side
of your steering wheel . Here you can adjust
the display according to your height to make
viewing easier and to customize what
content to view. The system's options appear
in the instrument cluster while the updates
happen in the HUD.
Note: If HUD On is unchecked, other options
of the system are hidden.
Note: The HUD menu automatically closes
after a certain period of inactivity.
Note: The initial brightness of the HUD
image depends on the brightness of the
ambient environment. Head-Up Display (HUD)
Turns the HUD on and off.
HUD On
Follow onscreen directions to confirm or modify your settings.
Brightness
Follow onscreen directions to confirm or
modify your settings.
Vertical Position
HUD Adjustments
Horizontal Position
138
Continental (CPL) Canada/United States of America, enUSA, First Printing Information Displays
Page 169 of 584

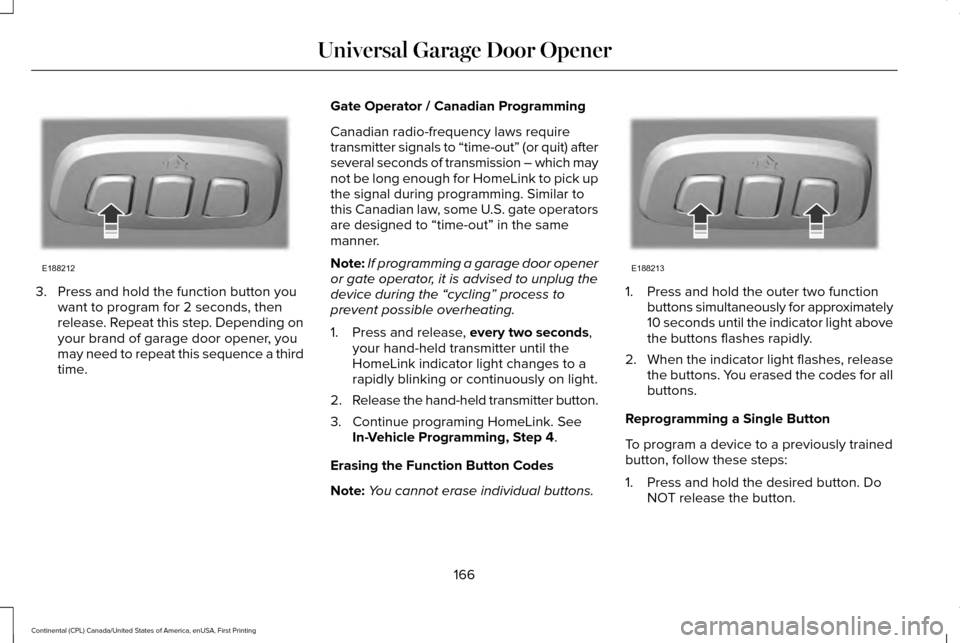
3. Press and hold the function button you
want to program for 2 seconds, then
release. Repeat this step. Depending on
your brand of garage door opener, you
may need to repeat this sequence a third
time. Gate Operator / Canadian Programming
Canadian radio-frequency laws require
transmitter signals to “time-out” (or quit) after
several seconds of transmission – which may
not be long enough for HomeLink to pick up
the signal during programming. Similar to
this Canadian law, some U.S. gate operators
are designed to “time-out” in the same
manner.
Note:
If programming a garage door opener
or gate operator, it is advised to unplug the
device during the “cycling” process to
prevent possible overheating.
1. Press and release, every two seconds,
your hand-held transmitter until the
HomeLink indicator light changes to a
rapidly blinking or continuously on light.
2. Release the hand-held transmitter button.
3. Continue programing HomeLink. See In-Vehicle Programming, Step 4
.
Erasing the Function Button Codes
Note: You cannot erase individual buttons. 1. Press and hold the outer two function
buttons simultaneously for approximately
10 seconds until the indicator light above
the buttons flashes rapidly.
2. When the indicator light flashes, release
the buttons. You erased the codes for all
buttons.
Reprogramming a Single Button
To program a device to a previously trained
button, follow these steps:
1. Press and hold the desired button. Do NOT release the button.
166
Continental (CPL) Canada/United States of America, enUSA, First Printing Universal Garage Door OpenerE188212 E188213
Page 192 of 584

A message will appear in your information
display screen when your vehicle has
entered Stay in Neutral mode.
Note:
During this mode the N button will
flash continuously and your instrument
cluster will display
N as the selected gear.
Exiting Stay in Neutral mode
To disable Stay in Neutral mode select
another gear. See the
Putting the Vehicle
in Gear for instructions on how to do this.
Entering a Carwash
Note: Always put your vehicle in Stay in
Neutral mode when entering an automatic
car wash. Failure to do this could result in
vehicle damage not covered by warranty.
Drive (D)
The normal driving position for the best fuel
economy.
Sport (S)
Putting the vehicle in sport (S): •
Provides additional engine braking and
extends lower gear operation to enhance
performance for uphill climbs, hilly terrain
or mountainous areas. This will increase
engine RPM during engine braking.
• Provides additional lower gear operation
through the automatic transmission shift
strategy.
• Provides gear selection more quickly and
at higher engine speeds.
SelectShift™ Automatic Transmission
Your vehicle is equipped with a SelectShift
Automatic transmission gearshift lever. The
SelectShift Automatic transmission gives you
the ability to change gears up or down as
desired. In order to prevent the engine from running
at too low an RPM, which may cause it to
stall, SelectShift still automatically makes
some downshifts if it has determined that
you have not downshifted in time. Although
SelectShift makes some downshifts for you,
it still allows you to downshift at any time as
long as the SelectShift determines that
damage will not be caused to the engine
from over-revving.
Note:
Engine damage may occur if you
maintain excessive engine revving without
shifting.
SelectShift does not automatically upshift,
even if the engine is approaching the RPM
limit. It must be shifted manually by pressing
the + button. Notice should be taken of the
shift indicator lamp, which alerts the driver
when to shift to ensure the highest level of
efficiency and fuel economy.
Pull the + paddle on the steering wheel to
activate SelectShift.
• Pull the right paddle (+) to upshift.
• Pull the left paddle (–) to downshift.
189
Continental (CPL) Canada/United States of America, enUSA, First Printing Transmission
Page 199 of 584

acceleration or braking which could result
in an increased risk of loss of vehicle
control, vehicle rollover and/or personal
injury. Use all available road surface to
return the vehicle to a safe direction of
travel.
• In the event of an emergency stop, avoid
skidding the tires and do not attempt any
sharp steering wheel movements.
• If the vehicle goes from one type of
surface to another (that is, from concrete
to gravel) there will be a change in the
way the vehicle responds to a maneuver
(steering, acceleration or braking). Again,
avoid these abrupt inputs.
Sand
Most of the time traction control improves
tire traction by managing wheel slip through
Brake, Engine, and AWD calibrations.
However, during low speed driving, disabling
traction control in deep sand can help keep
the wheels moving to maintain vehicle
momentum. When driving over sand, try to keep all four
wheels on the most solid area of the trail.
Avoid reducing the tire pressures but shift
to a lower gear and drive steadily through
the terrain. Apply the accelerator slowly and
avoid spinning the wheels.
Do not drive your vehicle in deep sand for
an extended period of time. This could cause
the AWD system to overheat and default to
front-wheel drive. If this occurs, an AWD OFF
message displays in the information display.
To resume normal AWD function as soon as
possible, stop the vehicle in a safe location
and stop the engine for at least 10 minutes.
After the engine has been restarted and the
AWD system has adequately cooled, the
AWD OFF message turns off and normal
AWD function returns. In the event the
engine is not stopped, the
AWD OFF
message turns off when the system cools
and normal AWD function returns.
When driving at slow speeds in deep sand
under high outside temperatures, use L (Low)
gear when possible. L (Low) gear operation
will maximize the engine and transmission
cooling capability. Under severe operating conditions, the A/C
may cycle on and off to protect overheating
of the engine.
Avoid excessive speed because vehicle
momentum can work against you and cause
the vehicle to become stuck to the point that
assistance may be required from another
vehicle. Remember, you may be able to back
out the way you came if you proceed with
caution.
Mud and Water
If you must drive through high water, drive
slowly. Traction or brake capability may be
limited.
When driving through water, determine the
depth; avoid water higher than the bottom
of the wheel rims (for cars) or the bottom of
the hubs (for trucks) (if possible) and proceed
slowly. If the ignition system gets wet, the
vehicle may stall.
196
Continental (CPL) Canada/United States of America, enUSA, First Printing All-Wheel Drive
(If Equipped)
Page 212 of 584

PRINCIPLE OF OPERATION
WARNINGS
Vehicle modifications involving braking
system, aftermarket roof racks,
suspension, steering system, tire
construction and wheel and tire size may
change the handling characteristics of your
vehicle and may adversely affect the
performance of the electronic stability control
system. In addition, installing any stereo
loudspeakers may interfere with and
adversely affect the electronic stability
control system. Install any aftermarket stereo
loudspeaker as far as possible from the front
center console, the tunnel, and the front
seats in order to minimize the risk of
interfering with the electronic stability control
sensors. Reducing the effectiveness of the
electronic stability control system could lead
to an increased risk of loss of vehicle control,
vehicle rollover, personal injury and death. WARNINGS
Remember that even advanced
technology cannot defy the laws of
physics. It’ s always possible to lose control
of a vehicle due to inappropriate driver input
for the conditions. Aggressive driving on any
road condition can cause you to lose control
of your vehicle increasing the risk of personal
injury or property damage. Activation of the
electronic stability control system is an
indication that at least some of the tires have
exceeded their ability to grip the road; this
could reduce the operator’ s ability to control
the vehicle potentially resulting in a loss of
vehicle control, vehicle rollover, personal
injury and death. If your electronic stability
control system activates, SLOW DOWN. The system automatically turns on each time
you switch the ignition on.
If a fault occurs in either the stability control
or the traction control system, you may
experience the following conditions:•
The stability and traction control light
illuminates steadily.
• The stability control and traction control
systems do not enhance your vehicle's
ability to maintain traction of the wheels.
• The adaptive steering system (if
equipped) automatically changes the
steering function to a fixed steering ratio.
See Steering (page 251).
If a driving condition activates either the
stability control or the traction control system
you may experience the following conditions:
• The stability and traction control light
flashes.
• Your vehicle slows down.
• Reduced engine power.
• A vibration in the brake pedal.
• The brake pedal is stiffer than usual.
• If the driving condition is severe and your
foot is not on the brake, the brake pedal
may move as the system applies higher
brake force.
209
Continental (CPL) Canada/United States of America, enUSA, First Printing Stability Control
Page 226 of 584

The system does not position the vehicle where I want in the space
A parked vehicle has a high attachment (salt sprayer, snowplow or moving truck bed).
The parking space length or position of parked objects changed after your vehicle passed.
The temperature around your vehicle changes quickly (driving from a hea\
ted garage into the cold, or after leaving a car wash).
REAR VIEW CAMERA WARNINGS
The rear view camera system is a
reverse aid supplement device that still
requires the driver to use it in conjunction
with the interior and exterior mirrors for
maximum coverage. Objects that are close to either corner
of the bumper or under the bumper,
might not be seen on the screen due to the
limited coverage of the camera system. Back up as slow as possible since
higher speeds might limit your reaction
time to stop your vehicle. WARNINGS
Use caution when using the rear video
camera and the luggage compartment
door is ajar. If the luggage compartment door
is ajar, the camera will be out of position and
the video image may be incorrect. All
guidelines disappear when the luggage
compartment door is ajar. Use caution when turning camera
features on or off. Make sure your
vehicle is not moving. The rear view camera system provides a
video image of the area behind your vehicle.
During operation, lines appear in the display
which represent your vehicle
’s path and
proximity to objects behind your vehicle. The camera is located on the luggage
compartment door.
Using the Rear View Camera System
The rear view camera system displays what
is behind your vehicle when you place the
transmission in reverse (R).
223
Continental (CPL) Canada/United States of America, enUSA, First Printing Parking AidsE222904
Page 238 of 584

Changing the Set Speed
•
When you select km/h as the display
measurement in the information display
the set speed changes in approximately
1 km/h increments. When you select mph
as the display measurement in the
information display the set speed
changes in approximately 1 mph
increments.
• Press the accelerator or brake pedal until
you reach the desired speed. Press and
release RES+ or SET-.
• Press and hold
RES+ or SET-. Release
the control when you reach the desired
speed. The set speed changes in
approximately 5 mph/10 km/h increments.
The system may apply the brakes to slow
the vehicle to the new set speed. The set
speed displays continuously in the
information display when the system is
active.
Canceling the Set Speed
Press and release
CAN or tap the brake
pedal. The set speed does not erase. The
last set speed displays with a strikethrough. Resuming the Set Speed
Press and release
RES. Your vehicle speed
returns to the previously set speed and gap
setting. The set speed displays continuously
in the information display when the system
is active.
Note: Only use resume if you are aware of
the set speed and intend to return to it.
Automatic Cancellation
Automatic cancellation can occur if:
• The tires lose traction.
• You apply the parking brake.
Hilly Condition Usage
Note: An audible alarm sounds and the
system shuts down if it applies brakes for an
extended period of time. This allows the
brakes to cool. The system functions
normally again when the brakes have
cooled. Select a lower gear during prolonged
downhill driving on steep slopes, such as
mountainous areas, when the system is
active. In such situations, the system needs
additional engine braking to reduce the load
on the vehicle
’s regular brake system to
prevent the brakes from overheating.
Switching Adaptive Cruise Control Off
Press and release
OFF when the system is
in stand by mode or switch the ignition off.
Note: You erase the set speed and gap
setting when you switch the system off.
Detection Issues WARNING
On rare occasions, detection issues
can occur due to the road
infrastructures, for example bridges, tunnels
and safety barriers. In these cases, the
system may brake late or unexpectedly. At
all times, you are responsible for controlling
your vehicle, supervising the system and
intervening, if required. 235
Continental (CPL) Canada/United States of America, enUSA, First Printing Cruise Control
Page 243 of 584

LANE KEEPING SYSTEM (If Equipped)
WARNINGS
The system does not relieve you of
your responsibility to drive with due
care and attention. At all times you are responsible for
controlling your vehicle, supervising
the system and intervening if required. If the sensor becomes blocked the
system may not function.
In cold and severe weather conditions
the system may not function. Rain,
snow, spray can all limit sensor performance. Large contrasts in lighting can limit
sensor performance.
The system will not operate if the
sensor cannot track the road lane
markings. The vehicle should be taken to an
authorized dealer for inspection if
damage occurs in the immediate area
surrounding the sensor. Note:
The system works above 40 mph
(64 km/h).
Note: The system works as long as the
camera can detect one lane marking.
Note: The system may not function if the
camera is blocked or there is damage to the
windshield.
Note: When Aid mode is on and the system
detects no steering activity for a short period,
the system will alert you to put your hands
on the steering wheel. The system may
detect a light grip or touch on the steering
wheel as hands off driving.
The system notifies you to stay in your lane
through the steering system and the display
screen when the front camera detects an
unintentional drift out of your lane is likely to
occur. The system automatically detects and
tracks the road lane markings using a camera
mounted behind the interior rear view mirror. Switching the System On and Off
Note:
The system on or off setting is stored
until it is manually changed unless a MyKey
is detected. If the system detects a MyKey
it defaults to on and the mode is set to Alert. Press the button on the steering
wheel stalk to switch the system
on or off.
System Settings
The system has optional setting menus
available. To view or adjust the settings, See
Settings
(page 469). The system stores the
last-known selection for each of these
settings. You do not need to readjust your
settings each time you turn on the system.
Mode: This setting allows you to select which
of the system features you can enable.
240
Continental (CPL) Canada/United States of America, enUSA, First Printing Driving AidsE144813