Page 155 of 640

1553-2. Opening, closing and locking the doors and trunk
3
Operation of each component
RC300h_EE(OM24740E)
●Locks and unlocks the doors (P. 144)
●Opens the trunk (P. 150)
●Starts the hybrid system (P. 215)
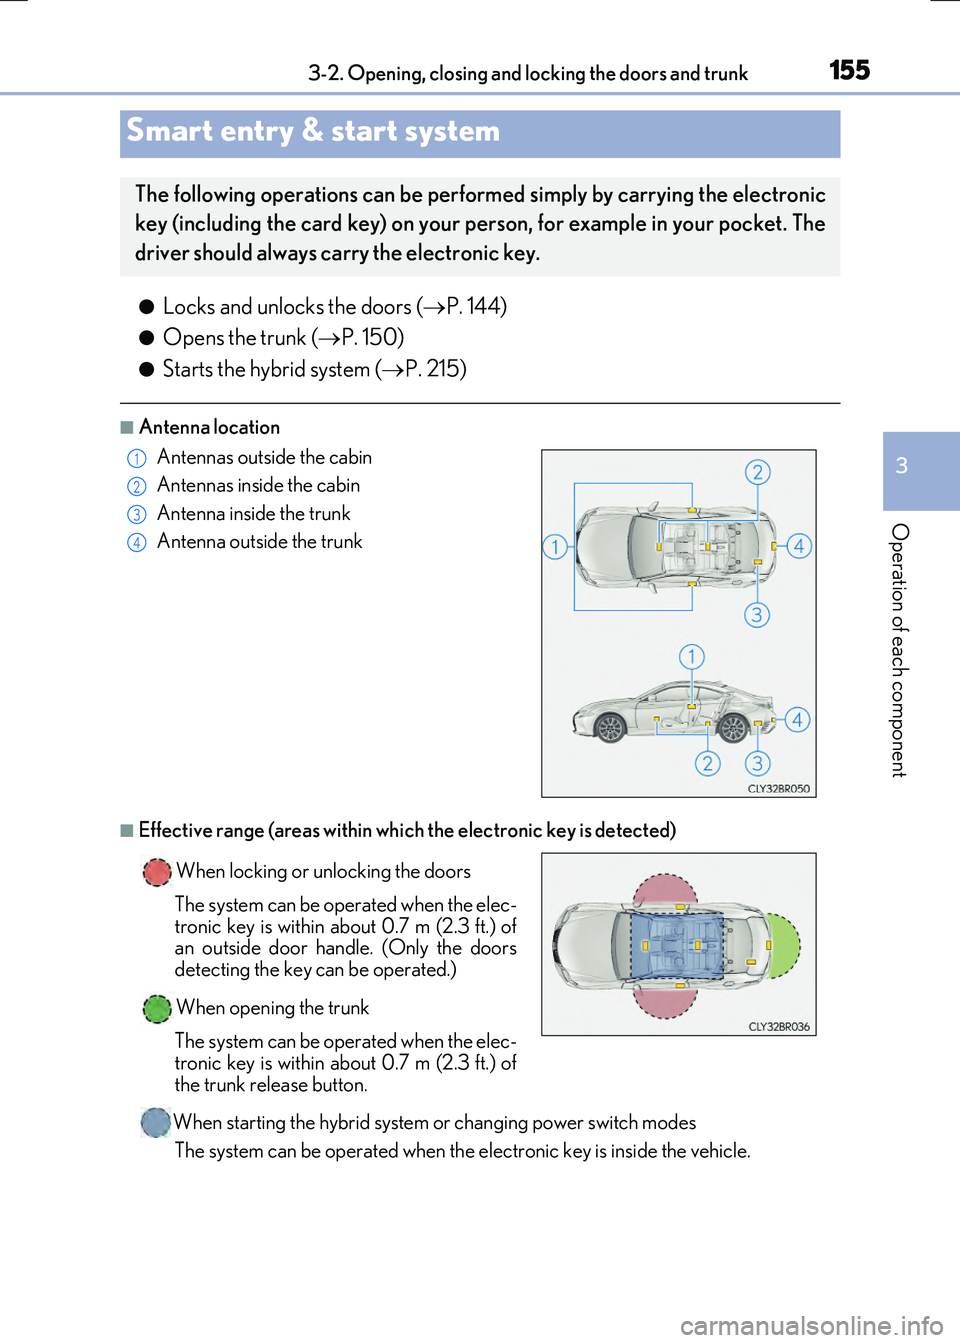
■Antenna location
■Effective range (areas within which the electronic key is detected)
Smart entry & start system
The following operations can be performed simply by carrying the electronic
key (including the card key) on your person, for example in your pocket. The
driver should always carry the electronic key.
Antennas outside the cabin
Antennas inside the cabin
Antenna inside the trunk
Antenna outside the trunk
When locking or unlocking the doors
The system can be operated when the elec-
tronic key is within about 0.7 m (2.3 ft.) of an outside door handle. (Only the doorsdetecting the key can be operated.)
When opening the trunk
The system can be operated when the elec- tronic key is within about 0.7 m (2.3 ft.) of
the trunk release button.
When starting the hybrid system or changing power switch modes
The system can be operated when the electronic key is inside the vehicle.
1
2
3
4
Page 183 of 640

1833-3. Adjusting the seats
3
Operation of each component
RC300h_EE(OM24740E)
Your preferred driving position (the position of the driver's seat, steering wheel
and outside rear view mirrors) can be recorded and recalled by pressing a but-
ton.
Three different driving positions can be recorded into memory.
■Recording procedure
Check that the shift lever is in P.
Turn the power switch to ON mode.
Adjust the driver’s seat, steering wheel, and outside rear view mirrors to the
desired positions.
While pressing the “SET” button,
or within 3 seconds after the
“SET” button is pressed, press
button “1”, “2” or “3” until the
buzzer sounds.
If the selected button has already been preset, the previously recordedposition will be overwritten.
■Recall procedure
Check that the shift lever is in P.
Turn the power switch to ON mode.
Press one of the buttons for the
driving position you want to recall
until the buzzer sounds.
Driving position memory
: If equipped
This feature automatically adjusts the driver’s seat, steering wheel and out-
side rear view mirrors to suit your preferences.
Driving position memory
1
2
3
4
1
2
3
Page 184 of 640

1843-3. Adjusting the seats
RC300h_EE(OM24740E)
■To stop the position recall operation part-way through
Perform any of the following:
●Press the “SET” button.
●Press button “1”, “2” or “3”.
●Operate any of the seat adjustment switches (only cancels seat position recall).
●Operate the tilt and telescopic steering control switch (only cancels steering wheel position recall).
■Seat positions that can be memorized ( P. 178)
The adjusted positions other than the position adjusted by lumbar support switch can be recorded.
■Operating the driving position memory after turning the power switch off
Recorded seat positions can be activated up to 180 seconds after the driver's door is opened and another 60 seconds after it is closed again.
■In order to correctly use the driving position memory function
If a seat position is already in the furthest possible position and the seat is operated in the same direction, the recorded position may be slightly different when it is recalled.
Each electronic key (including a card key) can be registered to recall your pre-
ferred driving position.
■Registering procedure
Record your driving position to button “1”, “2” or “3” before performing the
following:
Carry only the key you want to register, and then close the driver’s door.
If 2 or more keys are in the vehicle, the driving position cannot be recorded
properly.
Check that the shift lever is in P.
Turn the power switch to ON mode.
Recall the driving position that you want to record.
While pressing the recalled but-
ton, press and hold the door lock
switch (either lock or unlock) until
the buzzer sounds.
If the button could not be registered,
the buzzer sounds continuously for approximately 3 seconds.
Memory recall function
1
2
3
4
Page 185 of 640

1853-3. Adjusting the seats
3
Operation of each component
RC300h_EE(OM24740E)
■Recall procedure
Carry the electronic key that has been registered to the driving position,
and then unlock and open the driver’s door using the smart entry & start
system or wireless remote control.
The driving position will move to the recorded position (not including the steering wheel).
If the driving position is in a position that has already been recorded, the seat and
outside rear view mirrors will not move.
Turn the power switch to ACCESSORY mode or ON mode.
The steering wheel will move to the recorded position.
■Cancelation procedure
Carry only the key you want to cancel and then close the driver’s door.
If 2 or more keys are in the vehicle, the driving position cannot be canceled
properly.
Turn the power switch to ON mode.
While pressing the “SET” button, press and hold the door lock switch
(either lock or unlock) until the buzzer sounds twice.
If the button could not be canceled, the buzzer sounds continuously for approxi-
mately 3 seconds.
■Recalling the driving position us ing the memory recall function
●Different driving positions can be registered for each electronic key. Therefore, the driving position that is recalled may be different depending on the key being carried.
●If a door other than the driver’s door is unlocked with the smart entry & start system, the
driving position cannot be reca lled. In this case, press the driving position button which has been set.
■Customization
The unlock door settings of the memory recall function can be changed. (Customizable features: P. 607)
WARNING
■Seat adjustment caution
Take care during seat adjustment so that the seat does not strike the rear passenger or
squeeze your body against the steering wheel.
1
2
1
2
Page 186 of 640
1863-3. Adjusting the seats
RC300h_EE(OM24740E)
◆Vertical adjustment
Up
Pull the head restraints up.
Down
Push the head restraint down while pressing the lock release button.
◆Horizontal adjustment
The position of the head restraint
can be adjusted forward in 4 stages.
If the head restraint is pulled forward
from the foremost position, it will return to the rearmost position.
Up
Pull the head restraints up.
Down
Push the head restraint down whilepressing the lock release button.
Head restraints
Head restraints are provided for all seats.
Front seats
Lock release button
1
2
Rear seats
Lock release button
1
2
Page 187 of 640
1873-3. Adjusting the seats
3
Operation of each component
RC300h_EE(OM24740E)
■Removing the head restraints
■Installing the head restraints
Front seats
Rear seats
Pull the head restraint up while pressing the lock release button.
If the head restraint to uches the ceiling, making the removal difficult, change the seat height orangle. ( P. 178, 181)
Align the head restraint with the installation
holes and push it down to the lock position. Press and hold the lock release button whenlowering the head restraint.
Align the head restraint with the installation
holes and push it down to the lowest lock posi- tion while pressing the lock release button.
Lock release button
Lock release button
Lock release button
Page 191 of 640
1913-4. Adjusting the steering wheel and mirrors
3
Operation of each component
RC300h_EE(OM24740E)
The height of the rear view mirror can be adjusted to suit your driving posture.
Adjust the height of the rear view mir-
ror by moving it up and down.
Responding to the level of brightness of the headlights of vehicles behind, the
reflected light is automatically reduced.
Changing automatic anti-glare func-
tion mode
ON/OFF
When the automatic anti-glare function is in ON mode, the indicator illuminates.
The function will set to ON mode each time the power switch is turned to ON
mode. Pressing the button turns the function toOFF mode. (The indicator also turns
off.)
Inside rear view mirror
The rear view mirror’s position can be adjusted to enable sufficient confirma-
tion of the rear view.
Adjusting the height of rear view mirror
Anti-glare function
Indicator
Page 227 of 640

2274-2. Driving procedures
4
Driving
RC300h_EE(OM24740E)
■If the shift lever cannot be shifted from P
First, check whether the brake pedal is being depressed.
If the shift lever cannot be shifted with your foot on the brake pedal, there may be a prob-
lem with the shift lock system. Have the vehicle inspected by any authorized Lexus dealer or repairer, or another duly qualifie d and equipped professional immediately. The following steps may be used as an emerge ncy measure to ensure that the shift lever
can be shifted.
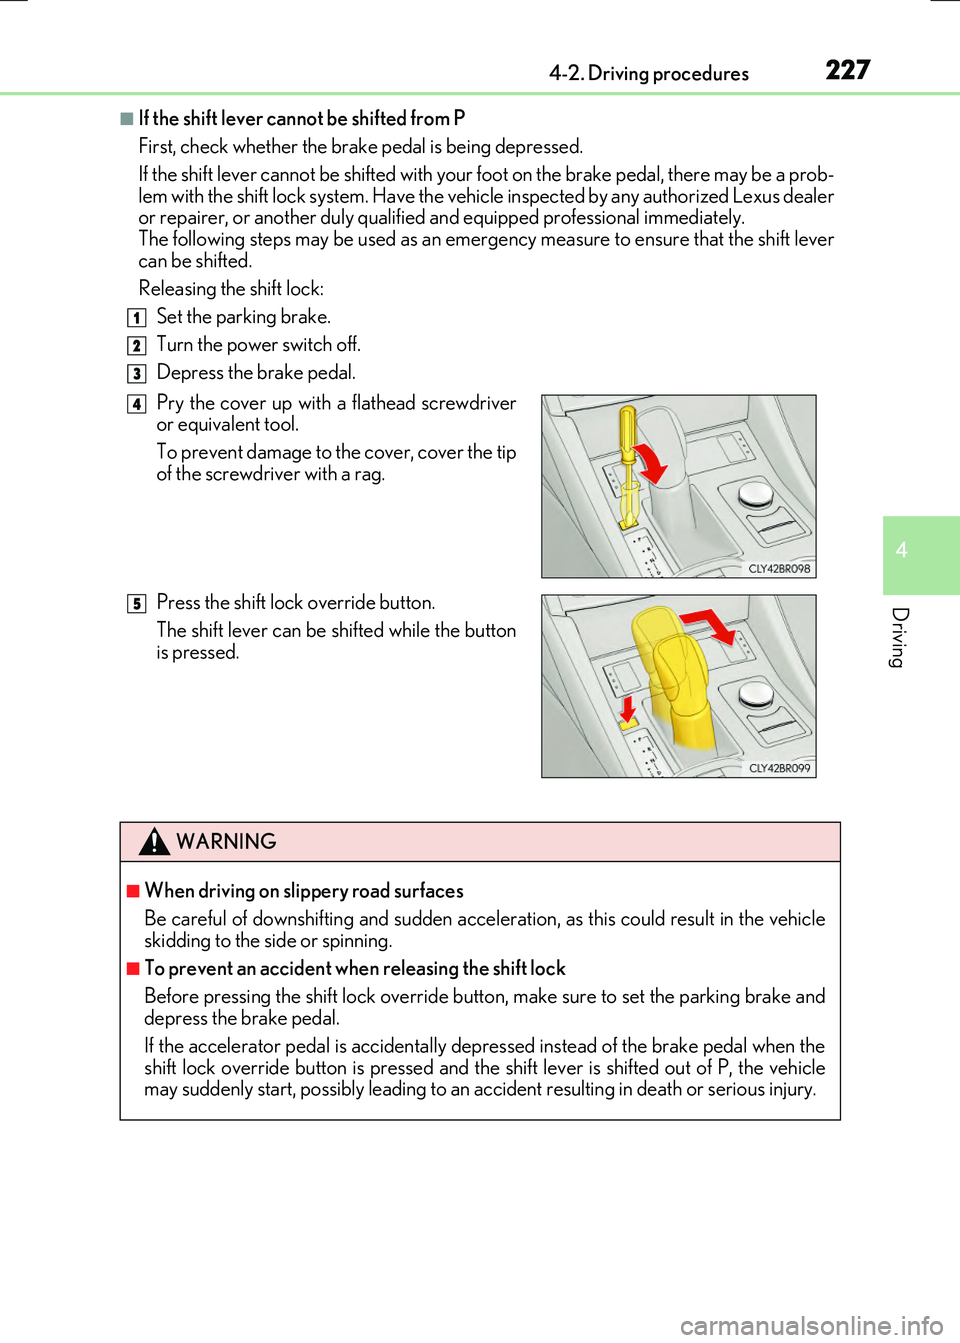
Releasing the shift lock:
Set the parking brake.
Turn the power switch off.
Depress the brake pedal.
Pry the cover up with a flathead screwdriver or equivalent tool.
To prevent damage to the cover, cover the tip
of the screwdriver with a rag.
Press the shift lock override button.
The shift lever can be shifted while the button is pressed.
1
2
3
4
5
WARNING
■When driving on slippery road surfaces
Be careful of downshifting and sudden acceler ation, as this could result in the vehicle skidding to the side or spinning.
■To prevent an accident wh en releasing the shift lock
Before pressing the shift lock override butt on, make sure to set the parking brake and depress the brake pedal.
If the accelerator pedal is accidentally depressed instead of the brake pedal when the shift lock override button is pressed and the shift lever is shifted out of P, the vehicle may suddenly start, possibly leading to an accident resulting in death or serious injury.