Page 6 of 724

TABLE OF CONTENTS6
6-4. Using the other interior features
Other interior features ............ 455 • Sun visors ................................ 455
• Vanity mirrors ....................... 455
• Clock ........................................ 456
• Power outlet .......................... 456
• Armrest.................................... 457
•Trunk storage extension ................................. 458
• Assist grips ............................. 459
• Coat hooks............................. 459
Garage door opener ............... 460
Compass ....................................... 468
LEXUS Enform Safety Connect.......................................472
LEXUS Enform Remote ..........477
LEXUS Enform Service Connect...................................... 478
7-1. Maintenance and care Cleaning and protecting the vehicle exterior ................480
Cleaning and protecting the vehicle interior.................. 485
7-2. Maintenance Maintenance requirements ............................488
General mainte nance................491
Emission inspection and maintenance (I/M)
programs.................................... 494 7-3. Do-it-yourself maintenance
Do-it-yourself service precautions ............................... 495
Hood ............................................... 497
Positioning a floor jack ............ 498
Engine compartment ................ 501
Tires ................................................... 517
Tire inflation pressure ................531
Wheels ........................................... 534
Air conditio ning filter ............... 536
Electronic key battery..............538
Checking and replacing fuses.............................................. 540
Light bulbs .................................... 543
8-1. Essential information Emergency flashers .................. 554
If your vehicle has to be stopped in an
emergency ................................ 555
7Maintenance and care
8When trouble arises
Page 354 of 724

3545-2. Setup
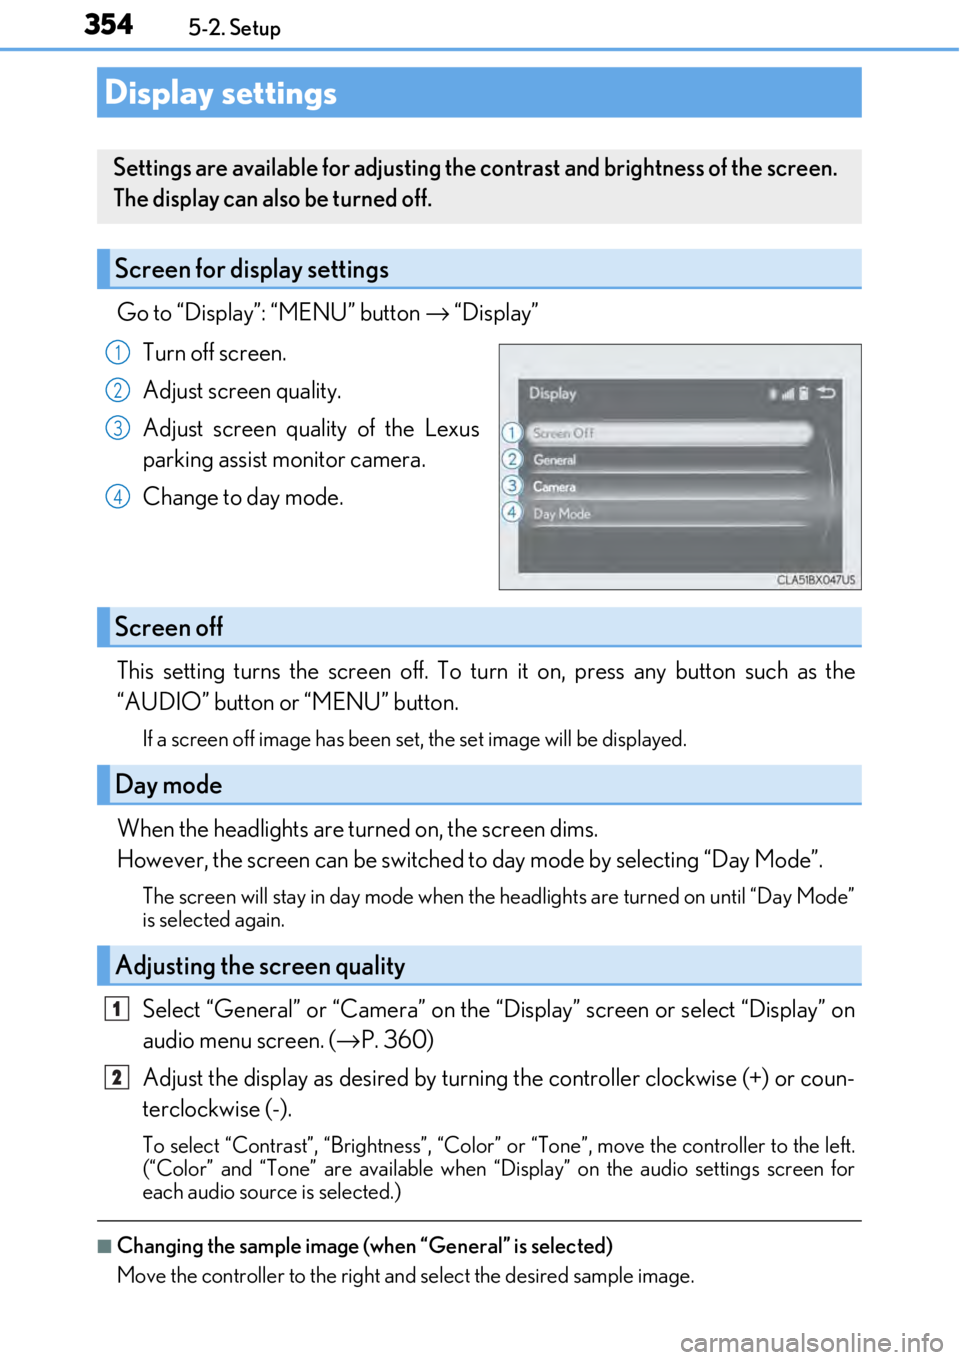
Go to “Display”: “MENU” button → “Display”
Turn off screen.
Adjust screen quality.
Adjust screen quality of the Lexus
parking assist monitor camera.
Change to day mode.
This setting turns the screen off. To tu rn it on, press any button such as the
“AUDIO” button or “MENU” button.
If a screen off image has been se t, the set image will be displayed.
When the headlights are turned on, the screen dims.
However, the screen can be switched to day mode by selecting “Day Mode”.
The screen will stay in day mode when the headlights are turned on until “Day Mode”
is selected again.
Select “General” or “Camera” on the “D isplay” screen or select “Display” on
audio menu screen. ( →P. 360)
Adjust the display as desired by turning the controller clockwise (+) or coun-
terclockwise (-).
To select “Contrast”, “Brightness”, “Color” or “Tone”, move the controller to the left.
(“Color” and “Tone” are available when “Display” on the audio settings screen for
each audio source is selected.)
■Changing the sample image (when “General” is selected)
Move the controller to the right and select the desired sample image.
Display settings
Settings are available for adjusting the contrast and brightness of the screen.
The display can also be turned off.
Screen for display settings
1
2
3
4
Screen off
Day mode
Adjusting the screen quality
1
2
Page 433 of 724

433
Interior features6
6-1. Using the air conditioning system
Automatic air conditioning system ..........................................434
Heated steering wheel/ seat heaters/
seat ventilators .........................445
6-2. Using the interior lights Interior lights list......................... 448• Interior lights ..........................449
• Personal lights ...................... 450
6-3. Using the storage features List of storage features.............. 451• Glove box ...............................452
• Console box ...........................452
• Cup holders............................453
Trunk features..............................454 6-4. Using the other interior
features
Other interior features ............455 • Sun visors ................................455
• Vanity mirrors .......................455
• Clock ........................................ 456
• Power outlet........................... 456
• Armrest .................................... 457
•Trunk storage extension .................................458
• Assist grips.............................. 459
• Coat hooks ............................. 459
Garage door opener ...............460
Compass .......................................468
LEXUS Enform Safety Connect ...................................... 472
LEXUS Enform Remote ......... 477
LEXUS Enform Service Connect ...................................... 478
Page 456 of 724
4566-4. Using the other interior features
The clock can be adjusted.Pressing and holding will move the
clock hands backward.
Pressing and holding will move the
clock hands forward.
Please use as a power supply for electronic goods that use less than 12 VDC/10
A (power consumption of 120 W).
Open the lid.
Clock
1
2
Power outlet
Page 506 of 724
5067-3. Do-it-yourself maintenance
■Adding engine oil
If the oil level is below or near the low level mark, add engine oil of the same
type as that already in the engine.
Make sure to check the oil type and prepare the items needed before adding
oil.
Remove the oil filler cap by turning it counterclockwise.
Add engine oil slowly, checking the dipstick.
Install the oil filler cap by turning it clockwise.
RC350/RC300RC200t
RC F
Engine oil selection →P. 645, 647
Oil quantity (Low → Full) 1.6 qt. (1.5 L, 1.3 Imp. qt.)
Items Clean funnel
1
2
3
Page 545 of 724
5457-3. Do-it-yourself maintenance
7
Maintenance and care
■Front turn signal lights (bulb type)To ensure enough space to per-
form work, turn the steering
wheel to move the front wheel
toward the bulb to be replaced.
Remove the fender liner clip.
To remove the clip , turn the head of
the clip to unlock it, then pull it out.
Disengage the fender liner from
the clamp then pull it back.
Turn the bulb base counterclock-
wise.
Replacing light bulbs
1
2
3
Page 546 of 724
5467-3. Do-it-yourself maintenance
Remove the light bulb.
Install a new light bulb then install
the bulb base to the light unit by
inserting it and turning the bulb
base clockwise.
After installing the light bulb, turn on
the front turn signal light to visually
check that there is no light leaking
from the bulb base.
Engage the clamp to reinstall the
fender liner and install the clip.
Insert the clip with its groove aligned
vertically to install it.
4
5
6
Page 547 of 724
5477-3. Do-it-yourself maintenance
7
Maintenance and care
■Rear turn signal lightsOpen the trunk, remove the 2
covers and 2 screws and pull the
light unit toward the rear of the
vehicle to remove it.
When removing the cover, wrap the
tip of the screwdriver with tape to
protect the vehicle from damage.
Turn the bulb base counterclock-
wise.
Remove the light bulb.
Install a new light bulb then install
the bulb base to the light unit by
inserting it and turning the bulb
base clockwise.
After installing the light bulb, turn on
the rear turn signal light to visually
check that there is no light leaking
from the bulb base.
1
2
3
4