Page 282 of 644

280
GX 460 _O M_ OM6 0F 6 8U _(U )4-5. Using the driving support systems
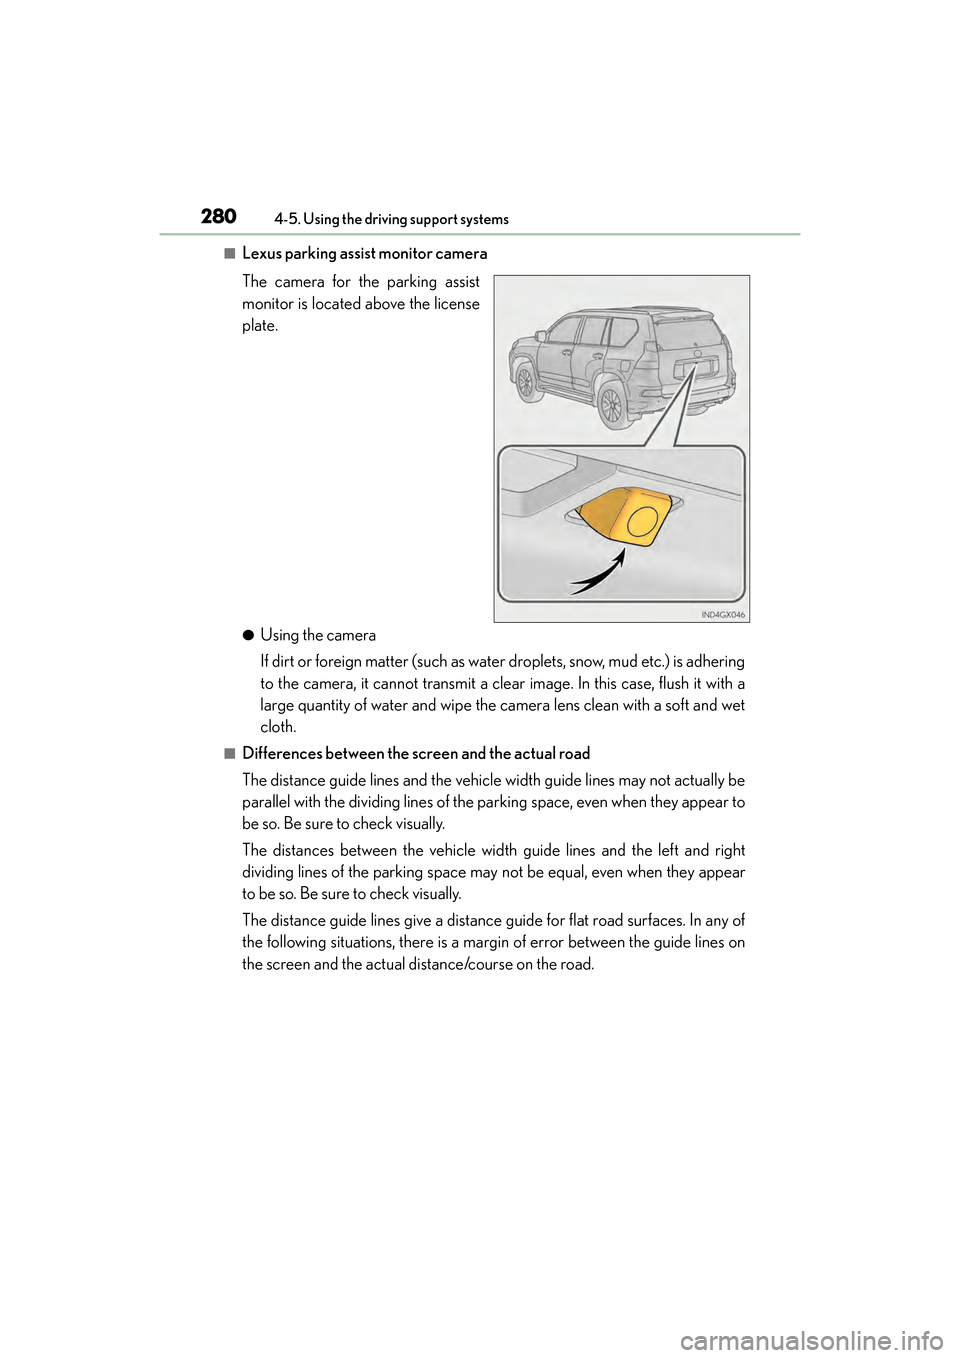
■Lexus parking assist monitor camera
The camera for the parking assist
monitor is located above the license
plate.
●Using the camera
If dirt or foreign matter (such as water droplets, snow, mud etc.) is adhering
to the camera, it cannot transmit a clear image. In this case, flush it with a
large quantity of water and wipe the camera lens clean with a soft and wet
cloth.
■Differences between the screen and the actual road
The distance guide lines and the vehicle width guide lines may not actually be
parallel with the dividing lines of the parking space, even when they appear to
be so. Be sure to check visually.
The distances between the vehicle width guide lines and the left and right
dividing lines of the parking space may not be equal, even when they appear
to be so. Be sure to check visually.
The distance guide lines give a distance
guide for flat road surfaces. In any of
the following situations, there is a margin of error between the guide lines on
the screen and the actual distance/course on the road.
GX460_OM_OM60F68U_(U).book Page 280 Wednesday, June 8, 2016 6:37 PM
Page 289 of 644

GX 460 _O M_ OM6 0F 6 8U _(U )
2874-5. Using the driving support systems
4
Driving
CAUTION
■When using the perpendicular parking assist screen
Estimated course line display mode: If the steering wheel is straight and the vehicle
width guide lines and the estimated course lines are not in alignment, have the vehicle
inspected by your Lexus dealer.
■When using the parallel parking assist screen
●Do not use the system if the display is incorrect due to an uneven (curvy/hilly) road or
a non-straight road.
●Make sure to operate the steering wheel only when the vehicle is stopped.
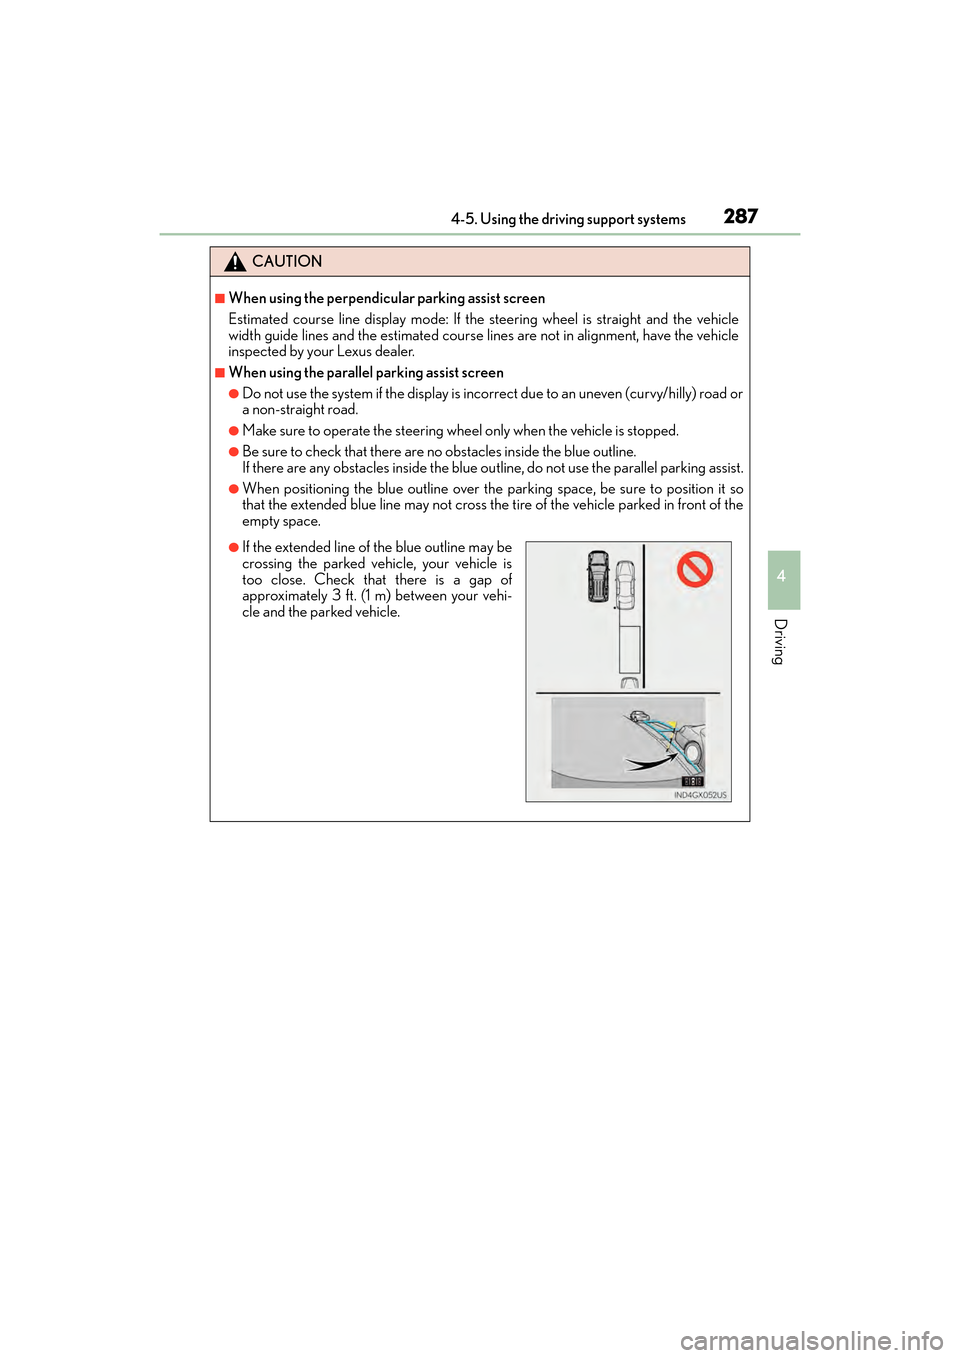
●Be sure to check that there are no obstacles inside the blue outline.
If there are any obstacles inside the blue ou tline, do not use the parallel parking assist.
●When positioning the blue outline over the parking space, be sure to position it so
that the extended blue line may not cross the tire of the vehicle parked in front of the
empty space.
●If the extended line of the blue outline may be
crossing the parked vehicle, your vehicle is
too close. Check that there is a gap of
approximately 3 ft. (1 m) between your vehi-
cle and the parked vehicle.
GX460_OM_OM60F68U_(U).book Page 287 Wednesday, June 8, 2016 6:37 PM
Page 296 of 644
294
GX 460 _O M_ OM6 0F 6 8U _(U )4-5. Using the driving support systems
●Simultaneous display
Front wheel contact point
Shows the position of the vehicle’s
front tire.
Vehicle front edge line
Shows the position of the vehicle’s
leading edge.
Vehicle width line (blue)
Indicates the width of the vehicle
including the outside rear view mir-
ror.
Projected course line (yellow)
Displays a rough guide of the vehicle path that moves according to the steering
wheel position. Displayed along with the minimum projected turning circle.
Minimum projected turning circle (blue)
Displays the smallest turning circle projected by the system if the steering wheel is
turned to full lock. Displayed when the steering wheel is turned to the right (further
than 90 ° from straight ahead).
Rear wheel contact point
Shows the position of the vehicle’s rear tire.
Using the side monitor
1
2
3
4
5
6
GX460_OM_OM60F68U_(U).book Page 294 Wednesday, June 8, 2016 6:37 PM
Page 297 of 644

GX 460 _O M_ OM6 0F 6 8U _(U )
2954-5. Using the driving support systems
4
Driving
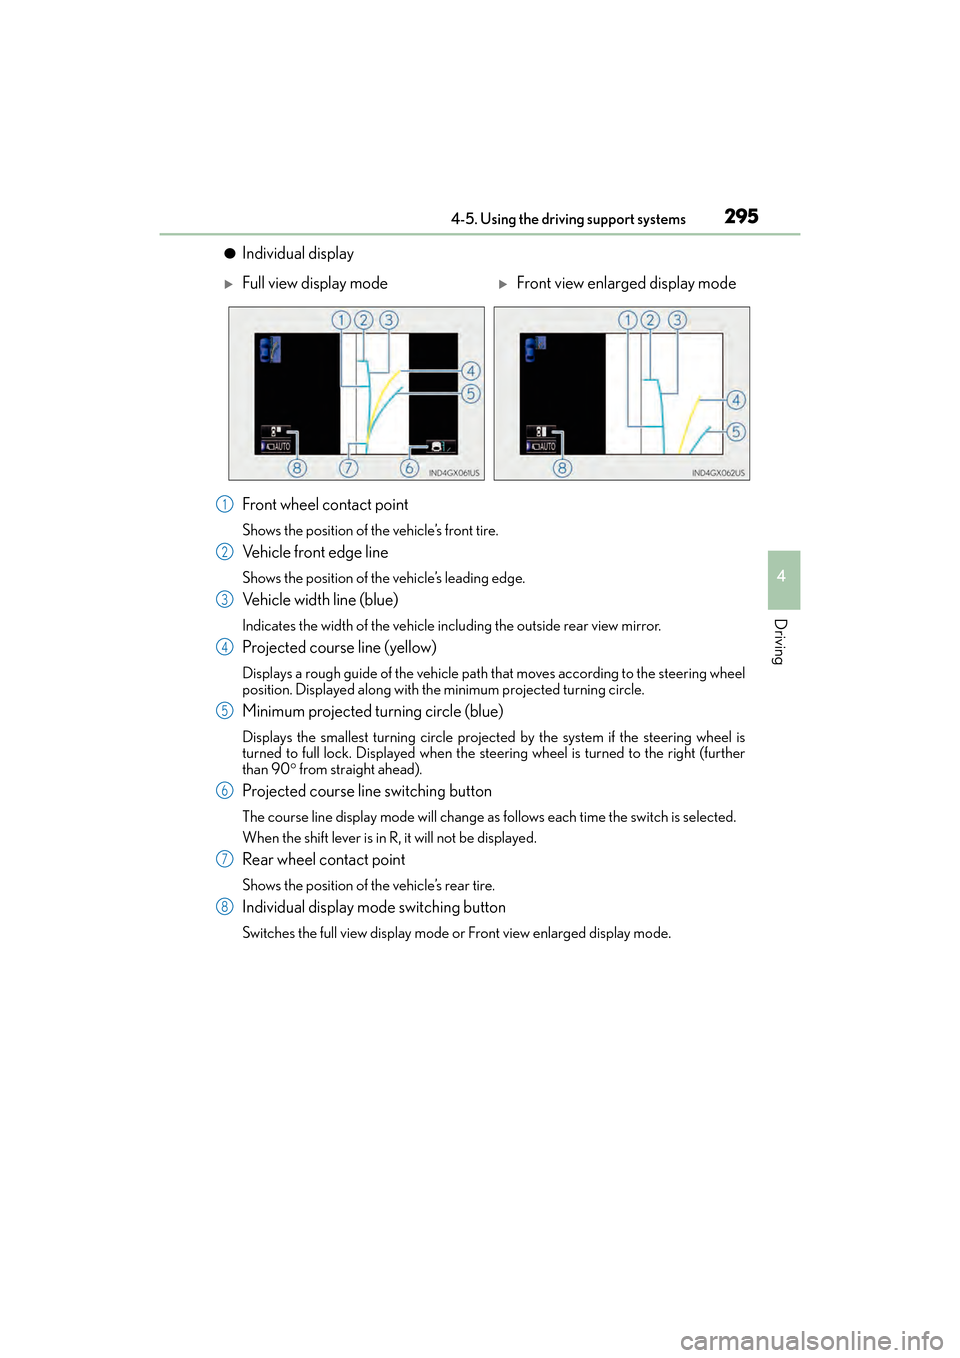
●Individual display
Front wheel contact point
Shows the position of the vehicle’s front tire.
Vehicle front edge line
Shows the position of the vehicle’s leading edge.
Vehicle width line (blue)
Indicates the width of the vehicle including the outside rear view mirror.
Projected course line (yellow)
Displays a rough guide of the vehicle path that moves according to the steering wheel
position. Displayed along with the minimum projected turning circle.
Minimum projected turning circle (blue)
Displays the smallest turning circle projected by the system if the steering wheel is
turned to full lock. Displayed when the steer ing wheel is turned to the right (further
than 90 ° from straight ahead).
Projected course line switching button
The course line display mode will change as follows each time the switch is selected.
When the shift lever is in R, it will not be displayed.
Rear wheel contact point
Shows the position of the vehicle’s rear tire.
Individual display mode switching button
Switches the full view display mode or Front view enlarged display mode.
�XFull view display mode�XFront view enlarged display mode
1
2
3
4
5
6
7
8
GX460_OM_OM60F68U_(U).book Page 295 Wednesday, June 8, 2016 6:37 PM
Page 298 of 644
296
GX 460 _O M_ OM6 0F 6 8U _(U )4-5. Using the driving support systems
■Changing the course line display mode
●No course lines mode
Vehicle width line is displayed.
●Turning course line display mode
The projected course line is
added to the minimum projected
turning circle mode.
●Minimum projected turning circle display mode
The minimum projected turning
circle line is added to the no
course lines mode.
GX460_OM_OM60F68U_(U).book Page 296 Wednesday, June 8, 2016 6:37 PM
Page 300 of 644
298
GX 460 _O M_ OM6 0F 6 8U _(U )4-5. Using the driving support systems
■Using the vehicle width line & course line
●Vehicle width line
Use the vehicle width line to
check the vehicle’s distance from
objects such as curbstones etc.
As shown in the illustration, be
sure that the vehicle width line
does not overlap the object. If you
also move the vehicle so that the
vehicle width line and the object
are parallel, you can park parallel
to the object
GX460_OM_OM60F68U_(U).book Page 298 Wednesday, June 8, 2016 6:37 PM
Page 320 of 644
318
GX 460 _O M_ OM6 0F 6 8U _(U )4-5. Using the driving support systems
■Side-front simultaneous display monitor
The image from both side cameras is
displayed. Use this monitor to help
check the area on both sides of the
vehicle at the same time, and to
check for objects near the tires or
the sides of the vehicle. Guidelines
showing an image of the vehicle
width and the position of the front
tires are displayed.
■Side-rear simultaneous display monitor
The image from both side cameras is
displayed. Use this monitor to help
check the area on both sides of the
vehicle at the same time, and to
check for objects near the tires or
the sides of the vehicle. Guidelines
showing an image of the vehicle
width and the position of the rear
tires are displayed.
■Rear monitor (Lexus parking assist monitor)
The image from the rear camera is
displayed. (
→P. 263)
GX460_OM_OM60F68U_(U).book Page 318 Wednesday, June 8, 2016 6:37 PM
Page 322 of 644

320
GX 460 _O M_ OM6 0F 6 8U _(U )4-5. Using the driving support systems
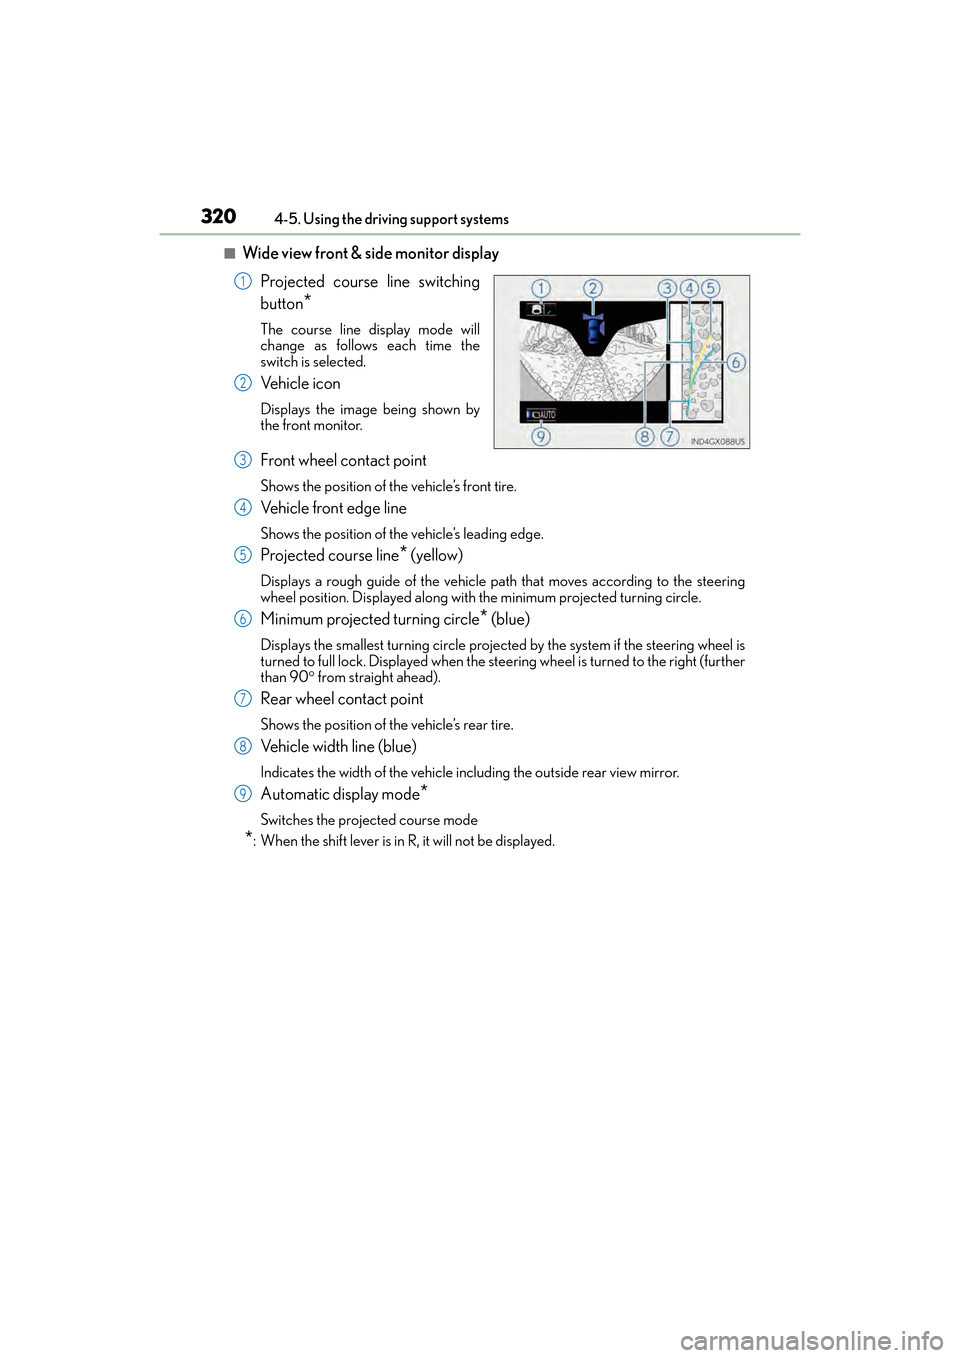
■Wide view front & side monitor display
Projected course line switching
button
*
The course line display mode will
change as follows each time the
switch is selected.
Ve h i c l e i c o n
Displays the image being shown by
the front monitor.
Front wheel contact point
Shows the position of the vehicle’s front tire.
Vehicle front edge line
Shows the position of the vehicle’s leading edge.
Projected course line* (yellow)
Displays a rough guide of the vehicle path that moves according to the steering
wheel position. Displayed along with the minimum projected turning circle.
Minimum projected turning circle* (blue)
Displays the smallest turning circle projected by the system if the steering wheel is
turned to full lock. Displayed when the steering wheel is turned to the right (further
than 90 ° from straight ahead).
Rear wheel contact point
Shows the position of the vehicle’s rear tire.
Vehicle width line (blue)
Indicates the width of the vehicle including the outside rear view mirror.
Automatic display mode*
Switches the projected course mode
*: When the shift lever is in R, it will not be displayed.
1
2
3
4
5
6
7
8
9
GX460_OM_OM60F68U_(U).book Page 320 Wednesday, June 8, 2016 6:37 PM