2017 Lexus ES300h Quick Guide
-
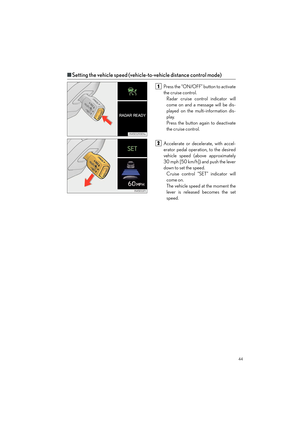
 1
1 -
 2
2 -
 3
3 -
 4
4 -
 5
5 -
 6
6 -
 7
7 -
 8
8 -
 9
9 -
 10
10 -
 11
11 -
 12
12 -
 13
13 -
 14
14 -
 15
15 -
 16
16 -
 17
17 -
 18
18 -
 19
19 -
 20
20 -
 21
21 -
 22
22 -
 23
23 -
 24
24 -
 25
25 -
 26
26 -
 27
27 -
 28
28 -
 29
29 -
 30
30 -
 31
31 -
 32
32 -
 33
33 -
 34
34 -
 35
35 -
 36
36 -
 37
37 -
 38
38 -
 39
39 -
 40
40 -
 41
41 -
 42
42 -
 43
43 -
 44
44 -
 45
45 -
 46
46 -
 47
47 -
 48
48 -
 49
49 -
 50
50 -
 51
51 -
 52
52 -
 53
53 -
 54
54 -
 55
55 -
 56
56 -
 57
57 -
 58
58 -
 59
59 -
 60
60 -
 61
61 -
 62
62 -
 63
63 -
 64
64 -
 65
65 -
 66
66 -
 67
67 -
 68
68 -
 69
69 -
 70
70 -
 71
71 -
 72
72 -
 73
73 -
 74
74 -
 75
75 -
 76
76 -
 77
77 -
 78
78 -
 79
79 -
 80
80 -
 81
81 -
 82
82 -
 83
83 -
 84
84 -
 85
85 -
 86
86 -
 87
87 -
 88
88 -
 89
89 -
 90
90 -
 91
91 -
 92
92 -
 93
93 -
 94
94 -
 95
95 -
 96
96 -
 97
97 -
 98
98 -
 99
99 -
 100
100 -
 101
101 -
 102
102 -
 103
103 -
 104
104 -
 105
105 -
 106
106 -
 107
107

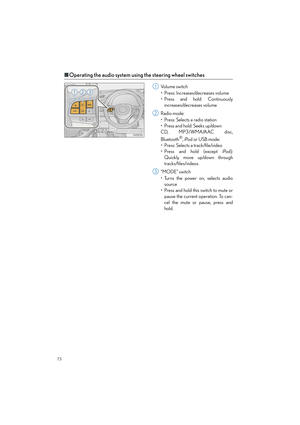
Lexus Display Audio screen
Press the “MENU” button on the Lexus Display Audio controller, then select “Info” on the
“Menu” screen, and then select “Fuel Consump")

Lexus Display Audio screen
Press the “MENU” button on the Lexus Display Audio controller, then select “Info” on the
“Menu” screen, and then select “Fuel Consump")

Keys
■Electronic key
Smart access system with push-button start
(→ P.1 9 , 2 6 )
Wireless remote control (→ P.1 8 )
■Mechanical key
To take out the mechanical key, p")

Smart Access System with Push-button Start
■Entering and exiting the vehicle
Grip the driver’s door handle to unlock
the door. Grip the passenger’s door
handle to unloc")

Theft Deterrent System
■Immobilizer system
The indicator light flashes after the power
switch has been turned off to indicate that
the system is operating.
The indicator li")

Front Seats
■Adjustment procedure
Seat position adjustment switch
Seatback angle adjustment switch
Seat cushion (front) angle adjustment
switch Vertical height adjustment s")

Head Restraints
■Front seats
Vertical adjustment
Up
Pull the head restraints up.
Down
Push the head restraint down while
pressing the lock release button.
Horizontal adjust")

Driving Position Memory (if equipped)
■Driving position memory
■
Recording procedure
Check that the shift lever is in P.
Turn the power switch to ON mode.
Adjust the driv")