Page 489 of 595

821
Maintenance
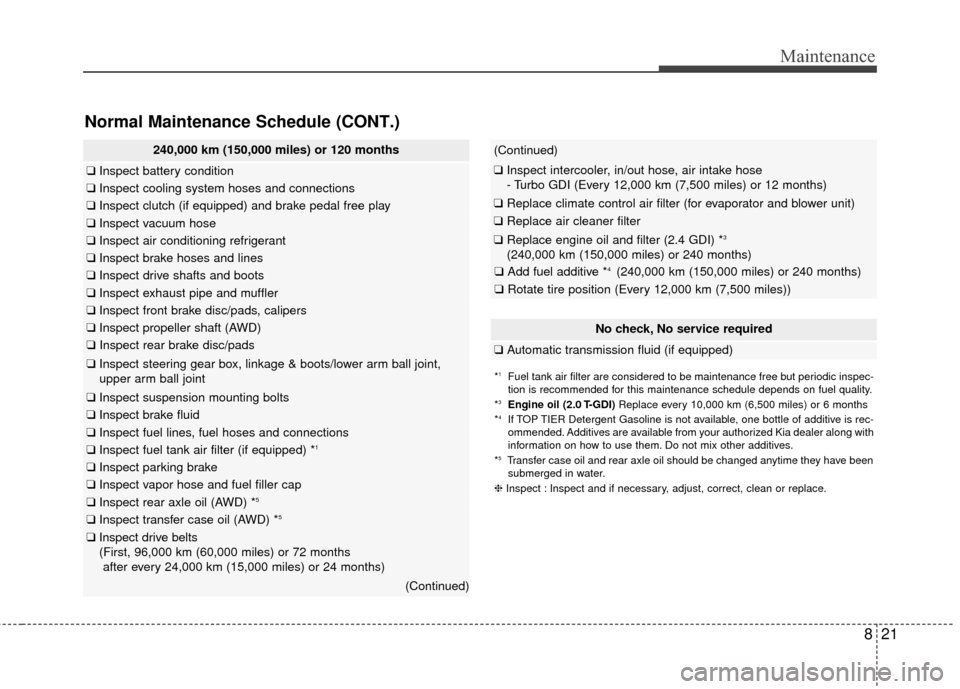
Normal Maintenance Schedule (CONT.)
240,000 km (150,000 miles) or 120 months
❑Inspect battery condition
❑Inspect cooling system hoses and connections
❑Inspect clutch (if equipped) and brake pedal free play
❑Inspect vacuum hose
❑Inspect air conditioning refrigerant
❑Inspect brake hoses and lines
❑Inspect drive shafts and boots
❑Inspect exhaust pipe and muffler
❑Inspect front brake disc/pads, calipers
❑Inspect propeller shaft (AWD)
❑Inspect rear brake disc/pads
❑Inspect steering gear box, linkage & boots/lower arm ball joint,
upper arm ball joint
❑ Inspect suspension mounting bolts
❑Inspect brake fluid
❑Inspect fuel lines, fuel hoses and connections
❑Inspect fuel tank air filter (if equipped) *1
❑Inspect parking brake
❑Inspect vapor hose and fuel filler cap
❑Inspect rear axle oil (AWD) *5
❑Inspect transfer case oil (AWD) *5
❑Inspect drive belts
(First, 96,000 km (60,000 miles) or 72 months
after every 24,000 km (15,000 miles) or 24 months)
(Continued)
(Continued)
❑ Inspect intercooler, in/out hose, air intake hose
- Turbo GDI (Every 12,000 km (7,500 miles) or 12 months)
❑ Replace climate control air filter (for evaporator and blower unit)
❑Replace air cleaner filter
❑Replace engine oil and filter (2.4 GDI) *3
(240,000 km (150,000 miles) or 240 months)
❑ Add fuel additive *4 (240,000 km (150,000 miles) or 240 months)
❑Rotate tire position (Every 12,000 km (7,500 miles))
No check, No service required
❑Automatic transmission fluid (if equipped)
*1Fuel tank air filter are considered to be maintenance free but periodic inspec-
tion is recommended for this maintenance schedule depends on fuel quality.
*
3Engine oil (2.0 T-GDI) Replace every 10,000 km (6,500 miles) or 6 months
*4If TOP TIER Detergent Gasoline is not available, one bottle of additive is rec-
ommended. Additives are available from your authorized Kia dealer along with
information on how to use them. Do not mix other additives.
*
5Transfer case oil and rear axle oil should be changed anytime they have been submerged in water.
❈ Inspect : Inspect and if necessary, adjust, correct, clean or replace.
Page 490 of 595
Maintenance
22
8
Maintenance Under Severe Usage Conditions
The following items must be serviced more frequently on cars normally used under severe driving conditions. Refer
to the chart below for the appropriate maintenance intervals.
R : Replace I : Inspect and, after inspection, clean, adjust, repair or replace if neces\
sary
MAINTENANCE ITEMMAINTENANCE
OPERATIONMAINTENANCE INTERVALSDRIVING CONDITION
Engine oil and filter (2.4 GDI)REvery 6,000 km (3,750 miles) or 6 monthsA, B, C, D, E, F, G,
H, I, J, K
Engine oil and filter (2.0 T-GDI)REvery 5,000 km (3,000 miles) or 3 months
Air cleaner filterRMore frequentlyC, E
Spark plugsRMore frequentlyB, H
Automatic transmission fluidREvery 96,000 km (60,000 miles)A, C, E, F, G, I
Front brake disc/pads, calipersIMore frequentlyC, D, G, H
Rear brake disc/padsIMore frequentlyC, D, G, F
Parking brakeIMore frequentlyC, D, G, H
Page 512 of 595

Maintenance
44
8
BATTERY
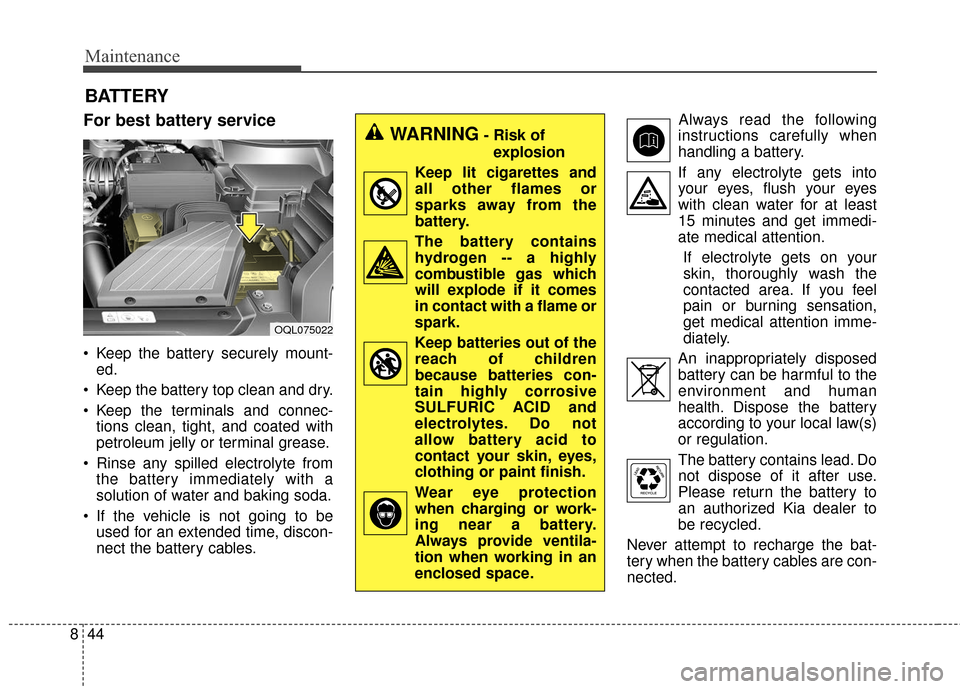
For best battery service
Keep the battery securely mount-
ed.
Keep the battery top clean and dry.
Keep the terminals and connec- tions clean, tight, and coated with
petroleum jelly or terminal grease.
Rinse any spilled electrolyte from the battery immediately with a
solution of water and baking soda.
If the vehicle is not going to be used for an extended time, discon-
nect the battery cables. Always read the following
instructions carefully when
handling a battery.
If any electrolyte gets into your eyes, flush your eyes
with clean water for at least
15 minutes and get immedi-
ate medical attention.
If electrolyte gets on your
skin, thoroughly wash the
contacted area. If you feel
pain or burning sensation,
get medical attention imme-
diately.
An inappropriately disposed battery can be harmful to the
environment and human
health. Dispose the battery
according to your local law(s)
or regulation.
The battery contains lead. Do
not dispose of it after use.
Please return the battery to
an authorized Kia dealer to
be recycled.
Never attempt to recharge the bat-
tery when the battery cables are con-
nected.
WARNING- Risk of explosion
Keep lit cigarettes and
all other flames or
sparks away from the
battery.
The battery contains hydrogen -- a highly
combustible gas which
will explode if it comes
in contact with a flame or
spark.
Keep batteries out of the reach of children
because batteries con-
tain highly corrosive
SULFURIC ACID and
electrolytes. Do not
allow battery acid to
contact your skin, eyes,
clothing or paint finish.
Wear eye protection when charging or work-
ing near a battery.
Always provide ventila-
tion when working in an
enclosed space.
OQL075022
Page 523 of 595

855
Maintenance
Tread wear
The tread wear grade is a compara-
tive rating based on the wear rate of
the tire when tested under controlled
conditions on a specified govern-
ment test course. For example, a tire
graded 150 would wear one-and-a-
half times (1½) as well on the gov-
ernment course as a tire graded 100.
The relative performance of tires
depends upon the actual conditions
of their use, however, and may
depart significantly from the norm
due to variations in driving habits,
service practices and differences in
road characteristics and climate.Tires degrade over time, even when
they are not being used. Regardless
of the remaining tread, we recom-
mend that tires be replaced after
approximately six (6) years of normal
service. Heat caused by hot climates
or frequent high loading conditions
can accelerate the aging process.
These grades are molded on the
side-walls of passenger vehicle tires.
The tires available as standard or
optional equipment on your vehicles
may vary with respect to grade.
Traction - AA, A, B & C
The traction grades, from highest to
lowest, are AA, A, B and C. Those
grades represent the tires ability to
stop on wet pavement as measured
under controlled conditions on spec-
ified government test surfaces of
asphalt and concrete. A tire marked
C may have poor traction perform-
ance.
The traction grade assigned to this
tire is based on straight-ahead brak-
ing traction tests, and does not
include acceleration, cornering,
hydroplaning, or peak traction char-
acteristics.
Page 555 of 595
887
Maintenance
Stop and tail lamp bulb
replacement
1. Open the tailgate.
2. Open the service cover.
3. Loosen the light assembly retain-ing screws with a cross-tip screw-
driver. 4. Remove the rear combination
lamp assembly from the body of
the vehicle.
5. Disconnect the rear combination lamp connector. 6. Remove the socket from the
assembly by turning the socket
counterclockwise until the tabs on
the socket align with the slots on
the assembly.
7. Remove the bulb from the socket by pressing it in and rotating it counter-
clockwise until the tabs on the bulb
align with the slots in the socket.
Pull the bulb out of the socket.
8. Insert a new bulb by inserting it into the socket and rotating it until
it locks into place.
OQL075059
OQL075060OQL075061
Page 556 of 595
Maintenance
88
8
9. Install the socket in the assembly
by aligning the tabs on the socket
with the slots in the assembly.
Push the socket into the assembly
and turn the socket clockwise.
10. Install the rear combination lamp assembly to the body of the vehi-
cle.
11. Install the service cover.Tail lamp (inside) bulb replace-
ment
1. Open the tailgate.
2. Remove the service cover. 3. Remove the socket from the
assembly by turning the socket
counterclockwise until the tabs on
the socket align with the slots on
the assembly.
4. Remove the bulb from the socket by pressing it in and rotating it
counter-clockwise until the tabs on
the bulb align with the slots in the
socket. Pull the bulb out of the
socket.
5. Insert a new bulb by inserting it into the socket and rotating it until
it locks into place.
OQL075062
OQL075063
Page 557 of 595
889
Maintenance
6. Install the socket in the assemblyby aligning the tabs on the socket
with the slots in the assembly.
Push the socket into the assembly
and turn the socket clockwise.
7. Install the service cover by putting it into the service hole.Stop and tail lamp (LED type)
bulb replacement
If the stop and tail lamp (LED) does
not operate, we recommend that you
checked an authorized Kia dealer.
Back-up lamp and Rear turn
signal lamp bulb replacement
If the Back-up lamp and Rear turn
signal lamp does not operate, we
recommend that you checked an
authorized Kia dealer.
OQL075069OQLE075070
Page 566 of 595

Maintenance
98
8
Do a thorough washing of the
undercarriage at the end of the
winter.
Use professional service techni- cians or governmental inspection
stations to annually inspect for cor-
rosion.
Immediately seek an inspection of your vehicle if you become visually
aware of corrosion flaking or scal-
ing or if you become aware of a
change in vehicle performance,
such as soft or spongey brakes,
fluids leaking, impairment of direc-
tional control, suspension noises
or rattling metal straps.Aluminum wheel maintenance
The aluminum wheels are coated
with a clear protective finish.
Do not use any abrasive cleaner,polishing compound, solvent, or
wire brushes on aluminum wheels.
They may scratch the finish.
Clean the wheel when it has cooled.
Use only a mild soap or neutral detergent, and rinse thoroughly
with water. Also, be sure to clean
the wheels after driving on salted
roads. This helps prevent corro-
sion.
Avoid washing the wheels with highspeed vehicle wash brushes.
Do not use any alkaline or acid detergents It may damage and cor-
rode the aluminum wheels coated
with a clear protective finish.
Corrosion protection
Protecting your vehicle from corrosion
By using the most advanced design
and construction practices to combat
corrosion, we produce vehicles of
the highest quality. However, this is
only part of the job. To achieve the
long-term corrosion resistance your
vehicle can deliver, the owner's
cooperation and assistance is also
required.
Common causes of corrosion
The most common causes of corro-
sion on your vehicle are:
Road salt, dirt and moisture that isallowed to accumulate underneath
the vehicle.
Removal of paint or protective coatings by stones, gravel, abra-
sion or minor scrapes and dents
which leave unprotected metal
exposed to corrosion.