2017 KIA Sportage Service
[x] Cancel search: ServicePage 424 of 595
Driving your vehicle
98
6
When you are ready to leave after
parking on a hill
1. With the automatic transaxle in P
(Park), apply your brakes and hold
the brake pedal down while you:
and
2. Slowly remove your foot from the brake pedal.
3. Drive slowly until the trailer is clear of the chocks.
4. Stop and have someone pick up and store the chocks.Maintenance when trailer tow-
ing
Your vehicle will need service more
often when you regularly pull a trail-
er. Important items to pay particular
attention to include engine oil, auto-
matic transaxle fluid, axle lubricant
and cooling system fluid. Brake con-
dition is another important item to
frequently check. Each item is cov-
ered in this manual, and the Index
will help you find them quickly. If
you’re trailering, it’s a good idea to
review these sections before you
start your trip.
Don’t forget to also maintain your
trailer and hitch. Follow the mainte-
nance schedule that accompanied
your trailer and check it periodically.
Preferably, conduct the check at the
start of each day’s driving. Most
importantly, all hitch nuts and bolts
should be tight. When towing check transaxle fluid
more frequently.
CAUTION - Air condition
Do not use the A/C while usingyour vehicle to tow uphill. Dueto higher load during trailerusage, overheating might occuron hot days or during uphilldriving.
Page 433 of 595
What to do in an emergency
Road warning . . . . . . . . . . . . . . . . . . . . . . . . . . . . . . 7-2
• Hazard warning flasher . . . . . . . . . . . . . . . . . . . . . . . . 7-2
In case of an emergency while driving . . . . . . . . . . 7-3
• If the engine stalls at a crossroad or crossing. . . . . . . 7-3
• If you have a flat tire while driving . . . . . . . . . . . . . . . 7-3
• If the engine stalls while driving . . . . . . . . . . . . . . . . . 7-3
If the engine will not start . . . . . . . . . . . . . . . . . . . . 7-4
• If engine doesn't turn over or turns over slowly . . . . 7-4
• If engine turns over normally but does not start . . . . 7-4
Emergency starting . . . . . . . . . . . . . . . . . . . . . . . . . 7-5
• Jump starting . . . . . . . . . . . . . . . . . . . . . . . . . . . . . . . . . 7-5
• Push-starting . . . . . . . . . . . . . . . . . . . . . . . . . . . . . . . . . 7-6
If the engine overheats . . . . . . . . . . . . . . . . . . . . . . . 7-7
Tire Pressure Monitoring System (TPMS) . . . . . . 7-8
• Check tire pressure . . . . . . . . . . . . . . . . . . . . . . . . . . . . 7-8
• Low tire pressure telltale . . . . . . . . . . . . . . . . . . . . . . 7-10
• Low tire pressure position telltale . . . . . . . . . . . . . . . 7-10
• Changing a tire with TPMS . . . . . . . . . . . . . . . . . . . . 7-12
If you have a flat tire . . . . . . . . . . . . . . . . . . . . . . . 7-15
• Jack and tools . . . . . . . . . . . . . . . . . . . . . . . . . . . . . . . 7-15
• Removing and storing the spare tire . . . . . . . . . . . . 7-16
• Changing tires . . . . . . . . . . . . . . . . . . . . . . . . . . . . . . . 7-17
If you have a flat tire (With Tire Mobility Kit). . 7-24
• Introduction . . . . . . . . . . . . . . . . . . . . . . . . . . . . . . . . . 7-24
• Notes on the safe use of the Tire Mobility Kit . . . . . 7-25
• Components of the Tire Mobility Kit . . . . . . . . . . . . 7-26
• Using the Tire Mobility Kit . . . . . . . . . . . . . . . . . . . . 7-27
• Distributing the sealant. . . . . . . . . . . . . . . . . . . . . . . . 7-30
• Checking the tire inflation pressure . . . . . . . . . . . . . 7-30
• Technical Data . . . . . . . . . . . . . . . . . . . . . . . . . . . . . . . 7-31
Towing . . . . . . . . . . . . . . . . . . . . . . . . . . . . . . . . . . . 7-\
32
• Towing service . . . . . . . . . . . . . . . . . . . . . . . . . . . . . . . 7-32
• Removable towing hook . . . . . . . . . . . . . . . . . . . . . . . 7-33
• Emergency towing . . . . . . . . . . . . . . . . . . . . . . . . . . . . 7-34
7
Page 442 of 595

What to do in an emergency
10
7
✽ ✽
NOTICE
If the TPMS, Low Tire Pressure
indicator does not illuminate for 3
seconds when the ignition switch is
turned to the ON position or engine
is running, or if they remain illumi-
nated after coming on for approxi-
mately 3 seconds, take your vehicle
to your nearest authorized Kia deal-
er and have the system checked.
Low tire pressure
telltale
Low tire pressure position tell-
tale
When the tire pressure monitoring
system warning indicators are illumi-
nated, one or more of your tires is
significantly under-inflated.
If the telltale illuminates, immediately
reduce your speed, avoid hard cor-
nering and anticipate increased stop-
ping distances. You should stop and
check your tires as soon as possible. Inflate the tires to the proper pres-
sure as indicated on the vehicle’s
placard or tire inflation pressure label
located on the driver’s side center pil-
lar outer panel. If you cannot reach a
service station or if the tire cannot
hold the newly added air, replace the
low pressure tire with the spare tire.
Then the TPMS malfunction indicator
and the Low Tire Pressure telltale
may turn on and illuminate after
restarting and about 20 minutes of
continuous driving before you have
the low pressure tire repaired and
replaced on the vehicle.
In winter or cold weather, the low tire
pressure telltale may be illuminated if
the tire pressure was adjusted to the
recommended tire inflation pressure
in warm weather. It does not mean
your TPMS is malfunctioning
because the decreased temperature
leads to a proportional lowering of
tire pressure.
OQLE065035
Page 444 of 595
What to do in an emergency
12
7
Changing a tire with TPMS
If you have a flat tire, the Low Tire
Pressure telltale will come on. Have
the flat tire repaired by an authorized
Kia dealer as soon as possible or
replace the flat tire with the spare
tire.
Each wheel is equipped with a tire
pressure sensor mounted inside the
tire behind the valve stem. You must
use TPMS specific wheels. It is rec-
ommended that you always have
your tires serviced by an authorized
Kia dealer. Even if you replace the low pressure
tire with the spare tire, the Low Tire
Pressure telltale will remain on until
the low pressure tire is repaired and
placed on the vehicle.
After you replace the low pressure
tire with the spare tire, the TPMS
malfunction indicator may illuminate
after a few minutes because the
TPMS sensor mounted on the spare
wheel is not initiated.
Once the low pressure tire is inflated
again to the recommended pressure
and installed on the vehicle or the
TPMS sensor mounted on the
replaced spare wheel is initiated by
an authorized Kia dealer, the TPMS
malfunction indicator and the low tire
pressure telltale will turn off within a
few minutes of driving.
If the indicator has not disappeared
after a few minutes of driving, please
visit an authorized Kia dealer.
If an original mounted tire is replaced
with the spare tire, the TPMS sensor
on the replaced spare wheel should
be initiated and the TPMS sensor on
the original mounted wheel should be
deactivated. If the TPMS sensor on
the original mounted wheel located in
the spare tire carrier still activates,
the tire pressure monitoring system
may not operate properly. Have the
tire with TPMS serviced or replaced
by an authorized Kia dealer.
CAUTION- Repair
Agents
Never use a puncture-repairing
agent not approved by Kia torepair and/or inflate a low pres-sure tire. The sealant notapproved by Kia may damagethe tire pressure sensor.
Page 447 of 595
715
What to do in an emergency
IF YOU HAVE A FLAT TIRE (WITH SPARE TIRE, IF EQUIPPED)
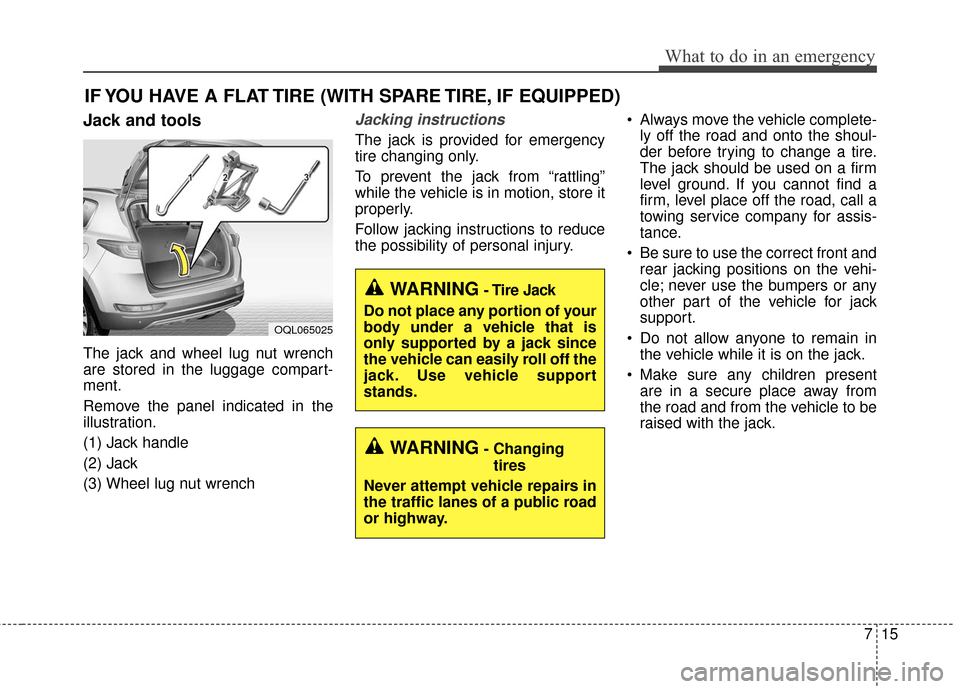
Jack and tools
The jack and wheel lug nut wrench
are stored in the luggage compart-
ment.
Remove the panel indicated in the
illustration.
(1) Jack handle
(2) Jack
(3) Wheel lug nut wrench
Jacking instructions
The jack is provided for emergency
tire changing only.
To prevent the jack from “rattling”
while the vehicle is in motion, store it
properly.
Follow jacking instructions to reduce
the possibility of personal injury. Always move the vehicle complete-
ly off the road and onto the shoul-
der before trying to change a tire.
The jack should be used on a firm
level ground. If you cannot find a
firm, level place off the road, call a
towing service company for assis-
tance.
Be sure to use the correct front and rear jacking positions on the vehi-
cle; never use the bumpers or any
other part of the vehicle for jack
support.
Do not allow anyone to remain in the vehicle while it is on the jack.
Make sure any children present are in a secure place away from
the road and from the vehicle to be
raised with the jack.
WARNING- Changing
tires
Never attempt vehicle repairs in
the traffic lanes of a public road
or highway.
OQL065025
WARNING- Tire Jack
Do not place any portion of your
body under a vehicle that is
only supported by a jack since
the vehicle can easily roll off the
jack. Use vehicle support
stands.
Page 452 of 595
What to do in an emergency
20
7
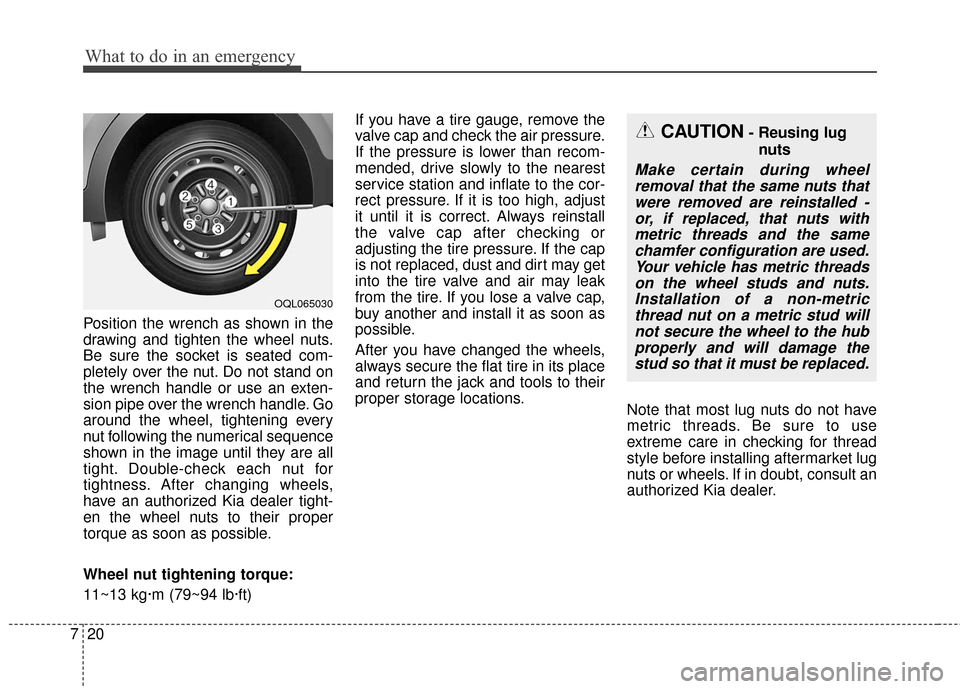
Position the wrench as shown in the
drawing and tighten the wheel nuts.
Be sure the socket is seated com-
pletely over the nut. Do not stand on
the wrench handle or use an exten-
sion pipe over the wrench handle. Go
around the wheel, tightening every
nut following the numerical sequence
shown in the image until they are all
tight. Double-check each nut for
tightness. After changing wheels,
have an authorized Kia dealer tight-
en the wheel nuts to their proper
torque as soon as possible.
Wheel nut tightening torque:
11~13 kg·m (79~94 lb·ft) If you have a tire gauge, remove the
valve cap and check the air pressure.
If the pressure is lower than recom-
mended, drive slowly to the nearest
service station and inflate to the cor-
rect pressure. If it is too high, adjust
it until it is correct. Always reinstall
the valve cap after checking or
adjusting the tire pressure. If the cap
is not replaced, dust and dirt may get
into the tire valve and air may leak
from the tire. If you lose a valve cap,
buy another and install it as soon as
possible.
After you have changed the wheels,
always secure the flat tire in its place
and return the jack and tools to their
proper storage locations.
Note that most lug nuts do not have
metric threads. Be sure to use
extreme care in checking for thread
style before installing aftermarket lug
nuts or wheels. If in doubt, consult an
authorized Kia dealer.
CAUTION- Reusing lug
nuts
Make certain during wheelremoval that the same nuts thatwere removed are reinstalled -or, if replaced, that nuts withmetric threads and the samechamfer configuration are used.Your vehicle has metric threadson the wheel studs and nuts.Installation of a non-metricthread nut on a metric stud willnot secure the wheel to the hubproperly and will damage thestud so that it must be replaced.
OQL065030
Page 456 of 595
What to do in an emergency
24
7
IF YOU HAVE A FLAT TIRE (WITH TIRE MOBILITY KIT, IF EQUIPPED)
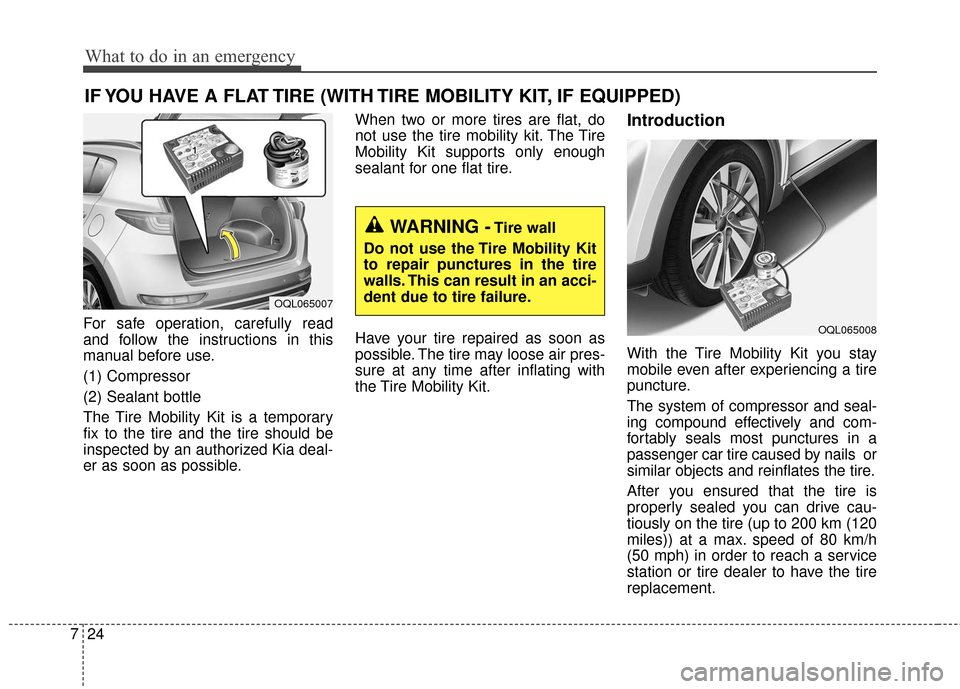
For safe operation, carefully read
and follow the instructions in this
manual before use.
(1) Compressor
(2) Sealant bottle
The Tire Mobility Kit is a temporary
fix to the tire and the tire should be
inspected by an authorized Kia deal-
er as soon as possible. When two or more tires are flat, do
not use the tire mobility kit. The Tire
Mobility Kit supports only enough
sealant for one flat tire.
Have your tire repaired as soon as
possible. The tire may loose air pres-
sure at any time after inflating with
the Tire Mobility Kit.
Introduction
With the Tire Mobility Kit you stay
mobile even after experiencing a tire
puncture.
The system of compressor and seal-
ing compound effectively and com-
fortably seals most punctures in a
passenger car tire caused by nails or
similar objects and reinflates the tire.
After you ensured that the tire is
properly sealed you can drive cau-
tiously on the tire (up to 200 km (120
miles)) at a max. speed of 80 km/h
(50 mph) in order to reach a service
station or tire dealer to have the tire
replacement.
OQL065008
OQL065007
WARNING -Tire wall
Do not use the Tire Mobility Kit
to repair punctures in the tire
walls. This can result in an acci-
dent due to tire failure.
Page 462 of 595
What to do in an emergency
30
7
Distributing the sealant
11. Immediately drive approximately
7~10 km (4~6 miles or, about 10
min) to evenly distribute the
sealant in the tire.
Do not exceed a speed of 80 km/h
(50 mph). If possible, do not fall
below a speed of 20 km/h (12 mph).
While driving, if you experience any
unusual vibration, ride disturbance or
noise, reduce your speed and drive
with caution until you can safely pull
off of the side of the road.
Call for road side service or towing.
When you use the Tire Mobility Kit,
the tire pressure sensors and wheel
may be stained by sealant.
Therefore, remove the tire pressure
sensors and wheel stained by
sealant and we recommend that
inspect at an authorized Kia dealer.
Checking the tire inflation
pressure
1. After driving approximately 4 ~ 6 miles (7 ~ 10 km or about 10 min),
stop at a safe location.
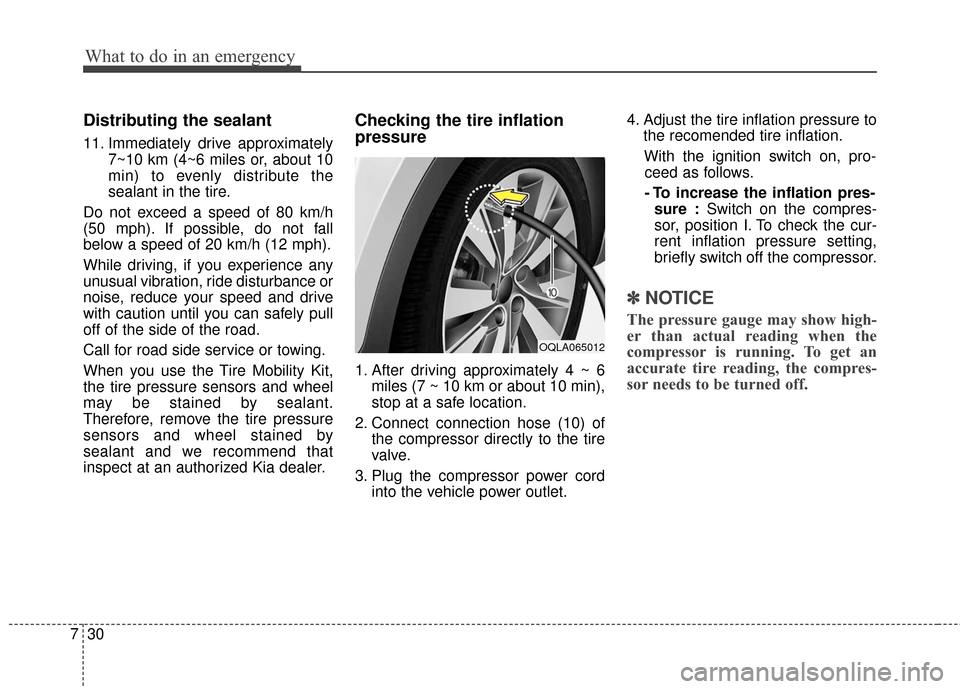
2. Connect connection hose (10) of the compressor directly to the tire
valve.
3. Plug the compressor power cord into the vehicle power outlet. 4. Adjust the tire inflation pressure to
the recomended tire inflation.
With the ignition switch on, pro- ceed as follows.
- To increase the inflation pres- sure : Switch on the compres-
sor, position I. To check the cur-
rent inflation pressure setting,
briefly switch off the compressor.
✽ ✽ NOTICE
The pressure gauge may show high-
er than actual reading when the
compressor is running. To get an
accurate tire reading, the compres-
sor needs to be turned off.
OQLA065012