2017 KIA Sportage light
[x] Cancel search: lightPage 84 of 595
Safety features of your vehicle
68
3
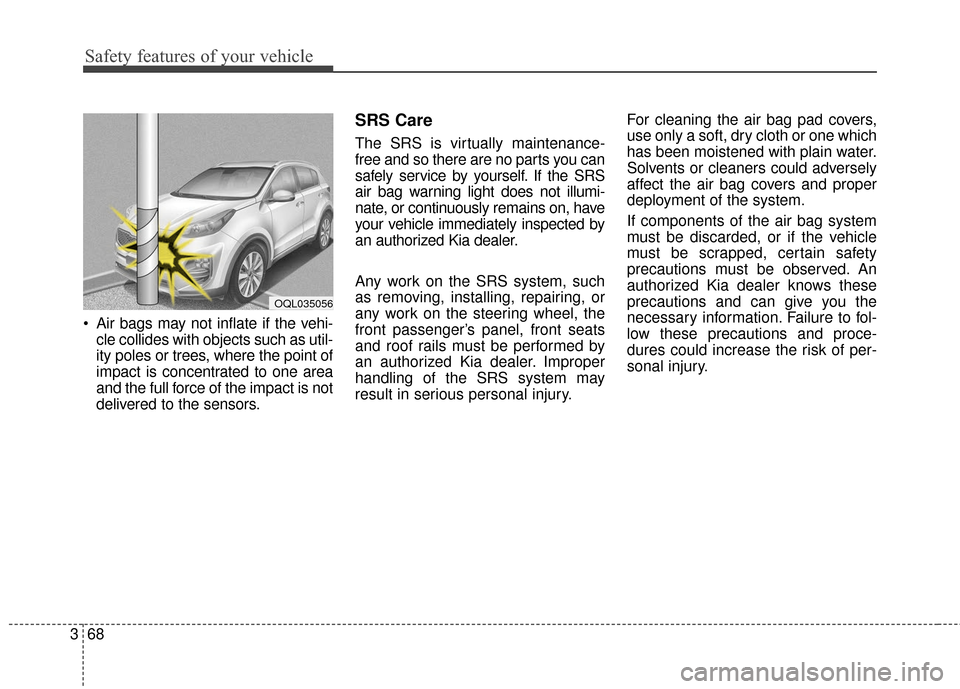
Air bags may not inflate if the vehi-
cle collides with objects such as util-
ity poles or trees, where the point of
impact is concentrated to one area
and the full force of the impact is not
delivered to the sensors.
SRS Care
The SRS is virtually maintenance-
free and so there are no parts you can
safely service by yourself. If the SRS
air bag warning light does not illumi-
nate, or continuously remains on, have
your vehicle immediately inspected by
an authorized Kia dealer.
Any work on the SRS system, such
as removing, installing, repairing, or
any work on the steering wheel, the
front passenger’s panel, front seats
and roof rails must be performed by
an authorized Kia dealer. Improper
handling of the SRS system may
result in serious personal injury. For cleaning the air bag pad covers,
use only a soft, dry cloth or one which
has been moistened with plain water.
Solvents or cleaners could adversely
affect the air bag covers and proper
deployment of the system.
If components of the air bag system
must be discarded, or if the vehicle
must be scrapped, certain safety
precautions must be observed. An
authorized Kia dealer knows these
precautions and can give you the
necessary information. Failure to fol-
low these precautions and proce-
dures could increase the risk of per-
sonal injury.
OQL035056
Page 87 of 595
Steering wheel . . . . . . . . . . . . . . . . . . . . . . . . . . . . . 4-54
• Electronic power steering (EPS) . . . . . . . . . . . . . . . . 4-54
• Tilt and telescopic steering . . . . . . . . . . . . . . . . . . . . 4-55
• Heated steering wheel . . . . . . . . . . . . . . . . . . . . . . . . . 4-56
• Horn . . . . . . . . . . . . . . . . . . . . . . . . . . . . . . . . . . . . \
. . . 4-57
Mirrors . . . . . . . . . . . . . . . . . . . . . . . . . . . . . . . . . . 4-58\
• Inside rearview mirror . . . . . . . . . . . . . . . . . . . . . . . . 4-58
• Outside rearview mirror . . . . . . . . . . . . . . . . . . . . . . 4-65
Instrument cluster . . . . . . . . . . . . . . . . . . . . . . . . . 4-69
• Instrument Cluster Control . . . . . . . . . . . . . . . . . . . . 4-70
• LCD Display Control . . . . . . . . . . . . . . . . . . . . . . . . . 4-70
• Gauges . . . . . . . . . . . . . . . . . . . . . . . . . . . . . . . . . . . . \
. 4-71
• Transaxle Shift Indicator . . . . . . . . . . . . . . . . . . . . . . 4-74
LCD Display . . . . . . . . . . . . . . . . . . . . . . . . . . . . . . 4-75
• LCD Modes . . . . . . . . . . . . . . . . . . . . . . . . . . . . . . . . . 4-75
• Service Mode . . . . . . . . . . . . . . . . . . . . . . . . . . . . . . . . 4-76
• User Settings Mode . . . . . . . . . . . . . . . . . . . . . . . . . . . 4-78
Trip modes (Trip computer) . . . . . . . . . . . . . . . . . 4-84
• Trip Modes . . . . . . . . . . . . . . . . . . . . . . . . . . . . . . . . . . 4-84\
• Fuel Economy . . . . . . . . . . . . . . . . . . . . . . . . . . . . . . . 4-84
• Trip A/B . . . . . . . . . . . . . . . . . . . . . . . . . . . . . . . . . . . . \
4-86
• Digital speedometer . . . . . . . . . . . . . . . . . . . . . . . . . . . 4-87
• One time driving information mode . . . . . . . . . . . . . 4-87
• Turn By Turn Mode . . . . . . . . . . . . . . . . . . . . . . . . . . 4-88• LDWS Mode . . . . . . . . . . . . . . . . . . . . . . . . . . . . . . . . 4-88
• A/V Mode . . . . . . . . . . . . . . . . . . . . . . . . . . . . . . . . . . . 4-\
88
• Warning Messages . . . . . . . . . . . . . . . . . . . . . . . . . . . . 4-89
Warning and indicator lights . . . . . . . . . . . . . . . . 4-97
• Warning lights . . . . . . . . . . . . . . . . . . . . . . . . . . . . . . . 4-97
• Indicator Lights . . . . . . . . . . . . . . . . . . . . . . . . . . . . . 4-104
Rear parking assist system . . . . . . . . . . . . . . . . . 4-109
• Operation of the rear parking assist system . . . . . . 4-109
• Non-operational conditions of
rear parking assist system . . . . . . . . . . . . . . . . . . . 4-110
• Rear parking assist system precautions . . . . . . . . . 4-111
• Self-diagnosis . . . . . . . . . . . . . . . . . . . . . . . . . . . . . . . 4-112
Parking assist system . . . . . . . . . . . . . . . . . . . . . . 4-113
• Operation of the parking assist system . . . . . . . . . . 4-113
• Non-operational conditions of parking assist system. . 4-115
• Self-diagnosis . . . . . . . . . . . . . . . . . . . . . . . . . . . . . . . 4-117
Rearview camera . . . . . . . . . . . . . . . . . . . . . . . . . 4-118
Lighting . . . . . . . . . . . . . . . . . . . . . . . . . . . . . . . . . 4-119
• Battery saver function . . . . . . . . . . . . . . . . . . . . . . . . 4-119
• Daytime running light . . . . . . . . . . . . . . . . . . . . . . . . 4-119
• Lighting control . . . . . . . . . . . . . . . . . . . . . . . . . . . . . 4-119
• High beam operation. . . . . . . . . . . . . . . . . . . . . . . . . 4-121
• High Beam Assist . . . . . . . . . . . . . . . . . . . . . . . . . . . . 4-122
4
Page 88 of 595
• Turn signals and lane change signals . . . . . . . . . . . 4-124
• Front fog light . . . . . . . . . . . . . . . . . . . . . . . . . . . . . . 4-124
• Check headlight . . . . . . . . . . . . . . . . . . . . . . . . . . . . 4-125
• AFLS (Adaptive Front Lighting System) . . . . . . . . 4-125
Wipers and washers . . . . . . . . . . . . . . . . . . . . . . . 4-126
• Windshield wipers . . . . . . . . . . . . . . . . . . . . . . . . . . 4-126
• Front windshield washers . . . . . . . . . . . . . . . . . . . . . 4-127
• Rear window wiper and washer switch. . . . . . . . . . 4-128
Interior lights . . . . . . . . . . . . . . . . . . . . . . . . . . . . 4-130
• Automatic turn off function . . . . . . . . . . . . . . . . . . . 4-130
• Room lamp . . . . . . . . . . . . . . . . . . . . . . . . . . . . . . . . . 4-130
• Map lamp . . . . . . . . . . . . . . . . . . . . . . . . . . . . . . . . . 4-131
• Liftgate room lamp . . . . . . . . . . . . . . . . . . . . . . . . . . 4-132
• Vanity mirror lamp . . . . . . . . . . . . . . . . . . . . . . . . . . 4-132
• Glove box lamp . . . . . . . . . . . . . . . . . . . . . . . . . . . . . 4-132
Welcome system . . . . . . . . . . . . . . . . . . . . . . . . . . 4-133
• Headlight (Headlamp) escort function . . . . . . . . . . 4-133
• Interior light . . . . . . . . . . . . . . . . . . . . . . . . . . . . . . . 4-133
• Pocket lamp . . . . . . . . . . . . . . . . . . . . . . . . . . . . . . . . 4-133
Defroster . . . . . . . . . . . . . . . . . . . . . . . . . . . . . . . . 4-134
• Rear window defroster . . . . . . . . . . . . . . . . . . . . . . . 4-134
Manual climate control system . . . . . . . . . . . . . . 4-135
• Heating and air conditioning . . . . . . . . . . . . . . . . . . 4-136
• System operation . . . . . . . . . . . . . . . . . . . . . . . . . . . . 4-141
• Climate control air filter. . . . . . . . . . . . . . . . . . . . . . 4-143
• Checking the amount of air conditioner refrigerantand compressor lubricant. . . . . . . . . . . . . . . . . . . . 4-143
Automatic climate control system . . . . . . . . . . . 4-145
• Automatic heating and air conditioning . . . . . . . . . 4-146
• Manual heating and air conditioning . . . . . . . . . . . 4-147
• System operation . . . . . . . . . . . . . . . . . . . . . . . . . . . . 4-153
• Climate control air filter. . . . . . . . . . . . . . . . . . . . . . 4-155
• Checking the amount of air conditioner refrigerant and compressor lubricant . . . . . . . . . . . . . . . . . . . . . . . 4-156
Windshield defrosting and defogging . . . . . . . . . 4-157
• Manual climate control system . . . . . . . . . . . . . . . . 4-157
• Automatic climate control system . . . . . . . . . . . . . . 4-158
• Defogging logic. . . . . . . . . . . . . . . . . . . . . . . . . . . . . . 4-159
Clean air . . . . . . . . . . . . . . . . . . . . . . . . . . . . . . . . 4-161
Storage compartments . . . . . . . . . . . . . . . . . . . . . 4-162
• Center console storage . . . . . . . . . . . . . . . . . . . . . . . 4-162
• Glove box . . . . . . . . . . . . . . . . . . . . . . . . . . . . . . . . . . 4-16\
2
• Sunglass holder . . . . . . . . . . . . . . . . . . . . . . . . . . . . . 4-163
• Luggage box . . . . . . . . . . . . . . . . . . . . . . . . . . . . . . . . 4-163
• Two types of luggage board use . . . . . . . . . . . . . . . . 4-164
4
Page 91 of 595
Features of your vehicle
64
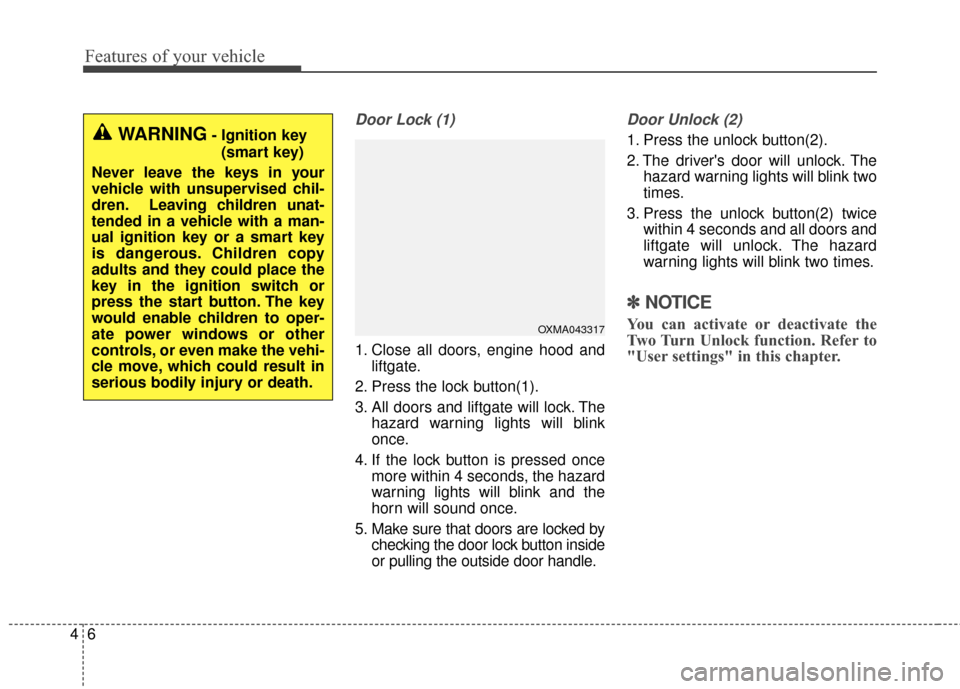
Door Lock (1)
1. Close all doors, engine hood andliftgate.
2. Press the lock button(1).
3. All doors and liftgate will lock. The hazard warning lights will blink
once.
4. If the lock button is pressed once more within 4 seconds, the hazard
warning lights will blink and the
horn will sound once.
5. Make sure that doors are locked by checking the door lock button inside
or pulling the outside door handle.
Door Unlock (2)
1. Press the unlock button(2).
2. The driver's door will unlock. Thehazard warning lights will blink two
times.
3. Press the unlock button(2) twice within 4 seconds and all doors and
liftgate will unlock. The hazard
warning lights will blink two times.
✽ ✽NOTICE
You can activate or deactivate the
Two Turn Unlock function. Refer to
"User settings" in this chapter.
WARNING- Ignition key
(smart key)
Never leave the keys in your
vehicle with unsupervised chil-
dren. Leaving children unat-
tended in a vehicle with a man-
ual ignition key or a smart key
is dangerous. Children copy
adults and they could place the
key in the ignition switch or
press the start button. The key
would enable children to oper-
ate power windows or other
controls, or even make the vehi-
cle move, which could result in
serious bodily injury or death.
OXMA043317
Page 92 of 595
47
Features of your vehicle
Liftgate unlock (3)
The liftgate is unlocked if the button
is pressed for more than 1 second.
Also, once the liftgate is opened and
then closed, the liftgate will be locked
automatically.
For Power Liftgate Only:
The Power Liftgate will open if the
button is pressed for more than 1
second. Also, once the liftgate is
opened and then closed, the liftgate
will be locked again automatically.
For detailed information refer to the
"Power liftgate" in this chapter.
Panic (4)
The horn sounds and hazard warn-
ing lights flash for about 27 seconds
if this button is pressed for more than
0.5 second. To stop the horn and
lights, press any button on the trans-
mitter.
Transmitter precautions
The transmitter will not work if anyof following occur:
- The ignition key is in the ignitionswitch.
- You exceed the operating dis- tance limit (about 10 m [30 feet]).
- The battery in the transmitter is weak.
- Other vehicles or objects may be blocking the signal.
- The weather is extremely cold.
- The transmitter is close to a radio transmitter such as a radio sub-
station or an airport which can
interfere with normal operation of
the transmitter.
Page 94 of 595
49
Features of your vehicle
For replacement transmitters, see an
authorized Kia dealer for transmitter
reprogramming.
The transmitter is designed to giveyou years of trouble-free use, how-
ever it can malfunction if exposed to
moisture or static electricity. If you
are unsure how to use your trans-
mitter or replace the battery, contact
an authorized Kia dealer.
Using the wrong battery can cause the transmitter to malfunction. Be
sure to use the correct battery.
To avoid damaging the transmitter, don't drop it, get it wet, or expose it
to heat or sunlight.
An inappropriately dis- posed battery can be
harmful to the environment
and may cause harm to
human health. Dispose the
battery according to your
local law(s) or regulation.Immobilizer system
Your vehicle is equipped with an
electronic engine immobilizer system
to reduce the risk of unauthorized
vehicle use.
Your immobilizer system is com-
prised of a small transponder in the
ignition key and electronic devices
inside the vehicle.
With the immobilizer system, when-
ever you insert your ignition key into
the ignition switch and turn it to ON,
verifies if the ignition key is valid.
If the key is determined to be valid,
the engine will start.
If the key is determined to be invalid,
the engine will not start.CAUTION - Transmitter
damage
Do not drop, wet or expose the keyless entry system transmit-ter to heat or sunlight.
IC WARNING
This device complies with
Industry Canada licence-
exempt RSS standard(s).
Operation is subject to the fol-
lowing two conditions: (1) this
device may not cause interfer-
ence, and (2) this device must
accept any interference, includ-
ing interference that may cause
undesired operation of the
device.
Page 98 of 595
413
Features of your vehicle
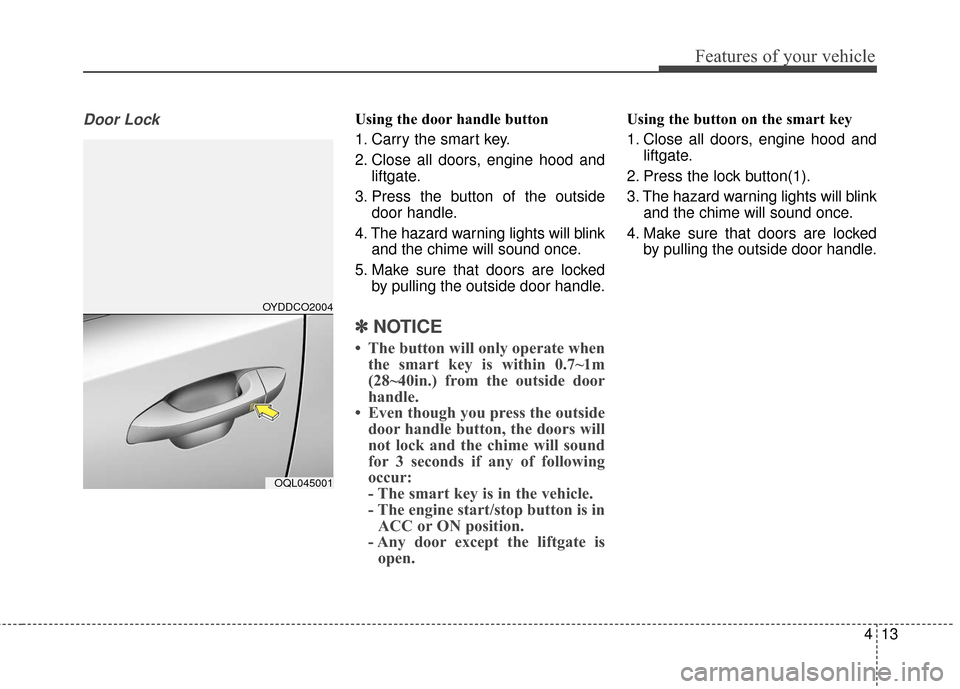
Door LockUsing the door handle button
1. Carry the smart key.
2. Close all doors, engine hood andliftgate.
3. Press the button of the outside door handle.
4. The hazard warning lights will blink and the chime will sound once.
5. Make sure that doors are locked by pulling the outside door handle.
✽ ✽NOTICE
• The button will only operate when
the smart key is within 0.7~1m
(28~40in.) from the outside door
handle.
• Even though you press the outside door handle button, the doors will
not lock and the chime will sound
for 3 seconds if any of following
occur:
- The smart key is in the vehicle.
- The engine start/stop button is inACC or ON position.
- Any door except the liftgate is open.
Using the button on the smart key
1. Close all doors, engine hood and
liftgate.
2. Press the lock button(1).
3. The hazard warning lights will blink and the chime will sound once.
4. Make sure that doors are locked by pulling the outside door handle.
OYDDCO2004
OQL045001
Page 99 of 595
Features of your vehicle
14
4
Unlocking
Using the door handle button
1. Carry the smart key.
2. Press the button of the driver's
outside door handle.
3. The driver’s door will unlock. The hazard warning lights will blink and
the chime will sound two times.
4. Press the button twice within 4 seconds and all doors and the lift-
gate will unlock and the hazard
warning lights will blink and the
chime will sound two times.
✽ ✽NOTICE
• The button will only operate when
the smart key is within 0.7~1m
(28~40in.) from the outside door
handle.
• When the smart key is recognized in the area of 0.7~1m (28~40in.) from
the front outside door handle, other
people can also open the doors.
• After unlocking the driver’s door or all doors, the door(s) will lock
automatically unless the door is
opened.
Using the button on the smart key
1. Press the unlock button(2) of the
smart key.
2. The driver’s door will unlock. The hazard warning lights will blink and
the chime will sound two times.
3. Press the unlock button(2) twice within 4 seconds and all doors and
the liftgate will unlock. The hazard
warning lights will blink and the
chime will sound two times.
✽ ✽NOTICE
After pressing the button, the doors
will lock automatically unless any
door is opened within 30 seconds.
✽ ✽NOTICE
You can activate or deactivate the
Two Turn Unlock function. Refer to
"User settings" in this chapter.
Liftgate unlocking
Using the liftgate handle button
1. Carry the smart key.
2. Press the liftgate handle button.
3. When all doors are locked, the
hazard warning lights will blink two
times.
Once the liftgate is opened and
then closed, the liftgate will lock
automatically.
✽ ✽ NOTICE
The button will only operate when
the smart key is within 0.7~1m
(28~40in.) from the liftgate handle.