2017 KIA SOUL tow
[x] Cancel search: towPage 10 of 589
Introduction
61
As with other vehicles of this type,
failure to operate this vehicle cor-
rectly may result in loss of control,
an accident or vehicle rollover.
Specific design characteristics (high-
er ground clearance, track, etc.) give
this vehicle a higher center of gravity
than other types of vehicles. It is not
designed for cornering at the same
speeds as a conventional 2-wheel
drive sedans or sports coupe. Avoid
sharp turns or abrupt maneuvers.
Failure to operate this vehicle cor-
rectly may result in loss of control, an
accident or vehicle rollover.Be sure
to read the “Reducing the risk of a
rollover” driving guidelines, in
chapter 6 of this manual. No special break-in period is need-
ed. By following a few simple precau-
tions for the first 600 miles (1,000
km) you may add to the perform-
ance, economy and life of your vehi-
cle.
Do not race the engine.
While driving, keep your engine
speed (rpm, or revolutions per
minute) between 2,000 rpm and
4,000 rpm.
Do not maintain a single speed for long periods of time, either fast or
slow. Varying engine speed is need-
ed to properly break-in the engine.
Avoid hard stops, except in emer- gencies, to allow the brakes to seat
properly.
Don't tow a trailer during the first 1,200 miles (2,000 km) of operation.
VEHICLE BREAK-IN
PROCESS
VEHICLE HANDLING
INSTRUCTIONS
Page 29 of 589
311
Safety features of your vehicle
✽
✽
NOTICE
If you recline the seatback towards
the front with the headrest and seat
cushion raised, the headrest may
come in contact with the sunvisor or
other parts of the vehicle.
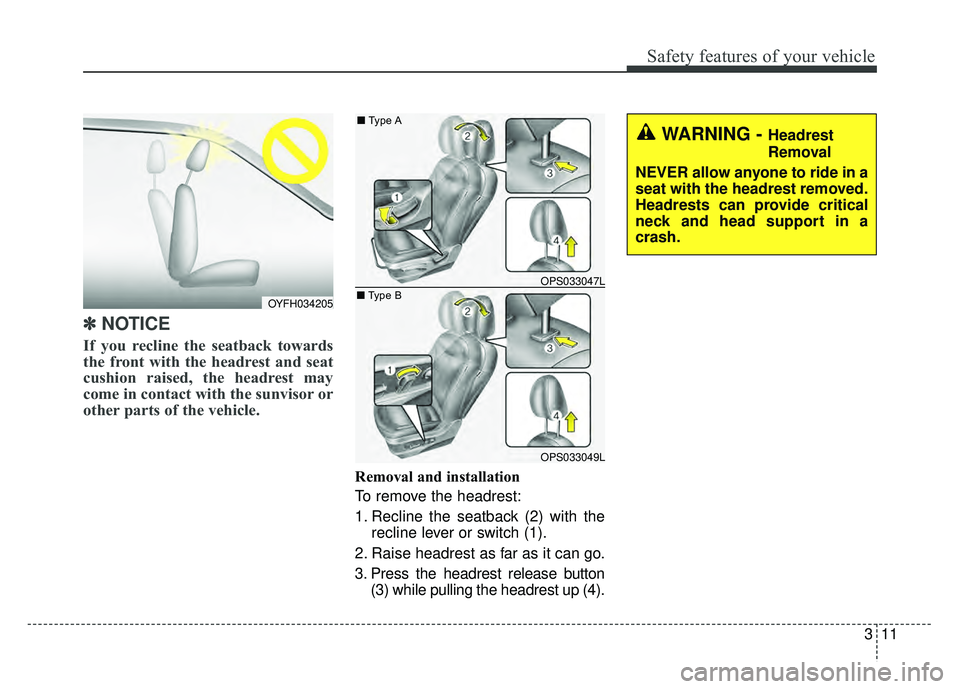
Removal and installation
To remove the headrest:
1. Recline the seatback (2) with the
recline lever or switch (1).
2. Raise headrest as far as it can go.
3. Press the headrest release button (3) while pulling the headrest up (4).
OYFH034205
OPS033047L
OPS033049L
■ Type A
■ Type B
WARNING - Headrest
Removal
NEVER allow anyone to ride in a
seat with the headrest removed.
Headrests can provide critical
neck and head support in a
crash.
Page 32 of 589
Safety features of your vehicle
14
3
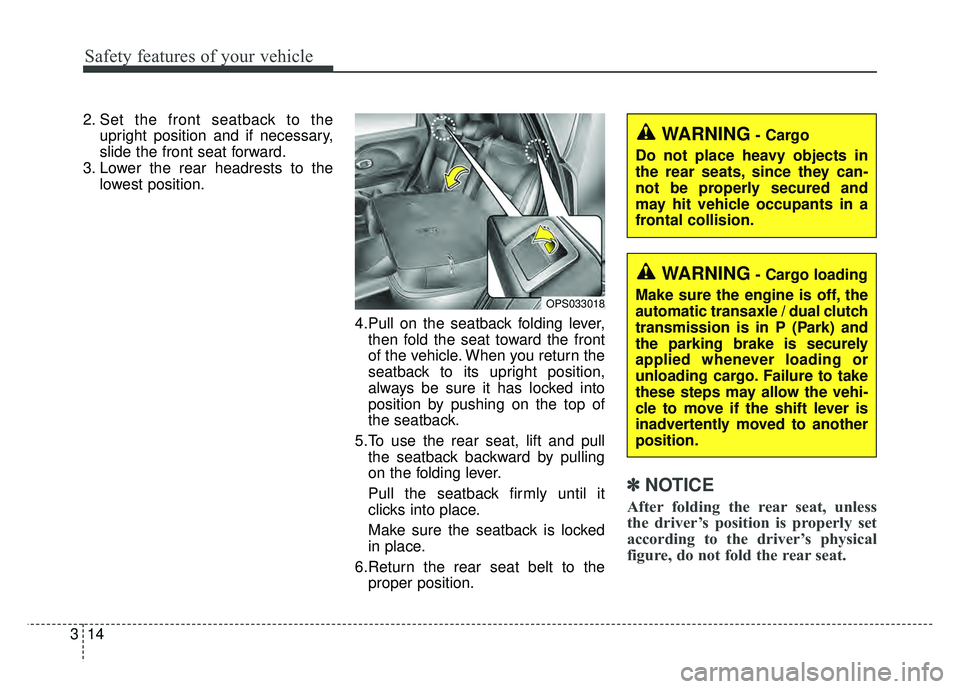
2. Set the front seatback to the
upright position and if necessary,
slide the front seat forward.
3. Lower the rear headrests to the lowest position.
4.Pull on the seatback folding lever,then fold the seat toward the front
of the vehicle. When you return the
seatback to its upright position,
always be sure it has locked into
position by pushing on the top of
the seatback.
5.To use the rear seat, lift and pull the seatback backward by pulling
on the folding lever.
Pull the seatback firmly until it
clicks into place.
Make sure the seatback is locked
in place.
6.Return the rear seat belt to the proper position.
✽ ✽
NOTICE
After folding the rear seat, unless
the driver’s position is properly set
according to the driver’s physical
figure, do not fold the rear seat.
OPS033018
WARNING- Cargo
Do not place heavy objects in
the rear seats, since they can-
not be properly secured and
may hit vehicle occupants in a
frontal collision.
WARNING- Cargo loading
Make sure the engine is off, the
automatic transaxle / dual clutch
transmission is in P (Park) and
the parking brake is securely
applied whenever loading or
unloading cargo. Failure to take
these steps may allow the vehi-
cle to move if the shift lever is
inadvertently moved to another
position.
Page 41 of 589
323
Safety features of your vehicle
To release the seat belt:
The seat belt is released by pressing
the release button (1) on the locking
buckle. When it is released, the belt
should automatically draw back into
the retractor.
If this does not happen, check the
belt to be sure it is not twisted, then
try again.
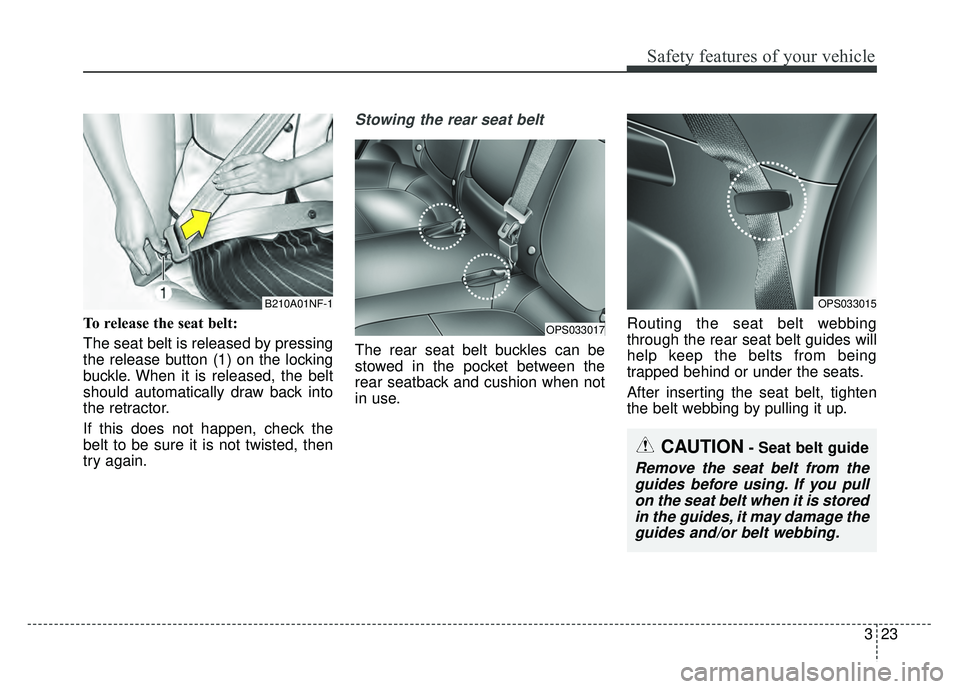
Stowing the rear seat belt
The rear seat belt buckles can be
stowed in the pocket between the
rear seatback and cushion when not
in use.Routing the seat belt webbing
through the rear seat belt guides will
help keep the belts from being
trapped behind or under the seats.
After inserting the seat belt, tighten
the belt webbing by pulling it up.
CAUTION- Seat belt guide
Remove the seat belt from the
guides before using. If you pullon the seat belt when it is storedin the guides, it may damage theguides and/or belt webbing.
B210A01NF-1
OPS033017
OPS033015
Page 59 of 589
341
Safety features of your vehicle
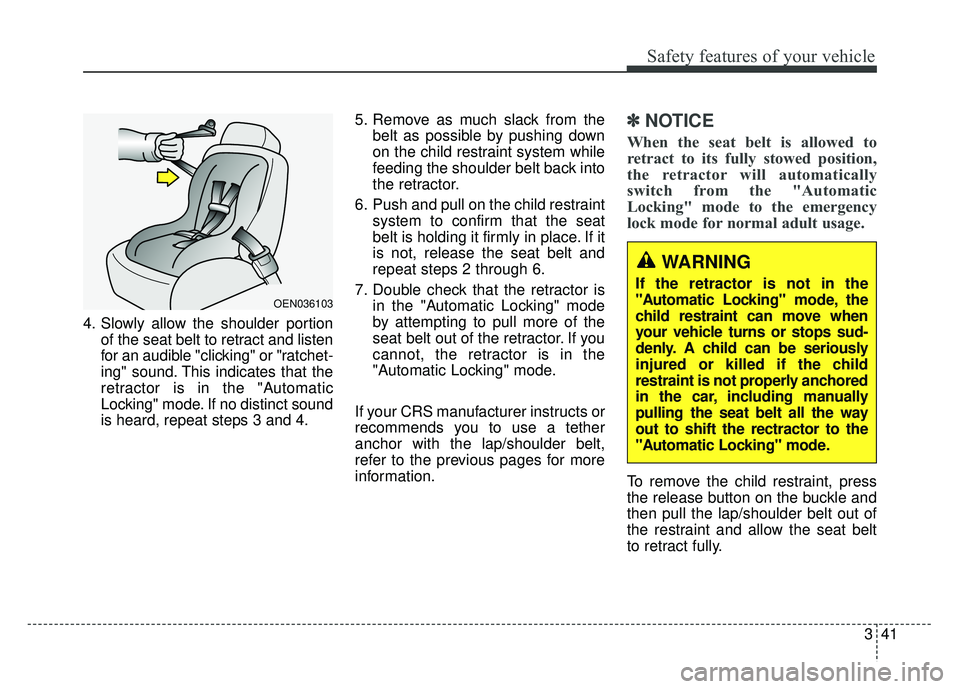
4. Slowly allow the shoulder portionof the seat belt to retract and listen
for an audible "clicking" or "ratchet-
ing" sound. This indicates that the
retractor is in the "Automatic
Locking" mode. If no distinct sound
is heard, repeat steps 3 and 4. 5. Remove as much slack from the
belt as possible by pushing down
on the child restraint system while
feeding the shoulder belt back into
the retractor.
6. Push and pull on the child restraint system to confirm that the seat
belt is holding it firmly in place. If it
is not, release the seat belt and
repeat steps 2 through 6.
7. Double check that the retractor is in the "Automatic Locking" mode
by attempting to pull more of the
seat belt out of the retractor. If you
cannot, the retractor is in the
"Automatic Locking" mode.
If your CRS manufacturer instructs or
recommends you to use a tether
anchor with the lap/shoulder belt,
refer to the previous pages for more
information.
✽ ✽ NOTICE
When the seat belt is allowed to
retract to its fully stowed position,
the retractor will automatically
switch from the "Automatic
Locking" mode to the emergency
lock mode for normal adult usage.
To remove the child restraint, press
the release button on the buckle and
then pull the lap/shoulder belt out of
the restraint and allow the seat belt
to retract fully.
OEN036103
WARNING
If the retractor is not in the
"Automatic Locking" mode, the
child restraint can move when
your vehicle turns or stops sud-
denly. A child can be seriously
injured or killed if the child
restraint is not properly anchored
in the car, including manually
pulling the seat belt all the way
out to shift the rectractor to the
"Automatic Locking" mode.
Page 68 of 589
Safety features of your vehicle
50
3
Main components of the occu-
pant detection system
A detection device located within the front passenger seat cushion.
An electronic system which deter- mines whether the passenger air
bag systems should be activated
or deactivated.
A indicator light located on the instrument panel which illuminates
the words PASSENGER AIR BAG
“OFF” indicating the front passen-
ger air bag system is deactivated.
The instrument panel air bag warn- ing light is interconnected with the
occupant detection system. If the front passenger seat is occupied
by a person that the system deter-
mines to be of appropriate size, and
he/she sits properly (sitting upright
with the seatback in an upright posi-
tion, centered on the seat cushion with
their seat belt on, legs comfortably
extended and their feet on the floor),
the PASSENGER AIR BAG “OFF”
indicator will turn off and the front pas-
senger's air bag will be able to inflate,
if necessary, in frontal crashes.
You will find the PASSENGER AIR
BAG “OFF” indicator on the center
facia panel. This system detects the
conditions 1~4 in the following table
and activates or deactivates the front
passenger air bag based on these
conditions.
Always be sure that you and all vehicle
occupants are seated and restrained
properly (sitting upright with the seat in
an upright position, centered on the
seat cushion, with the person’s legs
comfortably extended, feet on the floor,
and wearing the safety belt properly)
for the most effective protection by the
air bag and the safety belt. The ODS (Occupant Detection
System) may not function properly if
the passenger takes actions which
can defeat the detection system.
These include:
(1) Failing to sit in an upright position.
(2) Leaning against the door or cen- ter console.
(3) Sitting towards the sides or the front of the seat.
(4) Putting legs on the dashboard or resting them on other locations
which reduce the passenger
weight on the front seat.
(5) Improperly wear ing the safety
belt.
(6) Reclining the seat back.
(7) Wearing a thick cloth like ski wear or hip protection wear.
(8) Put on the seat an additional thick cushion.
Page 70 of 589
Safety features of your vehicle
52
3
(Continued)
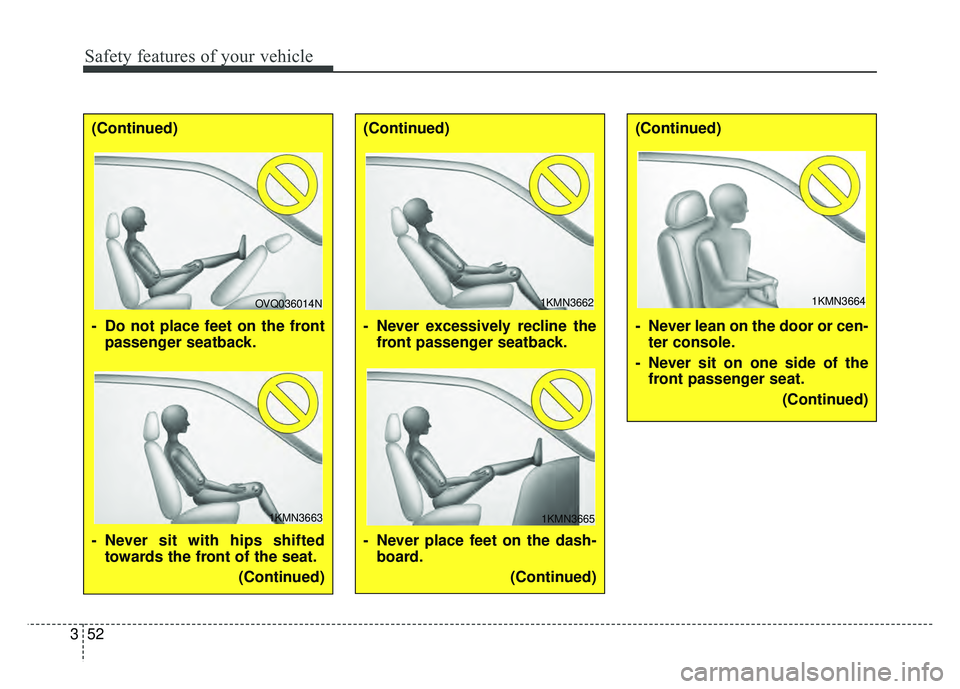
- Do not place feet on the front
passenger seatback.
- Never sit with hips shifted towards the front of the seat.
(Continued)(Continued)
- Never excessively recline thefront passenger seatback.
- Never place feet on the dash- board.
(Continued)(Continued)
- Never lean on the door or cen-ter console.
- Never sit on one side of the front passenger seat.
(Continued)
OVQ036014N1KMN3662
1KMN36631KMN3665
1KMN3664
Page 82 of 589
Safety features of your vehicle
64
3
Side and/or curtain air bags Side air bags (side and/or curtain air
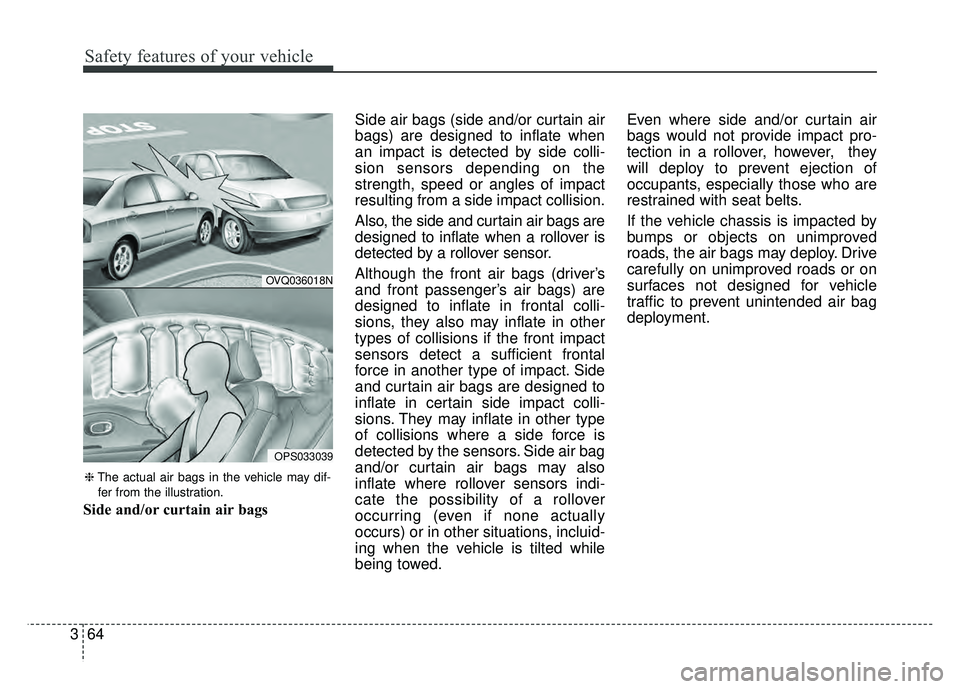
bags) are designed to inflate when
an impact is detected by side colli-
sion sensors depending on the
strength, speed or angles of impact
resulting from a side impact collision.
Also, the side and curtain air bags are
designed to inflate when a rollover is
detected by a rollover sensor.
Although the front air bags (driver’s
and front passenger’s air bags) are
designed to inflate in frontal colli-
sions, they also may inflate in other
types of collisions if the front impact
sensors detect a sufficient frontal
force in another type of impact. Side
and curtain air bags are designed to
inflate in certain side impact colli-
sions. They may inflate in other type
of collisions where a side force is
detected by the sensors. Side air bag
and/or curtain air bags may also
inflate where rollover sensors indi-
cate the possibility of a rollover
occurring (even if none actually
occurs) or in other situations, incluid-
ing when the vehicle is tilted while
being towed.Even where side and/or curtain air
bags would not provide impact pro-
tection in a rollover, however, they
will deploy to prevent ejection of
occupants, especially those who are
restrained with seat belts.
If the vehicle chassis is impacted by
bumps or objects on unimproved
roads, the air bags may deploy. Drive
carefully on unimproved roads or on
surfaces not designed for vehicle
traffic to prevent unintended air bag
deployment.
OVQ036018N
OPS033039
❈
The actual air bags in the vehicle may dif-
fer from the illustration.