Page 471 of 589
Maintenance
30
8
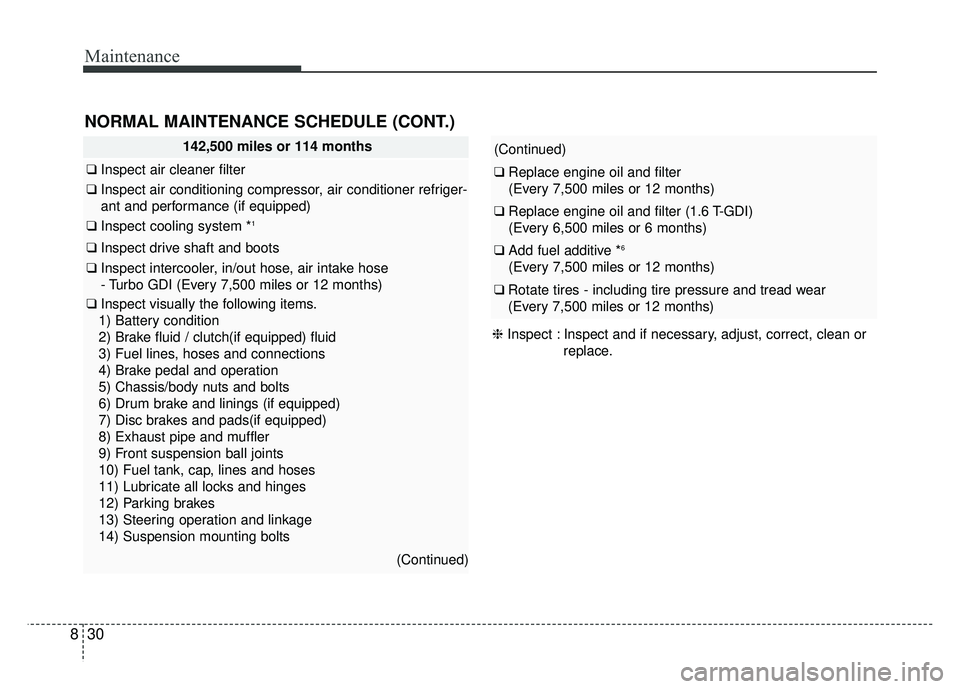
142,500 miles or 114 months
❑ Inspect air cleaner filter
❑Inspect air conditioning compressor, air conditioner refriger-
ant and performance (if equipped)
❑ Inspect cooling system *1
❑Inspect drive shaft and boots
❑Inspect intercooler, in/out hose, air intake hose
- Turbo GDI (Every 7,500 miles or 12 months)
❑Inspect visually the following items.
1) Battery condition
2) Brake fluid / clutch(if equipped) fluid
3) Fuel lines, hoses and connections
4) Brake pedal and operation
5) Chassis/body nuts and bolts
6) Drum brake and linings (if equipped)
7) Disc brakes and pads(if equipped)
8) Exhaust pipe and muffler
9) Front suspension ball joints
10) Fuel tank, cap, lines and hoses
11) Lubricate all locks and hinges
12) Parking brakes
13) Steering operation and linkage
14) Suspension mounting bolts
(Continued)
(Continued)
❑ Replace engine oil and filter
(Every 7,500 miles or 12 months)
❑Replace engine oil and filter (1.6 T-GDI)
(Every 6,500 miles or 6 months)
❑Add fuel additive *6
(Every 7,500 miles or 12 months)
❑Rotate tires - including tire pressure and tread wear
(Every 7,500 miles or 12 months)
NORMAL MAINTENANCE SCHEDULE (CONT.)
❈ Inspect : Inspect and if necessary, adjust, correct, clean or
replace.
Page 472 of 589
831
Maintenance
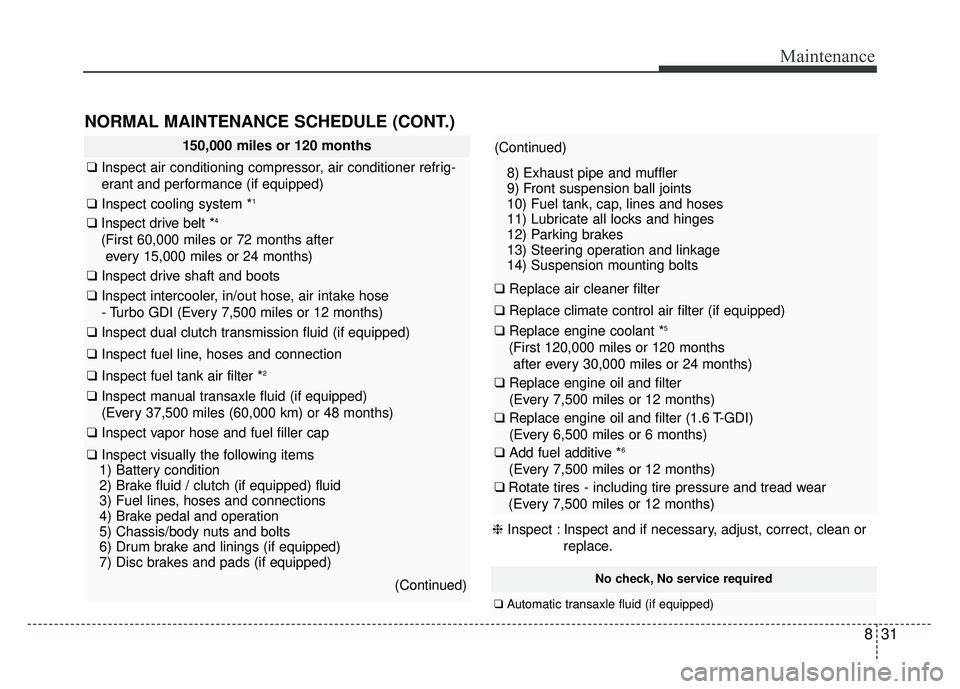
150,000 miles or 120 months
❑Inspect air conditioning compressor, air conditioner refrig-
erant and performance (if equipped)
❑ Inspect cooling system *1
❑Inspect drive belt *4
(First 60,000 miles or 72 months after
every 15,000 miles or 24 months)
❑ Inspect drive shaft and boots
❑Inspect intercooler, in/out hose, air intake hose
- Turbo GDI (Every 7,500 miles or 12 months)
❑Inspect dual clutch transmission fluid (if equipped)
❑ Inspect fuel line, hoses and connection
❑Inspect fuel tank air filter *2
❑Inspect manual transaxle fluid (if equipped)
(Every 37,500 miles (60,000 km) or 48 months)
❑ Inspect vapor hose and fuel filler cap
❑Inspect visually the following items
1) Battery condition
2) Brake fluid / clutch (if equipped) fluid
3) Fuel lines, hoses and connections
4) Brake pedal and operation
5) Chassis/body nuts and bolts
6) Drum brake and linings (if equipped)
7) Disc brakes and pads (if equipped)
(Continued)
(Continued)
8) Exhaust pipe and muffler
9) Front suspension ball joints
10) Fuel tank, cap, lines and hoses
11) Lubricate all locks and hinges
12) Parking brakes
13) Steering operation and linkage
14) Suspension mounting bolts
❑ Replace air cleaner filter
❑Replace climate control air filter (if equipped)
❑Replace engine coolant *5
(First 120,000 miles or 120 months
after every 30,000 miles or 24 months)
❑ Replace engine oil and filter
(Every 7,500 miles or 12 months)
❑Replace engine oil and filter (1.6 T-GDI)
(Every 6,500 miles or 6 months)
❑Add fuel additive *6
(Every 7,500 miles or 12 months)
❑Rotate tires - including tire pressure and tread wear
(Every 7,500 miles or 12 months)
NORMAL MAINTENANCE SCHEDULE (CONT.)
No check, No service required
❑ Automatic transaxle fluid (if equipped)
❈ Inspect : Inspect and if necessary, adjust, correct, clean or
replace.
Page 510 of 589
869
Maintenance
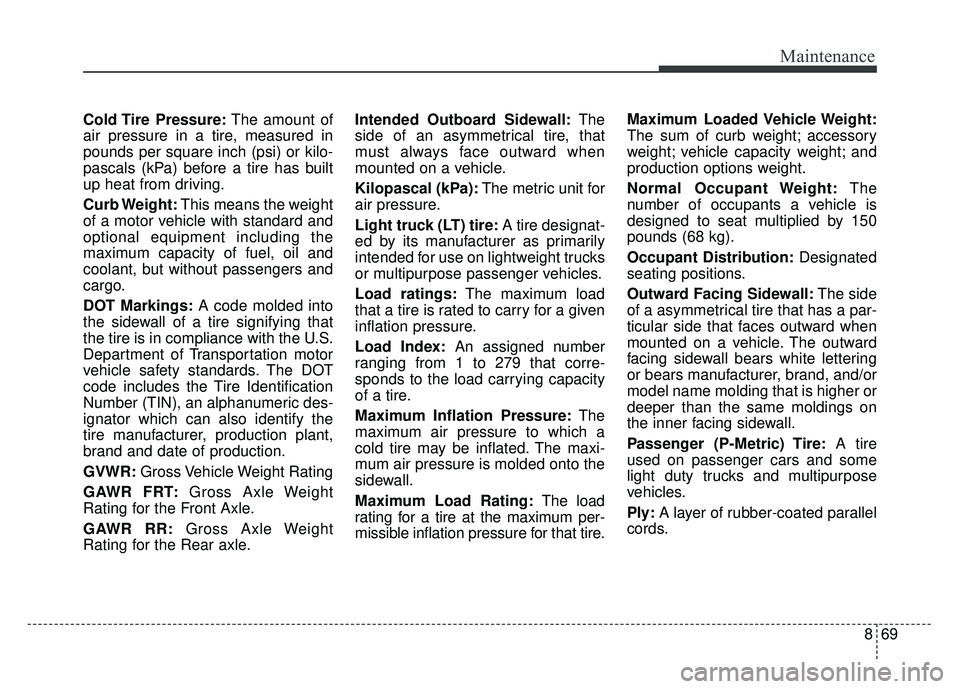
Cold Tire Pressure:The amount of
air pressure in a tire, measured in
pounds per square inch (psi) or kilo-
pascals (kPa) before a tire has built
up heat from driving.
Curb Weight: This means the weight
of a motor vehicle with standard and
optional equipment including the
maximum capacity of fuel, oil and
coolant, but without passengers and
cargo.
DOT Markings: A code molded into
the sidewall of a tire signifying that
the tire is in compliance with the U.S.
Department of Transportation motor
vehicle safety standards. The DOT
code includes the Tire Identification
Number (TIN), an alphanumeric des-
ignator which can also identify the
tire manufacturer, production plant,
brand and date of production.
GVWR: Gross Vehicle Weight Rating
GAWR FRT: Gross Axle Weight
Rating for the Front Axle.
GAWR RR: Gross Axle Weight
Rating for the Rear axle. Intended Outboard Sidewall:
The
side of an asymmetrical tire, that
must always face outward when
mounted on a vehicle.
Kilopascal (kPa): The metric unit for
air pressure.
Light truck (LT) tire: A tire designat-
ed by its manufacturer as primarily
intended for use on lightweight trucks
or multipurpose passenger vehicles.
Load ratings: The maximum load
that a tire is rated to carry for a given
inflation pressure.
Load Index: An assigned number
ranging from 1 to 279 that corre-
sponds to the load carrying capacity
of a tire.
Maximum Inflation Pressure: The
maximum air pressure to which a
cold tire may be inflated. The maxi-
mum air pressure is molded onto the
sidewall.
Maximum Load Rating: The load
rating for a tire at the maximum per-
missible inflation pressure for that tire. Maximum Loaded Vehicle Weight:
The sum of curb weight; accessory
weight; vehicle capacity weight; and
production options weight.
Normal Occupant Weight:
The
number of occupants a vehicle is
designed to seat multiplied by 150
pounds (68 kg).
Occupant Distribution: Designated
seating positions.
Outward Facing Sidewall: The side
of a asymmetrical tire that has a par-
ticular side that faces outward when
mounted on a vehicle. The outward
facing sidewall bears white lettering
or bears manufacturer, brand, and/or
model name molding that is higher or
deeper than the same moldings on
the inner facing sidewall.
Passenger (P-Metric) Tire: A tire
used on passenger cars and some
light duty trucks and multipurpose
vehicles.
Ply: A layer of rubber-coated parallel
cords.
Page 548 of 589
8107
Maintenance
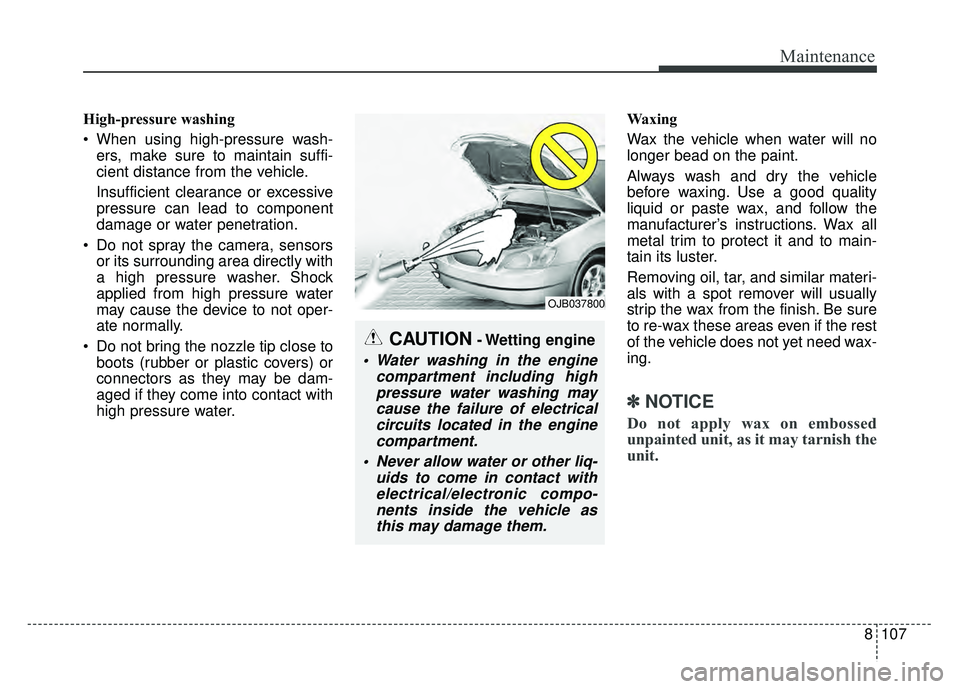
High-pressure washing
When using high-pressure wash-ers, make sure to maintain suffi-
cient distance from the vehicle.
Insufficient clearance or excessive
pressure can lead to component
damage or water penetration.
Do not spray the camera, sensors or its surrounding area directly with
a high pressure washer. Shock
applied from high pressure water
may cause the device to not oper-
ate normally.
Do not bring the nozzle tip close to boots (rubber or plastic covers) or
connectors as they may be dam-
aged if they come into contact with
high pressure water. Waxing
Wax the vehicle when water will no
longer bead on the paint.
Always wash and dry the vehicle
before waxing. Use a good quality
liquid or paste wax, and follow the
manufacturer’s instructions. Wax all
metal trim to protect it and to main-
tain its luster.
Removing oil, tar, and similar materi-
als with a spot remover will usually
strip the wax from the finish. Be sure
to re-wax these areas even if the rest
of the vehicle does not yet need wax-
ing.
✽ ✽
NOTICE
Do not apply wax on embossed
unpainted unit, as it may tarnish the
unit.
CAUTION- Wetting engine
Water washing in the engine
compartment including highpressure water washing maycause the failure of electricalcircuits located in the enginecompartment.
Never allow water or other liq- uids to come in contact withelectrical/electronic compo-nents inside the vehicle asthis may damage them.
OJB037800
Page 554 of 589
8113
Maintenance
Cleaning the lap/shoulder beltwebbing
Clean the belt webbing with any mild
soap solution recommended for
cleaning upholstery or carpet. Follow
the instructions provided with the
soap. Do not bleach or re-dye the
webbing because this may weaken
it.
Cleaning the interior window glass
If the interior glass surfaces of the
vehicle become fogged (that is, cov-
ered with an oily, greasy or waxy
film), they should be cleaned with a
glass cleaner. Follow the directions
on the glass cleaner container.
Leather seat cover using precau-tions (If equipped)
Natural leather has visible pores,
scars or blood vessels, etc. Pressure
marks or wrinkles may be made
when used. Prolonged exposure to
sunlight or heat may cause discol-
oration. These things occur due to
the natural characteristics of
cowhides. If the leather is exposed to
rain or gets wet, remove water with a
dry cloth and dry the leather in the
shade to minimize damage. Make
sure to keep sharp objects away
from the leather as these can create
scratches on the surface. For light-
colored leather, be careful of spots or
color transfer, such as from jeans.
Fabric seat cover using precau-tions (If equipped)
Please clean the fabric seats regu-
larly with a vacuum cleaner in con-
sideration of fabric material charac-
teristics. If they are heavily soiled
with beverage stains, etc., use a suit-
able interior cleaner. To prevent dam-
age to seat covers, wipe off the seat
covers down to the seams with a
large wiping motion and moderate
pressure using a soft sponge or
microfiber cloth.
Velcro closures on clothing or sharp
objects may cause snagging or
scratches on the surface of the
seats. Make sure not to rub such
objects against the surface.
CAUTION- Rear window
Do not scrape or scratch theinside of the rear window. Thismay result in damage of the rearwindow defroster grid.