Page 135 of 589
449
Features of your vehicle
Instrument Cluster Control
Adjusting Instrument ClusterIllumination
The brightness of the instrument
panel illumination is changed by
pressing the illumination control button
(“+” or “-”) when the ignition switch or
Engine Start/Stop button is ON, or the
tale lights are turned on. If you hold the illumination control
button (“+” or “-”), the brightness
will be changed continuously.
If the brightness reaches to the maximum or minimum level, an
alarm will sound.
LCD Display Control
The LCD display modes can be
changed by using the control buttons
on the steering wheel.OPS043039
OPS043117
OPS046430L
■Type A
■ Type B
OPS046489L
Page 155 of 589

469
Features of your vehicle
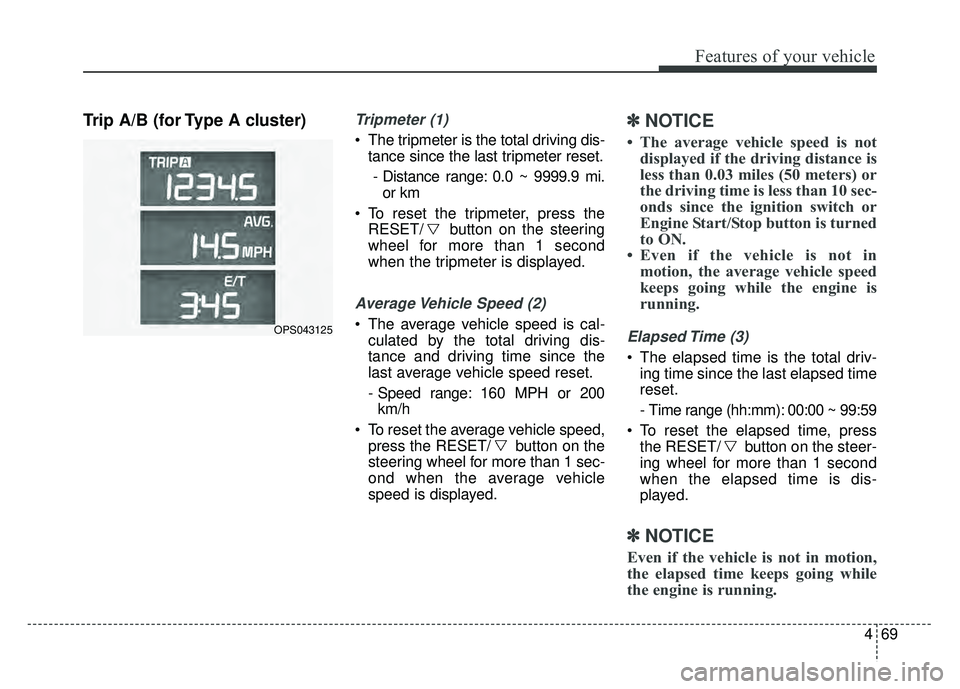
Trip A/B (for Type A cluster)Tripmeter (1)
The tripmeter is the total driving dis-tance since the last tripmeter reset.
- Distance range: 0.0 ~ 9999.9 mi. or km
To reset the tripmeter, press the RESET/ button on the steering
wheel for more than 1 second
when the tripmeter is displayed.
Average Vehicle Speed (2)
The average vehicle speed is cal-culated by the total driving dis-
tance and driving time since the
last average vehicle speed reset.
- Speed range: 160 MPH or 200km/h
To reset the average vehicle speed, press the RESET/ button on the
steering wheel for more than 1 sec-
ond when the average vehicle
speed is displayed.
✽ ✽ NOTICE
• The average vehicle speed is not
displayed if the driving distance is
less than 0.03 miles (50 meters) or
the driving time is less than 10 sec-
onds since the ignition switch or
Engine Start/Stop button is turned
to ON.
• Even if the vehicle is not in motion, the average vehicle speed
keeps going while the engine is
running.
Elapsed Time (3)
The elapsed time is the total driv-
ing time since the last elapsed time
reset.
- Time range (hh:mm): 00:00 ~ 99:59
To reset the elapsed time, press the RESET/ button on the steer-
ing wheel for more than 1 second
when the elapsed time is dis-
played.
✽ ✽ NOTICE
Even if the vehicle is not in motion,
the elapsed time keeps going while
the engine is running.
OPS043125
Page 156 of 589

Features of your vehicle
70
4
Fuel Economy
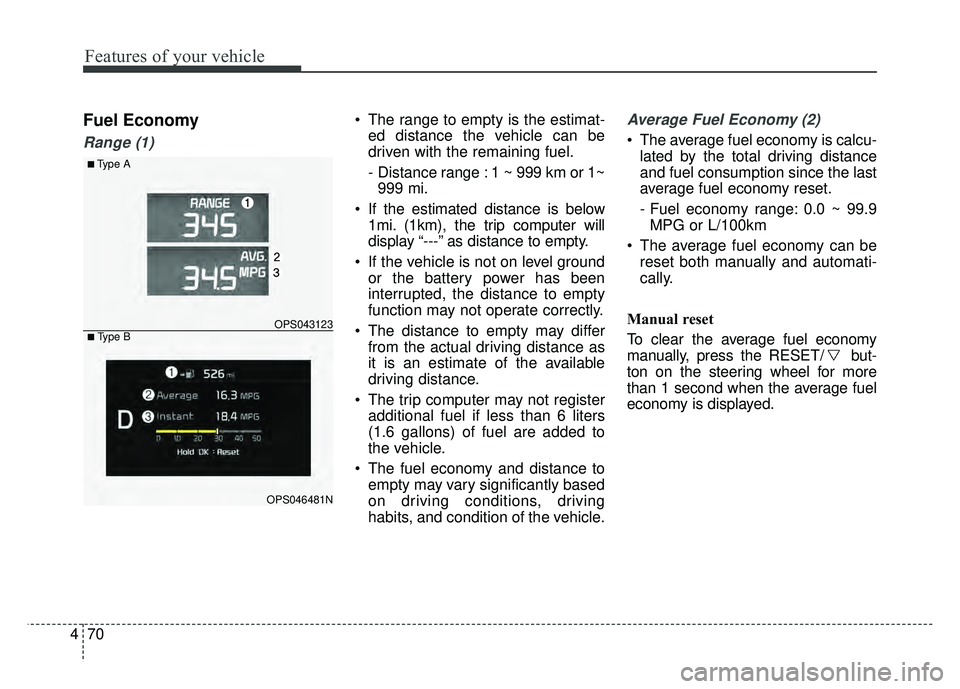
Range (1)
The range to empty is the estimat-
ed distance the vehicle can be
driven with the remaining fuel.
- Distance range : 1 ~ 999 km or 1~999 mi.
If the estimated distance is below 1mi. (1km), the trip computer will
display “---” as distance to empty.
If the vehicle is not on level ground or the battery power has been
interrupted, the distance to empty
function may not operate correctly.
The distance to empty may differ from the actual driving distance as
it is an estimate of the available
driving distance.
The trip computer may not register additional fuel if less than 6 liters
(1.6 gallons) of fuel are added to
the vehicle.
The fuel economy and distance to empty may vary significantly based
on driving conditions, driving
habits, and condition of the vehicle.Average Fuel Economy (2)
The average fuel economy is calcu-lated by the total driving distance
and fuel consumption since the last
average fuel economy reset.
- Fuel economy range: 0.0 ~ 99.9MPG or L/100km
The average fuel economy can be reset both manually and automati-
cally.
Manual reset
To clear the average fuel economy
manually, press the RESET/ but-
ton on the steering wheel for more
than 1 second when the average fuel
economy is displayed.
■Type A
OPS043123
OPS046481N
■ Type B
Page 163 of 589

477
Features of your vehicle
✽
✽NOTICE- Electronic Brake
force Distribution (EBD)
System Warning Light
When the ABS Warning Light is on
or both ABS and Parking Brake &
Brake Fluid Warning Lights are on,
the speedometer, odometer, or trip-
meter may not work. Also, the EPS
Warning Light may illuminate and
the steering effort may increase or
decrease.
In this case, have your vehicle inspect-
ed by an authorized Kia dealer as
soon as possible.
Electronic Power Steering (EPS) WarningLight (if equipped)
This warning light illuminates:
Once you set the ignition switch or Engine Start/Stop Button to the ON
position.
- It remains on until the engine isstarted.
When there is a malfunction with the EPS.
In this case, have your vehicle
inspected by an authorized Kia
dealer.
Malfunction Indicator
Lamp (MIL)
This warning light illuminates:
Once you set the ignition switch or Engine Start/Stop Button to the ON
position.
- It remains on until the engine isstarted.
When there is a malfunction with the emission control system.
In this case, have your vehicle
inspected by an authorized Kia
dealer.
CAUTION - Malfunction
Indicator Lamp (MIL)
Driving with the Malfunction Indicator Lamp (MIL) on maycause damage to the emissioncontrol systems which couldeffect drivability and/or fueleconomy.
Page 174 of 589

Features of your vehicle
88
4
Headlamp escort (if equipped)
If you turn the ignition switch to the
ACC or OFF position with the head-
lights ON, the headlights remain on
for about 5 minutes. However, if the
driver’s door is opened and closed,
the headlights are turned off after 15
seconds.
The headlights can be turned off by
pressing the lock button on the trans-
mitter (or smart key) twice or turning
the light switch to the OFF or Auto
position. However, if you turn the light
switch to the Auto position when it is
dark outside, the headlights will not
be turned off immediately.
Battery saver function
The purpose of this feature is to
prevent the battery from being dis-
charged. The system automatically
turns off the parking lights when
the driver removes the ignition key
and opens the driver-side door (in
that order).
With this feature, the parking lights will turn off automatically if the driv-
er parks on the side of the road at
night.
If necessary, to keep the lights on
when the ignition key is removed,
perform the following:
1) Open the driver-side door.
2) Turn the parking lights OFF and ON again using the light switch
on the steering column.
Daytime running light
(if equipped)
Daytime Running Lights (DRL) may
help make it easier for others to see
the front of your vehicle during the
day. DRL can be helpful in many dif-
ferent driving conditions, and it is
especially helpful after dawn and
before sunset.
The DRL system turns OFF when:
1. The front fog light or headlight (lowbeam) switch is ON.
2. The engine is OFF.
3. The parking brake is applied.
LIGHTING
Page 238 of 589

Audio system
53
Audio remote control
The steering wheel audio remote
control button may be installed.
Do not operate the audio remote
control buttons simultaneously.
VOLUME (VOL+/ VOL-) (1)
Push the VOL + to increase volume.
Push the VOL - to decrease volume.
SEEK/PRESET ( / ) (2)
If the SEEK/PRESET button is
pressed for more than 1 second, it
will work as follows in each mode.RADIO mode
It will function as the AUTO SEEK
select button.
USB mode
It will function as the FF/REW button.
If the SEEK/PRESET button is
pressed for less than 1 second, it will
work as follows in each mode.
RADIO mode
It will function as the PRESET STA-
TION select buttons.
USB mode
It will function as the FILE UP/DOWN
button.
MODE (3)
Press the button to select Radio,
USB or AUX.
Detailed information for audio control
buttons is described in the following
pages in this section.
OPS043190
WARNING- Distracted
Driving
Driving while distracted can
result in a loss of vehicle con-
trol that may lead to an acci-
dent, severe personal injury and
death. The driver’s primary
responsibility is in the safe and
legal operation of a vehicle, and
use of any handheld devices,
other equipment or vehicle sys-
tems which take the driver’s
eyes, attention and focus away
from the safe operation of a
vehicle or that are not permissi-
ble by law should never be used
during operation of the vehicle.
Page 248 of 589

Audio system
Steering wheel remote control
❈The actual features in the vehicle
may differ from the illustration.
(1) MODE
Press the button to change the mode in the following order: Radio
➟ Media.
Press and hold the button to turn off.
(2) VOLUME
Press to adjust the volume. (3)
UP/DOWN
Press the button in radio mode to search Presets.
Press and hold the button in radio mode to search frequencies.
Press the button in media mode to change the current song.
Press and hold the button in media mode to quick search through
songs.
(4) VOICE
Pressing the button - If Siri is not active: Starts Siri.
- If Siri is active: Re-starts Siri.
Pressing and holding the button: Siri is deactivated.
(5) CALL
Pressing the button - If not in
Bluetooth®Wireless
Technology Handsfree mode or
receiving a phone call.
First press: Display Dial Number
screen.
Second press: Automatically dis-
play the most recently Dialed call
number. Third press: Dial the phone num-
ber entered.
- Press in the Incoming Call notifi- cation screen to accept the
phone call.
- Press in
Bluetooth®Wireless
Technology Handsfree mode to
switch to the waiting call.
Pressing and holding the button - If not in
Bluetooth®Wireless
Technology Handsfree mode or
receiving a phone call, the most
recently Dialed Call number is
dialed.
- Press in
Bluetooth®Wireless
Technology Handsfree mode to
transfer the call to your cell
phone.
- Press in cell phone mode to switch to
Bluetooth®Wireless
Technology Handsfree mode.
(6) END
Press in
Bluetooth®Wireless
Technology Handsfree mode to
end the phone call.
Press in the incoming call screen to reject the call.
513
Page 272 of 589

Audio system
537
Pairing a Bluetooth®Wireless
Technology device
Information on pairing Bluetooth®
Wireless Technology devices
Pairing refers to the process of
pairing
Bluetooth®Wireless
Technology cell phones or devices
with the system prior to connec-
tion. This is a necessary procedure
for
Bluetooth®Wireless Technology
connection and usage.
Up to five devices can be paired.
Pairing
Bluetooth®Wireless
Technology device is not allowed
while vehicle is moving. Pairing the first
Bluetooth
®Wireless
Technology device
Select the [PHONE] button on the
audio system or the [CALL] button
on the steering wheel remote control
➟ Search for the vehicle from the
Bluetooth®Wireless Technology
device, and pair ➟ Enter the passkey
on the
Bluetooth®Wireless Technology
device or approve passkey ➟
Bluetooth®Wireless Technology pair-
ing completed.
1. When the [PHONE] button on the
audio or the [CALL] button on the
steering wheel remote control is
pressed, the following screen is dis-
played. Devices can now be paired. (1) Vehicle Name: Searched name inBluetooth®Wireless Technology
device
.
✽ ✽ NOTICE
The vehicle name in the image above
is an example. Refer to your device
for the actual name of your device.
2. Search for available Bluetooth®
Wireless Technology devices in
the
Bluetooth®Wireless Technology
menu of your
Bluetooth®Wireless
Technology device (cell phone,
etc.).
3. Confirm that the vehicle name in your
Bluetooth®Wireless Technology
device matches the vehicle name
shown on the audio screen, then
select it.